Spring Boot系列十二 通过redis实现Tomcat集群的Session同步及从源码分析其原理
1. 概述
在tomcat等web容器中,session是保存在本机内存中。如果我们对tomcat做集群,不可避免要涉及到session同步的问题,必须保证同一个集群中的tomcat的session是共享的。本文通过Spring boot实现分布式系统Session同步,主要包括如下内容:
- 详细介绍demo实现
- 从源码的角度分析其实现原理
2. 多个tocmat的Session的管理。
在tomcat等web容器中,session是保存在本机内存中。如果我们对tomcat做集群,不可避免要涉及到session同步的问题,必须保证同一个集群中的tomcat的session是共享的。
为了tomcat集群正常的工作,通常有以下的方法:
a. 在tomcat的前端配置nginx等,采用ip_hash负载均衡算法,保证来自同一个IP的访客固定访问一个后端服务器,这样避免多个tomcat需要session同步的问题。这个方法也有缺陷,如果这台服务停机了,则所有的用户状态都丢失了
b. 通过tomcat自带的cluster方式,多个tomcat之间实时共享session信息,但是此方法随着tomcat数量和请求量增加性能会下降的比较厉害
c. 利用filter方法
d. 利用terracotta服务器共享session
e. 利用redis、memcached等中间件存储session
下文演示在spring boot中使用redis实现session的共享
3. spring boot中使用redis实现session的共享
3.1. Demo工程介绍
工程名称: redis
引入依赖jar
<!-- spring 引入 session 信息存储到redis里的依赖包  -->
<dependency>
    <groupId>org.springframework.session</groupId>
    <artifactId>spring-session-data-redis</artifactId>
</dependency>
application-dev.properties的session相关配置参数
### session的配置 start ############
# session的存储方式的类型配置
spring.session.store-type=redis
#spring.session.redis.namespace=
# session 存活时间
server.session.timeout=300
### session的配置 end ############
在SessionTestCtrl.java中,我们会发现在配置redis共享后对session的操作和默认的session操作没有任何区别,其原理我们在下文的原理里再说。
此类有3个方法:
login(): 模拟登陆,在session中存储一个值
@RequestMapping("login")
public Map<String,Object> login(HttpServletRequest request) {
    HttpSession httpSession = request.getSession();
    // 设置session中的值
    httpSession.setAttribute("username", "hry" + System.currentTimeMillis());

    Map<String,Object> rtnMap = new HashMap<>();
    Enumeration<String> attributeNames = request.getSession().getAttributeNames();
    while(attributeNames.hasMoreElements()){
        String name = attributeNames.nextElement();
        rtnMap.put(name, httpSession.getAttribute(name));
    }
    rtnMap.put("sessionId", httpSession.getId());
    return rtnMap;
}
getSession(): 从session中获取值
@RequestMapping("get-session")
public Object getSession(HttpServletRequest request) {
    HttpSession httpSession = request.getSession();
    Map<String,Object> rtnMap = new HashMap<>();
    Enumeration<String> attributeNames = request.getSession().getAttributeNames();
    while(attributeNames.hasMoreElements()){
        String name = attributeNames.nextElement();
        rtnMap.put(name, httpSession.getAttribute(name));
    }
    int count;
    try {
        count = Integer.parseInt(String.valueOf(httpSession.getAttribute("count")));
        count++;
    }catch (NumberFormatException e){
        count = 1;
    }
    httpSession.setAttribute("count",count+"");

    rtnMap.put("sessionId", httpSession.getId());
    return rtnMap;
}
invalidate(): 使的sesion值失效
@RequestMapping("invalidate")
 public int invalidate(HttpServletRequest request) {
     HttpSession httpSession = request.getSession();
     httpSession.invalidate();
     return 1;
 }
SessionTestCtrl的完整代码见 这里
3.2. 测试
启动RedisApplication
登录: http://127.0.0.1:8080/login
输出:
{"count":"5","sessionId":"a095bdf3-e907-4fac-bf5e-132f7d737000","username":"hry1517311682642"}
获取session的信息: http://127.0.0.1:8080/get-session
输出:
{"count":"5","sessionId":"a095bdf3-e907-4fac-bf5e-132f7d737000","username":"hry1517311682642"}
查看redis里的session的值:我们的session值已经存储到redis中了

查看浏览器里cookies的值和我们生成的session值相同,说明我们redis生成的session代替了默认的session.
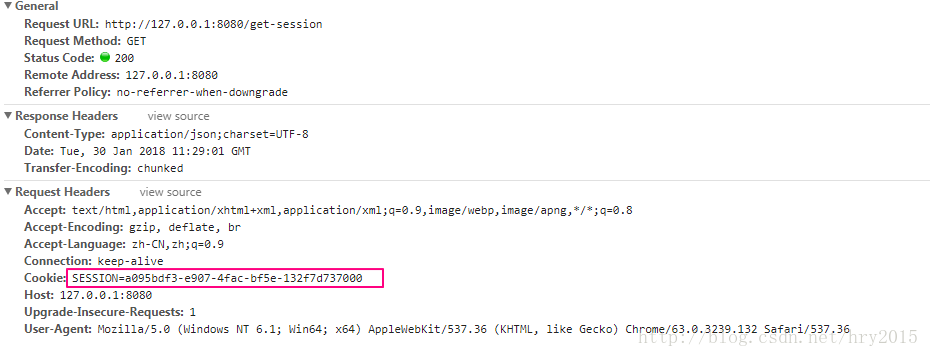
服务重启后,访问 http://127.0.0.1:8080/get-session ,session值不变,说明redis保存session生效了
输出:
{"count":"7","sessionId":"a095bdf3-e907-4fac-bf5e-132f7d737000","username":"hry1517311682642"}
执行使用session失效的URL: http://127.0.0.1:8080/invalidate ,再去执行 http://127.0.0.1:8080/get-session ,此时session值变了,且count值没有了,说明invalidate方法成功了
{"sessionId":"a54128d6-55c5-4233-aa97-54816b51c5cf"}
4. 从源码的角度分析其实现原理
在上文中,我们发现使用redis共享session后,对其的操作和普通的session操作没有任何区别,我们可以通过源代码查找其原理。
4.1. ExpiringSessionHttpSession
在spring-session-data-redis定义新的HttpSession对象代替默认:ExpiringSessionHttpSession
ExpiringSessionHttpSession:此类继承HttpSession,上文中对Session的操作实际就是这个session
class ExpiringSessionHttpSession<S extends ExpiringSession> implements HttpSession {
…
}
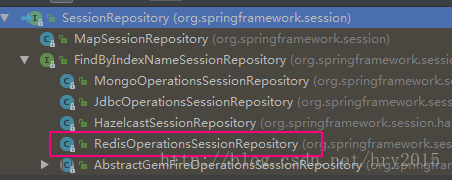
通过类的继承关系,可知道,除了使用redis存储共享session,还有GemFire, Hazelcast,jdbc,mongo,Map等

4.2. SessionRepository
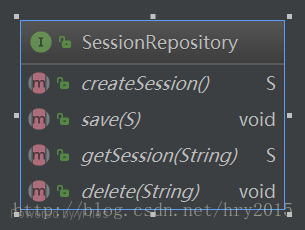
SessionRepository:管理操作session实例,在这里管理的是ExpiringSessionHttpSession对象
同ExpiringSessionHttpSession一样,也有GemFire, Hazelcast,jdbc,mongo,Map对应的类
4.3. HttpSessionWrapper
HttpSessionWrapper:对ExpiringSessionHttpSession进行包装
在执行时,ExpiringSessionHttpSession的实例会通过构造方法传入到HttpSessionWrapper中
private final class HttpSessionWrapper extends ExpiringSessionHttpSession<S> {
    HttpSessionWrapper(S session, ServletContext servletContext) {
        super(session, servletContext);
    }

    @Override
    public void invalidate() {
        super.invalidate();
        SessionRepositoryRequestWrapper.this.requestedSessionInvalidated = true;
        setCurrentSession(null);
        SessionRepositoryFilter.this.sessionRepository.delete(getId());
    }
}
4.4. SessionRepositoryRequestWrapper
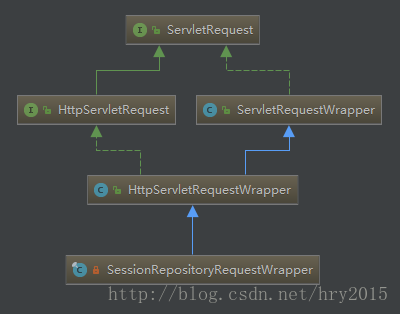
SessionRepositoryRequestWrapper封装request,通过SessionRepository + HttpSessionWrapper 对整个session的生命周期进行管理
// 以getSession方法分析
public HttpSessionWrapper getSession(boolean create) {
    HttpSessionWrapper currentSession = getCurrentSession();
    if (currentSession != null) {
        return currentSession;
    }
    // 从请求的cookie中获取session id值
    String requestedSessionId = getRequestedSessionId();

    if (requestedSessionId != null
        && getAttribute(INVALID_SESSION_ID_ATTR) == null) {
        // 如果有,则
        S session = getSession(requestedSessionId);
        if (session != null) {
            this.requestedSessionIdValid = true;
            // 使用上文的HttpSessionWrapper封装httpSession
            currentSession = new HttpSessionWrapper(session, getServletContext());
            currentSession.setNew(false);
            setCurrentSession(currentSession);
            return currentSession;
        }
        else {
            setAttribute(INVALID_SESSION_ID_ATTR, "true");
        }
    }
    if (!create) {
        return null;
    }
    // 没有则创建新的sessionid值,如使用redis的SessionRepository创建对象
    S session = SessionRepositoryFilter.this.sessionRepository.createSession();
    session.setLastAccessedTime(System.currentTimeMillis());
    // 使用上文的HttpSessionWrapper封装httpSession
    currentSession = new HttpSessionWrapper(session, getServletContext());
    setCurrentSession(currentSession);
    return currentSession;
    }

// 通过CookieHttpSessionStrategy,我们知道在这里使用cookie存储产生的sessionid,并传送给浏览器
        private MultiHttpSessionStrategy httpSessionStrategy = new CookieHttpSessionStrategy();
          // 从cookie中获取值sessionId值:
            @Override
    public String getRequestedSessionId() {
        return SessionRepositoryFilter.this.httpSessionStrategy
            .getRequestedSessionId(this);
}
// 在redis中,这里的 SessionRepositoryFilter.this.sessionRepository是RedisOperationsSessionRepository,会调用其方法从redsi中获取对应的信息,如果存在则新的对象httpSession
private S getSession(String sessionId) {
    S session = SessionRepositoryFilter.this.sessionRepository
        .getSession(sessionId);
    if (session == null) {
        return null;
    }
    session.setLastAccessedTime(System.currentTimeMillis());
    return session;
}
4.5. SessionRepositoryFilter
SessionRepositoryFilter是个fitler,会拦截所有的请求。通过 Filter 将使用我们上文的SessionRepositoryRequestWrapper封装HttpServletRequest 请求
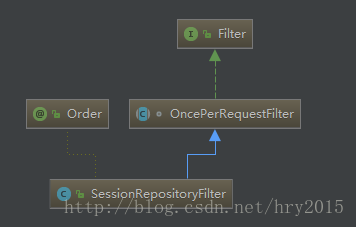
在OncePerRequestFilter中实现Filter的doFilter方法,此方法会所有的请求

public final void doFilter(ServletRequest request, ServletResponse response,
    FilterChain filterChain) throws ServletException, IOException {
    …
    doFilterInternal(httpRequest, httpResponse, filterChain);
    …
}

在SessionRepositoryFilter中重写了这个doFilterInternal方法
@Override
    protected void doFilterInternal(HttpServletRequest request,
        HttpServletResponse response, FilterChain filterChain)
        throws ServletException, IOException {
        request.setAttribute(SESSION_REPOSITORY_ATTR, this.sessionRepository);

    // 使用我们上文的SessionRepositoryRequestWrapper重新封装请求,这样涉及到session的操作就会调用我们上文定义SessionRepositoryRequestWrapper
    SessionRepositoryRequestWrapper wrappedRequest = new SessionRepositoryRequestWrapper(
        request, response, this.servletContext);
    SessionRepositoryResponseWrapper wrappedResponse = new SessionRepositoryResponseWrapper(
        wrappedRequest, response);

    HttpServletRequest strategyRequest = this.httpSessionStrategy
        .wrapRequest(wrappedRequest, wrappedResponse);
    HttpServletResponse strategyResponse = this.httpSessionStrategy
        .wrapResponse(wrappedRequest, wrappedResponse);

    try {
        // 执行过滤
        filterChain.doFilter(strategyRequest, strategyResponse);
    }
    finally {
        wrappedRequest.commitSession();
    }
}
4.6. 在配置类SpringHttpSessionConfiguration中,初始化SessionRepositoryFilter
@Configuration
public class SpringHttpSessionConfiguration implements ApplicationContextAware {

@Bean
public <S extends ExpiringSession> SessionRepositoryFilter<? extends ExpiringSession> springSessionRepositoryFilter(
    SessionRepository<S> sessionRepository) {
    // 初始化SessionRepositoryFilter
    SessionRepositoryFilter<S> sessionRepositoryFilter = new SessionRepositoryFilter<S>(
        sessionRepository);
    sessionRepositoryFilter.setServletContext(this.servletContext);
    ….
    return sessionRepositoryFilter;
}
4.7. @EnableSpringHttpSession :启动配置
// 引入SpringHttpSessionConfiguration并初始化
@Import(SpringHttpSessionConfiguration.class)
@Configuration
public @interface EnableSpringHttpSession {
}
4.8. 在spring boot中启动时,会默认开启EnableSpringHttpSession
5. 代码
以上的详细的代码见下面 github代码,请尽量使用tag v0.13,不要使用master,因为我不能保证master代码一直不变
- 本文标签: value 2015 分布式 web tomcat 集群 FIT 实例 ACE Spring Boot java servlet cat 管理 生命 id spring tar IDE parse http Master db redis App src IO 源码 负载均衡 UI 时间 同步 cache 测试 https 配置 代码 final ORM mongo 服务器 git map GitHub 参数 bean 分布式系统 Nginx ip apr SDN
- 版权声明: 本文为互联网转载文章,出处已在文章中说明(部分除外)。如果侵权,请联系本站长删除,谢谢。
- 本文海报: 生成海报一 生成海报二


![[HBLOG]公众号](https://www.liuhaihua.cn/img/qrcode_gzh.jpg)

