Spring Boot 开篇-创建和运行
概述
还没玩过Spring Boot,现在越来越多的公司在用了,不得不学习了。本篇是Spring Boot的开篇,简单介绍一下如何创建一个Spring Boot项目和运行起来。
环境准备
1、JDK 1.8
2、IDEA
创建Spring Boot的工程
new一个project

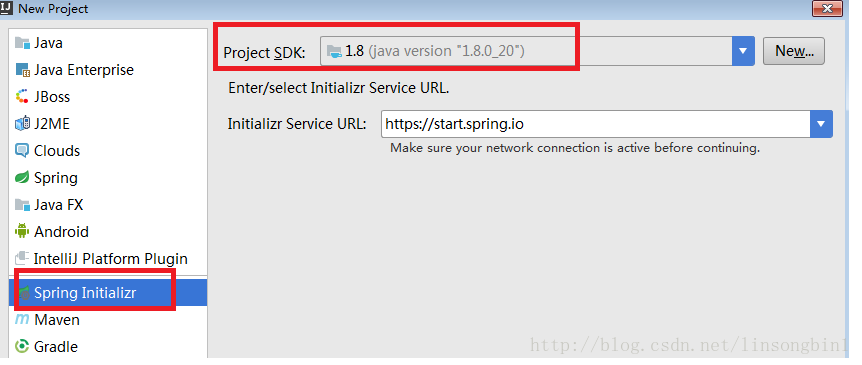
选择Spring Initializr

选择使用JDK1.8后,点击Next。
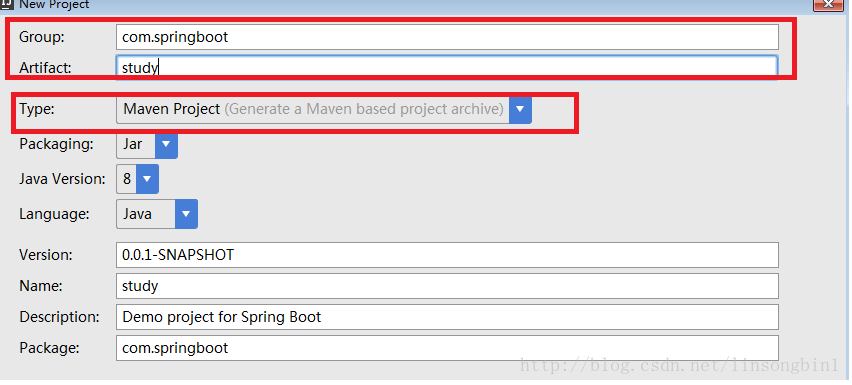
填写Group和Artifact

这里我写的是
Group: com.springboot Artifact:study
同时选用Maven来构建程序。选择完后点击Next。
选择Spring Boot的版本和组件

为了演示方便,目前就先勾选Web组件即可。选完后点击Next。
修改工程名称

本文使用的工程名称是
spring_boot_study
修改完后,点击finish按钮。
运行Spring Boot程序
经过上面的步骤后,Spring Boot为我们默认生成了一个启动类,叫 StudyApplication ,我们就基于这个来编写一个Hello程序。
package com.springboot;

import org.springframework.boot.SpringApplication;
import org.springframework.boot.autoconfigure.SpringBootApplication;
import org.springframework.web.bind.annotation.RequestMapping;
import org.springframework.web.bind.annotation.RestController;

@SpringBootApplication
@RestController
public class StudyApplication {

    @RequestMapping("/hello")
    public String hello() {
        return "hello,Spring Boot";
    }

    public static void main(String[] args) {
        SpringApplication.run(StudyApplication.class, args);
    }
}
直接在IDEA中运行这个main方法,就可以启动这个Spring Boot程序了。访问路径如下:
http://localhost:8080/hello
输出结果如下
hello,Spring Boot
可以从启动日志中,看到默认端口号是8080。

到此,一个简单的Spring Boot的程序就构建成功了。
正文到此结束
热门推荐
相关文章
Loading...


![[HBLOG]公众号](https://www.liuhaihua.cn/img/qrcode_gzh.jpg)

