简易版的Spring框架之IOC简单实现
- 支持singleton类型的bean,包括初始化、属性注入、以及依赖bean注入。
- 可从xml中读取配置。
- 可以使用Aspectj的方式进行AOP编写,支持接口和类代理。
说明
如果你有幸能看到
- 1、本文简易Spring框架参考 Github ,代码注释参考 Github .
- 2、所有权归原作者,在这里自己只是临摹,参考注释还原过程。不懂的可以看作者的视频。
- 3、大家一起努力,一起学习,有兴趣的也可以看下我的 Github 。上传了Spring源码。大佬可以看看。
- 4、看本文之前希望你有一份Spring源码。对照着找你想要的接口和类。加深印象。
- 5、本文只为自己以后复习用,如果不对还请谅解。
tiny-spring 是为了学习Spring的而开发的,可以认为是一个Spring的精简版。Spring的代码很多,层次复杂,阅读起来费劲。我尝试从使用功能的角度出发,参考Spring的实现,一步一步构建,最终完成一个精简版的Spring。 有人把程序员与画家做比较,画家有门基本功叫临摹,tiny-spring可以算是一个程序的临摹版本-从自己的需求出发,进行程序设计,同时对著名项目进行参考。
第一部分:IoC容器
早看到也不浪费时间了,唉。
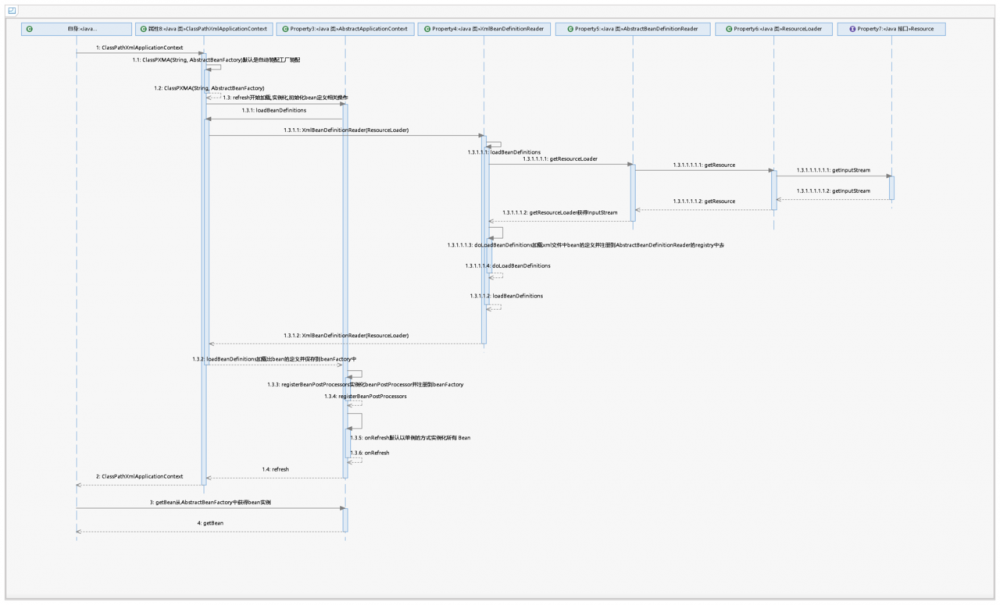
1、时序图-普通bean的加载过程
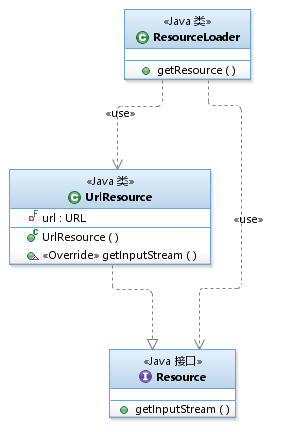
2、加载资源的主要相关类
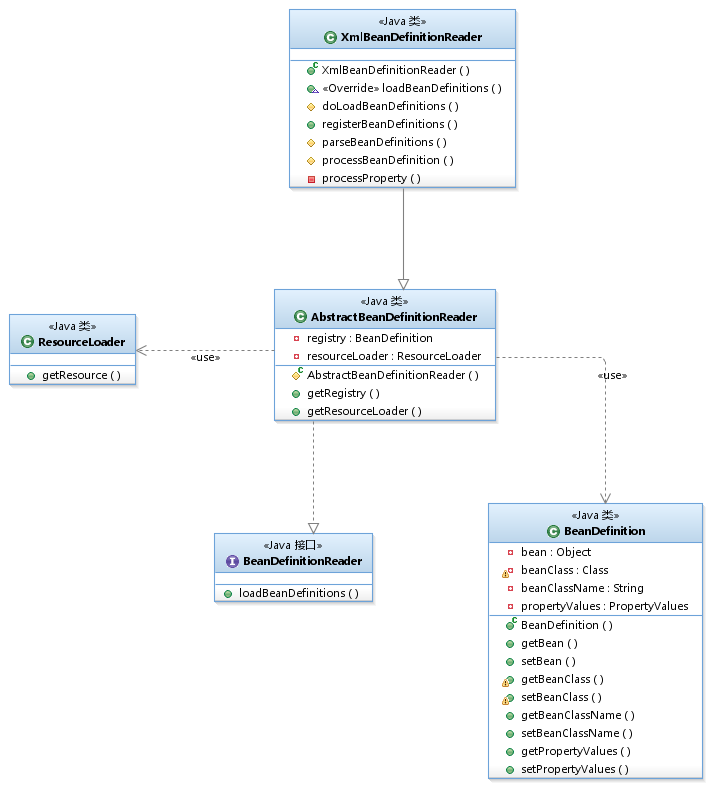
3、从xml中加载bean定义的主要相关类
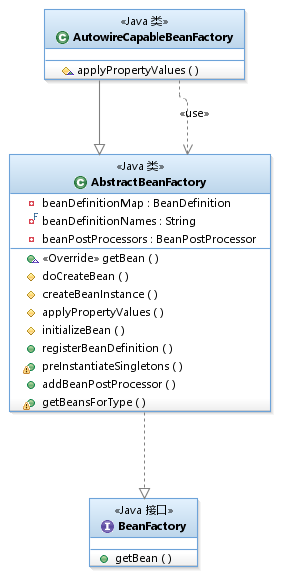
4、装配bean的主要相关类
5、实现ApplicationContext接口的相关类
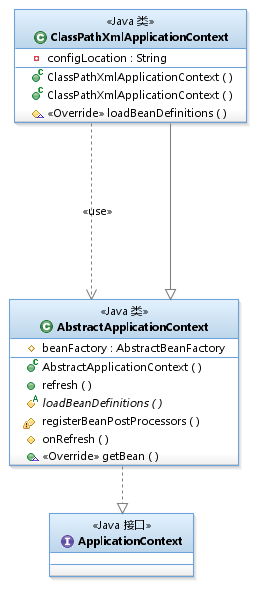
1.step1-最基本的容器
IoC最基本的角色有两个:容器(BeanFactory)和Bean本身。这里使用BeanDefinition来封装了bean对象,这样可以保存一些额外的元信息。测试代码:
// 1.初始化beanfactory
BeanFactory beanFactory = new BeanFactory();

// 2.注入bean
BeanDefinition beanDefinition = new BeanDefinition(new HelloWorldService());
beanFactory.registerBeanDefinition("helloWorldService", beanDefinition);

// 3.获取bean
HelloWorldService helloWorldService = (HelloWorldService) beanFactory.getBean("helloWorldService");
helloWorldService.helloWorld();
1、首先我们来看下整体代码结构,这里的要点是BeanFactory接口。我们应该面向接口编程。
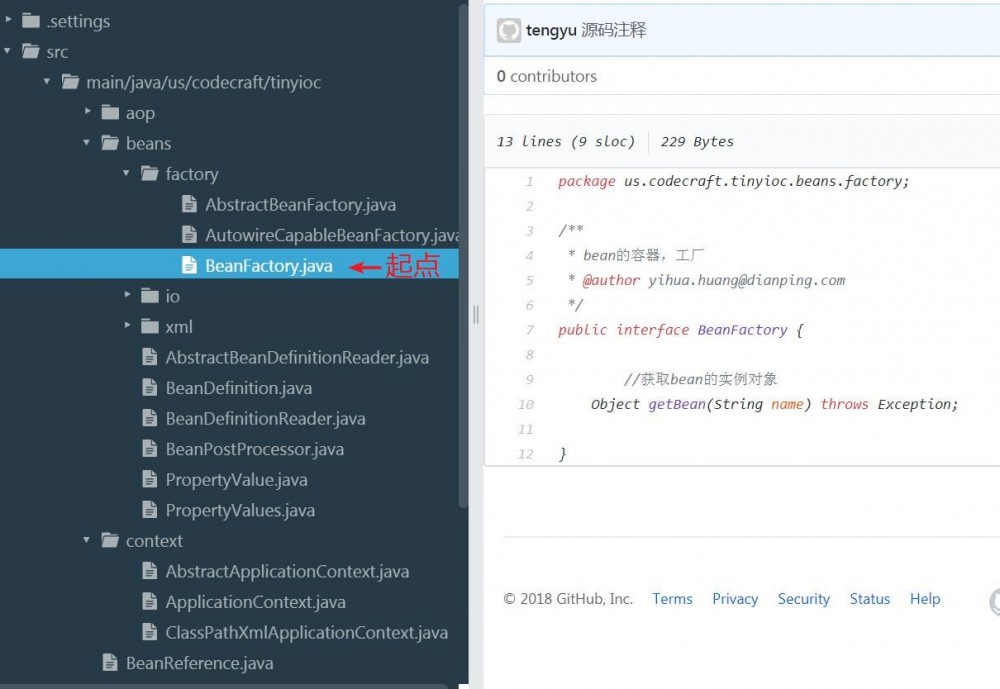
/**
 * Created by guo on 3/1/2018.
 * bean的容器,工厂
 */
public interface BeanFactory {
    Object getBean(String name) throws Exception;
}

/**
 * Created by guo on 3/1/2018.
 * 抽象bean工厂
 */
public abstract class AbstractBeanFactory implements BeanFactory {
}

``

2、大家想知道AbstractBeanFactory抽象类有什么作用吗?和接口有什么区别吗?什么时候用接口什么时候用抽象类?

- 1、如果你拥有一些方法想让他们中的一些默认实现,那么使用抽象类。
- 2、如果你想实现多重继承,那么你必须使用接口。由于java不支多继承,子类不能够继承多个类,但可以实现多个接口
- 3、如果基本功能在不断改变,那么就需要使用抽象类。如果不断改变基本功能并且使用接口 ,那么就需要改变所有实现了该接口的类。

3、有了bean工厂你总得bean的定义吧。`BeanDefinition`来了。bean的定义

```java
/**
 * Created by guo on 3/1/2018.
 * bean的内容及元数据,保存在beanFactory中,包装bean的实体。
 */
public class BeanDefinition {

  private Object bean;

  //类的class信息
  private Class beanClass;

  //类名
  private String beanClassName;

  //保存所有的属性,
  private PropertyValues  propertyValues  = new PropertyValues();

  public BeanDefinition() {

  }

    public BeanDefinition() {}

    //setters and gettes 略
    public void setBeanClassName(String beanClassName) {
        this.beanClassName = beanClassName;
        try {
            //加载类,并返回class对象
            //这里已经有类的实例来,但是没有引用,怎么可以获取这个引用呢?
            this.beanClass = Class.forName(beanClassName);
        } catch (ClassNotFoundException e) {
            e.printStackTrace();
        }
    }
}
4、有了bean的定义你总得创建啊,初始化那,注册啊,验证啊,不然一点卵用都没有。来瞅瞅。这时候我们来看下AbstractBeanFactory抽象类具体的实现。
/**
 * Created by guo on 3/1/2018.
 * 抽象bean工厂
 */
public abstract class AbstractBeanFactory implements BeanFactory {

    //bean工程里维护类的字典,类名+class对象
    private Map<String, BeanDefinition> beanDefinitionMap = new ConcurrentHashMap<String, BeanDefinition>();

    private final List<String> beanDefinitionNames = new ArrayList<String>();

    private List<BeanPostProcessor> beanPostProcessors = new ArrayList<BeanPostProcessor>();

    /**
     * 获取bean的时候,才创建类的实例对象,原来只是保存类名和类的Class对象 。
     * 到这一步会根据Class对象创建类的实例
     *
     * @param name
     * @return
     * @throws Exception
     */
    @Override
    public Object getBean(String name) throws Exception {
        BeanDefinition beanDefinition = beanDefinitionMap.get(name);
        if (beanDefinition == null) {
            throw new IllegalArgumentException("no bean named " + name + "is defined");
        }
        Object bean = beanDefinition.getBean();
        if (bean == null) {
            //1、刚创建的对象,其他什么都没做
            bean = doCreateBean(beanDefinition);
            //2、初始化bean对象
            bean = initializeBean(bean,name);
            //3、这里的bean是初始化之后的bean,与刚开始创建的bean不一样。
            beanDefinition.setBean(bean);
        }
        return bean;
    }
}
5、我们在来看看具体的 doCreateBean 、 initializeBean 、 registerBeanDefinition
/**
   * 初始化bean,BeanPostProcessor初始化前后处理器。
   */
  protected Object initializeBean(Object bean, String name) throws Exception {
      for (BeanPostProcessor beanPostProcessor : beanPostProcessors) {
          bean = beanPostProcessor.postProcessBeforeInitialization(bean, name);
      }

      for (BeanPostProcessor beanPostProcessor : beanPostProcessors) {
          bean = beanPostProcessor.postProcessAfterInitialization(bean, name);
      }
      return bean;
  }

  /**
   * 创建bean的实例
   */
  protected Object createBeanInstance(BeanDefinition beanDefinition) throws Exception {
      return beanDefinition.getBeanClass().newInstance();
  }

  /**
   * 注册bean,即将类名和定义保存到内存中(map对象)中
   */
  public void registerBeanDefinition(String name, BeanDefinition beanDefinition) throws Exception {
      beanDefinitionMap.put(name, beanDefinition);
      //保存一份做准备
      beanDefinitionNames.add(name);
  }

  /**
   * 创建bean并设置bean的引用
   */
  protected Object doCreateBean(BeanDefinition beanDefinition) throws Exception {
      //这里会创建bean的实例对象
      Object bean = createBeanInstance(beanDefinition);

      //将bean的实例对象设置到beandefinition中去
      beanDefinition.setBean(bean);
      //设置bean的引用的实例对象
      applyPropertyValues(bean, beanDefinition);

      return bean;
  }
6、无关紧要的方法暂时就不贴出来了,描述个大概过程。带着这些类和接口在源码中找。请忽略第二步和第三步。直接跳到第四步。记得是在Spring源码,这个简单多了,但是基本功能有
2.step2-将bean创建放入工厂
step1中的bean是初始化好之后再set进去的,实际使用中,我们希望容器来管理bean的创建。于是我们将bean的初始化放入BeanFactory中。为了保证扩展性,我们使用Extract Interface的方法,将BeanFactory替换成接口,而使用AbstractBeanFactory和AutowireCapableBeanFactory作为其实现。"AutowireCapable"的意思是“可自动装配的”,为我们后面注入属性做准备。
// 1.初始化beanfactory
BeanFactory beanFactory = new AutowireCapableBeanFactory();

// 2.注入bean
BeanDefinition beanDefinition = new BeanDefinition();
beanDefinition.setBeanClassName("us.codecraft.tinyioc.HelloWorldService");
beanFactory.registerBeanDefinition("helloWorldService", beanDefinition);

// 3.获取bean
HelloWorldService helloWorldService = (HelloWorldService) beanFactory.getBean("helloWorldService");
helloWorldService.helloWorld();
3.step3-为bean注入属性
这一步,我们想要为bean注入属性。我们选择将属性注入信息保存成PropertyValue对象,并且保存到BeanDefinition中。这样在初始化bean的时候,我们就可以根据PropertyValue来进行bean属性的注入。Spring本身使用了setter来进行注入,这里为了代码简洁,我们使用Field的形式来注入。
// 1.初始化beanfactory
BeanFactory beanFactory = new AutowireCapableBeanFactory();

// 2.bean定义
BeanDefinition beanDefinition = new BeanDefinition();
beanDefinition.setBeanClassName("us.codecraft.tinyioc.HelloWorldService");

// 3.设置属性
PropertyValues propertyValues = new PropertyValues();
propertyValues.addPropertyValue(new PropertyValue("text", "Hello World!"));
beanDefinition.setPropertyValues(propertyValues);

// 4.生成bean
beanFactory.registerBeanDefinition("helloWorldService", beanDefinition);

// 5.获取bean
HelloWorldService helloWorldService = (HelloWorldService) beanFactory.getBean("helloWorldService");
helloWorldService.helloWorld();
step4-读取xml配置来初始化bean
1、看到读取你总得有IO流吧 ,还有有资源啊(Xxx.xml),还有一个读取器。让我们看下重要的接口和实现类。
/**
 * Resource是Spring内部定位资源接口
 */
public interface Resource {
    InputStream getInputStream() throws Exception;
}
-----------------加载资源------------------------------
public class ResourceLoader {

    //获取资源
    public Resource getResource(String location){
        URL resource = this.getClass().getClassLoader().getResource(location);
        return new UrlResource(resource);
    }
}
--------------------------------------------------
*/
public class UrlResource implements Resource {

   private final URL url;

   public UrlResource(URL url) {
       this.url = url;
   }

   @Override
   //根据URL载入输入流
   public InputStream getInputStream() throws IOException{
       URLConnection urlConnection = url.openConnection();
       urlConnection.connect();
       return urlConnection.getInputStream();
   }
}

--------------------测试--------------------------------
public class ResourceLoaderTest {

	@Test
	public void test() throws IOException {
		ResourceLoader resourceLoader = new ResourceLoader();
        Resource resource = resourceLoader.getResource("tinyioc.xml");
        InputStream inputStream = resource.getInputStream();
        Assert.assertNotNull(inputStream);
    }
}
2、接下来就让我们看看更为重要的接口和实现类
public interface BeanDefinitionReader {

    void loadBeanDefinitions(String location) throws Exception;
}

----------------------重要实现----------------------------------
/**
 * Created by guo on 3/1/2018.
 * 从配置文件中读取BeanDifinition 抽象类
 */
public abstract class AbstractBeanDefinitionReader implements BeanDefinitionReader {

    //bean集合
    private Map<String,BeanDefinition> registry;

    //资源加载器
    private ResourceLoader resourceLoader;

    protected AbstractBeanDefinitionReader(ResourceLoader resourceLoader) {
        this.registry = new HashMap<String, BeanDefinition>();
        this.resourceLoader = resourceLoader;
    }
      //setter。getter
}
3、最终的实现来了
public class XmlBeanDefinitionReader extends AbstractBeanDefinitionReader {

    public XmlBeanDefinitionReader(ResourceLoader resourceLoader) {
        super(resourceLoader);
    }

    @Override
    public void loadBeanDefinitions(String location) throws Exception {
        InputStream inputStream = getResourceLoader().getResource(location).getInputStream();
        doLoadBeanDefinitions(inputStream);

    }
4、为了便于理解 ,我把方法抽出来了。这里主要是解析和注册
protected void doLoadBeanDefinitions(InputStream inputStream) throws Exception {
    //xml解析
    DocumentBuilderFactory factory = DocumentBuilderFactory.newInstance();
    DocumentBuilder docBuilder = factory.newDocumentBuilder();
    Document doc = docBuilder.parse(inputStream);
    // 解析bean
    registerBeanDefinitions(doc);
    inputStream.close();
}

public void registerBeanDefinitions(Document doc) {
    Element root = doc.getDocumentElement();
    parseBeanDefinitions(root);
}
5、真正的解析在这里。
protected void parseBeanDefinitions(Element root) {
    NodeList nl = root.getChildNodes();
    for (int i = 0; i < nl.getLength(); i++) {
        Node node = nl.item(i);
        if (node instanceof Element) {
            Element ele = (Element) node;
            processBeanDefinition(ele);
        }
    }
}

protected void processBeanDefinition(Element ele) {
    //获取id和classname
    String name = ele.getAttribute("id");
    String className = ele.getAttribute("class");
    BeanDefinition beanDefinition = new BeanDefinition();
    //处理属性
    processProperty(ele, beanDefinition);
    //注册Class
    beanDefinition.setBeanClassName(className);
    getRegistry().put(name, beanDefinition);
}

//添加bean的属性,和ref引用
private void processProperty(Element ele, BeanDefinition beanDefinition) {
    NodeList propertyNode = ele.getElementsByTagName("property");
    for (int i = 0; i < propertyNode.getLength(); i++) {
        Node node = propertyNode.item(i);
        if (node instanceof Element) {
            Element propertyEle = (Element) node;
            String name = propertyEle.getAttribute("name");
            String value = propertyEle.getAttribute("value");
            if (value != null && value.length() > 0) {
                beanDefinition.getPropertyValues().addPropertyValue(new PropertyValue(name, value));
            } else {
                String ref = propertyEle.getAttribute("ref");
                if (ref == null || ref.length() == 0) {
                    throw new IllegalArgumentException("Configuration problem: <property> element for property '"
                            + name + "' must specify a ref or value");
                }
                //bean对其他对象的引用,直接放到自己的属性里面
                BeanReference beanReference = new BeanReference(ref);
                beanDefinition.getPropertyValues().addPropertyValue(new PropertyValue(name, beanReference));
            }
        }
    }
}
}
6、这里是测试代码
@Test
public void test() throws Exception {
    XmlBeanDefinitionReader xmlBeanDefinitionReader = new XmlBeanDefinitionReader(new ResourceLoader());
    xmlBeanDefinitionReader.loadBeanDefinitions("tinyioc.xml");
    Map<String, BeanDefinition> registry = xmlBeanDefinitionReader.getRegistry();
    Assert.assertTrue(registry.size() > 0);
}
这么大一坨初始化代码让人心烦。这里的BeanDefinition只是一些配置,我们还是用xml来初始化吧。我们定义了BeanDefinitionReader初始化bean,它有一个实现是XmlBeanDefinitionReader。
// 1.读取配置
XmlBeanDefinitionReader xmlBeanDefinitionReader = new XmlBeanDefinitionReader(new ResourceLoader());
xmlBeanDefinitionReader.loadBeanDefinitions("tinyioc.xml");

// 2.初始化BeanFactory并注册bean
BeanFactory beanFactory = new AutowireCapableBeanFactory();
for (Map.Entry<String, BeanDefinition> beanDefinitionEntry : xmlBeanDefinitionReader.getRegistry().entrySet()) {
        beanFactory.registerBeanDefinition(beanDefinitionEntry.getKey(), beanDefinitionEntry.getValue());
}

// 3.获取bean
HelloWorldService helloWorldService = (HelloWorldService) beanFactory.getBean("helloWorldService");
helloWorldService.helloWorld();
5.step5-为bean注入bean
使用xml配置之后,似乎里我们熟知的Spring更近了一步!但是现在有一个大问题没有解决:我们无法处理bean之间的依赖,无法将bean注入到bean中,所以它无法称之为完整的IoC容器!如何实现呢?我们定义一个BeanReference,来表示这个属性是对另一个bean的引用。这个在读取xml的时候初始化,并在初始化bean的时候,进行解析和真实bean的注入。
for (PropertyValue propertyValue : mbd.getPropertyValues().getPropertyValues()) {
    Field declaredField = bean.getClass().getDeclaredField(propertyValue.getName());
    declaredField.setAccessible(true);
    Object value = propertyValue.getValue();
    if (value instanceof BeanReference) {
        BeanReference beanReference = (BeanReference) value;
        value = getBean(beanReference.getName());
    }
    declaredField.set(bean, value);
}
同时为了解决循环依赖的问题,我们使用lazy-init的方式,将createBean的事情放到getBean的时候才执行,是不是一下子方便很多?这样在注入bean的时候,如果该属性对应的bean找不到,那么就先创建!因为总是先创建后注入,所以不会存在两个循环依赖的bean创建死锁的问题。
// 1.读取配置
XmlBeanDefinitionReader xmlBeanDefinitionReader = new XmlBeanDefinitionReader(new ResourceLoader());
xmlBeanDefinitionReader.loadBeanDefinitions("tinyioc.xml");

// 2.初始化BeanFactory并注册bean
AbstractBeanFactory beanFactory = new AutowireCapableBeanFactory();
for (Map.Entry<String, BeanDefinition> beanDefinitionEntry : xmlBeanDefinitionReader.getRegistry().entrySet()) {
    beanFactory.registerBeanDefinition(beanDefinitionEntry.getKey(), beanDefinitionEntry.getValue());
}

// 3.初始化bean
beanFactory.preInstantiateSingletons();

// 4.获取bean
HelloWorldService helloWorldService = (HelloWorldService) beanFactory.getBean("helloWorldService");
helloWorldService.helloWorld();
6.step6-ApplicationContext登场
不管三七二十一,我们先看重要的接口以及重要实现
/**
 * 继承beanFactory,继承了factory所有的遗产
 */
public interface ApplicationContext extends BeanFactory {
}
-----------------------------------------------------------------
public abstract class AbstractApplicationContext implements ApplicationContext {
	protected AbstractBeanFactory beanFactory;

	public AbstractApplicationContext(AbstractBeanFactory beanFactory) {
		this.beanFactory = beanFactory;
	}

	public void refresh() throws Exception {
		//加载bean
		loadBeanDefinitions(beanFactory);
		//注册之前,干点什么事情
		registerBeanPostProcessors(beanFactory);
		onRefresh();
	}

	//调用beanfactory工厂获取bean的实例对象
	@Override
	public Object getBean(String name) throws Exception {
		return beanFactory.getBean(name);
	}
}
2、为了方便,方法放这里
protected abstract void loadBeanDefinitions(AbstractBeanFactory beanFactory) throws Exception;

protected void registerBeanPostProcessors(AbstractBeanFactory beanFactory) throws Exception {
  List beanPostProcessors = beanFactory.getBeansForType(BeanPostProcessor.class);
  for (Object beanPostProcessor : beanPostProcessors) {
    beanFactory.addBeanPostProcessor((BeanPostProcessor) beanPostProcessor);
  }
}

protected void onRefresh() throws Exception{
      beanFactory.preInstantiateSingletons();
  }
3、熟悉的东东出场了
public class ClassPathXmlApplicationContext extends AbstractApplicationContext {

	private String configLocation;

	public ClassPathXmlApplicationContext(String configLocation) throws Exception {
		this(configLocation, new AutowireCapableBeanFactory());     //可自动装配内容的BeanFactory
	}

	public ClassPathXmlApplicationContext(String configLocation, AbstractBeanFactory beanFactory) throws Exception {
		super(beanFactory);
		this.configLocation = configLocation;
		//直接全部初始化
		refresh();
	}

	@Override
	protected void loadBeanDefinitions(AbstractBeanFactory beanFactory) throws Exception {
		//定位bean,然后加载bean
		XmlBeanDefinitionReader xmlBeanDefinitionReader = new XmlBeanDefinitionReader(new ResourceLoader());
		xmlBeanDefinitionReader.loadBeanDefinitions(configLocation);
		//注册bean,这里bean已经加载到虚拟机中,但还没有实例化对象,先不急嘛。
		for (Map.Entry<String, BeanDefinition> beanDefinitionEntry : xmlBeanDefinitionReader.getRegistry().entrySet()) {
			beanFactory.registerBeanDefinition(beanDefinitionEntry.getKey(), beanDefinitionEntry.getValue());
		}
	}
3、测试代码
@Test
public void test() throws Exception {
    //就是把beanfactory封装一下,使调用更加方便。注册,全部初始化。
    ApplicationContext applicationContext = new ClassPathXmlApplicationContext("tinyioc.xml");
    HelloWorldService helloWorldService = (com.guo.codecraft.tinyioc.HelloWorldService) applicationContext.getBean("helloWorldService");
    helloWorldService.helloWorld();
}

@Test
public void testPostBeanProcessor() throws Exception {
    ApplicationContext applicationContext = new ClassPathXmlApplicationContext("tinyioc-postbeanprocessor.xml");
    HelloWorldService helloWorldService = (com.guo.codecraft.tinyioc.HelloWorldService) applicationContext.getBean("helloWorldService");
    helloWorldService.helloWorld();
}
现在BeanFactory的功能齐全了,但是使用起来有点麻烦。于是我们引入熟悉的ApplicationContext接口,并在AbstractApplicationContext的refresh()方法中进行bean的初始化工作。
ApplicationContext applicationContext = new ClassPathXmlApplicationContext("tinyioc.xml");
HelloWorldService helloWorldService = (HelloWorldService) applicationContext.getBean("helloWorldService");
helloWorldService.helloWorld();
是不是非常熟悉?至此为止,我们的tiny-spring的IoC部分可说完工了。这部分的类、方法命名和作用,都是对应Spring中相应的组件。虽然代码量只有400多行,但是已经有了基本的IoC功能!
- 本文标签: 代码注释 开发 node BeanDefinition UI 注释 实例 root build https ioc NFV 程序员 list 源码 处理器 配置 id 时间 Document java Connection git bean 管理 App value classpath ACE map 希望 需求 parse spring final Service IDE CTO key 测试 http cat AOP 代码 解析 锁 db Property 数据 CEO XML ssl src IO GitHub
- 版权声明: 本文为互联网转载文章,出处已在文章中说明(部分除外)。如果侵权,请联系本站长删除,谢谢。
- 本文海报: 生成海报一 生成海报二


![[HBLOG]公众号](https://www.liuhaihua.cn/img/qrcode_gzh.jpg)

