Spring Cloud与微服务学习笔记-服务调用(上)
在上一篇文章 「Spring Cloud与微服务学习笔记-注册与发现」 中,我们知道了怎样发现服务。既然已经发现了服务,那么接下来就轮到去调用了。服务调用会分为上、下两篇文章,在上篇中,我们来学习Spring Cloud服务调用的基本操作和基本概念,在下篇中我们会进一步深入分析Spring Cloud实现服务调用的原理。
例子
关于服务调用,没有太多新的概念需要理解,因此,我们直接先来从实践入手,写一个小例子,在这个例子里我们会负载均衡的从一个服务去调用另一个服务。通过这个例子我们可以体验一下在Spring Cloud平台下进行服务调用的过程。(例子 全部代码 在我的Github上)
仍然像上篇文章中一样,我们来建立一个多模块的 Gradle 工程,分为3个模块:eureka-server、service-a、service-b。工程结构和前篇文章中的例子工程基本一致:eureka-server是注册与发现服务器,service-a和service-b是两个服务。但是这一次,我们会让service-a来调用service-b提供的服务。
eureka-server怎样写请参看前篇文章,在此不再复述,我们来写service-a。先来写好配置:
//构建配置
dependencies {
    compile group: 'org.springframework.cloud', name: 'spring-cloud-starter-netflix-eureka-client', version: '1.4.0.RELEASE'
    compile group: 'org.springframework.cloud', name: 'spring-cloud-starter-openfeign', version: '1.4.4.RELEASE'
}
//主配置
package com.github.since1986.learn.cloud.service.a;

import org.springframework.cloud.netflix.feign.EnableFeignClients;
import org.springframework.context.annotation.Configuration;

@EnableFeignClients
@Configuration
public class AppConfig {
}
#application.yml
spring:
  profiles: peer1
  application:
    name: com-github-since1986-learn-cloud-service-a

server:
  port: 8010

eureka:
  client:
    serviceUrl:
      defaultZone: http://localhost:8001/eureka/
---
spring:
  profiles: peer2
  application:
    name: com-github-since1986-learn-cloud-service-a

server:
  port: 8011

eureka:
  client:
    serviceUrl:
      defaultZone: http://localhost:8001/eureka/
配置写好后,就可以开始写逻辑了,在service-a中写一个 Model 、一个 Service ( Service 里有些注解比较陌生,先不用管它是什么意思,后面我们会讲到)和一个 Controller :
//Model
package com.github.since1986.learn.cloud.service.a;

import java.io.Serializable;

public class Echo implements Serializable {

    private long id;

    private String content;

    private long timestamp;

    public Echo() {
    }

    private Echo(Builder builder) {
        setId(builder.id);
        setContent(builder.content);
        setTimestamp(builder.timestamp);
    }

    public static Builder newBuilder() {
        return new Builder();
    }

    public long getId() {
        return id;
    }

    public void setId(long id) {
        this.id = id;
    }

    public String getContent() {
        return content;
    }

    public void setContent(String content) {
        this.content = content;
    }

    public long getTimestamp() {
        return timestamp;
    }

    public void setTimestamp(long timestamp) {
        this.timestamp = timestamp;
    }

    public static final class Builder {
        private long id;
        private String content;
        private long timestamp;

        private Builder() {
        }

        public Builder withId(long id) {
            this.id = id;
            return this;
        }

        public Builder withContent(String content) {
            this.content = content;
            return this;
        }

        public Builder withTimestamp(long timestamp) {
            this.timestamp = timestamp;
            return this;
        }

        public Echo build() {
            return new Echo(this);
        }
    }
}
//Service
package com.github.since1986.learn.cloud.service.a;

import org.springframework.cloud.netflix.feign.FeignClient;
import org.springframework.web.bind.annotation.RequestMapping;
import org.springframework.web.bind.annotation.RequestMethod;
import org.springframework.web.bind.annotation.RequestParam;

@FeignClient("com-github-since1986-learn-cloud-service-b")
public interface B {

    @RequestMapping(method = RequestMethod.GET, value = "/echo")
    Echo getEcho(@RequestParam("id") long id, @RequestParam("showTimestamp") boolean showTimestamp);
}
//Controller
package com.github.since1986.learn.cloud.service.a;

import org.springframework.beans.factory.annotation.Autowired;
import org.springframework.http.ResponseEntity;
import org.springframework.web.bind.annotation.GetMapping;
import org.springframework.web.bind.annotation.RequestMapping;
import org.springframework.web.bind.annotation.RestController;

@RequestMapping("/call")
@RestController
public class CallServiceBController {

    private final B b;

    @Autowired
    public CallServiceBController(B b) {
        this.b = b;
    }

    @GetMapping
    public ResponseEntity get() {
        return ResponseEntity.ok(b.getEcho(System.nanoTime(), true));
    }
}
service-a到此就写完了,我们再来接着写service-b。service-b与service-a的配置只有 application.yml 不同。
#application.yml
spring:
  profiles: peer1
  application:
    name: com-github-since1986-learn-cloud-service-b

server:
  port: 8020

eureka:
  client:
    serviceUrl:
      defaultZone: http://localhost:8001/eureka/
---
spring:
  profiles: peer2
  application:
    name: com-github-since1986-learn-cloud-service-b

server:
  port: 8021

eureka:
  client:
    serviceUrl:
      defaultZone: http://localhost:8001/eureka/
业务:
//Model
package com.github.since1986.learn.cloud.service.b;

import java.io.Serializable;

public class Echo implements Serializable {

    private long id;

    private String content;

    private long timestamp;

    public Echo() {
    }

    private Echo(Builder builder) {
        setId(builder.id);
        setContent(builder.content);
        setTimestamp(builder.timestamp);
    }

    public static Builder newBuilder() {
        return new Builder();
    }

    public long getId() {
        return id;
    }

    public void setId(long id) {
        this.id = id;
    }

    public String getContent() {
        return content;
    }

    public void setContent(String content) {
        this.content = content;
    }

    public long getTimestamp() {
        return timestamp;
    }

    public void setTimestamp(long timestamp) {
        this.timestamp = timestamp;
    }

    public static final class Builder {
        private long id;
        private String content;
        private long timestamp;

        private Builder() {
        }

        public Builder withId(long id) {
            this.id = id;
            return this;
        }

        public Builder withContent(String content) {
            this.content = content;
            return this;
        }

        public Builder withTimestamp(long timestamp) {
            this.timestamp = timestamp;
            return this;
        }

        public Echo build() {
            return new Echo(this);
        }
    }
}
//Service接口
package com.github.since1986.learn.cloud.service.b;

public interface EchoService {

    Echo get(long id, boolean showTimestamp);
}
//Service实现
package com.github.since1986.learn.cloud.service.b;

import org.springframework.beans.BeansException;
import org.springframework.context.ApplicationContext;
import org.springframework.context.ApplicationContextAware;
import org.springframework.stereotype.Service;

@Service
public class EchoServiceImpl implements EchoService, ApplicationContextAware {

    private ApplicationContext applicationContext;

    @Override
    public Echo get(long id, boolean showTimestamp) {
        return Echo
                .newBuilder()
                .withId(id)
                .withContent("当前Profile为:" + applicationContext.getEnvironment().getActiveProfiles()[0])
                .withTimestamp(showTimestamp ? System.currentTimeMillis() : -1L)
                .build();
    }

    @Override
    public void setApplicationContext(ApplicationContext applicationContext) throws BeansException {
        this.applicationContext = applicationContext;
    }
}
//Controller
package com.github.since1986.learn.cloud.service.b;

import org.springframework.beans.factory.annotation.Autowired;
import org.springframework.http.ResponseEntity;
import org.springframework.web.bind.annotation.GetMapping;
import org.springframework.web.bind.annotation.RequestMapping;
import org.springframework.web.bind.annotation.RestController;

@RequestMapping("/echo")
@RestController
public class EchoController {

    private final EchoService echoService;

    @Autowired
    public EchoController(EchoService echoService) {
        this.echoService = echoService;
    }

    @GetMapping
    public ResponseEntity get(long id, boolean showTimestamp) {
        return ResponseEntity.ok(echoService.get(id, showTimestamp));
    }
}
大致说明下这个例子:
- service-a的
Controller对外暴露了/call这个地址,并返回Echo - service-a的
Controller调用B这个Service中的Echo getEcho(@RequestParam("id") long id, @RequestParam("showTimestamp") boolean showTimestamp);方法,这个getEcho()方法实际上是通过@FeignClient("com-github-since1986-learn-cloud-service-b")以及@RequestMapping(method = RequestMethod.GET, value = "/echo")这两个注解所提供的规则调用服务名为com-github-since1986-learn-cloud-service-b的服务实例提供的路径为/echo的服务 - 我们看service-b的
application.yml中的定义,service-b的服务名就是com-github-since1986-learn-cloud-service-b(同时注意application.yml中的定义,service-b定义有两个节点peer1和peer2,这是为了验证Spring Cloud提供给我们的客户端负载均衡,为了能够看出负载均衡是否生效,我们把被调用的服务service-b的两个节点都启动起来,调用者service-a可以只启一个节点) - service-b的
Controller暴露了地址为/echo的服务,并且输出Echo - 在service-b的
/echo调用的本地的Service方法Echo get(long id, boolean showTimestamp);中,我们会将service-b当前激活的profile的名字放在返回的Echo对象的content属性中,这样,我们在service-a调用时,就能知道我们调用的是service-b的哪一个实例了 - 回过头来整体看一下,其实整个例子就是service-a的
/call去负载均衡的调用了service-b提供的/echo
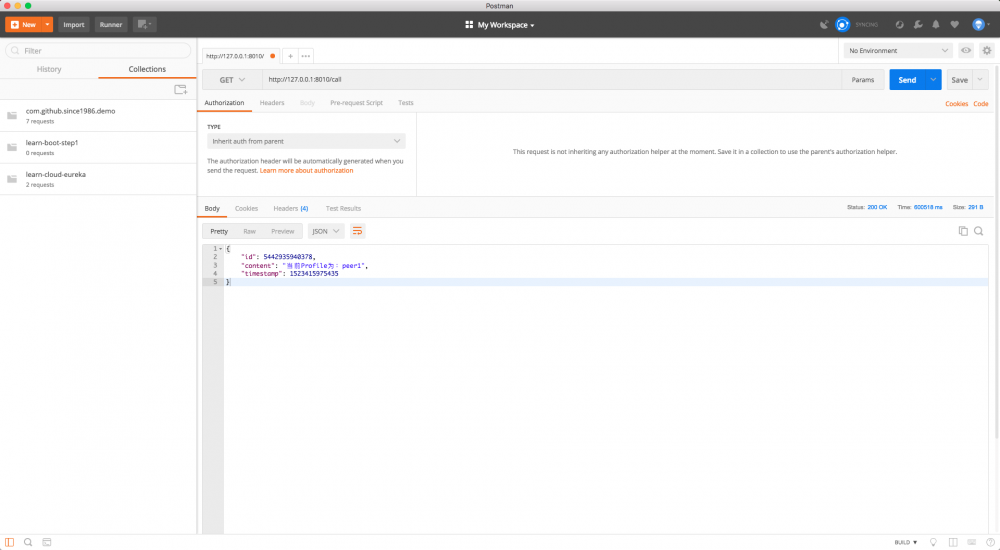
运行这个例子,访问service-a中 Controller 暴露的地址 /call ,查看结果:

可以看到service-a成功调用了service-b中提供的服务,输出了由 Echo 解码而成的 json ,并且,如果我们多次运行会发现返回的json结果中 "content" 属性会在 peer1 和 peer2 之间变换,前面说到了这个属性记录的是service-b当前激活的profile,其实也就是标识了当前调用的是service-b的哪个实例(实际上我们也可以直接看响应的 header ,Spring Cloud已经在其中给我们加上了调用的是哪个实例的标识了: X-Application-Context →com-github-since1986-learn-cloud-service-a:peer1:8010 ),被调用的实例是变化的,也就是表明了调用时是有负载均衡的。
这个例子我们已经看完了,然后我们来根据例子总结一下在如何在Spring Cloud中做服务调用吧,实际上也非常简单:
- 调用端与被调用端定义好调用契约,简单的理解就是约定好
REST接口的定义 - 被调用端将服务暴露为
REST - 调用端写一个
interface,并用@FeignClient注解声明为调用客户端,interface中写好具体的调用方法,这个方法通过使用Spring MVC的注解来与定义好的契约做对应
概念
实践完了,我们回过头来再来了解一下概念。看前边的例子,会发现,在Spring Cloud中做服务调用只需要写一个 interface ,加一个注解,就搞定了,而且调用时是支持负载均衡的。整个调用的代码量相当少,对于程序员来说十分便利。实际上这其中的便利是Spring Cloud中的 Feign 与 Ribbon 带给我们的,那么 Feign 和 Ribbon 都是什么呢?
先来说 Feign 。”Feign”,发音为 [feɪn],意为”捏造”。回想前面实验中的代码,我们在service-a中写了一个 interface ,然后加上了 @FeignClient 和 @RequestMapping 这两个注解,就可以调用service-b中暴露的 /echo 这个Http API了(在Spring Cloud中,最一般的服务调用是通过 REST API的方式来进行的,也就是Http API,所以,不严谨的说,可以把服务调用理解为是Http API调用),在这个过程中,我们根本没写任何Http客户端(诸如 URLConnection 或者 HttpClient )调用的实现,实际上,是 Feign 给我们用JDK动态代理’捏造’出了这些代码,因此,把 Feign 理解为”通过 interface 与 注解 自动生成Http客户端调用实现的工具”就好了,用官方的话来说就是:”Feign makes writing java http clients easier”,更详细的介绍请看 官网 。
再来看 Ribbon 。我们直接来看 官网 的介绍:
Ribbon is a client side IPC library that is battle-tested in cloud. It provides the following features
Load balancing
Fault tolerance
Multiple protocol (HTTP, TCP, UDP) support in an asynchronous and reactive model
Caching and batching
简单地说, Ribbon 就是一个远程调用工具。它支持负载均衡、容错,支持多种协议,支持异步以及 reactive编程模型 (RxJava),还支持缓存和batching。也就是说,Spring Cloud服务调用中的负载均衡是 Ribbon 提供的。
总结
在本篇文章中,我们通过一个例子来实践了Spring Cloud中的服务调用,并且了解了一些相关的概念。在下篇文章 Spring Cloud与微服务学习笔记-服务调用(下) 中我们会深入分析Spring Cloud服务调用背后的原理。
- 本文标签: bean map CTO dependencies spring http js 模型 API 实例 build 协议 Service cat Netflix UDP REST entity https id IDE HTML Connection 服务器 Features tar Feign TCP Eureka src git IO UI 程序员 总结 web 文章 ribbon 代码 value lib ip 自动生成 配置 App final java ACE 负载均衡 Spring cloud GitHub json client
- 版权声明: 本文为互联网转载文章,出处已在文章中说明(部分除外)。如果侵权,请联系本站长删除,谢谢。
- 本文海报: 生成海报一 生成海报二


![[HBLOG]公众号](https://www.liuhaihua.cn/img/qrcode_gzh.jpg)

