EasyBridge:一分钟实现 Java 与 JavaScirpt 相互调用
(中文文档在这里)
UPDATES
-
2017/04/09 adding the retry mechanism of injecting bridge
-
2017/04/08 invoke Java synchornized from Javascript is now enable in
feature/syncNow the
BridgeHandlerhas two function to be invoked from JavaScript.If the JavaScirpt invoke Java with a callback function,the Java method will be invoked Synchronizlly ,otherwise the Java method will be invoked asynchronous.the feature/sync may be merged into master oneday future
FEATURES
:heavy_check_mark:
Inject Bridge with retry mechanism
Now when EasyBridge try to inject a comunication bridge into the page,it will retry at most five times to make sure that the bridge is injected successfully .It works as below:
-
EasyBridgeWebViewwill register a handler name "injectFinished" default - when the bridge injected finish,it will invoke the handler in step one, and set the injected status to be true
- When injecting a bridge ,it will start a task
InjectBridgeTask,it will try to inject the bridge every 300ms at most 5 times,if the injected status is false
because of the single thread mechanism in JavaScrpt,we will make sure that the bridge will not be injected twice in the same page
:heavy_check_mark:
Register Handler with APT
Now you can register Handlers using the APT tech.Follow the steps:
- add the jitpack dependencies as below ;
- add the annotation
@EasyBridgeHandlerto your handler; - A class Named
EBHandlerManagerwill be generated after buiding the project; - call the static method
EBHandlerManager#register(webview)when you init the webview for the activity/fragment.
:heavy_check_mark:
Using Java IN JavaScript
EasyBridge allow you to invoke Java function both in Synchronize and Asynchronous ways.(But it's pity that the Asynchronous way is only opened for you nowadays)
Follow the steps:
- Register the document event
WebViewJavascriptBridgeReadyin your JavaScript logic; - Using the
easyBridge#callHandler(handlerName, args, callback)in your JavaScript when you received the event that the bridge had been injected.The object namedeasyBridgecan be renamed as you like.
:heavy_check_mark:
Using JavaScript IN Java
You can call all the JavaScirpt function that had been registed to the easyBridge .Steps as follow:
- Register the document event
WebViewJavascriptBridgeReadyin your JavaScript logic; - Using the
easyBridge#registerHandler(handlerName, handler)to registed all the functions that you want to be invoked in Java; - Calling the function
EasyBridgeWebView#callHandler(handlerName,parameters,resultCallBack)in Java layer to reach your JavaScript functions.
:heavy_check_mark:
Global Security Policy Check
Global Security check will be actived once you had defined it before in the situations below:
-
Time at bridge Injecting in Java layer
no bridge object will be injected if breaking the rule of global security check.The old bridge object injected in the previous page also will be removed .
-
Time at calling the Java functions in JavaScript layer
No Java functions will be invoked if breaking the rule of global security check.
:heavy_check_mark:
Security policy check on Handlers
The last point to make a security check based on the security policy of the handler that is about to be invoked in JavaScript.
You can set your policy according to the current page's url and the parameters you received from JavaScript
DEPENDENCIES
EasyBridgehad been pubished to Jitpack , add the dependencies to your project before using it,follow the steps:
-
add the Jitpack responsitory
allprojects { repositories { ... maven { url 'https://jitpack.io' } } } -
add the core dependencies of EasyBridge
dependencies { compile 'com.github.easilycoder.EasyBridge:easybridge:0.0.1'// change the version to the newest one } -
If you would to try to APT tech for registing handler ,add the dependencies below
dependencies { compile 'com.github.easilycoder.EasyBridge:easybridge-annotation:0.0.1' // change the version to the newest one annotationProcessor 'com.github.easilycoder.EasyBridge:easybridge-processor:0.0.1' // change the version to the newest one } -
Add the progurad rules to your file
-keepclassmembers class tech.easily.easybridge.lib.EasyBridge{
    public *;
}
-keepclassmembernames class tech.easily.easybridge.lib.CallBackMessage{
    <fields>;
}
功能
:heavy_check_mark:
注入jsbridge添加重试机制
现在当我们往页面中注入bridge的时候,具备了重试机制。EasyBridge最多会尝试5次重试,尽可能的确保bridge被注入成功。重试机制的工作流程如下:
- 当我们初始化
EasyBridgeWebView的时候,它会默认的注册一个名称为injectFinished的handler,用以监听bridge注入成功,并设置标志值 - 在bridge注入成功之后,会调用上面注册的那个handler,通知native,bridge已经注入成功了;
- 在注入bridge的时候,会启动一个
InjectBridgeTask的任务,在注入成功的标志状态值isInjected为false的情况下,它会每隔300ms发起一次注入bridge的操作(最多重试5次)
因为JavaScript是单线程的,所以我们能确保同一个页面不会出现重复注入bridge的情况
使用apt技术注册handler
支持使用apt技术,完成注册handler的功能,步骤如下:
- 添加依赖(参考下面的方案使用)
- 使用注解
@EasyBridgeHandler - 项目编译之后会生成工具类
EBHandlerManager - 在页面初始化webview的时候,调用步骤三得到的
EBHandlerManager的静态方法register(webview)
目前仅支持构造 BaseBridgeHandler 的子类实例(具体与之一致的构造方法),后续会对这一点改进,使其适应具备不同构造方法对handler实例
:heavy_check_mark:
JavaScript调用Java功能
支持同步和异步两种方式的调用(目前仅开放异步调用,但实现原理本身支持同步调用)
要使用这个功能,总共以下几个步骤:
- 业务的JavaScript代码监听Bridge的注入完成事件
WebViewJavascriptBridgeReady; - 使用步骤1注入的
easyBridge对象(对象名字支持自定义)的callHandler(handlerName, args, callback)函数调用Java代码。
请根据业务需要定义JavaScript与Java的通讯协议
:heavy_check_mark:
Java调用JavaScript功能
可以在Java代码中调用注册在EasyBridge上的JavaScript函数,步骤如下:
- 业务的JavaScript代码监听Bridge的注入完成事件
WebViewJavascriptBridgeReady; - 使用步骤1注入的
easyBridge对象(对象名字支持自定义)的registerHandler(handlerName, handler)方法,注册可供Java调用的方法; - 在Java层,调用EasyBridge的
EasyBridgeWebView实例的callHandler(handlerName,parameters,resultCallBack)方法,JavaScript的执行结果会通过第三个参数回调返回。
请根据业务需要定义JavaScript与Java的通讯协议
:heavy_check_mark:
全局的安全控制策略
EasyBridge提供两种安全检查策略。其中全局的安全检查在EasyBridge的内部发生在以下两个时机:
-
Java注入Bridge通讯桥的时候.
如果被安全检查禁止,则不会在页面中注入bridge对象,即无法访问Java中的方法
-
JavaScript调用具体的Java接口的时候.
如果被安全检查禁止,则不会触发下面的接口粒度的安全检查也无法访问Java中的方法
要使用全局的安全控制策略,步骤如下:
- 调用EasyBridge的
EasyBridgeWebView实例的setPolicyChecker(policyChecker)方法设置全局安全检查对象实例; - 需要在其他时机触发全局的安全检查请调用
checkSecurityGlobally(url,parameters)方法
:heavy_check_mark:
基于接口粒度的安全控制策略
接口粒度的安全检查是在执行对应的Java方法之前的最后一个检查点。要使用接口粒度的安全检查,步骤如下:
- 构造对应的
BridgeHandler接口对象实例 - 实现对应的
SecurityPolicyChecker实例,并提供给步骤1的接口实例
添加依赖
EasyBridge已经发布到 Jitpack 上,你可以快速将引入EasyBridge库。
-
在根目录的build.gradle文件中添加jitpack仓库
allprojects { repositories { ... maven { url 'https://jitpack.io' } } } -
添加EasyBridge依赖
dependencies { compile 'com.github.easilycoder.EasyBridge:easybridge:0.0.1'// change the version to the newest one } -
如果你需要使用提供的注解功能,添加以下的依赖
dependencies { compile 'com.github.easilycoder.EasyBridge:easybridge-annotation:0.0.1' // change the version to the newest one annotationProcessor 'com.github.easilycoder.EasyBridge:easybridge-processor:0.0.1' // change the version to the newest one } -
添加混淆规则:
-keepclassmembers class tech.easily.easybridge.lib.EasyBridge{
    public *;
}
-keepclassmembernames class tech.easily.easybridge.lib.CallBackMessage{
    <fields>;
}
EasyBridge
EasyBridge 是一个简单易用的js-bridge的工具库,提供了日常开发中,JavaScript与Java之间通讯的能力,与其他常见的js-bridge工具库实现方案不同, EasyBridge 具备以下几个特点:
- 基于Android
WebView的addJavascriptInterface特性实现 - 提供了基于接口粒度的安全管理接口
- 轻量级,并且简单易用。以这个工具库作为依赖,只需要编写实际通讯接口
实现原理说明
混合开发一直是工业界移动端开发比较看好的技术手段,结合h5的特性,能够更好的支持业务发展的需要,不仅快速上线、部署功能而且能够快速响应线上的bug。目前混合开发的方案包括:
- JSBridge
- Cordova
- React Native
- Flutter
EasyBridge就是一种简单的JSBridge解决方案。在众多的解决方案中,都是在利用系统的 WebView 所开放的权限和接口,打开Java与JavaScript通讯的渠道,这些方案的实现原理分别包括:
-
拦截
onJsPrompt()方法当
WebView中的页面调用了JavaScript当中的window.prompt()方法的时候,这个方法会被回调。而且这个方法不仅能获取到JavaScript传递过来的string字符串内容,同时也能返回一段string字符串内容被JavaScript接收到,是一个相当适合构建bridge的入口方法。 -
拦截
shouldOverrideUrlLoading()方法当页面重新load URL或者页面的iframe元素重新加载新的URL的时候,这个方法被回调。
-
addJavascriptInterface()接口这个接口简单却强大,通过这个接口,我们能够直接把Java中定义的对象在JavaScript中映射出一个对应的对象,使其直接调用Java当中的方法,但是,在android 4.1及之前的版本存在着严重的漏洞,所以一直被忽视。
EasyBridge在众多的解决方案中,最终了选择了 addJavascriptInterface() 接口作为方案的基础,主要基于以下几点考量:
- 目前Android版本已经到了9.0版本,市面上Android4.4之前的版本手机占有率已经很低,很多业务都已经把最低兼容版本定在了4.2以上,因此不需要考量4.1以下存在的漏洞问题;
-
addJavascriptInterface()能够提供最简单的同步调用 -
addJavascriptInterface()与evaluateJavascript()/loadUrl结合,能够带来更加简单的异步调用的解决方案
方案设计说明
EasyBridge最终方案实现,只支持了异步调用的方式,主要是基于以下的考量:
- 同步的调用可以转化为异步调用的方式,保留一种调用方式会使得整个方案更加简单;
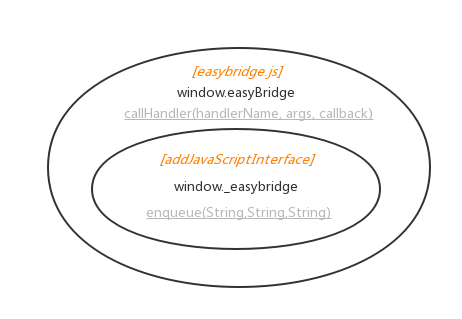
方案结构
EasyBridge的方案结构如下图所示:

EasyBridge总共会向页面中注入两个JavaScript对象,:
-
easyBridge
在页面加载到25%以上到时候(
onProgressChanged()),通过执行工具库中的一个js文件注入的。这个对象主要的作用是定义了业务页面的JavaScript代码调用native的Java代码的规范入口,对象中定义的一个最关键的函数就是callHandler(handlerName, args, callback),这就是桥梁的入口。实际上在这个方法的内部,最终就是通过下面的**_easybridge**对象进入到Java代码层。 -
_easybridge
通过
addJavascriptInterface()映射和注入的一个对象,这个对象提供了实质的入口方法enqueue(),在这个方法当中代码的路线从JavaScript层进入到了Java层,开启了两者的交互。
接口分发
实际上,我们可以通过 @JavascriptInterface 注解开放很多的接口给JavaScript层调用,也可以通过 addJavascriptInterface() 映射多个Java对象到JavaScript层,但是为了维护简单和通讯方便, EasyBridge 的设计只提供了一个入口和一个出口。所有需要开放给JavaScript层的功能,都是通过构建接口实例进行处理。
接口的定义如下:
public interface BridgeHandler {

    String getHandlerName();

    void onCall(String parameters, ResultCallBack callBack);

    SecurityPolicyChecker securityPolicyChecker();
}
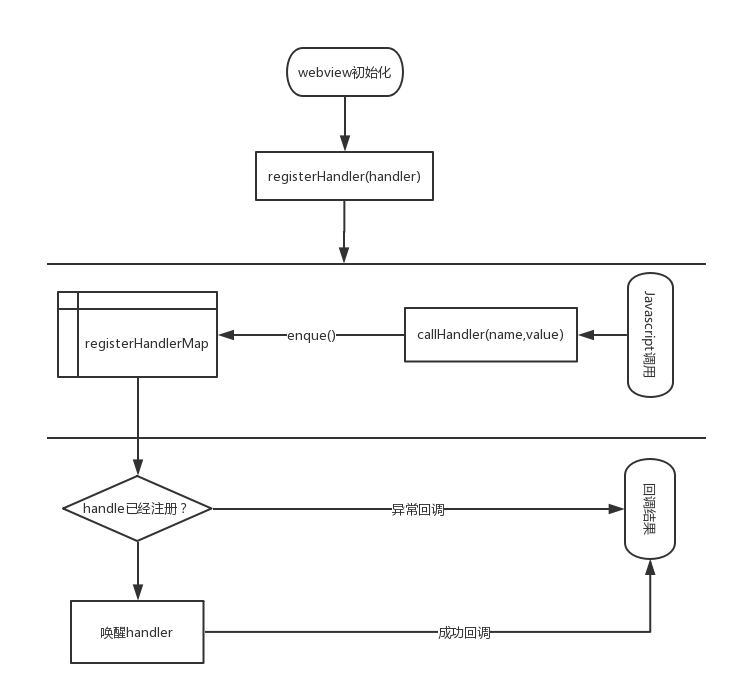
实际的工作流程如下图所示:

最开始初始化的时候需要注册所有可以被JavaScript层调用的业务接口。在运行的过程中, enqueue() 入口当中会根据协议定义,通过接口名称找到对应的处理接口实例,并触发接口响应。并且最终的接口响应都在入口处进行回传。因此,实际上,_easybridge对象(在Java层中,其实是 EasyBridge 的实例)就是一个枢纽站,做任务的分派和结果的传递。
安全控制
每一个 BridgeHandler 实例,都可以定义自己的安全控制策略,对应的是一个 SecurityPolicyChecker 的实例,其定义如下:
public interface SecurityPolicyChecker {
    boolean check(String url, String parameters);
}
每一个接口在接收到分派的指令之前,会先调用其安全控制策略,根据当前加载的页面地址以及传入的指令参数判断是否需要进行指令的分派,否则将会直接命令安全受限,错误返回,结果调用。
方案使用
EasyBridge是一个极其简单易用的方案,只需要简单的几步即可具备JavaScript层与Java层通讯的能力。在引入 EasyBridge 库作为依赖之后:
-
继承/直接使用
EasyBridgeWebViewEasyBridgeWebView是功能的承载者,负责了bridge对象的注入,以及handler接口的管理(内部使用`EasyBridge对象管理) -
根据业务以及协议定义实现对应的
BridgeHandler实例 -
在加载第一步的webview的实例页面绑定第二步构造的handler实例
以上三步即完成了所有的工作。
如果你需要调试这个方案的实际工作,你可以在把手机连接到电脑之后,使用chrome进行调试。 EasyBridge 会把传递的结果信息以及错误信息打印在控制台之上。你将会很容易的感知和发现问题。关于在Chrome中调试web页面,你可以参考官方的教程文档 Remote Debugging WebViews
- 本文标签: 代码 build java Security https 调试 Chrome ask 协议 Master tar GitHub 同步 目录 queue git UI 实例 core 编译 IO 管理 开发 message ip 安全 Lua Document src web JavaScript CDN 漏洞 dependencies ACE maven cat bug Android lib update Features js IDE 参数 http remote id 线程
- 版权声明: 本文为互联网转载文章,出处已在文章中说明(部分除外)。如果侵权,请联系本站长删除,谢谢。
- 本文海报: 生成海报一 生成海报二


![[HBLOG]公众号](https://www.liuhaihua.cn/img/qrcode_gzh.jpg)

