Spring IOC容器分析(二) 解析XML配置文件的前期工作
原创作品未经作者同意严禁私自转载,或私自修改后据为自有。违者将追究法律责任
Ⅰ. 令人震惊的凶杀案
深夜12点驾驶着 Chrome 汽车飞驰在 Tomcat 高速公路上,速度表飞速逼近160码,而我的心情却越来越忧虑。
我是 design pattern 市刑事探长 高Sir ,因 code 市发生一起重大凶杀案件,我被火速遣往 code 市参与破案。
以下是案情背景
在 code 市 javascript 大道 webpack 大酒店 444 号房间内发生一起谋杀,受害者 configuration.xml 先生于晚上11点被酒店服务员发现死亡。
ClassPathResource 匕首,以及,一行神秘的注释 —— "
configuration.xml
先生在某种意义上来说并没有死,只是转化为另一种形式,另一层更高境界的艺术..."
这是什么意思?没有人知道!但毫无疑问为了人民的安全,我必须找出这幕后的凶手!
FBI Warning: 前方内容血腥,如有不适感请即刻停止观看!!!
Ⅱ. 听说你也想当蜀黎破案?
我相信有很多朋友刚接触Spring就迫不及待地想要一探实现原理,但其实这样很快就会发现自己难以驾驭Spring的源码而自信心受挫。
要理解一个框架的工作原理,最重要的前提是: 你必须真的在实践中用过这个框架,了解它的基本使用方法
纸上谈兵是大忌,所以请还不熟悉Spring用法的朋友不要急功近利
千里之行,始于足下 —— 老子
任何事情都要有个头,解剖源代码更是如此,解析IOC容器的起点就是下面这段代码
XmlBeanFactory bf = new XmlBeanFactory(new ClassPathResource("configuration.xml"));
Dog dog = (Dog) bf.getBean("dog");
XML配置文件的内容如下, Dog 类是个空类(当前讲解解析流程不需要复杂的对象)
<?xml version="1.0" encoding="UTF-8" ?>
<beans xmlns="http://www.springframework.org/schema/beans"
       xmlns:xsi="http://www.w3.org/2001/XMLSchema-instance"
       xsi:schemaLocation="http://www.springframework.org/schema/beans http://www.springframework.org/schema/beans/spring-beans.xsd">

    <bean id="dog" class="com.bean.Dog" />
</beans>
我先来教大家快速读懂源码的秘技
读懂Spring源代码最有效的方式只有一个 —— Debug代码一步一步跟进
Ⅲ. 从凶器 ClassPathResource 开始
就是这把利刃刺穿了 configuration.xml 先生,造成他的大量出血并死亡,它是如此的锋利和轻盈,我们推断 configuration.xml 先生甚至都没有发觉自己受了重伤,直到大量的失血让他失去了行动力。
可是究竟是什么人要下此毒手呢?
new ClassPathResource("configuration.xml")
下面是 ClassPathResource 的家族成员
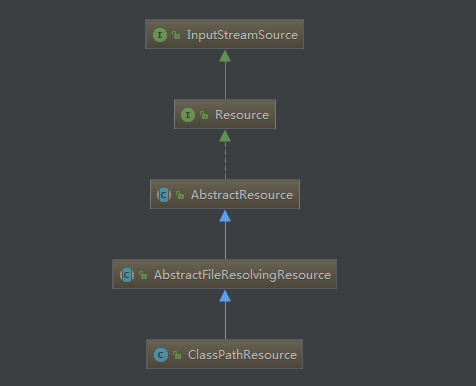
可以看到 ClassPathResource 的基本接口是 InputStreamSource 和 Resource
Spring框架定制了自己的 Resource 抽象,从最基础的接口 InputStreamSource 的名称也可以看出,它们其实无非是对底层的 InputStream 做了些封装以方便使用罢了
具体的接口定义大家可以自行查阅源码, ClassPathResource 顾名思义就是用来操作位于 类装载路径上的资源 ,它有两个构造器
public ClassPathResource(String path) {
        this(path, (ClassLoader) null);
    }

    public ClassPathResource(String path, ClassLoader classLoader) {
        Assert.notNull(path, "Path must not be null");
        String pathToUse = StringUtils.cleanPath(path);
        if (pathToUse.startsWith("/")) {
            pathToUse = pathToUse.substring(1);
        }
        this.path = pathToUse;
        this.classLoader = (classLoader != null ? classLoader : ClassUtils.getDefaultClassLoader());
    }
主要的工作集中在 StringUtils.cleanPath(path) 方法中,这个方法做了两件事
- 将
path中的Windows风格的路径分隔符'/'转换成'/' - 压缩
path,比如将file://core/../core/io/Resource.class这样的路径压缩成file://core/io/Resource.class
在 new XmlBeanFactory(new ClassPathResource("configuration.xml")) 的后续执行流程中,会调用 ClassPathResource.getInputStream() 这个 InputStreamSource 父接口中的方法,我们来看下这个方法的实现
@Override
    public InputStream getInputStream() throws IOException {
        InputStream is;
        if (this.clazz != null) {
            is = this.clazz.getResourceAsStream(this.path);
        }
        else if (this.classLoader != null) {
            is = this.classLoader.getResourceAsStream(this.path);
        }
        else {
            is = ClassLoader.getSystemResourceAsStream(this.path);
        }
        if (is == null) {
            throw new FileNotFoundException(getDescription() + " cannot be opened because it does not exist");
        }
        return is;
    }
可以看到获取ClassPath中的资源流十分简单,直接调用 ClassLoader.getResourceAsStream() 方法,剩下和操作系统的互动交给JVM就好了。
另外还需要注意的是 ClassPathResource 的 hashCode 实现,它会返回关联资源路径的 String 哈希值。关注这个是因为加载xml文件会去根据 ClassPathResource 的哈希码检测循环加载配置文件的情况
@Override
public int hashCode() {
    return this.path.hashCode();
}
午夜1点,唯一的线索分析完了,可是凶手很狡猾,除此之外犯罪现场没有留下任何有用的信息,我还是一筹莫展。无奈只能先去休息
Ⅳ. 转机!抓住了犯罪嫌疑人 XmlBeanFactory 和 XmlBeanDefinitionReader
凌晨2点。"叮铃铃"一阵急促的电话声将我惊醒,原来 code 市的破案人员通过监控系统 Intellj Idea 对 ClassPathResource 对象进行调用分析,发现了 XmlBeanFactory 和 XmlBeanDefinitionReader 曾经与 ClassPathResource 有过接触。
这两个恶棍喝得酩酊大醉,经过一系列的审讯 XmlBeanFactory 只肯招供他仅仅把 ClassPathResource 交给了 XmlBeanDefinitionReader ,其他的一概不知,可恶!
而 XmlBeanDefinitionReader 则是醉得不省人事,趴在审讯桌上呼呼大睡!
根据我们的代码入口
new XmlBeanFactory(new ClassPathResource("configuration.xml"))
其实它做的事情就是这个
public XmlBeanFactory(Resource resource) throws BeansException {
        this(resource, null);
    }
    public XmlBeanFactory(Resource resource, BeanFactory parentBeanFactory) throws BeansException {
        super(parentBeanFactory);
        this.reader.loadBeanDefinitions(resource);
    }
将工作都交给 XmlBeanDefinitionReader.loadBeanDefinitions() 方法完成
XmlBeanDefinitionReader 做的事情就是把Xml配置文件内容转换成 Bean Definition 对象表示。它主要依靠以下两个类的协作完成解析工作
-
DefaultDocumentLoader
这个类主要是使用Java内置的javax.xml类库完成Xml文件到Document对象的转换 -
BeanDefinitionDocumentReader
这个类使用上一步的Document对象完成从xml标签到Bean Definition的转换,并将Bean Definition注册到IOC容器中
下面我们从 XmlBeanDefinitionReader 的入口方法一步一步跟进
/* XmlBeanDefinitionReader.class */
    @Override
    public int loadBeanDefinitions(Resource resource) throws BeanDefinitionStoreException {
        return loadBeanDefinitions(new EncodedResource(resource));
    }
在第Ⅲ节中,我们了解到Spring将资源都抽象成 Resource ,而这个 EncodedResource 只是多了个编码属性的设置,当调用 EncodedResource.getReader() 时,会使用设置的编码
/* EncodedResource.class */
    public Reader getReader() throws IOException {
        if (this.charset != null) {
            return new InputStreamReader(this.resource.getInputStream(), this.charset);
        }
        else if (this.encoding != null) {
            return new InputStreamReader(this.resource.getInputStream(), this.encoding);
        }
        else {
            return new InputStreamReader(this.resource.getInputStream());
        }
    }
loadBeanDefnitions() 又调用了另一个重载方法
/* XmlBeanDefinitionReader.class */
    public int loadBeanDefinitions(EncodedResource encodedResource) throws BeanDefinitionStoreException {
        Assert.notNull(encodedResource, "EncodedResource must not be null");

        Set<EncodedResource> currentResources = this.resourcesCurrentlyBeingLoaded.get();
        if (currentResources == null) {
            currentResources = new HashSet<EncodedResource>(4);
            this.resourcesCurrentlyBeingLoaded.set(currentResources);
        }
        if (!currentResources.add(encodedResource)) {
            throw new BeanDefinitionStoreException(
                    "Detected cyclic loading of " + encodedResource + " - check your import definitions!");
        }
        try {
            InputStream inputStream = encodedResource.getResource().getInputStream();
            try {
                InputSource inputSource = new InputSource(inputStream);
                if (encodedResource.getEncoding() != null) {
                    inputSource.setEncoding(encodedResource.getEncoding());
                }
                return doLoadBeanDefinitions(inputSource, encodedResource.getResource());
            }
            finally {
                inputStream.close();
            }
        }
        catch (IOException ex) {
            throw new BeanDefinitionStoreException(
                    "IOException parsing XML document from " + encodedResource.getResource(), ex);
        }
        finally {
            currentResources.remove(encodedResource);
            if (currentResources.isEmpty()) {
                this.resourcesCurrentlyBeingLoaded.remove();
            }
        }
    }
可以看到其内部是通过 HashSet<EncodedResource> currentResources 这个HashSet集合进行重复加载相同配置文件的检测的,具体操作自然是检查新加入的 EncodedResource 的 hashCode() 是否重复
/* EncodedResource.class*/
    @Override
    public int hashCode() {
        return this.resource.hashCode();
    }
前面说过, ClassPathResource 的哈希值就是 String 表示的配置文件路径的哈希值,这就意味着如果重复加载了路径相同的xml资源则会抛出 Cyclic Loading 异常
/* ClassPathResource.class */
    @Override
    public int hashCode() {
        return this.path.hashCode();
    }
最后的工作交给了 doLoadBeanDefinitions() 方法
/* XmlBeanDefinitionReader.class */
    protected int doLoadBeanDefinitions(InputSource inputSource, Resource resource) throws BeanDefinitionStoreException {
        try {
            Document doc = doLoadDocument(inputSource, resource);
            return registerBeanDefinitions(doc, resource);
        }
        catch (...) {
            ...
        }
    }
下面我们来分析 doLoadDocument() 方法
/* XmlBeanDefinitionReader.class */
    protected Document doLoadDocument(InputSource inputSource, Resource resource) throws Exception {
        return this.documentLoader.loadDocument(inputSource, getEntityResolver(), this.errorHandler,
                getValidationModeForResource(resource), isNamespaceAware());
    }
this.documentLoader 就是前面提到的 DefaultDocumentLoader ,利用 javax.xml 类库完成配置文件到 Document 对象的转换
/* XmlBeanDefinitionReader.class */
    private DocumentLoader documentLoader = new DefaultDocumentLoader();
DefaultDocumentLoader 需要 EntityResolver 和 ValidationMode 的辅助进行配置文件到 Document 的转换
/* XmlBeanDefinitionReader.class */
    protected EntityResolver getEntityResolver() {
        if (this.entityResolver == null) {
            // Determine default EntityResolver to use.
            ResourceLoader resourceLoader = getResourceLoader();
            if (resourceLoader != null) {
                this.entityResolver = new ResourceEntityResolver(resourceLoader);
            }
            else {
                this.entityResolver = new DelegatingEntityResolver(getBeanClassLoader());
            }
        }
        return this.entityResolver;
    }
EntityResolver 的作用是什么呢?请看下面这个简单的配置文件
<?xml version="1.0" encoding="UTF-8" ?>
<beans xmlns="http://www.springframework.org/schema/beans"
       xmlns:xsi="http://www.w3.org/2001/XMLSchema-instance"
       xsi:schemaLocation="http://www.springframework.org/schema/beans http://www.springframework.org/schema/beans/spring-beans.xsd">

    <bean id="myTestBean" class="com.bean.MyTestBean" />
</beans>
DefaultDocumentLoader 在使用 javax.xml 内置库去解析xml文件的过程中,当遇到命名空间对应的 schema 文件时
(本例即 http://www.springframework.org/schema/beans/spring-beans.xsd ),它会去访问这个URL尝试获得 schema 文件内容,
然而网络环境是很复杂的,在不同地域不同的机器上,难以保证网络的畅通性,如果网络一直拥塞则解析xml过程就会一直失败。
为了避免依赖不可靠的网络,用户可以编写自定义的 EntityResolver 来为解析过程提供其他途径获取 schema 文件内容。
所谓 schema 就是一组规则,用来定义xml命名空间下能够合法出现的标签和每个标签合法的属性。
比如<beans>命名空间对应的 schema —— spring-beans.xsd 就定义了<beans>标签的合法属性 default-autowire 、 default-lazy-init 等等,
以及<beans>下能够出现的标签<bean>、<import>等以及它们各自合法的属性。
我们重点来关注下 ResourceEntityResolver 的父类 DelegatingEntityResolver 的 resolveEntity() 方法
/* DelegatingEntityResolver.class */
    @Override
    public InputSource resolveEntity(String publicId, String systemId) throws SAXException, IOException {
        if (systemId != null) {
            if (systemId.endsWith(DTD_SUFFIX)) {
                return this.dtdResolver.resolveEntity(publicId, systemId);
            }
            else if (systemId.endsWith(XSD_SUFFIX)) {
                return this.schemaResolver.resolveEntity(publicId, systemId);
            }
        }
        return null;
    }
systemId 就是 "http://www.springframework.org/schema/beans/spring-beans.xsd" ,然后具体解析过程交给 schemaResolver
/* DelegatingEntityResolver.class */
    public DelegatingEntityResolver(ClassLoader classLoader) {
        this.dtdResolver = new BeansDtdResolver();
        this.schemaResolver = new PluggableSchemaResolver(classLoader);
    }
在子类 ResourceEntityResolver 构造时会调用上面的构造器,可以看到 schemaResolver 被赋值为 PluggableSchemaResolver ,我们进入它的 resolveEntity() 方法
/* PluggableSchemaResolver.class */

    1. public static final String DEFAULT_SCHEMA_MAPPINGS_LOCATION = "META-INF/spring.schemas";

    2. public PluggableSchemaResolver(ClassLoader classLoader) {
        this.classLoader = classLoader;
        this.schemaMappingsLocation = DEFAULT_SCHEMA_MAPPINGS_LOCATION;
    }

       @Override
    3. public InputSource resolveEntity(String publicId, String systemId) throws IOException {
        if (systemId != null) {
            String resourceLocation = getSchemaMappings().get(systemId);
            if (resourceLocation != null) {
                Resource resource = new ClassPathResource(resourceLocation, this.classLoader);
                try {
                    InputSource source = new InputSource(resource.getInputStream());
                    source.setPublicId(publicId);
                    source.setSystemId(systemId);
                    if (logger.isDebugEnabled()) {
                        logger.debug("Found XML schema [" + systemId + "] in classpath: " + resourceLocation);
                    }
                    return source;
                }
                catch (FileNotFoundException ex) {
                    if (logger.isDebugEnabled()) {
                        logger.debug("Couldn't find XML schema [" + systemId + "]: " + resource, ex);
                    }
                }
            }
        }
        return null;
    }
getSchemaMappings() 方法会根据 META-INF/spring.schemas 文件中的内容找到对应 systemId 的物理文件位置,然后就能获得对应的文件内容。以下是我本地 spring-beans-4.3.14.RELEASE.jar 中的 spring/schemas 文件的部分截图

可以看到真正的规则文件都位于 org.springframework.beans.factory.xml 包下,所以这就避免了网络环境的不可靠导致解析xml失败。
使用 javax.xml 类库进行解析工作所需要的 EntityResolver 和 Validation Mode 还剩下一个需要分析
/* XmlBeanDefinitionReader.class */
    1. private int validationMode = VALIDATION_AUTO;

    2. protected int getValidationModeForResource(Resource resource) {
        int validationModeToUse = getValidationMode();
        if (validationModeToUse != VALIDATION_AUTO) {
            return validationModeToUse;
        }
        int detectedMode = detectValidationMode(resource);
        if (detectedMode != VALIDATION_AUTO) {
            return detectedMode;
        }
        // Hmm, we didn't get a clear indication... Let's assume XSD,
        // since apparently no DTD declaration has been found up until
        // detection stopped (before finding the document's root tag).
        return VALIDATION_XSD;
    }
validation mode 有四种 —— VALIDATION_NONE , VALIDATION_AUTO , VALIDATION_DTD , VALIDATION_XSD ,在上面的方法中只有在验证模式为 VALIDATION_AUTO 时才需要进一步检测。 Validation Mode 在 XmlBeanDefinitionReader 中初始化了为 AUTO 模式,用户可以调用 XmlBeanDefinitionReader.setValidationMode() 进行设置
/* XmlBeanDefinitionReader.class */

    1. private final XmlValidationModeDetector validationModeDetector = new XmlValidationModeDetector();

    2. protected int detectValidationMode(Resource resource) {
        ...
        try {
            return this.validationModeDetector.detectValidationMode(inputStream);
        }
        catch (IOException ex) {
            ...
        }
    }
继续分析 ValidationModeDetector.detectValidationMode()
/* XmlValidationModeDetector.class */
    public int detectValidationMode(InputStream inputStream) throws IOException {
        BufferedReader reader = new BufferedReader(new InputStreamReader(inputStream));
        try {
            boolean isDtdValidated = false;
            String content;
            while ((content = reader.readLine()) != null) {
                content = consumeCommentTokens(content); // 跳过注释
                if (this.inComment || !StringUtils.hasText(content)) {
                    continue;
                }
                if (hasDoctype(content)) {
                    isDtdValidated = true;
                    break;
                }
                if (hasOpeningTag(content)) {
                    // End of meaningful data...
                    break;
                }
            }
            return (isDtdValidated ? VALIDATION_DTD : VALIDATION_XSD);
        }
        catch (CharConversionException ex) {
            // Choked on some character encoding...
            // Leave the decision up to the caller.
            return VALIDATION_AUTO;
        }
        finally {
            reader.close();
        }
    }
可以看到核心的分析在于 hasDoctype() 方法,这个方法很无脑...如果xml文件的非注释内容的第一行含有" DOCTYPE "字符串,则认为是 VALIDATION_DTD 模式,否则是 VALIDATION_XSD 模式
获得了这些必要信息后,就可以将Xml文件解析为 Document 对象了
/* XmlBeanDefinitionReader.class */
    protected Document doLoadDocument(InputSource inputSource, Resource resource) throws Exception {
        return this.documentLoader.loadDocument(inputSource, getEntityResolver(), this.errorHandler,
                getValidationModeForResource(resource), isNamespaceAware());
    }
Ⅴ. 渐渐清晰的案情脉络
解析Xml文件是个复杂的过程,而现在我们才刚刚把解析的前期工作 —— 将Xml文件解析为 Document 对象讲完。为了更好地理解整个解析过程,我制作了一份时序图给大家提供参考。
然而很多细节是没法体现在图中的,要想理解代码逻辑就必须要 Debug 代码步步跟进
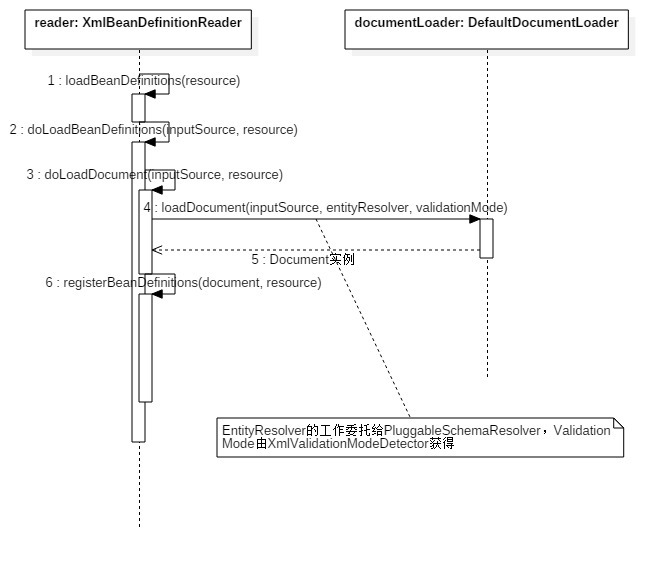
后面的篇章就是重点了 —— 遍历 Document 的元素,注册 Bean Definition
如果读者对本文有疑问,欢迎在评论区留言交流
正文到此结束
- 本文标签: db core 酒店 IO 空间 ssl final https 汽车 配置 token rmi 遍历 windows entity cat ioc 注释 root 操作系统 ip ACE map bug 解析 源码 src description bean 代码 web Chrome tomcat 凌晨 安全 id App classpath schema find BeanDefinition IDE java XML http 房间 工作原理 CTO 定制 spring ioc tar JavaScript JVM UI spring Document
- 版权声明: 本文为互联网转载文章,出处已在文章中说明(部分除外)。如果侵权,请联系本站长删除,谢谢。
- 本文海报: 生成海报一 生成海报二
热门推荐


相关文章

近期评论
-
谢谢
-
https://www.newcmy.com/register?aff=HBVX建议您试试草莓云机场,可以流畅观看youtube和tiktok,上reddit/x也没有问题,还有各种ai优化节点。
-
-
-
想购买您这个站,我的联系方式QQ741756694微信同步 能卖联系
-
-
-
-
-
https://www.liuhaihua.cn/archives/40657.html 这篇博客中的图片打不开了
Loading...
![[HBLOG]公众号](https://www.liuhaihua.cn/img/qrcode_gzh.jpg)

