一篇文章,从源码深入详解ThreadLocal内存泄漏问题
threadLocal是为了解决 对象不能被多线程共享访问 的问题,通过threadLocal.set方法将对象实例保存在每个线程自己所拥有的threadLocalMap中,这样每个线程使用自己的对象实例,彼此不会影响达到隔离的作用,从而就解决了对象在被共享访问带来线程安全问题。如果将同步机制和threadLocal做一个横向比较的话,同步机制就是通过控制线程访问共享对象的顺序,而threadLocal就是为每一个线程分配一个该对象,各用各的互不影响。打个比方说,现在有100个同学需要填写一张表格但是只有一支笔,同步就相当于A使用完这支笔后给B,B使用后给C用......老师就控制着这支笔的使用顺序,使得同学之间不会产生冲突。而threadLocal就相当于,老师直接准备了100支笔,这样每个同学都使用自己的,同学之间就不会产生冲突。很显然这就是两种不同的思路,同步机制以“时间换空间”,由于每个线程在同一时刻共享对象只能被一个线程访问造成整体上响应时间增加,但是对象只占有一份内存,牺牲了时间效率换来了空间效率即“时间换空间”。而threadLocal,为每个线程都分配了一份对象,自然而然内存使用率增加,每个线程各用各的,整体上时间效率要增加很多,牺牲了空间效率换来时间效率即“空间换时间”。
关于threadLocal,threadLocalMap更多的细节可以看这篇文章,给出了很详细的各个方面的知识(很多也是面试高频考点)。threadLocal,threadLocalMap,entry之间的关系如下图所示:
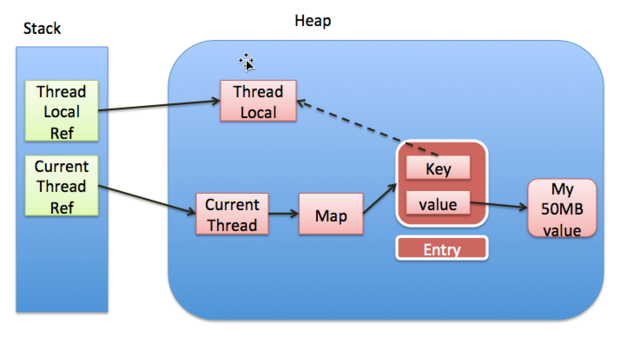
上图中,实线代表强引用,虚线代表的是弱引用,如果threadLocal外部强引用被置为null(threadLocalInstance=null)的话,threadLocal实例就没有一条引用链路可达,很显然在gc(垃圾回收)的时候势必会被回收,因此entry就存在key为null的情况,无法通过一个Key为null去访问到该entry的value。同时,就存在了这样一条引用链:threadRef->currentThread->threadLocalMap->entry->valueRef->valueMemory,导致在垃圾回收的时候进行可达性分析的时候,value可达从而不会被回收掉,但是该value永远不能被访问到,这样就存在了 内存泄漏 。当然,如果线程执行结束后,threadLocal,threadRef会断掉,因此threadLocal,threadLocalMap,entry都会被回收掉。可是,在实际使用中我们都是会用线程池去维护我们的线程,比如在Executors.newFixedThreadPool()时创建线程的时候,为了复用线程是不会结束的,所以threadLocal内存泄漏就值得我们关注。
2. 已经做出了哪些改进?
实际上,为了解决threadLocal潜在的内存泄漏的问题,Josh Bloch and Doug Lea大师已经做了一些改进。在threadLocal的set和get方法中都有相应的处理。下文为了叙述,针对key为null的entry,源码注释为stale entry,直译为不新鲜的entry,这里我就称之为“脏entry”。比如在ThreadLocalMap的set方法中:
private void set(ThreadLocal<?> key, Object value) {

    // We don't use a fast path as with get() because it is at
    // least as common to use set() to create new entries as
    // it is to replace existing ones, in which case, a fast
    // path would fail more often than not.

    Entry[] tab = table;
    int len = tab.length;
    int i = key.threadLocalHashCode & (len-1);

    for (Entry e = tab[i];
             e != null;
             e = tab[i = nextIndex(i, len)]) {
        ThreadLocal<?> k = e.get();

        if (k == key) {
            e.value = value;
            return;
        }

        if (k == null) {
            replaceStaleEntry(key, value, i);
            return;
        }
     }

    tab[i] = new Entry(key, value);
    int sz = ++size;
    if (!cleanSomeSlots(i, sz) && sz >= threshold)
        rehash();
}
在该方法中针对脏entry做了这样的处理:
- 如果当前table[i]!=null的话说明hash冲突就需要向后环形查找,若在查找过程中遇到脏entry就通过replaceStaleEntry进行处理;
- 如果当前table[i]==null的话说明新的entry可以直接插入,但是插入后会调用cleanSomeSlots方法检测并清除脏entry
2.1 cleanSomeSlots
该方法的源码为:
/* @param i a position known NOT to hold a stale entry. The
 * scan starts at the element after i.
 *
 * @param n scan control: {@code log2(n)} cells are scanned,
 * unless a stale entry is found, in which case
 * {@code log2(table.length)-1} additional cells are scanned.
 * When called from insertions, this parameter is the number
 * of elements, but when from replaceStaleEntry, it is the
 * table length. (Note: all this could be changed to be either
 * more or less aggressive by weighting n instead of just
 * using straight log n. But this version is simple, fast, and
 * seems to work well.)
 *
 * @return true if any stale entries have been removed.
 */
private boolean cleanSomeSlots(int i, int n) {
    boolean removed = false;
    Entry[] tab = table;
    int len = tab.length;
    do {
        i = nextIndex(i, len);
        Entry e = tab[i];
        if (e != null && e.get() == null) {
            n = len;
            removed = true;
            i = expungeStaleEntry(i);
        }
    } while ( (n >>>= 1) != 0);
    return removed;
}
入参:
-
i表示:插入entry的位置i,很显然在上述情况2(table[i]==null)中,entry刚插入后该位置i很显然不是脏entry;
-
参数n
2.1. n的用途
主要用于 扫描控制(scan control),从while中是通过n来进行条件判断的说明n就是用来控制扫描趟数(循环次数)的 。在扫描过程中,如果没有遇到脏entry就整个扫描过程持续log2(n)次,log2(n)的得来是因为
n >>>= 1,每次n右移一位相当于n除以2。如果在扫描过程中遇到脏entry的话就会令n为当前hash表的长度(n=len),再扫描log2(n)趟,注意此时n增加无非就是多增加了循环次数从而通过nextIndex往后搜索的范围扩大,示意图如下
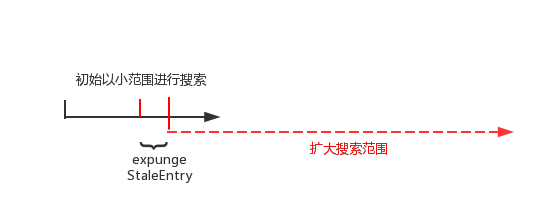
按照n的初始值,搜索范围为黑线,当遇到了脏entry,此时n变成了哈希数组的长度(n取值增大),搜索范围log2(n)增大,红线表示。如果在整个搜索过程没遇到脏entry的话,搜索结束,采用这种方式的主要是用于时间效率上的平衡。
2.2. n的取值
如果是在set方法插入新的entry后调用(上述情况2),n位当前已经插入的entry个数size;如果是在replaceSateleEntry方法中调用n为哈希表的长度len。
2.2 expungeStaleEntry
如果对输入参数能够理解的话,那么cleanSomeSlots方法搜索基本上清除了,但是全部搞定还需要掌握expungeStaleEntry方法,当在搜索过程中遇到了脏entry的话就会调用该方法去清理掉脏entry。源码为:
/**
 * Expunge a stale entry by rehashing any possibly colliding entries
 * lying between staleSlot and the next null slot.  This also expunges
 * any other stale entries encountered before the trailing null.  See
 * Knuth, Section 6.4
 *
 * @param staleSlot index of slot known to have null key
 * @return the index of the next null slot after staleSlot
 * (all between staleSlot and this slot will have been checked
 * for expunging).
 */
private int expungeStaleEntry(int staleSlot) {
    Entry[] tab = table;
    int len = tab.length;

	//清除当前脏entry
    // expunge entry at staleSlot
    tab[staleSlot].value = null;
    tab[staleSlot] = null;
    size--;

    // Rehash until we encounter null
    Entry e;
    int i;
	//2.往后环形继续查找,直到遇到table[i]==null时结束
    for (i = nextIndex(staleSlot, len);
         (e = tab[i]) != null;
         i = nextIndex(i, len)) {
        ThreadLocal<?> k = e.get();
		//3. 如果在向后搜索过程中再次遇到脏entry,同样将其清理掉
        if (k == null) {
            e.value = null;
            tab[i] = null;
            size--;
        } else {
			//处理rehash的情况
            int h = k.threadLocalHashCode & (len - 1);
            if (h != i) {
                tab[i] = null;

                // Unlike Knuth 6.4 Algorithm R, we must scan until
                // null because multiple entries could have been stale.
                while (tab[h] != null)
                    h = nextIndex(h, len);
                tab[h] = e;
            }
        }
    }
    return i;
}
该方法逻辑请看注释(第1,2,3步),主要做了这么几件事情:
- 清理当前脏entry,即将其value引用置为null,并且将table[staleSlot]也置为null。value置为null后该value域变为不可达,在下一次gc的时候就会被回收掉,同时table[staleSlot]为null后以便于存放新的entry;
- 从当前staleSlot位置向后环形(nextIndex)继续搜索,直到遇到哈希桶(tab[i])为null的时候退出;
- 若在搜索过程再次遇到脏entry,继续将其清除。
也就是说该方法, 清理掉当前脏entry后,并没有闲下来继续向后搜索,若再次遇到脏entry继续将其清理,直到哈希桶(table[i])为null时退出 。因此方法执行完的结果为 从当前脏entry(staleSlot)位到返回的i位,这中间所有的entry不是脏entry 。为什么是遇到null退出呢?原因是存在脏entry的前提条件是 当前哈希桶(table[i])不为null ,只是该entry的key域为null。如果遇到哈希桶为null,很显然它连成为脏entry的前提条件都不具备。
现在对cleanSomeSlot方法做一下总结,其方法执行示意图如下:
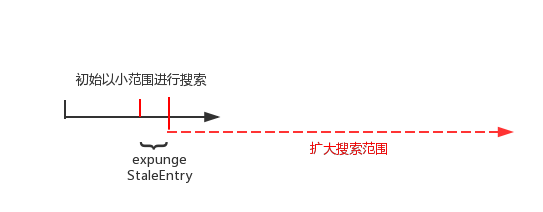
如图所示,cleanSomeSlot方法主要有这样几点:
- 从当前位置i处(位于i处的entry一定不是脏entry)为起点在初始小范围(log2(n),n为哈希表已插入entry的个数size)开始向后搜索脏entry,若在整个搜索过程没有脏entry,方法结束退出
- 如果在搜索过程中遇到脏entryt通过expungeStaleEntry方法清理掉当前脏entry,并且该方法会返回下一个哈希桶(table[i])为null的索引位置为i。这时重新令搜索起点为索引位置i,n为哈希表的长度len,再次扩大搜索范围为log2(n')继续搜索。
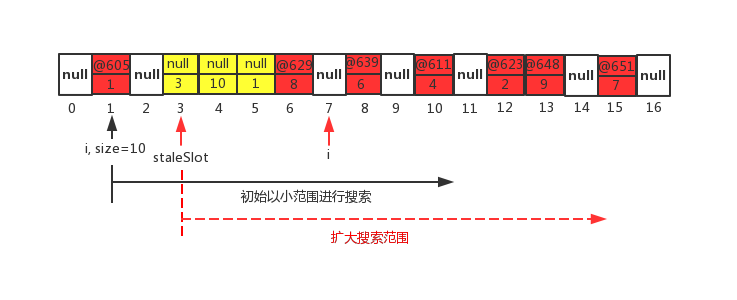
下面,以一个例子更清晰的来说一下,假设当前table数组的情况如下图。
-
如图当前n等于hash表的size即n=10,i=1,在第一趟搜索过程中通过nextIndex,i指向了索引为2的位置,此时table[2]为null,说明第一趟未发现脏entry,则第一趟结束进行第二趟的搜索。
-
第二趟所搜先通过nextIndex方法,索引由2的位置变成了i=3,当前table[3]!=null但是该entry的key为null,说明找到了一个脏entry, 先将n置为哈希表的长度len,然后继续调用expungeStaleEntry方法 ,该方法会将当前索引为3的脏entry给清除掉(令value为null,并且table[3]也为null),但是 该方法可不想偷懒,它会继续往后环形搜索 ,往后会发现索引为4,5的位置的entry同样为脏entry,索引为6的位置的entry不是脏entry保持不变,直至i=7的时候此处table[7]位null,该方法就以i=7返回。至此,第二趟搜索结束;
-
由于在第二趟搜索中发现脏entry,n增大为数组的长度len,因此扩大搜索范围(增大循环次数)继续向后环形搜索;
-
直到在整个搜索范围里都未发现脏entry,cleanSomeSlot方法执行结束退出。
2.3 replaceStaleEntry
先来看replaceStaleEntry 方法,该方法源码为:
/*
 * @param  key the key
 * @param  value the value to be associated with key
 * @param  staleSlot index of the first stale entry encountered while
 *         searching for key.
 */
private void replaceStaleEntry(ThreadLocal<?> key, Object value,
                               int staleSlot) {
    Entry[] tab = table;
    int len = tab.length;
    Entry e;

    // Back up to check for prior stale entry in current run.
    // We clean out whole runs at a time to avoid continual
    // incremental rehashing due to garbage collector freeing
    // up refs in bunches (i.e., whenever the collector runs).

	//向前找到第一个脏entry
    int slotToExpunge = staleSlot;
    for (int i = prevIndex(staleSlot, len);
         (e = tab[i]) != null;
         i = prevIndex(i, len))
        if (e.get() == null)
1.          slotToExpunge = i;

    // Find either the key or trailing null slot of run, whichever
    // occurs first
    for (int i = nextIndex(staleSlot, len);
         (e = tab[i]) != null;
         i = nextIndex(i, len)) {
        ThreadLocal<?> k = e.get();

        // If we find key, then we need to swap it
        // with the stale entry to maintain hash table order.
        // The newly stale slot, or any other stale slot
        // encountered above it, can then be sent to expungeStaleEntry
        // to remove or rehash all of the other entries in run.
        if (k == key) {

			//如果在向后环形查找过程中发现key相同的entry就覆盖并且和脏entry进行交换
2.            e.value = value;
3.            tab[i] = tab[staleSlot];
4.            tab[staleSlot] = e;

            // Start expunge at preceding stale entry if it exists
			//如果在查找过程中还未发现脏entry,那么就以当前位置作为cleanSomeSlots
			//的起点
            if (slotToExpunge == staleSlot)
5.                slotToExpunge = i;
			//搜索脏entry并进行清理
6.            cleanSomeSlots(expungeStaleEntry(slotToExpunge), len);
            return;
        }

        // If we didn't find stale entry on backward scan, the
        // first stale entry seen while scanning for key is the
        // first still present in the run.
		//如果向前未搜索到脏entry,则在查找过程遇到脏entry的话,后面就以此时这个位置
		//作为起点执行cleanSomeSlots
        if (k == null && slotToExpunge == staleSlot)
7.            slotToExpunge = i;
    }

    // If key not found, put new entry in stale slot
	//如果在查找过程中没有找到可以覆盖的entry,则将新的entry插入在脏entry
8.    tab[staleSlot].value = null;
9.    tab[staleSlot] = new Entry(key, value);

    // If there are any other stale entries in run, expunge them
10.    if (slotToExpunge != staleSlot)
		//执行cleanSomeSlots
11.        cleanSomeSlots(expungeStaleEntry(slotToExpunge), len);
}
该方法的逻辑请看注释,下面我结合各种情况详细说一下该方法的执行过程。首先先看这一部分的代码:
int slotToExpunge = staleSlot;
    for (int i = prevIndex(staleSlot, len);
         (e = tab[i]) != null;
         i = prevIndex(i, len))
        if (e.get() == null)
            slotToExpunge = i;
这部分代码通过PreIndex方法实现往前环形搜索脏entry的功能,初始时slotToExpunge和staleSlot相同,若在搜索过程中发现了脏entry,则更新slotToExpunge为当前索引i。另外,说明replaceStaleEntry并不仅仅局限于处理当前已知的脏entry,它认为在出 现脏entry的相邻位置也有很大概率出现脏entry,所以为了一次处理到位,就需要向前环形搜索,找到前面的脏entry 。那么根据在向前搜索中是否还有脏entry以及在for循环后向环形查找中是否找到可覆盖的entry,我们分这四种情况来充分理解这个方法:
-
1.前向有脏entry
-
1.1后向环形查找找到可覆盖的entry
该情形如下图所示。
-
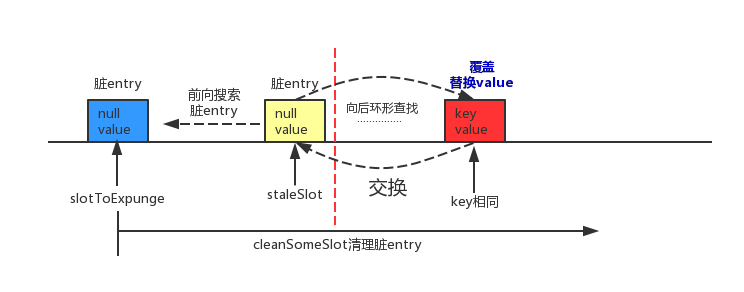
如图,slotToExpunge初始状态和staleSlot相同,当前向环形搜索遇到脏entry时,在第1行代码中slotToExpunge会更新为当前脏entry的索引i,直到遇到哈希桶(table[i])为null的时候,前向搜索过程结束。在接下来的for循环中进行后向环形查找,若查找到了可覆盖的entry,第2,3,4行代码先覆盖当前位置的entry,然后再与staleSlot位置上的脏entry进行交换。交换之后脏entry就更换到了i处,最后使用cleanSomeSlots方法从slotToExpunge为起点开始进行清理脏entry的过程 - 1.2后向环形查找未找到可覆盖的entry 该情形如下图所示。  如图,slotToExpunge初始状态和staleSlot相同,当前向环形搜索遇到脏entry时,在第1行代码中slotToExpunge会更新为当前脏entry的索引i,直到遇到哈希桶(table[i])为null的时候,前向搜索过程结束。在接下来的for循环中进行后向环形查找,若没有查找到了可覆盖的entry,哈希桶(table[i])为null的时候,后向环形查找过程结束。那么接下来在8,9行代码中,将插入的新entry直接放在staleSlot处即可,最后使用cleanSomeSlots方法从slotToExpunge为起点开始进行清理脏entry的过程
-
2.前向没有脏entry
-
2.1后向环形查找找到可覆盖的entry 该情形如下图所示。
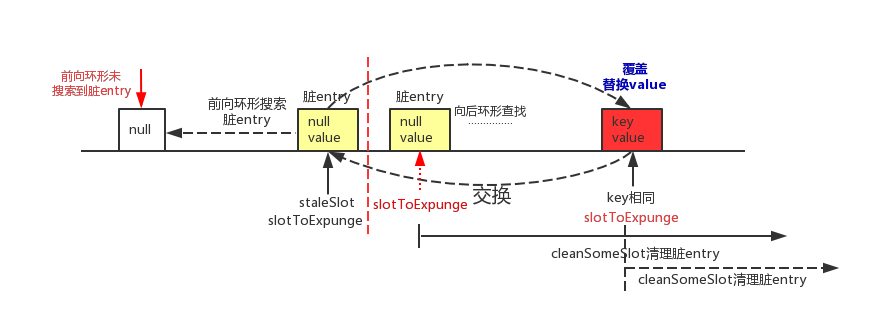
如图,slotToExpunge初始状态和staleSlot相同,当前向环形搜索直到遇到哈希桶(table[i])为null的时候,前向搜索过程结束,若在整个过程未遇到脏entry,slotToExpunge初始状态依旧和staleSlot相同。在接下来的for循环中进行后向环形查找,若遇到了脏entry,在第7行代码中更新slotToExpunge为位置i。若查找到了可覆盖的entry,第2,3,4行代码先覆盖当前位置的entry,然后再与staleSlot位置上的脏entry进行交换,交换之后脏entry就更换到了i处。如果在整个查找过程中都还没有遇到脏entry的话,会通过第5行代码,将slotToExpunge更新当前i处,最后使用cleanSomeSlots方法从slotToExpunge为起点开始进行清理脏entry的过程。
-
2.2后向环形查找未找到可覆盖的entry 该情形如下图所示。
-
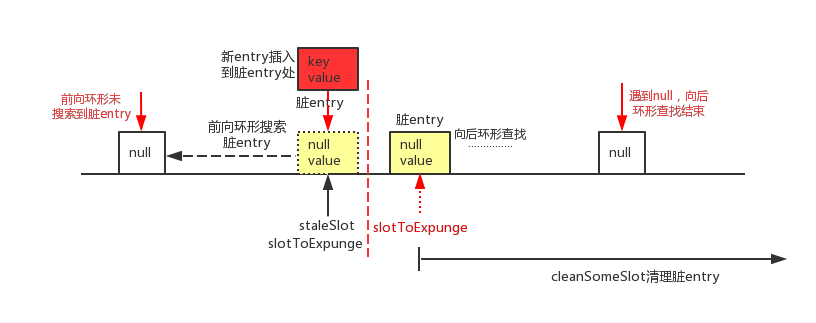
如图,slotToExpunge初始状态和staleSlot相同,当前向环形搜索直到遇到哈希桶(table[i])为null的时候,前向搜索过程结束,若在整个过程未遇到脏entry,slotToExpunge初始状态依旧和staleSlot相同。在接下来的for循环中进行后向环形查找,若遇到了脏entry,在第7行代码中更新slotToExpunge为位置i。若没有查找到了可覆盖的entry,哈希桶(table[i])为null的时候,后向环形查找过程结束。那么接下来在8,9行代码中,将插入的新entry直接放在staleSlot处即可。另外,如果发现slotToExpunge被重置,则第10行代码if判断为true,就使用cleanSomeSlots方法从slotToExpunge为起点开始进行清理脏entry的过程。
下面用一个实例来有个直观的感受,示例代码就不给出了,代码debug时table状态如下图所示:
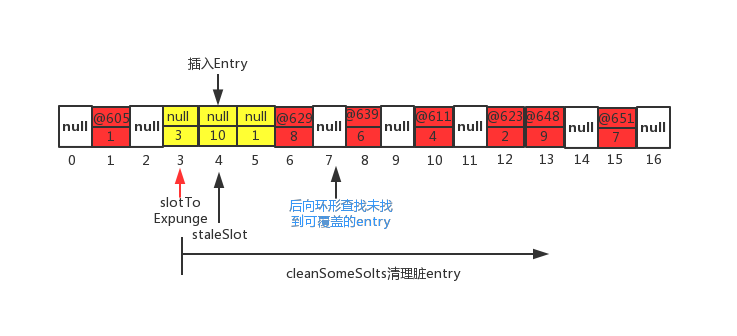
如图所示,当前的staleSolt为i=4,首先先进行前向搜索脏entry,当i=3的时候遇到脏entry,slotToExpung更新为3,当i=2的时候tabel[2]为null,因此前向搜索脏entry的过程结束。然后进行后向环形查找,知道i=7的时候遇到table[7]为null,结束后向查找过程,并且在该过程并没有找到可以覆盖的entry。最后只能在staleSlot(4)处插入新entry,然后从slotToExpunge(3)为起点进行cleanSomeSlots进行脏entry的清理。是不是上面的1.2的情况。
这些核心方法,通过源码又给出示例图,应该最终都能掌握了,也还挺有意思的。若觉得不错,对我的辛劳付出能给出鼓励欢迎点赞,给小弟鼓励,在此谢过 :)。
当我们调用threadLocal的get方法时,当table[i]不是和所要找的key相同的话,会继续通过threadLocalMap的 getEntryAfterMiss方法向后环形去找,该方法为:
private Entry getEntryAfterMiss(ThreadLocal<?> key, int i, Entry e) {
    Entry[] tab = table;
    int len = tab.length;

    while (e != null) {
        ThreadLocal<?> k = e.get();
        if (k == key)
            return e;
        if (k == null)
            expungeStaleEntry(i);
        else
            i = nextIndex(i, len);
        e = tab[i];
    }
    return null;
}
当key==null的时候,即遇到脏entry也会调用expungeStleEntry对脏entry进行清理。
当我们调用threadLocal.remove方法时候,实际上会调用threadLocalMap的remove方法,该方法的源码为:
private void remove(ThreadLocal<?> key) {
    Entry[] tab = table;
    int len = tab.length;
    int i = key.threadLocalHashCode & (len-1);
    for (Entry e = tab[i];
         e != null;
         e = tab[i = nextIndex(i, len)]) {
        if (e.get() == key) {
            e.clear();
            expungeStaleEntry(i);
            return;
        }
    }
}
同样的可以看出,当遇到了key为null的脏entry的时候,也会调用expungeStaleEntry清理掉脏entry。
从以上set,getEntry,remove方法看出, 在threadLocal的生命周期里,针对threadLocal存在的内存泄漏的问题,都会通过expungeStaleEntry,cleanSomeSlots,replaceStaleEntry这三个方法清理掉key为null的脏entry 。
2.4 为什么使用弱引用?
从文章开头通过threadLocal,threadLocalMap,entry的引用关系看起来threadLocal存在内存泄漏的问题似乎是因为threadLocal是被弱引用修饰的。那为什么要使用弱引用呢?
如果使用强引用
假设threadLocal使用的是强引用,在业务代码中执行 threadLocalInstance==null 操作,以清理掉threadLocal实例的目的,但是因为threadLocalMap的Entry强引用threadLocal,因此在gc的时候进行可达性分析,threadLocal依然可达,对threadLocal并不会进行垃圾回收,这样就无法真正达到业务逻辑的目的,出现逻辑错误
如果使用弱引用
假设Entry弱引用threadLocal,尽管会出现内存泄漏的问题,但是在threadLocal的生命周期里(set,getEntry,remove)里,都会针对key为null的脏entry进行处理。
从以上的分析可以看出,使用弱引用的话在threadLocal生命周期里会尽可能的保证不出现内存泄漏的问题,达到安全的状态。
2.5 Thread.exit()
当线程退出时会执行exit方法:
private void exit() {
    if (group != null) {
        group.threadTerminated(this);
        group = null;
    }
    /* Aggressively null out all reference fields: see bug 4006245 */
    target = null;
    /* Speed the release of some of these resources */
    threadLocals = null;
    inheritableThreadLocals = null;
    inheritedAccessControlContext = null;
    blocker = null;
    uncaughtExceptionHandler = null;
}
从源码可以看出当线程结束时,会令threadLocals=null,也就意味着GC的时候就可以将threadLocalMap进行垃圾回收,换句话说threadLocalMap生命周期实际上thread的生命周期相同。
3. threadLocal最佳实践
通过这篇文章对threadLocal的内存泄漏做了很详细的分析,我们可以完全理解threadLocal内存泄漏的前因后果,那么实践中我们应该怎么做?
- 每次使用完ThreadLocal,都调用它的remove()方法,清除数据。
- 在使用线程池的情况下,没有及时清理ThreadLocal,不仅是内存泄漏的问题,更严重的是可能导致业务逻辑出现问题。所以,使用ThreadLocal就跟加锁完要解锁一样,用完就清理。
参考资料
《java高并发程序设计》 blog.xiaohansong.com/2016/08/06/…


![[HBLOG]公众号](https://www.liuhaihua.cn/img/qrcode_gzh.jpg)

