热修复与插件化基础——Java与Android的类加载器

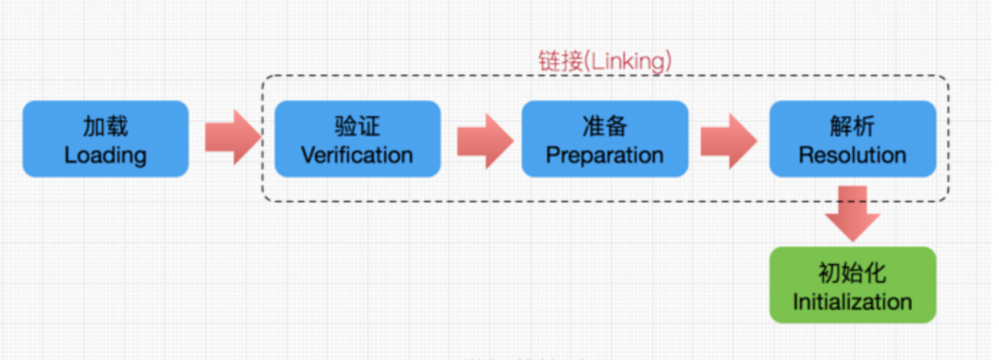
2、加载流程

- Loading:类的信息从文件中获取并载入到JVM的内存中。
- Verifying:检查读入的结构是否符合JVM规范的描述。
- Preparing:分配一人上结构用来存储类信息。
- Resolving:把类的常量池中的所有符号引用变成直接引用。
- Initializing:执行静态初始化程序,把静态变量初始化成指定的值。
二、Android中的ClassLoader
1、类加载器
Android中最主要的类加载器有如下4个:

一个app一定会用到BootClassLoader、PathClassLoader这2个类加载器,可通过如下代码进行验证:
@Override
    protected void onCreate(Bundle savedInstanceState) {
        super.onCreate(savedInstanceState);
        ...

        ClassLoader classLoader = getClassLoader();
        if (classLoader != null) {
            Log.e("lqr", "classLoader = " + classLoader);
            while (classLoader.getParent() != null) {
                classLoader = classLoader.getParent();
                Log.e("lqr", "classLoader = " + classLoader);
            }
        }
    }
日志输出结果如下:

上面代码中可以通过上下文拿到当前类的类加载器(PathClassLoader),然后通过getParent()得到父类加载器(BootClassLoader),这是由于Android中的类加载器使用的是双亲委派模型。
2、特点及作用
双亲委派模型:
在加载一个字节码文件时,会询问当前的classLoader是否已经加载过此字节码文件。如果加载过,则直接返回,不再重复加载。如果没有加载过,则会询问它的Parent是否已经加载过此字节码文件,同样的,如果已经加载过,就直接返回parent加载过的字节码文件,而如果整个继承线路上的classLoader都没有加载过,才由child类加载器(即,当前的子classLoader)执行类的加载工作。
1)特点:
显然,如果一个类被classLoader继承线路上的任意一个加载过,那么在以后整个系统的生命周期中,这个类都不会再被加载,大大提高了类的加载效率。
2)作用:
- 类加载的共享功能
一些Framework层级的类一旦被顶层classLoader加载过,会缓存到内存中,以后在任何地方用到,都不会去重新加载。
- 类加载的隔离功能
共同继承线程上的classLoader加载的类,肯定不是同一个类,这样可以避免某些开发者自己去写一些代码冒充核心类库,来访问核心类库中可见的成员变量。如java.lang.String在应用程序启动前就已经被系统加载好了,如果在一个应用中能够简单的用自定义的String类把系统中的String类替换掉的话,会有严重的安全问题。
验证多个类是同一个类的成立条件:
- 相同的className
- 相同的packageName
- 被相同的classLoader加载
3、ClassLoader源码
通过阅读ClassLoader的源码来验证双亲委派模型。
1)loadClass()
找到ClassLoader这个类中的loadClass()方法,它调用的是另一个2个参数的重载loadClass()方法。
public Class<?> loadClass(String name) throws ClassNotFoundException {
    return loadClass(name, false);
}
找到最终这个真正的loadClass()方法,下面便是该方法的源码:
protected Class<?> loadClass(String name, boolean resolve)
    throws ClassNotFoundException
{
    // First, check if the class has already been loaded
    Class<?> c = findLoadedClass(name);
    if (c == null) {
        try {
            if (parent != null) {
                c = parent.loadClass(name, false);
            } else {
                c = findBootstrapClassOrNull(name);
            }
        } catch (ClassNotFoundException e) {
            // ClassNotFoundException thrown if class not found
            // from the non-null parent class loader
        }

        if (c == null) {
            // If still not found, then invoke findClass in order
            // to find the class.
            c = findClass(name);
        }
    }
    return c;
}
可以看到,如前面所说,加载一个类时,会有如下3步:
- 检查当前的classLoader是否已经加载琮这个class,有则直接返回,没有则进行第2步。
- 调用父classLoader的loadClass()方法,检查父classLoader是否有加载过这个class,有则直接返回,没有就继续检查上上个父classLoader,直到顶层classLoader。
- 如果所有的父classLoader都没有加载过这个class,则最终由当前classLoader调用findClass()方法,去dex文件中找出并加载这个class。
以上就是双亲委派模型的核心。在loadClass()中,调用了一个很重要的方法,那就是findClass(),去查找要加载的类。
2)findClass()
在ClassLoader中,findClass()是空实现,这说明具体的方法会在子类中去重写实现。
protected Class<?> findClass(String name) throws ClassNotFoundException {
    throw new ClassNotFoundException(name);
}
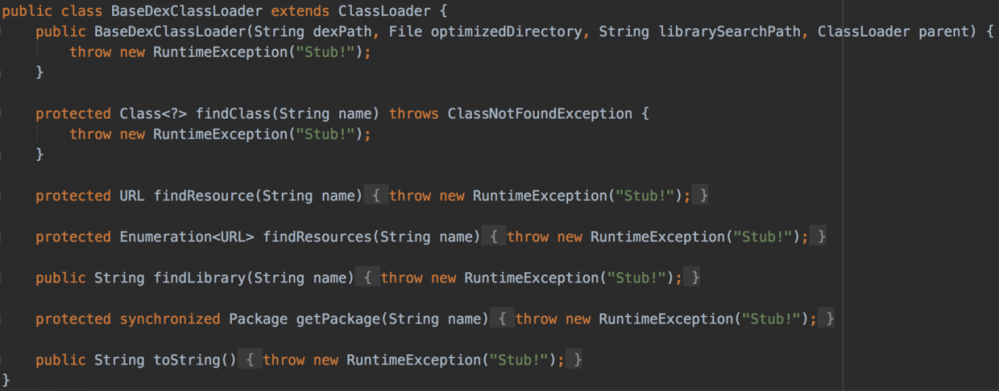
于是,找到其子类BaseDexClassLoader,发现,AS实际上看不到系统级源码。

这种情况,在本人之前的 《热修复——深入浅出原理与实现》 文章中也有所提及,可以借助第三方源码网站上查看,如:
- BaseDexClassLoader.java 的源码链接
- PathClassLoader.java 的源码链接
- DexClassLoader.java 的源码链接
PathClassLoader和DexClassLoader是BaseDexClassLoader的子类,源码很少,就先查阅这2个类,再去研读BaseDexClassLoader。
4、BaseDexClassLoader源码
1)DexClassLoader
/**
* A class loader that loads classes from {@code .jar} and {@code .apk} files
* containing a {@code classes.dex} entry. This can be used to execute code not
* installed as part of an application.
* ...
*/
public class DexClassLoader extends BaseDexClassLoader {
    public DexClassLoader(String dexPath, String optimizedDirectory,
        String libraryPath, ClassLoader parent) {
    super(dexPath, new File(optimizedDirectory), libraryPath, parent);
    }
}
DexClassLoader的构造函数:
- dexPath:dex文件路径
- optimizedDirectory:dex文件解压路径(一般是app的data目录)
- libraryPath:加载dex文件时需要用到的库的路径
- parent:父类加载器
再回过头来看DexClassLoader类上的注释,大概翻译就是说,DexClassLoader可以加载jar包和apk包内dex文件中的类,可以被用来执行非安装过的app中的代码。
这句注释其实是很重要的,它就是腾讯Tinker这一类热修复解决方案的核心。一句话:可以加载任意路径下的dex文件。
2)PathClassLoader
/**
* Provides a simple {@link ClassLoader} implementation that operates on a list
* of files and directories in the local file system, but does not attempt to
* load classes from the network. Android uses this class for its system class
* loader and for its application class loader(s).
*/
public class PathClassLoader extends BaseDexClassLoader {
    public PathClassLoader(String dexPath, ClassLoader parent) {
        super(dexPath, null, null, parent);
    }
    public PathClassLoader(String dexPath, String libraryPath,
            ClassLoader parent) {
        super(dexPath, null, libraryPath, parent);
    }
}
PathClassLoader的构造函数:
- dexPath:dex文件路径
- libraryPath:加载dex文件时需要用到的库的路径
- parent:父类加载器
相比DexClassLoader的构造函数,PathClassLoader的构造函数少了一个参数libraryPath,这也就导致了PathClassLoader只能加载已安装应用内dex中的class,从类上的说明中也可以了解到,只能加载本地应用中的类,不能加载网络上的类。
一句话,PathClassLoader只能用于加载已安装应用的dex文件。
3)BaseDexClassLoader
看完DexClassLoader和PathClassLoader,发现它们根本没有对findClass()这个方法进行重写,说明它们的findClass()方法肯定在其父类BaseDexClassLoader中进行了统一实现处理。
public class BaseDexClassLoader extends ClassLoader {
    private final DexPathList pathList;

    public BaseDexClassLoader(String dexPath, File optimizedDirectory,String libraryPath, ClassLoader parent) {
        super(parent);
        this.pathList = new DexPathList(this, dexPath, libraryPath, optimizedDirectory);
    }

    @Override
    protected Class<?> findClass(String name) throws ClassNotFoundException {
        List<Throwable> suppressedExceptions = new ArrayList<Throwable>();
        Class c = pathList.findClass(name, suppressedExceptions);
        if (c == null) {
            ClassNotFoundException cnfe = new ClassNotFoundException("Didn't find class /"" + name + "/" on path: " + pathList);
            for (Throwable t : suppressedExceptions) {
                cnfe.addSuppressed(t);
            }
            throw cnfe;
        }
        return c;
    }
}
...
可以发现,实际上BaseDexClassLoader并没有实现查找类的具体逻辑,它只是一个中转,调用的是DexPathList的findClass()方法,而这个DexPathList对象是在BaseDexClassLoader构造函数中进行实例化,并保存了几个BaseDexClassLoader会用到的属性,注意,DexPathList保存的optimizedDirectory可能为空,到时走的是PathClassLoader的逻辑。所以,下面就来看DexPathList:
4)DexPathList
a.构造函数
final class DexPathList {
    private static final String DEX_SUFFIX = ".dex";

    private final ClassLoader definingContext;

    /**
     * List of dex/resource (class path) elements.
     * Should be called pathElements, but the Facebook app uses reflection
     * to modify 'dexElements' (http://b/7726934).
     */
    private final Element[] dexElements;

    public DexPathList(ClassLoader definingContext, String dexPath,
            String libraryPath, File optimizedDirectory) {
        this.definingContext = definingContext;
        this.dexElements = makeDexElements(splitDexPath(dexPath), optimizedDirectory,
                                           suppressedExceptions);
    }
- definingContext:就是在前面传入的BaseDexClassLoader(app运行后,这个definingContext可能是PathClassLoader或DexClassLoader)
- dexElements:这个就是 dex文件 或 资源文件 组成的元素数据了,它是通过makeDexElements()方法创建出来的,
自然下面就得先了解下这个Element和makeDexElements()方法。
b.Element
static class Element {
    private final File file;
    private final boolean isDirectory;
    private final File zip;
    private final DexFile dexFile;
    private ZipFile zipFile;
    private boolean initialized;

    public Element(File file, boolean isDirectory, File zip, DexFile dexFile) {
        this.file = file;
        this.isDirectory = isDirectory;
        this.zip = zip;
        this.dexFile = dexFile;
    }
    ...
}
Element是PathList的静态内部类,其中,DexFile dexFile这个属性是最关键的。接下来是makeDexElements()方法:
private static Element[] makeDexElements(ArrayList<File> files, File optimizedDirectory,
                                         ArrayList<IOException> suppressedExceptions) {
    ArrayList<Element> elements = new ArrayList<Element>();
    /*
     * Open all files and load the (direct or contained) dex files
     * up front.
     */
    for (File file : files) {
        File zip = null;
        DexFile dex = null;
        String name = file.getName();
        if (file.isDirectory()) {
            // We support directories for looking up resources.
            // This is only useful for running libcore tests.
            elements.add(new Element(file, true, null, null));
        } else if (file.isFile()){
            if (name.endsWith(DEX_SUFFIX)) {
                // Raw dex file (not inside a zip/jar).
                try {
                    dex = loadDexFile(file, optimizedDirectory);
                } catch (IOException ex) {
                    System.logE("Unable to load dex file: " + file, ex);
                }
            } else {
                zip = file;
                dex = loadDexFile(file, optimizedDirectory);
            }
        } else {
            System.logW("ClassLoader referenced unknown path: " + file);
        }
        if ((zip != null) || (dex != null)) {
            elements.add(new Element(file, false, zip, dex));
        }
    }
    return elements.toArray(new Element[elements.size()]);
}
它对files集合进行遍历(这个files集合就是dexPath下所有的文件及目录),来看该方法对文件是怎么处理的:它不管是dex文件,或是压缩包文件,都会调用到loadDexFile()方法:
private static DexFile loadDexFile(File file, File optimizedDirectory)
        throws IOException {
    if (optimizedDirectory == null) {
        return new DexFile(file);
    } else {
        String optimizedPath = optimizedPathFor(file, optimizedDirectory);
        return DexFile.loadDex(file.getPath(), optimizedPath, 0);
    }
}
所以,如果optimizedDirectory为null,说明这是PathClassLoader的处理方式,直接将file封装成DexFile对象返回;如果optimizedDirectory不为null,说明这是DexClassLoader的处理方式,若file是dex文件就封装成DexFile对象返回,若file是压缩包,会先进行解压,将其中的dex文件封装成DexFile对象返回。反正,不管是哪种方式,就终都是得到dex文件对象,并且,在makeDexElements()方法的最后,添加进Element数组中。
c.findClass()
public Class findClass(String name, List<Throwable> suppressed) {
    for (Element element : dexElements) {
        DexFile dex = element.dexFile;
        if (dex != null) {
            Class clazz = dex.loadClassBinaryName(name, definingContext, suppressed);
            if (clazz != null) {
                return clazz;
            }
        }
    }
    return null;
}
终于到最后一个findClass()方法了,其实它就是遍历dex文件数组(dexElements),得到一个个的dex文件对象,调用其loadClassBinaryName()方法通用类名找到类,快接近真相了,下面就看看DexFile中到底是怎么通过类名找到类的,坚持~
5)DexFile
public Class loadClassBinaryName(String name, ClassLoader loader, List<Throwable> suppressed) {
    return defineClass(name, loader, mCookie, suppressed);
}

private static Class defineClass(String name, ClassLoader loader, long cookie,
                                 List<Throwable> suppressed) {
    Class result = null;
    result = defineClassNative(name, loader, cookie);
    return result;
}

private static native Class defineClassNative(String name, ClassLoader loader, long cookie) throws ClassNotFoundException, NoClassDefFoundError;
在DexFile这个类中,loadClassBinaryName()调用了defineClass(),最终调用的是defineClassNative()这个native方法,也就是说,类的加载最终是用c/c++的方式来进行处理的,因为是native方法,这里就没办法继续往下跟了,因此,其真实处理逻辑我们就不得而知了。
但是,联想到前面的 《热修复与插件化基础——dex与class》 文章中提到的dex头文件中包含了该dex中所有class的信息,所以,我们不妨可以大胆猜想一下,其实defineClassNative()这个native方法应该就是通过读取dex头文件的方式找到并定义了class。
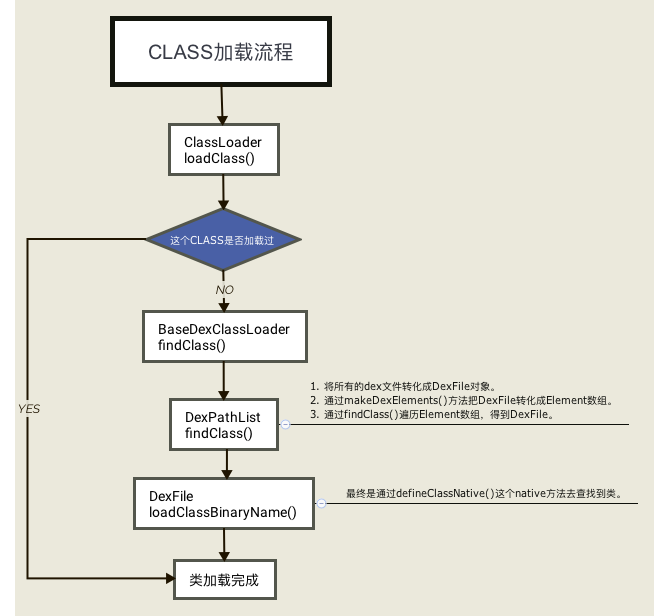
4、类加载流程
所谓一图胜千言,通过上面一系列的方法跟踪,及流程梳理,最终,得到如下这张图:


![[HBLOG]公众号](https://www.liuhaihua.cn/img/qrcode_gzh.jpg)

