TensorFlow Java+eclipse下环境搭建
目前AI已经火热的不行,这两天看了看TensorFlow,官方对TensorFlow的叙述如下:
TensorFlow是一个使用数据流图进行数值计算的开放源代码软件库。图中的节点代表数学运算,而图中的边则代表在这些节点之间传递的多维数组(张量)。借助这种灵活的架构,您可以通过一个 API 将计算工作部署到桌面设备、服务器或移动设备中的一个或多个 CPU 或 GPU。
TensorFlow官网
官网的环境中并没有说明我们在eclipse+JDK的环境怎么搭建TensorFlow的环境,自己尝试了一下还是比较容易的
TensorFlow JDK+eclipse环境
1.下载libtensorflow.jar,这是 TensorFlow Java 归档 (JAR)。
2.下载 Windows 上适用于 Java 的 TensorFlow 的 Java 原生接口 (JNI) 文件。
3. 解压zip文件提取这个里面的.dll文件。
4. 在eclipse中创建一个Java工程,我这直接使用官网给的例子,代码如下
public class HelloTF {
	public static void main(String[] args) throws Exception {
		try (Graph g = new Graph()) {
			final String value = "Hello from " + TensorFlow.version();

			// Construct the computation graph with a single operation, a constant
			// named "MyConst" with a value "value".
			try (Tensor t = Tensor.create(value.getBytes("UTF-8"))) {
				// The Java API doesn't yet include convenience functions for adding operations.
				g.opBuilder("Const", "MyConst").setAttr("dtype", t.dataType()).setAttr("value", t).build();
			}

			// Execute the "MyConst" operation in a Session.
			try (Session s = new Session(g); Tensor output = s.runner().fetch("MyConst").run().get(0)) {
				System.out.println(new String(output.bytesValue(), "UTF-8"));
			}
		}
	}
}
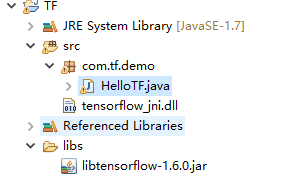
5. Java工程添加libtensorflow.jar,如果不添加这个jar,程序会找不到相关的类
6. 最后一步也是,关键的一步,我们要加载解压提取的.dll文件,怎么做呢,第一步,将tensorflow_jni.dll文件复制到工程的src目录下,第二步,在工程上右键属性---》Java Build Path--->Source,点击Source左边的箭头选择native library,点击右边的edit,选择项目的src目录即可。

这样我们的环境就搭建完成,最后运行一下项目,输出Hello from 版本号,表示我们的环境已经搭建好了
Hello from 1.6.0
其他语言的环境可以参考官方网站
正文到此结束
热门推荐
相关文章
Loading...


![[HBLOG]公众号](https://www.liuhaihua.cn/img/qrcode_gzh.jpg)

