阿里 RPC 框架 DUBBO 初体验
最近研究了一下阿里开源的分布式RPC框架dubbo,楼主写了一个 demo,体验了一下dubbo的功能。
快速开始
实际上,dubbo的官方文档已经提供了如何使用这个RPC框架example代码,基于 Netty 的长连接。楼主看这个框架主要是为了在微服务,service mesh大火的今天做一些技术储备以及了解一下分布式 RPC 框架的设计。
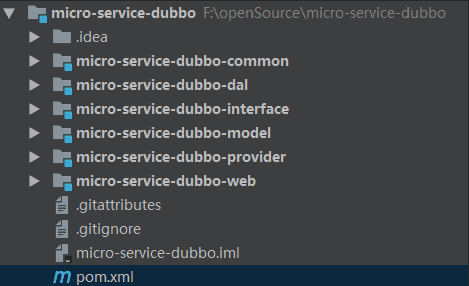
当然即便是写一个dubbo的demo也不能随便写写就好了,要认真对待说不定哪一天可以派上用场呢,下面是楼主写的代码的目录结构:

下面我来一一说明一下每个model的作用,
- micro-service-dubbo-common:是通用工具模块其他的model都需要依赖它 。
- micro-service-dubbo-dal:是整个项目的dao模块,有关数据库操作的相关代码都放在这里。
- micro-service-dubbo-interface:是通用接口模块,专门用来声明接口,被consumer与provider同时依赖,这么做是为了项目的可拆分与分布式部署。
- micro-service-dubbo-model:是公用的实体类模块,不限于数据库对应的model,也可以放DTO,VO等。
- micro-service-dubbo-provider:项目的服务提供者。
- micro-service-dubbo-web:项目的消费者,也是直接跟前端交互的controller层。
另外需要在pom文件中添加相关依赖
<!--dubbo-->
<dependency>
    <groupId>com.alibaba</groupId>
    <artifactId>dubbo</artifactId>
    <version>${dubbo.version}</version>
</dependency>

<dependency>
    <groupId>com.101tec</groupId>
    <artifactId>zkclient</artifactId>
    <version>${zkclient_version}</version>
</dependency>

<dependency>
    <groupId>org.apache.zookeeper</groupId>
    <artifactId>zookeeper</artifactId>
    <version>${zookeeper_version}</version>
</dependency>

<dependency>
    <groupId>org.apache.curator</groupId>
    <artifactId>curator-framework</artifactId>
    <version>${curator_version}</version>
</dependency>
接口创建
既然是 RPC 服务,那就需要一个接口,再有一个实现类。在这里的接口定义是在我们的micro-service-dubbo-interface,具体实现是在provider这里创建,在楼主的项目中就是在micro-service-dubbo-provider中创建 DemoService 的实现。
public interface DemoService {
    String sayHello(String name);

    public List getUsers();
}
@Service("demoService")
public class DemoServiceImpl implements DemoService {

    @Override
    public String sayHello(String name) {
        System.out.println("[" + new SimpleDateFormat("HH:mm:ss").format(new Date()) + "] Hello " + name + ", request from consumer: " + RpcContext
                .getContext().getRemoteAddress());
        return "Hello " + name + ", response from provider: " + RpcContext.getContext().getLocalAddress();
    }

    @Override
    public List getUsers() {
        List list = new ArrayList();
        User u1 = new User();
        u1.setName("hejingyuan");
        u1.setAge(20);
        u1.setSex("f");

        User u2 = new User();
        u2.setName("xvshu");
        u2.setAge(21);
        u2.setSex("m");


        list.add(u1);
        list.add(u2);

        return list;
    }
}
然后consumer的 pom.xml 添加对这个接口的依赖,在这里的接口定义是在我们的consumer就是micro-service-dubbo-web。
<dependency>
  <groupId>com.whforever</groupId>
    <artifactId>micro-service-dubbo-provider</artifactId>
    <version>1.0-SNAPSHOT</version>
</dependency>
<dependency>
    <groupId>com.whforever</groupId>
    <artifactId>micro-service-dubbo-interface</artifactId>
    <version>1.0-SNAPSHOT</version>
</dependency>
有了接口,就需要配置一下。
接口配置
首先在提供方这里发布接口。创建一个 xml 文件,名为:dubbo-provider.xml。
文件内容:
<?xml version="1.0" encoding="UTF-8"?>
<beans xmlns:xsi="http://www.w3.org/2001/XMLSchema-instance"
       xmlns:dubbo="http://code.alibabatech.com/schema/dubbo"
       xmlns="http://www.springframework.org/schema/beans"
       xsi:schemaLocation="http://www.springframework.org/schema/beans http://www.springframework.org/schema/beans/spring-beans-4.3.xsd
       http://code.alibabatech.com/schema/dubbo http://code.alibabatech.com/schema/dubbo/dubbo.xsd">

    <!-- provider's application name, used for tracing dependency relationship -->
    <dubbo:application name="demo-provider"/>

    <!-- use multicast registry center to export service -->
    <dubbo:registry protocol="zookeeper" address="127.0.0.1:2181" />

    <!-- use dubbo protocol to export service on port 20880 -->
    <dubbo:protocol name="dubbo" port="20880"/>

    <!-- service implementation, as same as regular local bean -->
    <bean id="demoProviderService" class="com.whforever.service.impl.DemoServiceImpl"/>

    <!-- declare the service interface to be exported -->
    <dubbo:service interface="com.whforever.service.DemoService" ref="demoProviderService"/>

</beans>
很简单,发布了一个接口,类似 Spring 的一个 bean。
同样的,在consumer即 micro-service-dubbo-web 的 resource 文件下,也创建一个 dubbo-consumer.xml 文件。内容稍有不同。
<?xml version="1.0" encoding="UTF-8"?>
<beans xmlns:xsi="http://www.w3.org/2001/XMLSchema-instance"
       xmlns:dubbo="http://code.alibabatech.com/schema/dubbo"
       xmlns="http://www.springframework.org/schema/beans"
       xsi:schemaLocation="http://www.springframework.org/schema/beans http://www.springframework.org/schema/beans/spring-beans-4.3.xsd
       http://code.alibabatech.com/schema/dubbo http://code.alibabatech.com/schema/dubbo/dubbo.xsd">

    <!-- consumer's application name, used for tracing dependency relationship (not a matching criterion),
    don't set it same as provider -->
    <dubbo:application name="demo-consumer"/>

    <!-- use multicast registry center to discover service -->
    <!--<dubbo:registry address="multicast://224.5.6.7:1234"/>-->
    <dubbo:registry protocol="zookeeper" address="127.0.0.1:2181" />

    <!-- generate proxy for the remote service, then demoService can be used in the same way as the
    local regular interface -->
    <dubbo:reference id="demoConsumerService" check="false" interface="com.whforever.service.DemoService"/>

</beans>
从上面可以看出这两个文件的注册发现协议是zookeeper,因此在服务启动之前需要启动zookeeper,具体移步 Zookeeper 注册中心安装启动
准备测试
测试之前还要做点点工作。
在启动provider事需要一部分引导程序,请看如下代码:
public class ProviderMain {
    public static void main(String[] args) throws IOException {
        System.setProperty("java.net.preferIPv4Stack", "true");
        ClassPathXmlApplicationContext context = new ClassPathXmlApplicationContext("dubbo-provider.xml");
        context.start();

        System.in.read(); // press any key to exit
    }
}
consumer代码
@Controller
@RequestMapping("/")
public class IndexController {

    @Autowired
    DemoService demoService;

    @RequestMapping("/echo")
    @ResponseBody
    public String echo() {
        System.out.println(">>>>>>echo");
        return JSON.toJSONString(demoService.getUsers());
    }
}
运行
先运行provider:
[06/06/18 11:56:29:029 CST] main INFO config.AbstractConfig: [DUBBO] The service ready on spring started. service: com.whforever.service.DemoService, dubbo version: 2.6.1, current host: 192.168.1.120 [06/06/18 11:56:30:030 CST] main INFO config.AbstractConfig: [DUBBO] Export dubbo service com.whforever.service.DemoService to local registry, dubbo version: 2.6.1, current host: 192.168.1.120 [06/06/18 11:56:30:030 CST] main INFO config.AbstractConfig: [DUBBO] Export dubbo service com.whforever.service.DemoService to url dubbo://192.168.1.120:20880/com.whforever.service.DemoService?anyhost=true&application=demo-provider&bind.ip=192.168.1.120&bind.port=20880&dubbo=2.6.1&generic=false&interface=com.whforever.service.DemoService&methods=sayHello,getUsers&pid=13992&side=provider×tamp=1528300589682, dubbo version: 2.6.1, current host: 192.168.1.120 [06/06/18 11:56:30:030 CST] main INFO config.AbstractConfig: [DUBBO] Register dubbo service com.whforever.service.DemoService url dubbo://192.168.1.120:20880/com.whforever.service.DemoService?anyhost=true&application=demo-provider&bind.ip=192.168.1.120&bind.port=20880&dubbo=2.6.1&generic=false&interface=com.whforever.service.DemoService&methods=sayHello,getUsers&pid=13992&side=provider×tamp=1528300589682 to registry registry://127.0.0.1:2181/com.alibaba.dubbo.registry.RegistryService?application=demo-provider&dubbo=2.6.1&pid=13992®istry=zookeeper×tamp=1528300589673, dubbo version: 2.6.1, current host: 192.168.1.120 [06/06/18 11:56:30:030 CST] main INFO transport.AbstractServer: [DUBBO] Start NettyServer bind /0.0.0.0:20880, export /192.168.1.120:20880, dubbo version: 2.6.1, current host: 192.168.1.120
再运行sonsumer:

通过查看dubbo监控中心,可以看到如下所示的情况,具体dubbo监控中心如何安装部署请移步 Simple 监控中心安装

小结
对于dubbo听其大名已久,直到最近才动手写了一些demo,总体来看上手还是比较简单,官方也提供了比较详细的文档,社区也比较活跃。关于本篇博客中的代码,楼主已经放到了github,该兴趣的小伙伴,请移步 Dubbo初体验Demo模板代码
- 本文标签: 代码 consumer web Transport js 注册中心 UI key lib remote ORM cat GitHub provider apache ACE https 分布式 配置 XML client classpath bean 数据库 Netty dubbo java 博客 git id 安装 json example 测试 Service tar Proxy IDE 开源 spring http ip 长连接 map App schema 协议 Property ArrayList 数据 list 目录 src pom IO zookeeper
- 版权声明: 本文为互联网转载文章,出处已在文章中说明(部分除外)。如果侵权,请联系本站长删除,谢谢。
- 本文海报: 生成海报一 生成海报二


![[HBLOG]公众号](https://www.liuhaihua.cn/img/qrcode_gzh.jpg)

