SpringBoot之路(一)之初识SpringBoot
####前言 Spring Boot 是用来简化 Spring 应用初始搭建以及开发过程的全新框架,被认为是 SpringMVC 的接班人,和微服务紧密联系在一起。 Spring Boot 简单实例Demo
####SpringMVC 的优缺点
-
优点:
-
Spring Boot适合快速开发,适合构建微服务系统。封装了经常使用的组件,比如MyBatis,Hibernate,MongoDB等。 - 纯
Java的配置,简单方便。 - 配置Maven等构建工具后,
java -jar进行部署比较简单。 -
Spring Boot对自定义十分友好,可以配置在application.yml或者Config类,Spring Boot的整体思想是有自定义的话,自定义优先,否则走默认配置。 -
Spring Boot使编码,配置,部署,监控变得简单起来。
-
-
缺点:
Spring Boot
####第一个Spring Boot的应用
- 首先创建一个
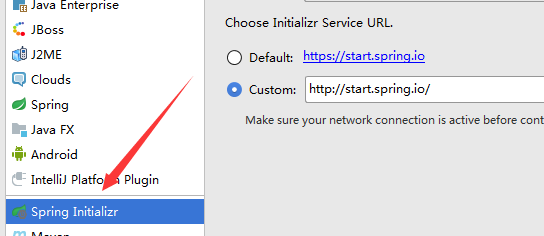
New Project,要选择Spring Initializr,然后Choose Initializr Service URL应该选择Custom, 正确的链接应该是http://start.spring.io/,而不是https://start.spring.io/。https会造成我们访问失败!
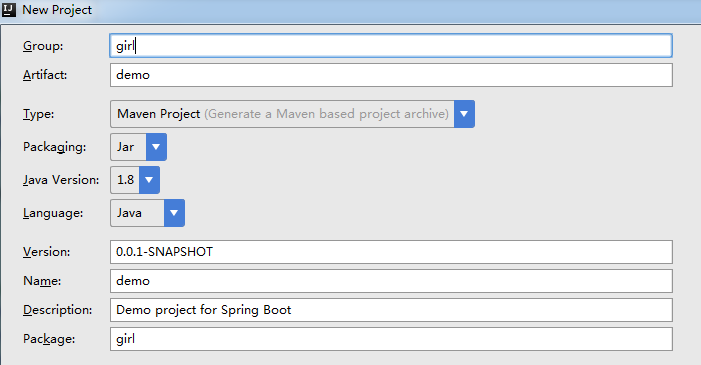
2.相关配置, Type 我们选择 Maven Project
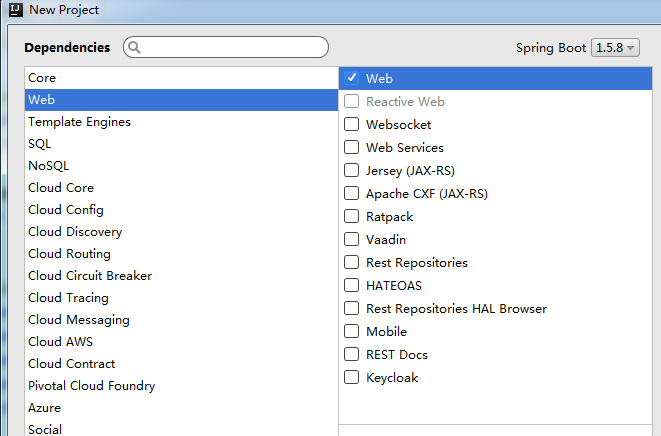
3.选择 Web 就行了。另外 Spring Boot 的版本是1.5.8
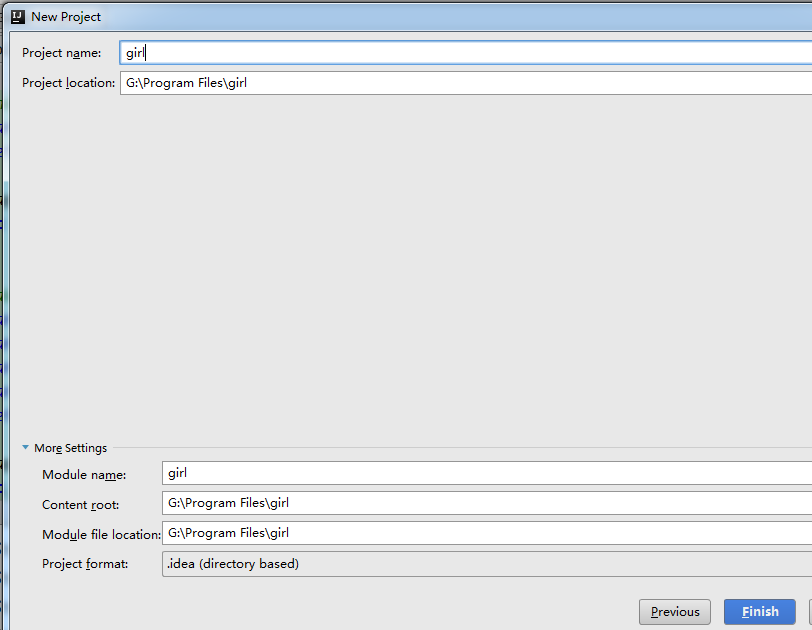
4. Finished 。大功告成!
5.由于默认的 setting.xml 配置,导致我们从远程下jar实在是太慢,所以我们要修改 .m2 下面的 setting.xml 文件,同时将 setting.xml 原本指向 C:/Users/Administrator/.m2/repository 的仓库地址,改成我们自定义的盘下面即可。 我的setting.xml是这样的,如果还是看不懂的话,请移步Setting.xml相关配置
<mirrors>
	 <mirror>
		<id>alimaven</id>
		<name>aliyun maven</name>
		<url>http://maven.aliyun.com/nexus/content/groups/public/</url>
		<mirrorOf>central</mirrorOf>
	</mirror>
  </mirrors
6.我们可以看到这个 DemoApplication 类, 这是整个 Spring Boot 应用的入口,有 @SpringBootApplication 这个注解,显而易见。
@SpringBootApplication
public class DemoApplication {

	public static void main(String[] args) {
		SpringApplication.run(DemoApplication.class, args);
	}
}
7.接下来我们创建一个 HelloController.java , @RestController 这个注解的作用:声明这是一个 Controller 类,返回 json 。其实就是 @ResponseBody 和 @Controller 的结合体。
@RestController
public class HelloController {

    @RequestMapping(value = "/hello", method = RequestMethod.GET)
    public String say() {
        return "Hello, Spring Boot!";
    }
}
8.启动有3种方式。 (1)直接在 Itellij IDEA 启动。

mvn spring-boot:run
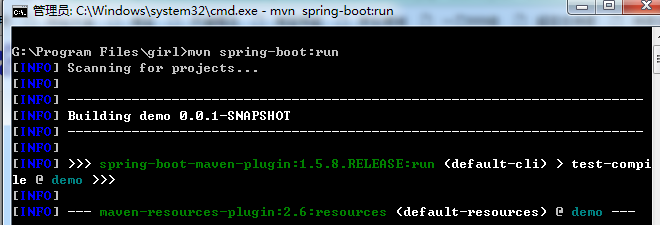
(3)在项目的根目录下,打开命令窗口,输入 mvn install ,让项目生成 jar 包。
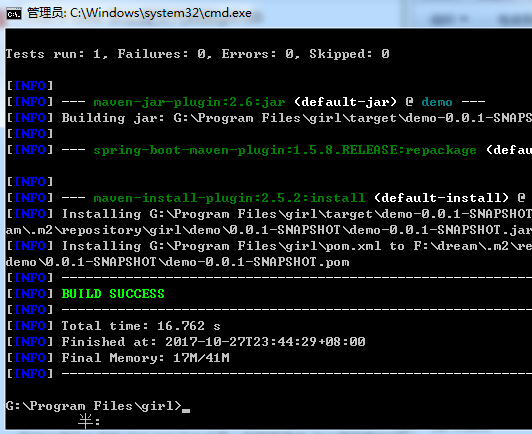
target 包下面多了一个
jar
包。

输入命令 java -jar target/demo-0.0.1-SNAPSHOT.jar

Spring Boot
应用了。

###项目属性配置 1.我们可以在 resources文件夹 下面建3个 properties , application-dev.properties 是开发环境下的配置文件。 application-prod.properties 是应用环境下的配置文件。 Spring Boot 默认读取的配置文件是 application.properties ,我们只需要在 application.properties 指定使用哪一个环境下的配置文件即可。比如: spring.profiles.active=dev
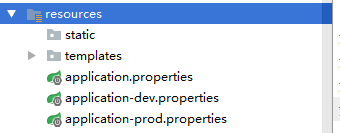
2.我们在 application-dev.properties ,配置一些信息,让我们的 Controller 类去读取配置信息。
server.port=8081
server.context-path=/girl
cupSize=A
height=160
content="cupSize: ${cupSize}, age: ${height}"
girl.cupSize=A
girl.height=160
3.Controller类读取配置信息,启动Spring Boot输出结果。
public class HelloController {
    @Value("${cupSize}")
    private String cupSize;

    @Value("${height}")
    private String height;

    @Value("${content}")
    private String content;

    @RequestMapping(value = "/display", method = RequestMethod.GET)
    public String display() {
       return "cupSize=" + cupSize + ", height=" + height;
    }

    @RequestMapping(value = "/content", method = RequestMethod.GET)
    public String displayContent() {
        return content;
    }
}


4. Controller 类读取配置信息带前缀的字符串,比如我们要读取 girl.cupSize=A girl.height=160 这些带girl的配置信息,我们该怎么办呢。我们需要定义一个 GirlProperties.java 。 @ConfigurationProperties 代表我们要读取带什么前缀的配置信息, @Component 代表这个类已经在Spring配置文件中注册过。
@ConfigurationProperties(prefix = "girl")
@Component
public class GirlProperties {
    private String cupSize;
    private String height;

    public String getCupSize() {
        return cupSize;
    }

    public void setCupSize(String cupSize) {
        this.cupSize = cupSize;
    }

    public String getHeight() {
        return height;
    }

    public void setHeight(String height) {
        this.height = height;
    }
}
5. Controller 类读取 GirlProperties ,我们要使用 @Autowired 注入 GirlProperties 这个类的实例,它是通过bean的类型注入的。启动Spring Boot应用,输出结果。
@RestController
public class HelloController {
    @Autowired
    private GirlProperties girlProperties;

    @RequestMapping(value = "/properties", method = RequestMethod.GET)
    public String displayProperties() {
        return girlProperties.getCupSize() + girlProperties.getHeight();
    }
}

###Controller的使用 1.尽量使用 @GetMapping 和 @PostMapping 代替 @RequestMapping(value = "/xxxxx", method = RequestMethod.GET) 2.如果需要在 Spring Boot 使用 @Controller ,需要返回一个逻辑视图。比如
@Controller
public class DemoController {
    @RequestMapping(value = "/saylove", method = RequestMethod.GET)
    public String sayLove() {
        return "index";
    }
}
index.html 是在 templates 文件夹下面的

3. pom.xml 配置如下
<?xml version="1.0" encoding="UTF-8"?>
<project xmlns="http://maven.apache.org/POM/4.0.0" xmlns:xsi="http://www.w3.org/2001/XMLSchema-instance"
	xsi:schemaLocation="http://maven.apache.org/POM/4.0.0 http://maven.apache.org/xsd/maven-4.0.0.xsd">
	<modelVersion>4.0.0</modelVersion>

	<groupId>girl</groupId>
	<artifactId>demo</artifactId>
	<version>0.0.1-SNAPSHOT</version>
	<packaging>jar</packaging>

	<name>demo</name>
	<description>Demo project for Spring Boot</description>

	<parent>
		<groupId>org.springframework.boot</groupId>
		<artifactId>spring-boot-starter-parent</artifactId>
		<version>1.5.8.RELEASE</version>
		<relativePath/> <!-- lookup parent from repository -->
	</parent>

	<properties>
		<project.build.sourceEncoding>UTF-8</project.build.sourceEncoding>
		<project.reporting.outputEncoding>UTF-8</project.reporting.outputEncoding>
		<java.version>1.8</java.version>
	</properties>

	<dependencies>
		<dependency>
			<groupId>org.springframework.boot</groupId>
			<artifactId>spring-boot-starter-web</artifactId>
		</dependency>

		<dependency>
			<groupId>org.springframework.boot</groupId>
			<artifactId>spring-boot-starter-test</artifactId>
			<scope>test</scope>
		</dependency>

		<dependency>
			<groupId>org.springframework.boot</groupId>
			<artifactId>spring-boot-starter-thymeleaf</artifactId>
		</dependency>

		<dependency>
			<groupId>mysql</groupId>
			<artifactId>mysql-connector-java</artifactId>
		</dependency>

		<dependency>
			<groupId>org.springframework.boot</groupId>
			<artifactId>spring-boot-starter-data-jpa</artifactId>
			<version>1.5.8.RELEASE</version>
		</dependency>

	</dependencies>

	<build>
		<plugins>
			<plugin>
				<groupId>org.springframework.boot</groupId>
				<artifactId>spring-boot-maven-plugin</artifactId>
			</plugin>
		</plugins>
	</build>


</project>
###数据库操作 1.在 application-dev.properties 配置数据连接配置
spring.datasource.driver-class-name=com.mysql.jdbc.Driver
spring.datasource.url=jdbc:mysql://localhost:3306/spring_boot
spring.datasource.username=root
spring.datasource.password=xiaoma96
spring.jpa.hibernate.ddl-auto=update
spring.jpa.show-sql=true
spring.jpa.hibernate.ddl-auto 有4个属性: create : 不管数据库原先有没有这个表,每次启动应用,都会drop这个表,然后再创建新的一张表。 update : 如果数据库中有这个表且有数据,那么我会保留这张表,不会去删除它。 create-drop : 应用停止的时候, 会把数据库里面这张表删除。 none : 不产生任何行为。
2.什么是 JPA ? JPA 的英文全称是 Java Persistence API 定义了一系列对象持久化的标准,目前实现这个规范的产品有 Hibernate 。
3.怎么去使用 JPA ? 之前用过 Liferay 技术, Liferay 通过 ServiceBuilder 生成 Service.xml ,在这个 Service.xml 配置你需要创建数据库表的 entity 信息,然后定义一些方法的字段。然后build一下。就会生成对应的 CRUD 方法,很是智能。而且在下一次应用启动时,会生成对应的数据库表哟。如果需要定制化sql语句,只需要在 finderImpl 和 ServiceImpl 里面添加自己的方法,然后 build 一下,重新生成接口。同样 JPA ,简单的 CRUD 我们不需要去写sql语句,只需要定义一个 GirlRepository 的接口,继承 JpaRepository<Girl, Integer> 就行了。需要定制化 CRUD ,我们添加相应的方法就行了。
public interface GirlRepository extends JpaRepository<Girl, Integer> {

    public List<Girl> findByAge(Integer age);

    public List<Girl> findByCupSize(String cupSize);

    public List<Girl> findByName(String name);
}
4.定义 RESTfulAPI ,开放 CRUD 接口。增加,使用 POST , 查询使用 GET , 更新使用 PUT ,删除使用 DELETE 。
@RestController
public class GirlController {
    @Autowired
    private GirlRepository girlRepository;

    /**
     * Queries all girls.
     * @return girls List queryed
     */
    @GetMapping(value = "/girls")
    public List<Girl> girlList() {
        return girlRepository.findAll();
    }

    /**
     * Adds girl
     * @param name
     * @param cupSize
     * @param age
     * @return girl added
     */
    @PostMapping(value = "/girls")
    public Girl girlAdd(@RequestParam("name") String name, @RequestParam("cupsize") String cupSize
            , @RequestParam("age") Integer age) {
        Girl girl = new Girl();
        girl.setAge(age);
        girl.setName(name);
        girl.setCupSize(cupSize);
        return girlRepository.save(girl);
    }

    /**
     * Finds girl by id
     * @param id
     * @return girl finded
     */
    @GetMapping(value = "/girls/{id}")
    public Girl girlFindOne(@PathVariable("id") Integer id) {
        return girlRepository.findOne(id);
    }

    /**
     * Updates girl
     * @param id
     * @param name
     * @param cupSize
     * @param age
     * @return girl updated
     */
    @PutMapping(value = "/girls/{id}")
    public Girl girlUpdateOne(@PathVariable("id") Integer id, @RequestParam("name") String name, @RequestParam("cupsize") String cupSize
            , @RequestParam("age") Integer age) {
        Girl girl = new Girl();
        girl.setCupSize(cupSize);
        girl.setName(name);
        girl.setAge(age);
        girl.setId(id);
        return girlRepository.save(girl);
    }

    /**
     * Deletes girl by id
     * @param id
     */
    @DeleteMapping(value = "/girls/{id}")
    public void girlDeleteOne(@PathVariable("id") Integer id) {
        girlRepository.delete(id);
    }

    /**
     * Queries girls by name
     * @param name
     * @return girl list queryed
     */
    @GetMapping(value = "/girls/name/{name}")
    public List<Girl> girlFindByName(@PathVariable("name") String name) {
        return girlRepository.findByName(name);
    }

    /**
     * Queries girls by age
     * @param age
     * @return girl list queryed
     */
    @GetMapping(value = "/girls/age/{age}")
    public List<Girl> girlFindByAge(@PathVariable("age") Integer age) {
        return girlRepository.findByAge(age);
    }

    /**
     * Queries girls by cupsize
     * @param cupSize
     * @return girl list queryed
     */
    @GetMapping(value = "/girls/cupsize/{cupsize}")
    public List<Girl> girlFindByCupSize(@PathVariable("cupsize") String cupSize) {
        return girlRepository.findByCupSize(cupSize);
    }
}
5.使用 Postman 软件,测试 API 。在这里,我就测试一个查询 api ,演示一下。
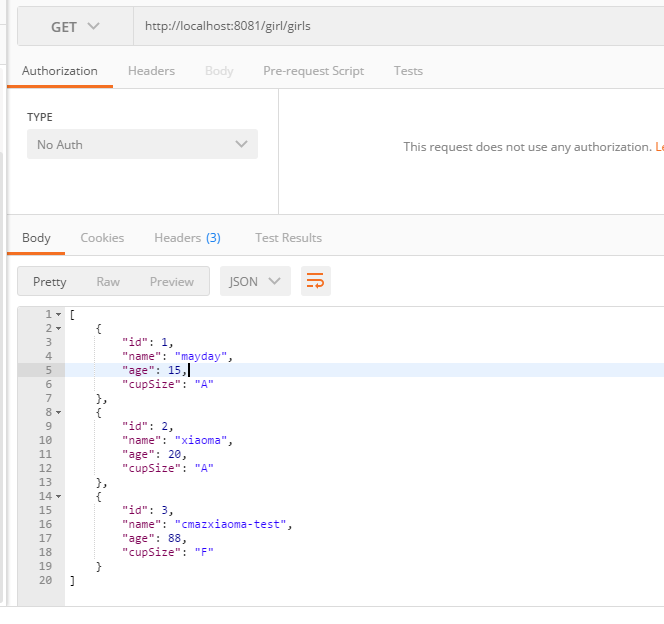
###事务管理 1.什么是事务?事务是作为一个逻辑单元执行的一系列操作。它有4个特性
- 原子性:事务是一个原子操作,由一系列动作组成。事务的原子性确保动作要么全部完成,要么全部失败。
- 一致性: 一旦事务完成,不管成功还是失败,系统必须确保它所建模的业务处于一致的状态,而不全是部分完成,或者是部分失败,在现实的数据不应有被破坏。
- 隔离性: 可能有许多事务会同时处理相同的数据, 因此每个事务都应该与其他事务隔离开,防止数据被破坏。
- 持久性: 一旦事务完成, 无论发生什么,系统发生错误,它的结果都不应该受到影响,这样就能从任何系统崩溃中恢复过来, 通常情况下,事务的记过被写到持久化存储器。
2.我们常用的几个事务:
PROPAGATION_REQUIRED
PROPAGATION_SUPPORTS
PROPAGATION_REQUIRES_NEW
3.我们模拟一个事务的回滚,体现事务的原子性,第一个 save 操作不会出现问题,第二个 save 操作会抛出异常。但是不能部分成功,不能部分失败。这二个操作最终会被回滚。
@Service
public class GirlService {

    @Autowired
    private GirlRepository girlRepository;

    @Transactional
    public void insertTwo() {
        Girl girlA = new Girl("garrett-test", 18, "Z");
        girlRepository.save(girlA);

        Girl girlB = new Girl("mayday-test", 21, "BBBBBBBB");
        girlRepository.save(girlB);
    }
}

@RestController
public class GirlController {
    @Autowired
    private GirlService girlService;

    /**
     * Tests transaction
     */
    @GetMapping(value = "/transaction")
    public void transactionTest() {
        girlService.insertTwo();
    }
}
4.启动应用,打开 Postman ,测试 API 。很显然,操作发生异常进行回滚,数据库未插入任何数据。

####尾言 学无止境,一起共勉。
- 本文标签: src 数据库 Action NSA 一致性 web 实例 https dependencies 删除 map IO 目录 CTO db list build description Persistence IDE springboot apache MongoDB ip mybatis http sql plugin mysql API 测试 value schema find JPA 数据 Spring Boot update HTML REST DDL cat bean RESTful JDBC 定制 XML dataSource tar ACE UI id java App pom 软件 entity 产品 Service 管理 mongo root json js 开发 Word 配置 MQ spring 智能 maven SpringMVC
- 版权声明: 本文为互联网转载文章,出处已在文章中说明(部分除外)。如果侵权,请联系本站长删除,谢谢。
- 本文海报: 生成海报一 生成海报二


![[HBLOG]公众号](https://www.liuhaihua.cn/img/qrcode_gzh.jpg)

