JDK SPI的使用和源码分析
SPI 是什么? Service Provider Interface,服务提供接口。是一种基于资源文件配置的服务发现机制。
我们用一个示例看下 JDK 自带的 SPI 机制如何使用。代码参考了「 Java SPI(Service Provider Interface)简介 」。
这篇文章中,使用 IDEA 创建maven项目,maven版本是3.5.3,Java版本是1.8。
1. 从一个简单的项目开始
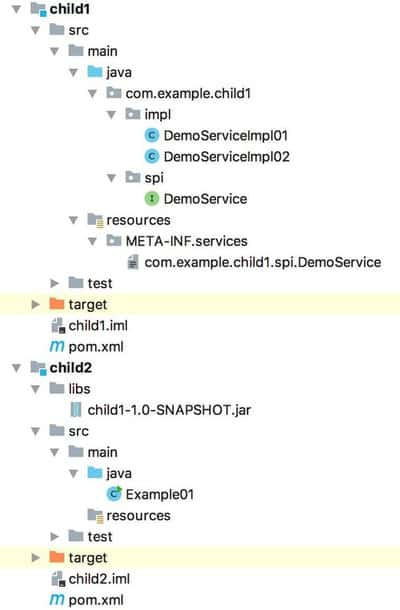
我们使用 IDEA 创建一个maven项目,增加两个module,一个是child1,一个是child2。child1提供服务,child2调用服务。
先看下最终的项目结构:

在child1模块中添加接口 DemoService ,内容如下:
package com.example.child1.spi;

public interface DemoService {

    public String sayHi(String msg);

}
是的,我们要把这个接口当做服务提供出去的。
对于这个接口(服务),编写两个实现类 DemoServiceImpl01 和 DemoServiceImpl02 。代码分别如下:
package com.example.child1.impl;

import com.example.child1.spi.DemoService;

public class DemoServiceImpl01 implements DemoService {
    public String sayHi(String msg) {
        return "Hello " + msg;
    }
}
package com.example.child1.impl;

import com.example.child1.spi.DemoService;

public class DemoServiceImpl02 implements DemoService {
    public String sayHi(String msg) {
        return "Hi " + msg;
    }
}
然后,需要把服务暴露出去。
在 child1/src/main/resources/META-INF/services/ 目录中创建文件 com.example.child1.spi.DemoService ,将实现类全路径写进去:
com.example.child1.impl.DemoServiceImpl01
com.example.child1.impl.DemoServiceImpl02
命令行进入 child1 目录,执行打包命令:
$ mvn package
可以看到 child1/target/ 目录下生成了 child1-1.0-SNAPSHOT.jar 。
我们把这个jar挪到 child2/libs 下面,然后在 child2/pom.xml 中将它作为依赖引入进来。
<dependencies>
    <dependency>
        <groupId>com.example</groupId>
        <artifactId>child1</artifactId>
        <version>1.0-SNAPSHOT</version>
        <scope>system</scope>
        <systemPath>${basedir}/libs/child1-1.0-SNAPSHOT.jar</systemPath>
    </dependency>
</dependencies>
child2如何通过 SPI 调用 child1 提供的服务呢?很简单,编写 Example01类:
import com.example.child1.spi.DemoService;

import java.util.Iterator;
import java.util.ServiceLoader;

public class Example01 {

    public static void main(String[] args)  {
        ServiceLoader<DemoService> serviceLoader = ServiceLoader.load(DemoService.class);
        Iterator<DemoService> it = serviceLoader.iterator();
        while (it.hasNext()) {
            DemoService demoService = it.next();
            System.out.println(String.format("class: %s, result: %s ", demoService.getClass().getName(), demoService.sayHi("World")));
        }
    }
}
运行后输出:
class: com.example.child1.impl.DemoServiceImpl01, result: Hello World
class: com.example.child1.impl.DemoServiceImpl02, result: Hi World
从main函数里发现了什么没有?对,调用方child2只需要关心child1提供的接口就行,不关心具体的实现类。
代码在: https://github.com/letiantian/demo/tree/master/jdk-spi/spi-demo1 。
2. 再复杂点
我们重新创建一个maven项目,把在上面的child1和child2再实现一遍。child1不打包成jar供child2用了,直接 mvn install 。如此,child2的pom.xml中的依赖要改成:
<dependency>
    <groupId>com.example</groupId>
    <artifactId>child1</artifactId>
    <version>1.0-SNAPSHOT</version>
</dependency>
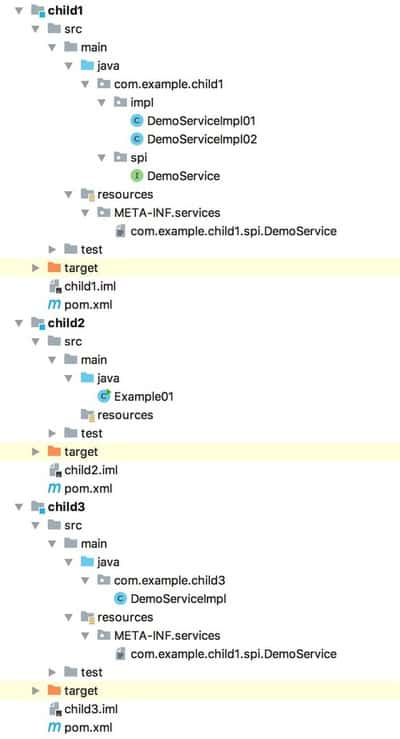
我们再增加一个module,叫child3。child3依赖child1,同时child3也实现一个DemoService。
首先在child3的pom.xml中加入对child1的依赖:
<dependency>
    <groupId>com.example</groupId>
    <artifactId>child1</artifactId>
    <version>1.0-SNAPSHOT</version>
</dependency>
然后增加一个实现类:
package com.example.child3;

import com.example.child1.spi.DemoService;

public class DemoServiceImpl implements DemoService {

    public String sayHi(String msg) {
        return "你好," + msg;
    }
}
接着在 child3/src/main/resources/META-INF/services/ 目录中创建文件 com.example.child1.spi.DemoService ,将实现类全路径写进去:
com.example.child3.DemoServiceImpl
然后针对该模块,执行 mvn install 。
child2的pom.xml中的依赖增加以下内容:
<dependency>
    <groupId>com.example</groupId>
    <artifactId>child3</artifactId>
    <version>1.0-SNAPSHOT</version>
</dependency>
执行 child2 中的 Example01 ,输出:
class: com.example.child1.impl.DemoServiceImpl01, result: Hello World
class: com.example.child1.impl.DemoServiceImpl02, result: Hi World
class: com.example.child3.DemoServiceImpl, result: 你好,World
最终的项目结构:

代码在: https://github.com/letiantian/demo/tree/master/jdk-spi/spi-demo2 。
3. 原理剖析
ServiceLoader 的代码并不多,算上注释不到600行。但它用了懒加载、迭代器,直接贴代码,我怕解释的不好。干脆写个简化版本的吧,不到60行。
在child2中增加类 CustomServiceLoader 。
import java.io.BufferedReader;
import java.io.InputStream;
import java.io.InputStreamReader;
import java.net.URL;
import java.util.ArrayList;
import java.util.Enumeration;
import java.util.List;

public class CustomServiceLoader<S> {

    private static final String PREFIX = "META-INF/services/";

    // 读取 META-INF/services/ 下文件的内容,返回由每一行内容组成的List
    private static List<String> parseConfigFile(URL configURL) throws Exception {
        InputStream in = configURL.openStream();
        BufferedReader reader = new BufferedReader(new InputStreamReader(in, "utf-8"));
        ArrayList<String> names = new ArrayList<>();
        while(true) {
            String line = reader.readLine();
            if (line != null) {
                int ci = line.indexOf('#');  // `#`字符后的内容是注释
                if (ci >= 0) line = line.substring(0, ci);
                line = line.trim();
                if (line.length()>0) {  // 空行就不要了
                    names.add(line);
                }
            } else {
                break;
            }
        }
        return names;
    }

    // 得到参数 service 的所有实现类的实例
    public static <S> List<S> load(Class<S> service) throws Exception {
        ClassLoader classLoader = Thread.currentThread().getContextClassLoader();
        String fullName = PREFIX + service.getName();

        // 符合要求的文件可能不止一个
        Enumeration<URL> configs = ClassLoader.getSystemResources(fullName);

        List<S> instanceList = new ArrayList<>();

        while(configs.hasMoreElements()) {
            URL config = configs.nextElement();
            List<String> implClassNames = parseConfigFile(config);
            for(String impl: implClassNames) {
                Class<?> cls = Class.forName(impl, false, classLoader);
                S instance = service.cast(cls.newInstance()); // 生成实例
                instanceList.add(instance);
            }
        }
        return instanceList;
    }

}
然后,我们增加一个Example02类:
import com.example.child1.spi.DemoService;
import java.util.List;

public class Example02 {

    public static void main(String[] args)  throws Exception {
        List<DemoService> serviceImplList = CustomServiceLoader.load(DemoService.class);

        for (DemoService impl: serviceImplList) {
            System.out.println(String.format("class: %s, result: %s ", impl.getClass().getName(), impl.sayHi("World")));
        }

    }
}
运行结果如下:
class: com.example.child1.impl.DemoServiceImpl01, result: Hello World
class: com.example.child1.impl.DemoServiceImpl02, result: Hi World
class: com.example.child3.DemoServiceImpl, result: 你好,World
嗯, CustomServiceLoader 写的没问题:laughing:
如果看懂了 CustomServiceLoader ,再去看 ServiceLoader ,应该会更快看明白。
相比于 CustomServiceLoader , ServiceLoader 多了两个特性:
com.example.child1.spi.DemoService
代码在: https://github.com/letiantian/demo/tree/master/jdk-spi/spi-demo3 。
4. 值得读
Java SPI思想梳理 https://zhuanlan.zhihu.com/p/28909673
Java SPI(Service Provider Interface)简介 https://blog.csdn.net/top_code/article/details/51934459


![[HBLOG]公众号](https://www.liuhaihua.cn/img/qrcode_gzh.jpg)

