SSM 框架整合实例
SSM 框架整合实例
一、实验介绍
1.1 实验内容
SSM(Spring+Spring MVC+MyBatis)是媲美于 SSH 框架的轻量级 Java EE 框架。本次项目课的场景,假设为开发一个简单的用户基本信息的管理网站,在数据库中存在的每一个用户都可以登录网站,然后在网站上进行用户的管理(增删改查)。主要目的是为了展示如何整合 SSM 框架。
1.2 实验知识点
- Spring 框架
- Spring MVC 框架
- MyBatis 框架
- MySQL
1.3 实验环境
- Tomcat 7
- JDK1.7
- Eclipse JavaEE
- Firefox浏览器
- MySQL 5.5.50
- Xfce终端
1.4 适合人群
本课程难度偏上,属于中高级课程,适合具有Java Web 和框架知识的同学学习,帮助他们更加清晰、透彻地理解和应用框架。
1.5 代码获取
你可以在Xfce终端下通过下面命令将实验的完整工程项目下载到实验楼环境中,作为参照对比进行学习。
wget http://labfile.oss.aliyuncs.com/courses/817/SSMTest.tar
二、实验原理
(1)前置课程
在开始本课程前,请同学们先学习 Spring、Spring MVC、MyBatis 三个框架的基础知识。
- 本次项目课的场景,假设为开发一个简单的用户基本信息的管理网站,在数据库中存在的每一个用户都可以登录网站,然后在网站上进行用户的管理(增删改查)。
(2)SSM 框架分析
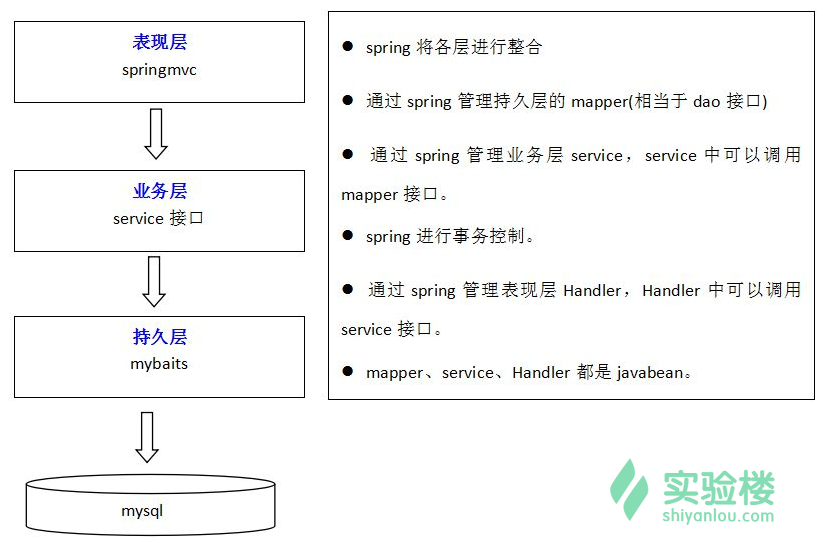
在实际项目中,我们采用 SSM 框架进行开发,Spring MVC 用于 Web 层,相当于 Controller,处理请求并作出响应;MyBatis 作为持久层的框架,可以自由的控制 SQL,更加简捷地完成数据库操作;Spring 的依赖注入可以减少代码的耦合,可以装配 Bean,另外其 AOP、事务管理尤其方便,同时,Spring 可以将各层进行整合。
三、项目文件结构

四、开发准备
本次课程 SSM 框架的版本:
- Spring 4.2.0 RELEASE
- Spring MVC 4.2.0 RELEASE
- MyBatis 3.3.0
SSM 框架整合所需的 jar 包已经放在实验楼的服务器中,请打开实验环境桌面上的 Xfce ,输入下面的代码获取:
wget http://labfile.oss.aliyuncs.com/courses/817/ssm-jars.zip
输入下面的命令解压 .zip 文件:
unzip ssm-jars.zip
五、实验步骤
5.1 数据库准备
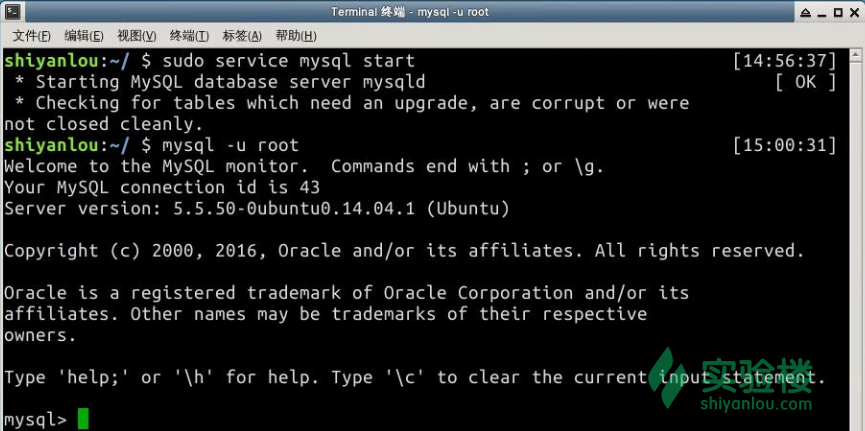
本次课程使用 MySQL 数据库。首先启动 mysql :
$ sudo service mysql start
然后在终端下输入以下命令,进入到 MySQL 数据库(-u 表示用户名,比如这里的 root,-p 表示密码,这里没有密码就省略了):
$ mysql -u root
为了实验方便,我们在这里新建一个数据库并取名 ssm
用作实验。
create database ssm;

在数据库 ssm
下创建表 user
,代码如下:
use ssm;
mysql> create table user(
    -> id int primary key auto_increment,
    -> username varchar(20),
    -> password varchar(20),
    -> sex varchar(10),
    -> age int);

我们先往 user 表插入一条测试数据:
insert into user(username,password,sex,age) value('shiyanlou','123456','male',22);

5.2 新建工程项目
首先在 Eclipse 里新建一个 Web 工程(Dynamic Web Project),命名为 SSMTest
。
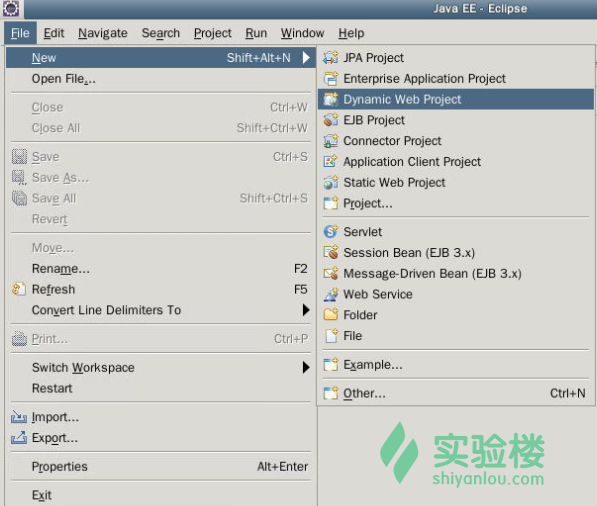
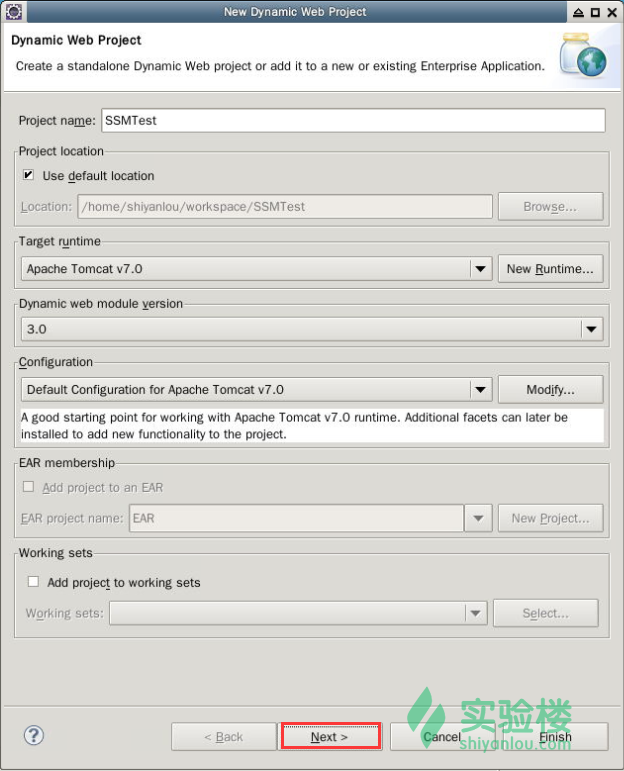
点击 Next
, 注意勾选 “自动生成 web.xml”
这个选项。
同时,将 /home/shiyanlou/ssm-jars/
路径下的全部 jar 包拷贝到项目的 WebContent/WEB-INF/lib/
目录下。导入的 jar 包包括:
- Spring 框架 jar 包
- MyBatis 框架 jar 包
- MyBatis 整合 Spring 中间件 jar 包
- aspectj 框架 jar 包
- aopalliance.jar
- 数据库驱动 jar 包
- 数据源 c3p0 jar 包
- JSTL 标签库 jar 包
- 单元测试 junit.jar
这些 jar 包在本项目中可能并没有完全用到。
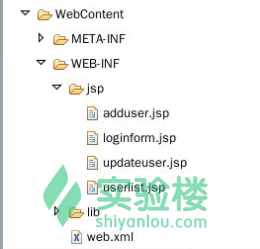
在 /Java Resources/src
下新建各层的包,如图:
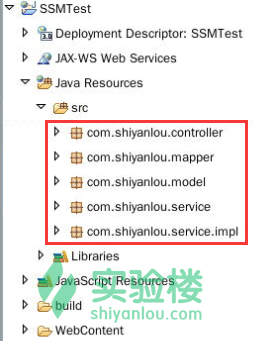
- model 下是一系列 POJO,即各种实体类
- mapper 相当于 DAO 层,由于这里采用 MyBatis,所以把它称为 Mapper,其下包括 Mapper 接口和 Mapper 配置文件,通过 SQL 语句的映射完成 CRUD 操作
- service 由一系列业务逻辑对象组成,放置各种 service 接口
- service.impl 是 service 的具体实现
- controller 由一系列控制器组成,处理用户请求并作出响应
5.3 model 层实体类 User
在包 com.shiyanlou.model
下新建类 User.java
, 一个用户具有:id、username、password、sex、age 五个属性,代码如下:
package com.shiyanlou.model;

public class User {
    private Integer id;       // 用户 id
    private String username;  // 用户名
    private String password;  // 密码
    private String sex;       // 性别
    private Integer age;      // 年龄

    public Integer getId() {
        return id;
    }

    public void setId(Integer id) {
        this.id = id;
    }

    public String getUsername() {
        return username;
    }

    public void setUsername(String username) {
        this.username = username;
    }

    public String getPassword() {
        return password;
    }

    public void setPassword(String password) {
        this.password = password;
    }

    public String getSex() {
        return sex;
    }

    public void setSex(String sex) {
        this.sex = sex;
    }

    public Integer getAge() {
        return age;
    }

    public void setAge(Integer age) {
        this.age = age;
    }

    // 重写了 toString 方法,方便后面的测试
    public String toString() {
        return "id:" + id + ",username:" + username + ",password:" + password
                + ",sex:" + sex + ",age:" + age;

    }
}
5.4 mapper(dao) 层实现
在包 com.shiyanlou.mapper
下建一个 UserMapper.java
接口文件和 UserMapper.xml
。
UserMapper 接口的代码如下:
package com.shiyanlou.mapper;

import java.util.List;

import com.shiyanlou.model.User;

public interface UserMapper {

    /**
     * 用户登录查询
     * @param user
     * @return User
     **/
    public User selectLogin(User user);

    /**
     * 查询全部用户
     * @return List<User>
     **/
    public List<User> selectAllUser();

    /**
     * 新增用户
     * @param user
     **/
    public void addUser(User user);

    /**
     * 更新用户
     * @param user
     **/
    public void updateUser(User user);

    /**
     * 删除用户
     * @param id
     **/
    public void deleteUser(Integer id);
}
UserMapper.xml 的配置如下:
<?xml version="1.0" encoding="UTF-8"?>
<!DOCTYPE mapper PUBLIC "-//mybatis.org//DTD Mapper 3.0//EN"
"http://mybatis.org/dtd/mybatis-3-mapper.dtd">
<mapper namespace="com.shiyanlou.mapper.UserMapper">
    <!-- 自定义结果集 -->
    <resultMap type="User" id="userResultMap">
        <id property="id" column="id" />
        <result property="username" column="username" />
        <result property="password" column="password" />
        <result property="sex" column="sex" />
        <result property="age" column="age" />
    </resultMap>
    <!-- 登录查询 -->
    <select id="selectLogin" parameterType="User" resultMap="userResultMap">
        select *
        from user where username=#{username} and password=#{password}
    </select>
    <!-- 查询所有用户 -->
    <select id="selectAllUser" resultMap="userResultMap">
        select * from user
    </select>
    <!-- 新增用户 -->
    <insert id="addUser" useGeneratedKeys="true" keyProperty="id">
        insert
        into user(username,password,sex,age)
        values(#{username},#{password},#{sex},#{age})
    </insert>
    <!-- 更新用户 -->
    <update id="updateUser" parameterType="User">
        update user set
        username=#{username},password=#{password},sex=#{sex},age=#{age} where
        id=#{id}
    </update>
    <!-- 删除用户 -->
    <delete id="deleteUser" parameterType="int">
        delete from user where
        id=#{id}
    </delete>

</mapper>
到这里, DAO 层的代码就写完了,接下来我们来实现 Service 层的代码。
注:MyBatis 的配置文件放在整合时在进行处理。
5.5 service 层实现
5.5.1 Service 层接口
在包 com.shiyanlou.service
下建一个 UserService.java
接口文件,添加如下代码:
package com.shiyanlou.service;

import java.util.List;
import com.shiyanlou.model.User;

public interface UserService {

    /**
     * 用户登录
     * @param user
     * @return 登录成功返回 User 对象,失败返回 null
     **/
    User login(User user);

    /**
     * 查询所有用户
     * @return 查询到的所有 User 对象的 list
     **/
    List<User> selectAllUser();

    /**
     * 新增用户
     * @param user
     **/
    void addUser(User user);

    /**
     * 更新用户
     * @param user
     **/
    void updateUser(User user);

    /**
     * 删除用户
     * @param id(用户 id)
     **/
    void deleteUser(Integer id);
}
5.5.2 Service 层接口实现类
在包 com.shiyanlou.service.impl
下建一个类 UserServiceImpl.java
,用来实现 UserService
接口中的方法,添加如下代码:
package com.shiyanlou.service.impl;

import java.util.List;

import org.springframework.beans.factory.annotation.Autowired;
import org.springframework.stereotype.Service;
import org.springframework.transaction.annotation.Transactional;

import com.shiyanlou.mapper.UserMapper;
import com.shiyanlou.model.User;
import com.shiyanlou.service.UserService;

/**
 * 将当前类注释为一个 Spring 的 bean
 **/
@Service
@Transactional
public class UserServiceImpl implements UserService{
    /**
     * 自动注入 UserMapper
     **/
    @Autowired
    public UserMapper userMapper;

    // 下面是 UserService 接口所有方法的具体实现
    @Override
    public User login(User user) {
        return userMapper.selectLogin(user);
    }
    @Override
    public List<User> selectAllUser() {
        List<User> users = userMapper.selectAllUser();
        return users;
    }
    @Override
    public void addUser(User user) {
        userMapper.addUser(user);
    }
    @Override
    public void updateUser(User user) {
        userMapper.updateUser(user);
    }
    @Override
    public void deleteUser(Integer id) {
        userMapper.deleteUser(id);
    }
}
到这里, Service 层的代码就写完了,接下来将 Spring 和 MyBatis 进行整合。
5.6 Spring 和 MyBatis 整合
5.6.1 MyBatis 配置文件
在目录 Java Resources/src
下新建 MyBatis 配置文件 mybatis-config.xml
,代码如下:
<?xml version="1.0" encoding="UTF-8"?>
<!DOCTYPE configuration PUBLIC "-//mybatis.org//DTD Config 3.0//EN"
"http://mybatis.org/dtd/mybatis-3-config.dtd">
<configuration>
    <!-- 为JavaBean起类别名 -->
    <typeAliases>
        <package name="com.shiyanlou.model" />
    </typeAliases>
    <!-- 通过 mapper 接口包加载整个包的映射文件 -->
    <mappers>
        <package name="com/shiyanlou/mapper" />
    </mappers>
</configuration>
注:在这里,我们没有配置 MyBatis 的运行环境、数据源等,那是因为我们要将这些交给 Spring 进行配置管理。
5.6.2 applicationContext.xml
在目录 Java Resources/src
下新建文件 applicationContext.xml
,该文件用来完成 Spring 和 MyBatis 的整合,主要包括了自动扫描,自动注入,配置数据库等,内容如下:
<?xml version="1.0" encoding="UTF-8"?>
<beans xmlns="http://www.springframework.org/schema/beans"
    xmlns:xsi="http://www.w3.org/2001/XMLSchema-instance" xmlns:p="http://www.springframework.org/schema/p"
    xmlns:context="http://www.springframework.org/schema/context" xmlns:tx="http://www.springframework.org/schema/tx"
    xsi:schemaLocation="
          http://www.springframework.org/schema/beans
          http://www.springframework.org/schema/beans/spring-beans-4.2.xsd
          http://www.springframework.org/schema/context
          http://www.springframework.org/schema/context/spring-context-4.2.xsd
          http://www.springframework.org/schema/tx
          http://www.springframework.org/schema/tx/spring-tx-4.1.xsd">

    <!-- 自动扫描有 Spring 相关注解的类,并把这些类注册为 bean -->
    <context:component-scan base-package="com.shiyanlou" />
    <!-- 配置数据源 -->
    <bean id="dataSource"
        class="org.springframework.jdbc.datasource.DriverManagerDataSource">
        <property name="driverClassName" value="com.mysql.jdbc.Driver" />
        <property name="url" value="jdbc:mysql://localhost:3306/ssm" />
        <property name="username" value="root" />
        <property name="password" value="" />
    </bean>
    <!-- MyBatis 的 SqlSession 的工厂,并引用数据源,扫描 MyBatis 的配置文件 -->
    <bean id="sqlSessionFactory" class="org.mybatis.spring.SqlSessionFactoryBean">
        <property name="dataSource" ref="dataSource"></property>
        <property name="configLocation" value="classpath:mybatis-config.xml" />
    </bean>

    <!-- MyBatis 自动扫描加载 Sql 映射文件/接口 -->
    <bean class="org.mybatis.spring.mapper.MapperScannerConfigurer">
        <property name="basePackage" value="com.shiyanlou.mapper"></property>
        <property name="sqlSessionFactory" ref="sqlSessionFactory"></property>
    </bean>
    <!-- JDBC 事务管理器 -->
    <bean id="txManager"
        class="org.springframework.jdbc.datasource.DataSourceTransactionManager">
        <property name="dataSource" ref="dataSource"></property>
    </bean>
    <!-- 启用支持 annotation 注解方式事务管理 -->
    <tx:annotation-driven transaction-manager="txManager" />

</beans>
在这里,我们将数据源配置信息写死在 applicationContext.xml 中的,也可以新建 jdbc.properties 文件,然后进行引入。
5.6.3 log4j.properties 配置日志
在目录 Java Resources/src
下新建日志文件 log4j.properties ,在里面添加如下内容:
# Global logging configuration
log4j.rootLogger=DEBUG, stdout
# Console output...
log4j.appender.stdout=org.apache.log4j.ConsoleAppender
log4j.appender.stdout.layout=org.apache.log4j.PatternLayout
log4j.appender.stdout.layout.ConversionPattern=%5p [%t] - %m%n
到这里,Spring 和 MyBatis 就整合完成,下面我们通过一个测试类测试整合是否成功。
5.7 Spring、MyBatis 整合测试
在目录 Java Resources/src
下新建包 com.shiyanlou.test
,并在包中新建测试类 SpringMybatisTest,添加如下代码:
package com.shiyanlou.test;

import java.util.List;

import org.junit.Test;
import org.junit.runner.RunWith;
import org.springframework.beans.factory.annotation.Autowired;
import org.springframework.test.context.ContextConfiguration;
import org.springframework.test.context.junit4.SpringJUnit4ClassRunner;

import com.shiyanlou.model.User;
import com.shiyanlou.service.UserService;

/**
 * 配置spring和junit整合,junit启动时加载springIOC容器 spring-test,junit
 **/
@RunWith(SpringJUnit4ClassRunner.class)
// 告诉junit spring配置文件
@ContextConfiguration({ "classpath:applicationContext.xml" })
public class SpringMybatisTest {
    @Autowired
    private UserService userService;

/*    @Autowired
    private User user;*/

/*    @Test
    public void testLogin() {
        //User user = new User();
        user.setUsername("shiyanlou");
        user.setPassword("123456");
        System.out.println(userService.login(user).toString());

    }*/

    @Test
    public void testSelectAllUser() {
        List<User> users = userService.selectAllUser();
        for (User us : users) {
            System.out.println(us.toString());
        }
    }

/*    @Test
    public void testAdd() {
        //User user = new User();
        user.setUsername("user2");
        user.setPassword("123456");
        user.setSex("female");
        user.setAge(25);
        userService.addUser(user);
    }

    @Test
    public void testUpdate() {
        //User user = new User();
        user.setId(3);
        user.setUsername("user2");
        user.setPassword("123");
        user.setSex("female");
        user.setAge(30);
        userService.updateUser(user);
    }

    @Test
    public void testUpdate() {
        int id = 3;
        userService.deleteUser(id);
    }*/

}
在这里,我们采用 Junit 进行单元测试,分别测试五个方法,这里只演示 查询所有用户 testSelectAllUser()
方法,结果如下:
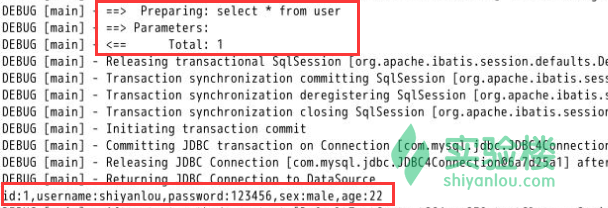
我们 user 表中只有一条数据,可以看到 Spring 和 MyBatis 已经整合成功。
如果想要在测试类中注入 User 对象,需要做两点:
- 在测试类中添加代码
@Autowired
private User user;
-
在 model 层的 User 类中添加
@Component注解
@Component
public class User {
    private Integer id;
    private String username;
    private String password;
    private String sex;
    private Integer age;
    ......
}
注:但是一般实体类的对象不进行注入,而是由外部传入,这里是为了方便测试。
整合完 Spring 和 MyBatis 后,我们要完成 Spring MVC 的整合。
5.8 Controller 层实现
在包 com.shiyanlou.controller
下建一个 Controller 类 UserController.java
,代码如下:
package com.shiyanlou.controller;

import java.util.List;

import javax.servlet.http.HttpServletRequest;
import javax.servlet.http.HttpSession;

import org.apache.ibatis.annotations.Param;
import org.springframework.beans.factory.annotation.Autowired;
import org.springframework.stereotype.Controller;
import org.springframework.ui.Model;
import org.springframework.web.bind.annotation.RequestMapping;

import com.shiyanlou.model.User;
import com.shiyanlou.service.UserService;

/**
 * 处理用户请求 Controller
 **/
@Controller
public class UserController {

    /**
      * 自动注入 UserService
      **/
    @Autowired
    private UserService userService;

    // 登录
    @RequestMapping("/login")
    public String login(User user, Model model, HttpSession session) {
        User loginUser = userService.login(user);
        if (loginUser != null) {
            session.setAttribute("user", loginUser);
            return "redirect:alluser";
        } else {
            model.addAttribute("message", "username or password is wrong!");
            return "loginform";
        }
    }

    // 退出
    @RequestMapping(value = "/loginout")
    public String loginout(HttpSession session) {
        session.invalidate();
        return "loginform";
    }

    // 查询所有用户
    @RequestMapping("/alluser")
    public String selectAllUser(HttpServletRequest request) {
        List<User> listUser = userService.selectAllUser();
        request.setAttribute("listUser", listUser);
        return "userlist";
    }

    // 跳转至新增用户页面
    @RequestMapping("/toadduser")
    public String toAddUserPage() {
        return "adduser";
    }

    // 新增用户
    @RequestMapping("/adduser")
    public String addUser(User user, HttpServletRequest request) {
        userService.addUser(user);
        List<User> listUser = userService.selectAllUser();
        request.setAttribute("listUser", listUser);
        return "userlist";
    }

    // 跳转至更新用户页面
    @RequestMapping("/toupdateuser")
    public String toUpdateUser(@Param("id") Integer id,
            HttpServletRequest request, Model model) {
        model.addAttribute("user_id", id);
        return "updateuser";
    }

    // 更新用户
    @RequestMapping("/updateuser")
    public String updateUser(User user, HttpServletRequest request) {
        userService.updateUser(user);
        List<User> listUser = userService.selectAllUser();
        request.setAttribute("listUser", listUser);
        return "userlist";
    }

    // 删除用户
    @RequestMapping("/deleteuser")
    public String deleteUser(@Param("id") Integer id, HttpServletRequest request) {
        userService.deleteUser(id);
        List<User> listUser = userService.selectAllUser();
        request.setAttribute("listUser", listUser);
        return "userlist";
    }
}
5.9 JSP 页面
5.9.1 loginform.jsp
在 WebContent/WEB-INF
目录下新建文件夹 jsp
,并在该路径下新建一个 JSP 页面命名为 loginform.jsp,作为登录页面,代码如下:
<%@ page language="java" contentType="text/html; charset=UTF-8"
    pageEncoding="UTF-8"%>
<!DOCTYPE html PUBLIC "-//W3C//DTD HTML 4.01 Transitional//EN" "http://www.w3.org/TR/html4/loose.dtd">
<html>
<head>
<meta http-equiv="Content-Type" content="text/html; charset=UTF-8">
<title>Login Page</title>
</head>
<body>
    <h4>Login Page</h4>
    <form action="login" method="post">
        <font color="red">${requestScope.message}</font>
        <table>
            <tr>
                <td><label>username:</label></td>
                <td><input type="text" id="username" name="username" />
            </tr>
            <tr>
                <td><label>password:</label></td>
                <td><input type="password" id="password" name="password" />
            </tr>
            <tr>
                <td><input type="submit" value="login" />
            </tr>
        </table>
    </form>
</body>
</html>
5.9.2 userlist.jsp
在 WebContent/WEB-INF/jsp
目录下新建一个 JSP 页面命名为 userlist.jsp,作为主页面,代码如下:
<%@ page language="java" import="java.util.*" pageEncoding="utf-8"%>
<%@ taglib uri="http://java.sun.com/jsp/jstl/core" prefix="c"%>
<!DOCTYPE HTML PUBLIC "-//W3C//DTD HTML 4.01 Transitional//EN">
<html>
<head>
<title>ssm</title>
<style type="text/css">
td {
    text-align: center;
    width: 100px;
}
</style>
</head>

<body>
    <div align="right">
        Welcome,[<font color=red>${sessionScope.user.username}</font>] | <a
            href="loginout">Exit</a>
    </div>
    <br>
    <center>
        <table border="1">
            <tbody>
                <tr>
                    <th>id</th>
                    <th>username</th>
                    <th>password</th>
                    <th>sex</th>
                    <th>age</th>
                    <th colspan="2" style="">Options</th>
                </tr>
                <c:if test="${!empty listUser }">
                    <c:forEach items="${listUser}" var="user">
                        <tr>
                            <td>${user.id}</td>
                            <td>${user.username}</td>
                            <td>${user.password}</td>
                            <td>${user.sex}</td>
                            <td>${user.age}</td>
                            <td><a href="toupdateuser?id=${user.id}">modify</a></td>
                            <td><a href="deleteuser?id=${user.id}">delete</a></td>
                        </tr>
                    </c:forEach>
                </c:if>
            </tbody>
        </table>
        <br>
        <a href="toadduser">Add a new user</a>
    </center>
</body>
</html>
5.9.3 adduser.jsp
在 WebContent/WEB-INF/jsp
目录下新建一个 JSP 页面命名为 adduser.jsp,作为新增用户页面,代码如下:
<%@ page language="java" contentType="text/html; charset=UTF-8"
    pageEncoding="UTF-8"%>
<!DOCTYPE html PUBLIC "-//W3C//DTD HTML 4.01 Transitional//EN" "http://www.w3.org/TR/html4/loose.dtd">
<html>
<head>
<meta http-equiv="Content-Type" content="text/html; charset=UTF-8">
<title>Add Page</title>
</head>
<body>
    <h4>AddUser Page</h4>
    <form action="adduser" method="post">
        <table>
            <tr>
                <td><label>username:</label></td>
                <td><input type="text" id="username" name="username" />
            </tr>
            <tr>
                <td><label>password:</label></td>
                <td><input type="password" id="password" name="password" />
            </tr>
            <tr>
                <td><label>sex:</label></td>
                <td><input type="text" id="sex" name="sex" />
            </tr>
            <tr>
                <td><label>age:</label></td>
                <td><input type="text" id="age" name="age" />
            </tr>
            <tr>
                <td><input type="submit" value="add" />
            </tr>
        </table>
    </form>
</body>
</html>
5.9.4 updateuser.jsp
在 WebContent/WEB-INF/jsp
目录下新建一个 JSP 页面命名为 updateuser.jsp,作为更新用户页面,代码如下:
<%@ page language="java" contentType="text/html; charset=UTF-8"
    pageEncoding="UTF-8"%>
<!DOCTYPE html PUBLIC "-//W3C//DTD HTML 4.01 Transitional//EN" "http://www.w3.org/TR/html4/loose.dtd">
<html>
<head>
<meta http-equiv="Content-Type" content="text/html; charset=UTF-8">
<title>Modify Page</title>
</head>
<body>
    <h4>Modify Page</h4>
    <form action="updateuser" method="post">
        <table>
            <tr>
                <td><label>id:</label></td>
                <td><input type="text" id="id" name="id" value="${user_id}" readonly="readonly"/>
            </tr>
            <tr>
                <td><label>username:</label></td>
                <td><input type="text" id="username" name="username" />
            </tr>
            <tr>
                <td><label>password:</label></td>
                <td><input type="password" id="password" name="password" />
            </tr>
            <tr>
                <td><label>sex:</label></td>
                <td><input type="text" id="sex" name="sex" />
            </tr>
            <tr>
                <td><label>age:</label></td>
                <td><input type="text" id="age" name="age" />
            </tr>
            <tr>
                <td><input type="submit" value="modify" />
            </tr>
        </table>
    </form>
</body>
</html>
5.10 配置 spring-mvc.xml 文件
在目录 Java Resources/src
下新建 Spring MVC 配置文件 spring-mvc.xml
,代码如下:
<?xml version="1.0" encoding="UTF-8"?>
<beans xmlns="http://www.springframework.org/schema/beans"
    xmlns:xsi="http://www.w3.org/2001/XMLSchema-instance" xmlns:context="http://www.springframework.org/schema/context"
    xmlns:mvc="http://www.springframework.org/schema/mvc"
    xsi:schemaLocation="http://www.springframework.org/schema/beans
      http://www.springframework.org/schema/beans/spring-beans.xsd
      http://www.springframework.org/schema/context
      http://www.springframework.org/schema/context/spring-context-4.2.xsd
      http://www.springframework.org/schema/mvc
     http://www.springframework.org/schema/mvc/spring-mvc-4.2.xsd">

    <!-- 自动扫描该包,Spring MVC 会将包下用 @Controller 注解的类注册为 Spring 的 controller -->
    <context:component-scan base-package="com.shiyanlou.controller" />
    <!-- 设置默认配置方案 -->
    <mvc:annotation-driven />
    <!-- 视图解析器 -->
    <bean id="viewResolver"
        class="org.springframework.web.servlet.view.InternalResourceViewResolver">
        <property name="prefix" value="/WEB-INF/jsp/" />
        <property name="suffix" value=".jsp" />
    </bean>
</beans>
5.11 配置 web.xml 文件
现在我们来到整合的最后一步,配置 web.xml 文件,代码如下:
<?xml version="1.0" encoding="UTF-8"?>
<web-app xmlns:xsi="http://www.w3.org/2001/XMLSchema-instance"
    xmlns="http://java.sun.com/xml/ns/javaee" xmlns:web="http://java.sun.com/xml/ns/javaee/web-app_2_5.xsd"
    xsi:schemaLocation="http://java.sun.com/xml/ns/javaee http://java.sun.com/xml/ns/javaee/web-app_3_0.xsd"
    id="WebApp_ID" version="3.0">
    <display-name>SSMTest</display-name>

    <!-- 配置 Spring 核心监听器 -->
    <listener>
        <listener-class>org.springframework.web.context.ContextLoaderListener</listener-class>
    </listener>

    <!-- 指定 Spring 的配置文件 -->
    <context-param>
        <param-name>contextConfigLocation</param-name>
        <param-value>classpath:applicationContext.xml</param-value>
    </context-param>

    <!-- 定义 Spring MVC 前端控制器 -->
    <servlet>
        <servlet-name>springMVC</servlet-name>
        <servlet-class>org.springframework.web.servlet.DispatcherServlet</servlet-class>

        <init-param>
            <param-name>contextConfigLocation</param-name>
            <param-value>classpath:spring-mvc.xml</param-value>
        </init-param>
        <load-on-startup>1</load-on-startup>
    </servlet>

    <!-- 为 DispatcherServlet 建立映射 -->
    <servlet-mapping>
        <servlet-name>springMVC</servlet-name>
        <url-pattern>/</url-pattern>
    </servlet-mapping>
    <listener>
        <listener-class>org.springframework.web.util.IntrospectorCleanupListener</listener-class>
    </listener>

    <!-- 编码过滤器 -->
    <filter>
        <filter-name>encodingFilter</filter-name>
        <filter-class>org.springframework.web.filter.CharacterEncodingFilter</filter-class>
        <init-param>
            <param-name>encoding</param-name>
            <param-value>UTF-8</param-value>
        </init-param>
        <init-param>
            <param-name>forceEncoding</param-name>
            <param-value>true</param-value>
        </init-param>
    </filter>

    <filter-mapping>
        <filter-name>encodingFilter</filter-name>
        <url-pattern>/*</url-pattern>
    </filter-mapping>

    <!-- 设置首页 -->
    <welcome-file-list>
        <welcome-file>/WEB-INF/jsp/loginform.jsp</welcome-file>
    </welcome-file-list>
</web-app>
到这里,SSM 框架就全部整合完毕,接下来我们要进行测试。
5.12 运行测试
注:由于在线环境的资源问题,这里启动 tomcat 比较慢,需要大家耐心等待几分钟。如果遇到 Tomcat 启动超时的问题,请按照下图的方法延长 Tomcat 的启动时间。
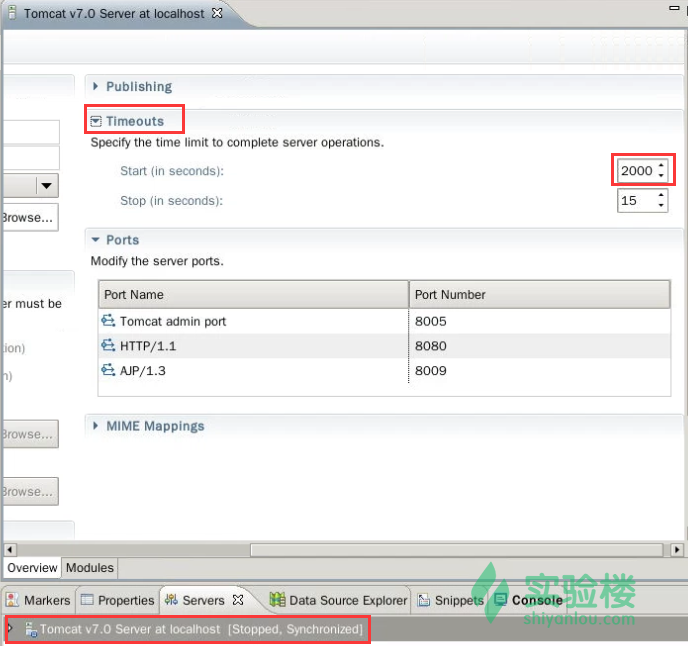
右击 SSMTest 工程,Run As->Run on Server,保持默认选项不变,点击 Finish。
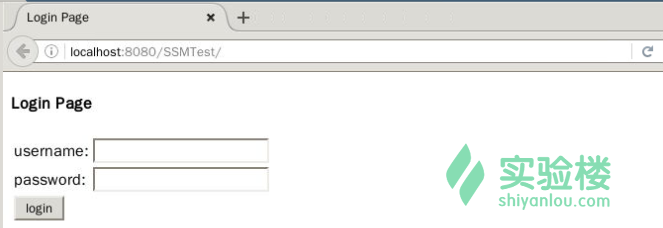
输入错误的用户名或密码(我们最开始的数据是 username:shiyanlou,password:123456 )。
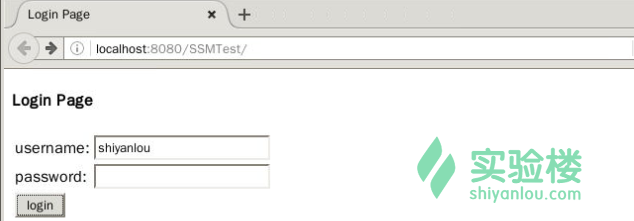
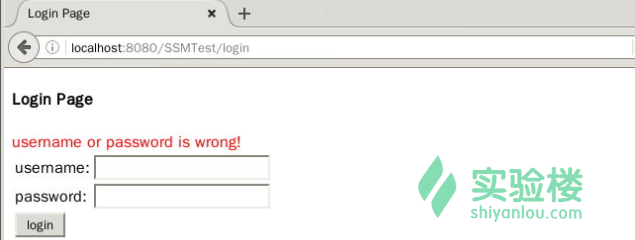
当用户名和密码都正确的时候进入首页。

在这里一共只有一条数据。
点击下面的 Add a new user
链接,进入新增用户页面,并填写新增用户的信息。
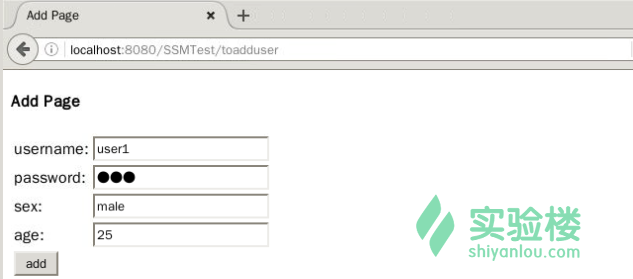
点击 add
按钮,完整用户的新增操作,可以看到用户新增成功。

点击 id 为 2
的用户记录行的 modify
链接,进入更新用户页面,并填写更新信息。
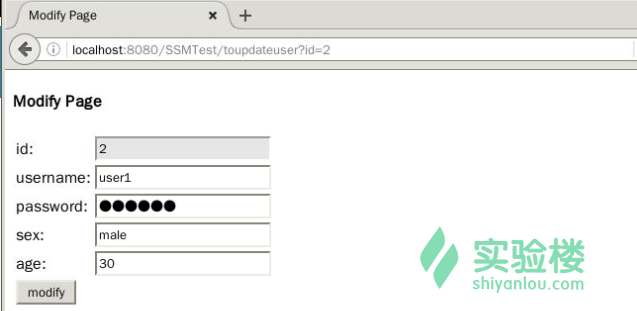
点击 modify
按钮,完整用户的更新操作,可以看到用户信息更新成功。

点击 id 为 2
的用户记录行的 delete
链接,删除该用户。

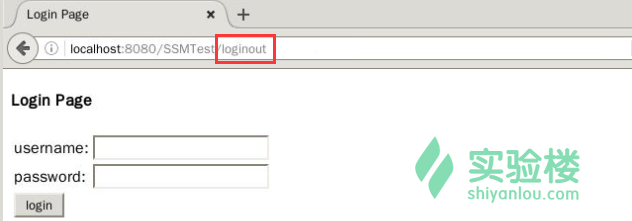
点击右上角的 Exit
链接,退出主页到登录页面。
六、实验总结
本次项目课通过一个简单的基于 SSM 框架的用户基本信息管理的网站, 让同学们学习如何整合 SSM 框架,希望同学们能够熟练的在实际项目中运用。
七、参考链接
- 《Spring+MyBatis 企业应用实战》
- SSM框架入门和搭建 十部曲
- 手把手教你整合最优雅SSM框架:SpringMVC + Spring + MyBatis
- 本文标签: Action 自动生成 JDBC zip tab js UI 注释 key C3P0 删除 sqlsession session update classpath https 配置 时间 XML 企业 http Property mapper bug ssh 测试 ip map 代码 实例 总结 W3C message SqlSessionFactory id java 服务器 tomcat sql 管理 Select 开发 core 监听器 ORM 希望 spring root servlet 网站 NSA 解析 mybatis src Logging ioc iBATIS junit 目录 web cat CSS HTML SpringMVC lib 下载 bean AOP 单元测试 mysql apache eclipse 数据库 IDE App list schema ACE Service IO springioc wget db tar 数据 CTO value dataSource Word
- 版权声明: 本文为互联网转载文章,出处已在文章中说明(部分除外)。如果侵权,请联系本站长删除,谢谢。
- 本文海报: 生成海报一 生成海报二


![[HBLOG]公众号](https://www.liuhaihua.cn/img/qrcode_gzh.jpg)

