Guava 源码分析(Cache 原理【二阶段】)
在上文「 Guava 源码分析(Cache 原理) 」中分析了 Guava Cache 的相关原理。
文末提到了 回收机制、移除时间通知 等内容,许多朋友也挺感兴趣,这次就这两个内容再来分析分析。
在开始之前先补习下 Java 自带的两个特性,Guava 中都有具体的应用。
Java 中的引用
首先是 Java 中的 引用 。
在之前分享过 JVM 是根据 可达性分析算法 找出需要回收的对象,判断对象的存活状态都和 引用 有关。
在 JDK1.2 之前这点设计的非常简单:一个对象的状态只有 引用 和 没被引用 两种区别。
这样的划分对垃圾回收不是很友好,因为总有一些对象的状态处于这两之间。
因此 1.2 之后新增了四种状态用于更细粒度的划分引用关系:
A a = new A();
事件回调
事件回调其实是一种常见的设计模式,比如之前讲过的Netty 就使用了这样的设计。
这里采用一个 demo,试下如下功能:
- Caller 向 Notifier 提问。
- 提问方式是异步,接着做其他事情。
- Notifier 收到问题执行计算然后回调 Caller 告知结果。
在 Java 中利用接口来实现回调,所以需要定义一个接口:
public interface CallBackListener {

    /**
     * 回调通知函数
     * @param msg
     */
    void callBackNotify(String msg) ;
}
复制代码
Caller 中调用 Notifier 执行提问,调用时将接口传递过去:
public class Caller {

    private final static Logger LOGGER = LoggerFactory.getLogger(Caller.class);

    private CallBackListener callBackListener ;

    private Notifier notifier ;

    private String question ;

    /**
     * 使用
     */
    public void call(){

        LOGGER.info("开始提问");

		//新建线程,达到异步效果
        new Thread(new Runnable() {
            @Override
            public void run() {
                try {
                    notifier.execute(Caller.this,question);
                } catch (InterruptedException e) {
                    e.printStackTrace();
                }
            }
        }).start();

        LOGGER.info("提问完毕,我去干其他事了");
    }

    //隐藏 getter/setter

}
复制代码
Notifier 收到提问,执行计算(耗时操作),最后做出响应(回调接口,告诉 Caller 结果)。
public class Notifier {

    private final static Logger LOGGER = LoggerFactory.getLogger(Notifier.class);

    public void execute(Caller caller, String msg) throws InterruptedException {
        LOGGER.info("收到消息=【{}】", msg);

        LOGGER.info("等待响应中。。。。。");
        TimeUnit.SECONDS.sleep(2);


        caller.getCallBackListener().callBackNotify("我在北京!");

    }

}
复制代码
模拟执行:
public static void main(String[] args) {
        Notifier notifier = new Notifier() ;

        Caller caller = new Caller() ;
        caller.setNotifier(notifier) ;
        caller.setQuestion("你在哪儿!");
        caller.setCallBackListener(new CallBackListener() {
            @Override
            public void callBackNotify(String msg) {
                LOGGER.info("回复=【{}】" ,msg);
            }
        });

        caller.call();
    }
复制代码
最后执行结果:
2018-07-15 19:52:11.105 [main] INFO  c.crossoverjie.guava.callback.Caller - 开始提问
2018-07-15 19:52:11.118 [main] INFO  c.crossoverjie.guava.callback.Caller - 提问完毕,我去干其他事了
2018-07-15 19:52:11.117 [Thread-0] INFO  c.c.guava.callback.Notifier - 收到消息=【你在哪儿!】
2018-07-15 19:52:11.121 [Thread-0] INFO  c.c.guava.callback.Notifier - 等待响应中。。。。。
2018-07-15 19:52:13.124 [Thread-0] INFO  com.crossoverjie.guava.callback.Main - 回复=【我在北京!】
复制代码
这样一个模拟的异步事件回调就完成了。
Guava 的用法
Guava 就是利用了上文的两个特性来实现了 引用回收 及 移除通知 。
引用
可以在初始化缓存时利用:
- CacheBuilder.weakKeys()
- CacheBuilder.weakValues()
- CacheBuilder.softValues()
来自定义键和值的引用关系。

在上文的分析中可以看出 Cache 中的 ReferenceEntry 是类似于 HashMap 的 Entry 存放数据的。
来看看 ReferenceEntry 的定义:
interface ReferenceEntry<K, V> {
    /**
     * Returns the value reference from this entry.
     */
    ValueReference<K, V> getValueReference();

    /**
     * Sets the value reference for this entry.
     */
    void setValueReference(ValueReference<K, V> valueReference);

    /**
     * Returns the next entry in the chain.
     */
    @Nullable
    ReferenceEntry<K, V> getNext();

    /**
     * Returns the entry's hash.
     */
    int getHash();

    /**
     * Returns the key for this entry.
     */
    @Nullable
    K getKey();

    /*
     * Used by entries that use access order. Access entries are maintained in a doubly-linked list.
     * New entries are added at the tail of the list at write time; stale entries are expired from
     * the head of the list.
     */

    /**
     * Returns the time that this entry was last accessed, in ns.
     */
    long getAccessTime();

    /**
     * Sets the entry access time in ns.
     */
    void setAccessTime(long time);
}
复制代码
包含了很多常用的操作,如值引用、键引用、访问时间等。
根据 ValueReference<K, V> getValueReference(); 的实现:

具有强引用和弱引用的不同实现。
key 也是相同的道理:

当使用这样的构造方式时,弱引用的 key 和 value 都会被垃圾回收。
当然我们也可以显式的回收:
/**
   * Discards any cached value for key {@code key}.
   * 单个回收
   */
  void invalidate(Object key);

  /**
   * Discards any cached values for keys {@code keys}.
   *
   * @since 11.0
   */
  void invalidateAll(Iterable<?> keys);

  /**
   * Discards all entries in the cache.
   */
  void invalidateAll();
复制代码
回调
改造了之前的例子:
loadingCache = CacheBuilder.newBuilder()
        .expireAfterWrite(2, TimeUnit.SECONDS)
        .removalListener(new RemovalListener<Object, Object>() {
            @Override
            public void onRemoval(RemovalNotification<Object, Object> notification) {
                LOGGER.info("删除原因={},删除 key={},删除 value={}",notification.getCause(),notification.getKey(),notification.getValue());
            }
        })
        .build(new CacheLoader<Integer, AtomicLong>() {
            @Override
            public AtomicLong load(Integer key) throws Exception {
                return new AtomicLong(0);
            }
        });
复制代码
执行结果:
2018-07-15 20:41:07.433 [main] INFO  c.crossoverjie.guava.CacheLoaderTest - 当前缓存值=0,缓存大小=1
2018-07-15 20:41:07.442 [main] INFO  c.crossoverjie.guava.CacheLoaderTest - 缓存的所有内容={1000=0}
2018-07-15 20:41:07.443 [main] INFO  c.crossoverjie.guava.CacheLoaderTest - job running times=10
2018-07-15 20:41:10.461 [main] INFO  c.crossoverjie.guava.CacheLoaderTest - 删除原因=EXPIRED,删除 key=1000,删除 value=1
2018-07-15 20:41:10.462 [main] INFO  c.crossoverjie.guava.CacheLoaderTest - 当前缓存值=0,缓存大小=1
2018-07-15 20:41:10.462 [main] INFO  c.crossoverjie.guava.CacheLoaderTest - 缓存的所有内容={1000=0}
复制代码
可以看出当缓存被删除的时候会回调我们自定义的函数,并告知删除原因。
那么 Guava 是如何实现的呢?

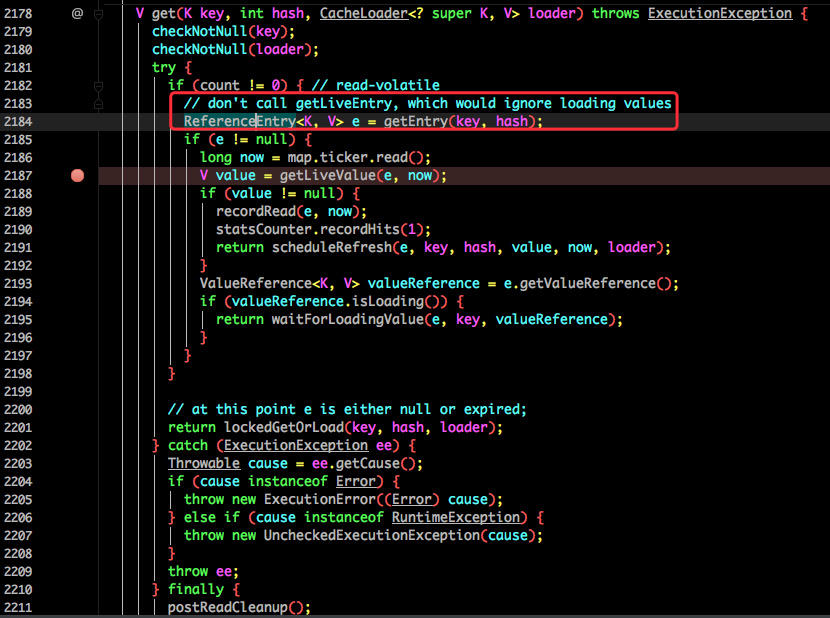
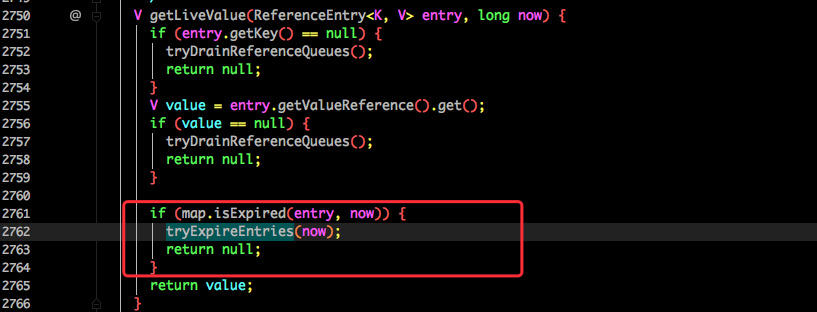
根据 LocalCache 中的 getLiveValue() 中判断缓存过期时,跟着这里的调用关系就会一直跟到:

removeValueFromChain() 中的:

enqueueNotification() 方法会将回收的缓存(包含了 key,value)以及回收原因包装成之前定义的事件接口加入到一个 本地队列 中。

这样一看也没有回调我们初始化时候的事件啊。
不过用过队列的同学应该能猜出,既然这里写入队列,那就肯定就有消费。
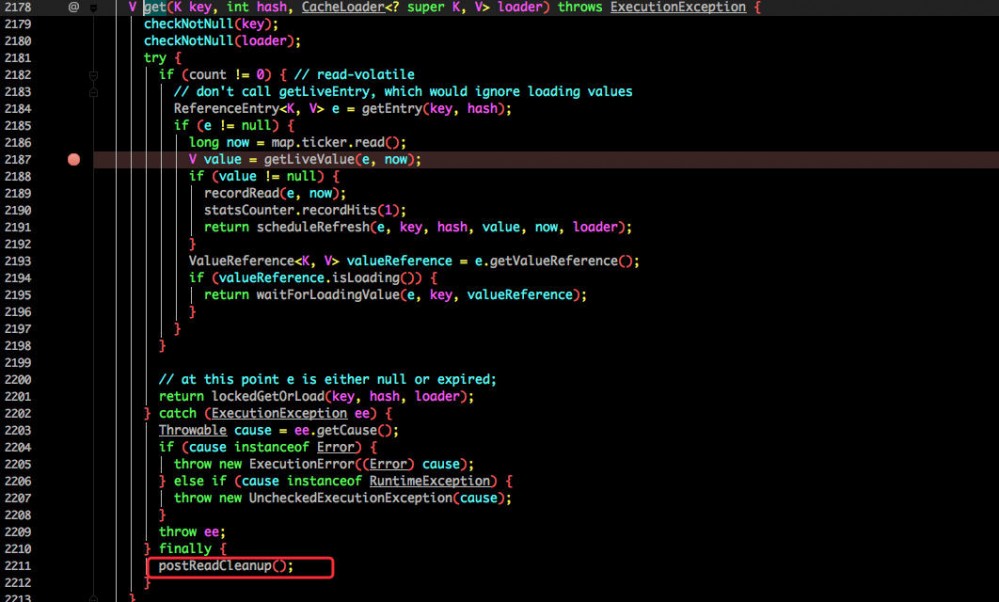
我们回到获取缓存的地方:

在 finally 中执行了 postReadCleanup() 方法;其实在这里面就是对刚才的队列进行了消费:

一直跟进来就会发现这里消费了队列,将之前包装好的移除消息调用了我们自定义的事件,这样就完成了一次事件回调。
总结
以上所有源码:
github.com/crossoverJi…
通过分析 Guava 的源码可以让我们学习到顶级的设计及实现方式,甚至自己也能尝试编写。
Guava 里还有很多强大的增强实现,值得我们再好好研究。


![[HBLOG]公众号](https://www.liuhaihua.cn/img/qrcode_gzh.jpg)

