结合Spring发送邮件的四种正确姿势,你知道几种?
测试使用的环境是企业主流的SSM 框架即 SpringMVC+Spring+Mybatis。为了节省时间,我直接使用的是我上次的“ SSM项目中整合Echarts开发 ”该项目已经搭建完成的SSM环境。
标题说的四种姿势指的是哪四种姿势?
- 发送text格式的邮件
- 发送HTML格式的邮件
- 基于FreeMarker模板引擎发送邮件
- 基于Velocity模板引擎发送邮件
如何获取以及运行我的Demo
Github地址: github.com/Snailclimb/… 。
你可以选择直接下载或者直接在DOS窗口运行: git clone https://github.com/Snailclimb/J2ee-Advanced.git 命令,这样项目就被拷贝到你的电脑了。

然后选择导入Maven项目即可(不懂Maven的可以自行百度学习).
二 准备工作
既然要发送邮件,那么你首先要提供一个能在第三方软件上发送邮件功能的账号。在这里,我选择的网易邮箱账号。
我拿网易邮箱账号举例子,那么我们如何才能让你的邮箱账号可以利用第三方发送邮件(这里的第三方就是我们即将编写的程序)。
大家应该清楚:客户端和后台交互数据的时候用到了Http协议,那么相应的,邮箱传输也有自己的一套协议,如SMTP,POP3,IMAP。
开启POP3/SMTP/IMAP服务
所以,我们第一步首先要去开启这些服务,如下图所示:
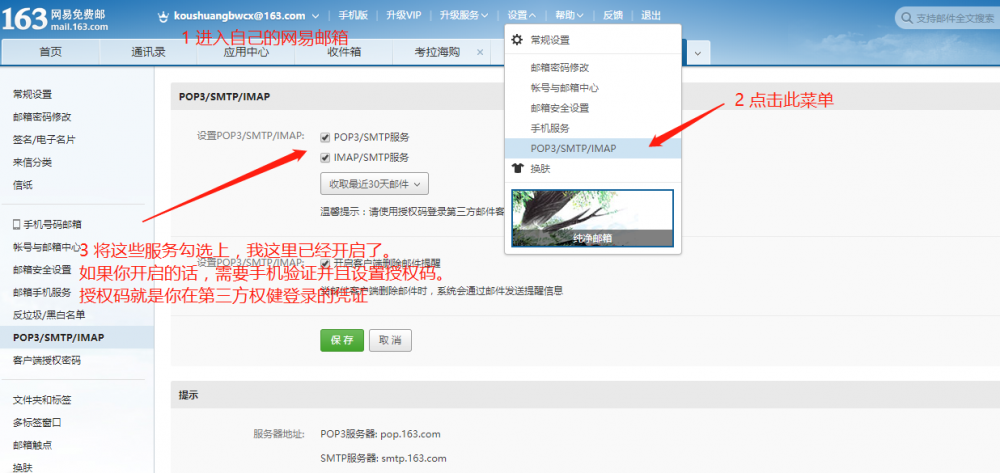
如果你未开启该服务的话,运行程序会报如下错误(配置文件中配置的密码是你的授权码而不是你登录邮箱的密码,授权码是你第三方登录的凭证):
HTTP Status 500 - Request processing failed; nested exception is org.springframework.mail.MailAuthenticationException: Authentication failed; nested exception is javax.mail.AuthenticationFailedException: 550 User has no permission
复制代码
JavaMail介绍
我们需要用到的发邮件的核心jar包,所以这里好好介绍一下。
JavaMail是由Sun定义的一套收发电子邮件的API,不同的厂商可以提供自己的实现类。但它并没有包含在JDK中,而是作为JavaEE的一部分。厂商所提供的JavaMail服务程序可以有选择地实现某些邮件协议,常见的邮件协议包括:
- SMTP:简单邮件传输协议,用于发送电子邮件的传输协议;
- POP3:用于接收电子邮件的标准协议;
- IMAP:互联网消息协议,是POP3的替代协议。
这三种协议都有对应SSL加密传输的协议,分别是SMTPS,POP3S和IMAPS。
我们如果要使用JavaMail的话,需要自己引用相应的jar包,如下图所示:
<dependency>
			<groupId>javax.mail</groupId>
			<artifactId>mail</artifactId>
			<version>1.4.7</version>
		</dependency>
复制代码
相关配置文件
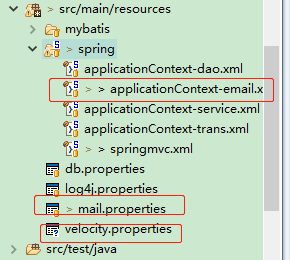
下图是除了pom.xml之外用到的其他所有配置文件
pom.xml
需要用到的jar包。
<!--spring支持-->
        <dependency>
              <groupId>org.springframework</groupId>
              <artifactId>spring-context-support</artifactId>
              <version>5.0.0.RELEASE</version>
        </dependency>
		<!-- 发送邮件 -->
		<dependency>
			<groupId>javax.mail</groupId>
			<artifactId>mail</artifactId>
			<version>1.4.7</version>
		</dependency>
		<!-- Freemarker -->
		<dependency>
			<groupId>org.freemarker</groupId>
			<artifactId>freemarker</artifactId>
			<version>2.3.23</version>
		</dependency>
		<!-- velocity模板引擎 -->
		<dependency>
			<groupId>org.apache.velocity</groupId>
			<artifactId>velocity</artifactId>
			<version>1.7</version>
		</dependency>
		<dependency>
			<groupId>org.apache.velocity</groupId>
			<artifactId>velocity-tools</artifactId>
			<version>2.0</version>
		</dependency>
复制代码
mail.properties
#服务器主机名
mail.smtp.host=smtp.163.com
#你的邮箱地址
mail.smtp.username=koushuangbwcx@163.com
#你的授权码
mail.smtp.password=cSdN153963000
#编码格式
mail.smtp.defaultEncoding=utf-8
#是否进行用户名密码校验
mail.smtp.auth=true
#设置超时时间
mail.smtp.timeout=20000
复制代码
如果你的授权码填写错误的话,会报如下错误:
TTP Status 500 - Request processing failed; nested exception is org.springframework.mail.MailAuthenticationException: Authentication failed; nested exception is javax.mail.AuthenticationFailedException: 535 Error: authentication failed
复制代码
velocity.properties
input.encoding=UTF-8
output.encoding=UTF-8
contentType=ext/html;charset=UTF-8
directive.foreach.counter.name=loopCounter
directive.foreach.counter.initial.value=0
复制代码
applicationContext-email.xml
<?xml version="1.0" encoding="UTF-8"?>
<beans xmlns="http://www.springframework.org/schema/beans"
	xmlns:xsi="http://www.w3.org/2001/XMLSchema-instance" xmlns:p="http://www.springframework.org/schema/p"
	xmlns:context="http://www.springframework.org/schema/context" xmlns:tx="http://www.springframework.org/schema/tx"
	xmlns:aop="http://www.springframework.org/schema/aop"
	xsi:schemaLocation="
        http://www.springframework.org/schema/beans
        http://www.springframework.org/schema/beans/spring-beans-4.0.xsd
        http://www.springframework.org/schema/context
        http://www.springframework.org/schema/context/spring-context-4.0.xsd
        http://www.springframework.org/schema/tx
        http://www.springframework.org/schema/tx/spring-tx-4.2.xsd
        http://www.springframework.org/schema/aop
        http://www.springframework.org/schema/aop/spring-aop-4.0.xsd">

	<!--邮件配置 -->
	<context:property-placeholder location="classpath:mail.properties"
		ignore-unresolvable="true" />

	<!--配置邮件接口 -->
	<bean id="javaMailSender" class="org.springframework.mail.javamail.JavaMailSenderImpl">
		<property name="host" value="${mail.smtp.host}" />
		<property name="username" value="${mail.smtp.username}" />
		<property name="password" value="${mail.smtp.password}" />
		<property name="defaultEncoding" value="${mail.smtp.defaultEncoding}" />
		<property name="javaMailProperties">
			<props>
				<prop key="mail.smtp.auth">${mail.smtp.auth}</prop>
				<prop key="mail.smtp.timeout">${mail.smtp.timeout}</prop>
			</props>
		</property>
	</bean>
	<!-- freemarker -->
	<bean id="configuration"
		class="org.springframework.ui.freemarker.FreeMarkerConfigurationFactoryBean">
		<property name="templateLoaderPath" value="/WEB-INF/freemarker/" />
		<!-- 设置FreeMarker环境变量 -->
		<property name="freemarkerSettings">
			<props>
				<prop key="default_encoding">UTF-8</prop>
			</props>
		</property>
	</bean>


	<!-- velocity -->
	<bean id="velocityEngine"
		class="org.springframework.ui.velocity.VelocityEngineFactoryBean">
		<property name="resourceLoaderPath" value="/WEB-INF/velocity/" /><!--
			模板存放的路径 -->
		<property name="configLocation" value="classpath:velocity.properties" /><!--
			Velocity的配置文件 -->
	</bean>

</beans>
复制代码
三 开始编写工具类
我这里说是工具类,其实只是我自己做了简单的封装,实际项目使用的话,可能会需要根据需要简单修改一下。
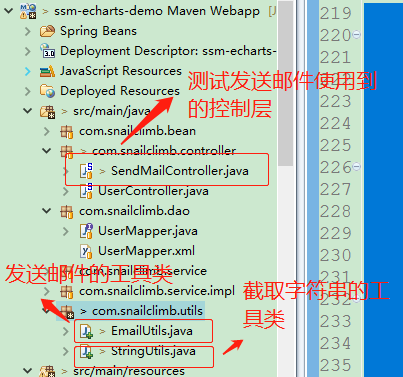
所有用到的类如下图所示:
发送Text或者HTML格式的邮件的方法
/**
	 *
	 * Text或者HTML格式邮件的方法
	 *
	 * @param text
	 *            要发送的内容
	 * @param subject
	 *            邮件的主题也就是邮件的标题
	 * @param location
	 *            文件的地址
	 * @param emailAdress
	 *            目的地
	 * @param javaMailSender
	 *            发送邮件的核心类(在xml文件中已经配置好了)
	 * @param type
	 *            如果为true则代表发送HTML格式的文本
	 * @return
	 * @throws TemplateException
	 */
	public String sendMail(String text, String subject, String location, String emailAdress,
			JavaMailSender javaMailSender, Boolean type) {
		MimeMessage mMessage = javaMailSender.createMimeMessage();// 创建邮件对象
		MimeMessageHelper mMessageHelper;
		Properties prop = new Properties();
		try {
			// 从配置文件中拿到发件人邮箱地址
			prop.load(this.getClass().getResourceAsStream("/mail.properties"));
			String from = prop.get("mail.smtp.username") + "";
			mMessageHelper = new MimeMessageHelper(mMessage, true, "UTF-8");
			// 发件人邮箱
			mMessageHelper.setFrom(from);
			// 收件人邮箱
			mMessageHelper.setTo(emailAdress);
			// 邮件的主题也就是邮件的标题
			mMessageHelper.setSubject(subject);
			// 邮件的文本内容,true表示文本以html格式打开
			if (type) {
				mMessageHelper.setText(text, true);
			} else {
				mMessageHelper.setText(text, false);
			}

			// 通过文件路径获取文件名字
			String filename = StringUtils.getFileName(location);
			// 定义要发送的资源位置
			File file = new File(location);
			FileSystemResource resource = new FileSystemResource(file);
			FileSystemResource resource2 = new FileSystemResource("D:/email.txt");
			mMessageHelper.addAttachment(filename, resource);// 在邮件中添加一个附件
			mMessageHelper.addAttachment("JavaApiRename.txt", resource2);//
			// 在邮件中添加一个附件
			javaMailSender.send(mMessage);// 发送邮件
		} catch (MessagingException e) {
			e.printStackTrace();
		} catch (IOException e) {
			// TODO Auto-generated catch block
			e.printStackTrace();
		}
		return "发送成功";
	}
复制代码
我在 sendMail() 方法中添加了一个 boolean 类型的变量type作为标志,如果为ture就表示发送html格式的邮件否则直接发送text格式的邮件。实现起来很简单,我们通过下面的判断语句就可以实现了
if (type) {
		        //表示文本以html格式打开
				mMessageHelper.setText(text, true);
			} else {
				mMessageHelper.setText(text, false);
			}
复制代码
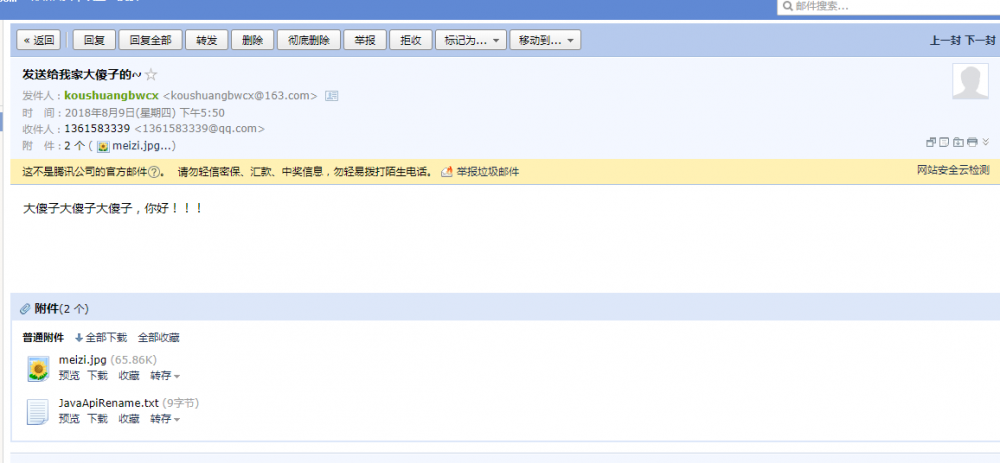
效果:
基于FreeMarker模板引擎发送邮件
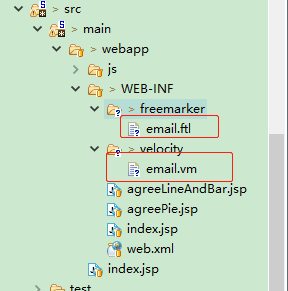
下图是我们用到的FreeMarker模板文件以及Velocity模板文件的位置。
/**
	 * FreeMarker模板格式的邮件的方法
	 *
	 * @param subject
	 *            邮件的主题也就是邮件的标题
	 * @param location
	 *            文件的地址
	 * @param emailAdress
	 *            目的地
	 * @param javaMailSender
	 *            发送邮件的核心类(在xml文件中已经配置好了)
	 * @param freeMarkerConfiguration
	 *            freemarker配置管理类
	 * @return
	 * @throws TemplateException
	 */
	public String sendMailFreeMarker(String subject, String location, String emailAdress, JavaMailSender javaMailSender,
			Configuration freeMarkerConfiguration) {
		MimeMessage mMessage = javaMailSender.createMimeMessage();// 创建邮件对象
		MimeMessageHelper mMessageHelper;
		Properties prop = new Properties();
		try {
			// 从配置文件中拿到发件人邮箱地址
			prop.load(this.getClass().getResourceAsStream("/mail.properties"));
			String from = prop.get("mail.smtp.username") + "";
			mMessageHelper = new MimeMessageHelper(mMessage, true);
			// 发件人邮箱
			mMessageHelper.setFrom(from);
			// 收件人邮箱
			mMessageHelper.setTo(emailAdress);
			// 邮件的主题也就是邮件的标题
			mMessageHelper.setSubject(subject);
			// 解析模板文件
			mMessageHelper.setText(getText(freeMarkerConfiguration), true);
			// 通过文件路径获取文件名字
			String filename = StringUtils.getFileName(location);
			// 定义要发送的资源位置
			File file = new File(location);
			FileSystemResource resource = new FileSystemResource(file);
			mMessageHelper.addAttachment(filename, resource);// 在邮件中添加一个附件
			javaMailSender.send(mMessage);// 发送邮件
		} catch (MessagingException e) {
			e.printStackTrace();
		} catch (IOException e) {
			// TODO Auto-generated catch block
			e.printStackTrace();
		}
		return "发送成功";
	}

  	/**
	 * 读取freemarker模板的方法
	 */
	private String getText(Configuration freeMarkerConfiguration) {
		String txt = "";
		try {
			Template template = freeMarkerConfiguration.getTemplate("email.ftl");
			// 通过map传递动态数据
			Map<String, Object> map = new HashMap<String, Object>();
			map.put("user", "Snailclimb");
			// 解析模板文件
			txt = FreeMarkerTemplateUtils.processTemplateIntoString(template, map);
			System.out.println("getText()->>>>>>>>>");// 输出的是HTML格式的文档
			System.out.println(txt);
		} catch (IOException e) {
			// TODO 异常执行块!
			e.printStackTrace();
		} catch (TemplateException e) {
			// TODO 异常执行块!
			e.printStackTrace();
		}

		return txt;
	}
复制代码
我们通过 getText(Configuration freeMarkerConfiguration) 方法读取freemarker模板,返回的格式如下图所示:
<html>
<head>
<meta http-equiv="Content-Type" content="text/html; charset=UTF-8">
<title>测试</title>
</head>

<body>
<h1>你好Snailclimb</h1>
</body>
</html>
复制代码
其实就是HTML,然后我们就可以像前面发送HTML格式邮件的方式发送这端消息了。
email.ftl
<html>
<head>
<meta http-equiv="Content-Type" content="text/html; charset=UTF-8">
<title>测试</title>
</head>

<body>
<h1>你好${user}</h1>
</body>
</html>
复制代码
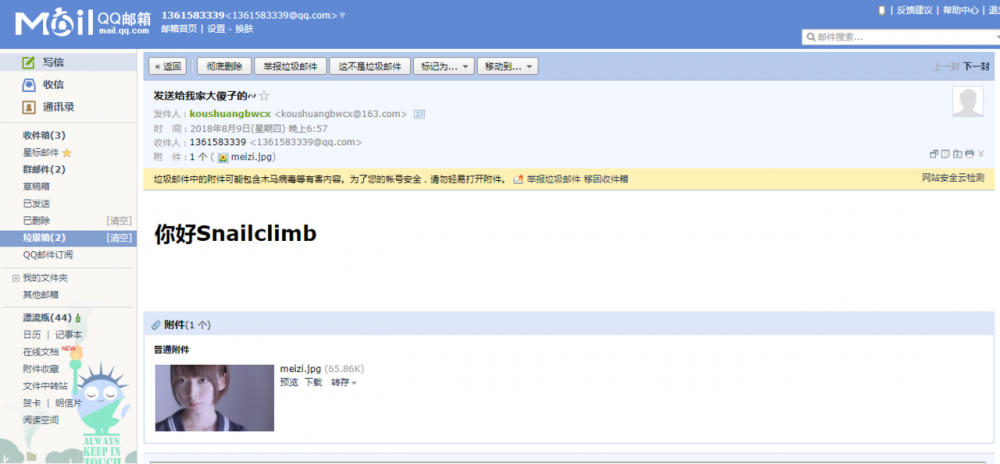
效果:
不知道为啥,腾讯每次把我使用模板引擎发的邮件直接放到垃圾箱。大家如果遇到接收不到邮件,但是又没报错的情况,可以看看是不是到了自己邮箱的垃圾箱。
基于Velocity模板引擎发送邮件
/**
	 *
	 * @param subject
	 *            邮件主题
	 * @param location
	 *            收件人地址
	 * @param emailAdress
	 *            目的地
	 * @param javaMailSender
	 *            发送邮件的核心类(在xml文件中已经配置好了)
	 * @param velocityEngine
	 *            Velocity模板引擎
	 * @return
	 */
	public String sendMailVelocity(String subject, String location, String emailAdress, JavaMailSender javaMailSender,
			VelocityEngine velocityEngine) {
		MimeMessage mMessage = javaMailSender.createMimeMessage();// 创建邮件对象
		MimeMessageHelper mMessageHelper;
		Properties prop = new Properties();
		try {
			// 从配置文件中拿到发件人邮箱地址
			prop.load(this.getClass().getResourceAsStream("/mail.properties"));
			System.out.println(this.getClass().getResourceAsStream("/mail.properties"));
			String from = prop.get("mail.smtp.username") + "";
			mMessageHelper = new MimeMessageHelper(mMessage, true, "UTF-8");
			// 发件人邮箱
			mMessageHelper.setFrom(from);
			// 收件人邮箱
			mMessageHelper.setTo(emailAdress);
			// 邮件的主题也就是邮件的标题
			mMessageHelper.setSubject(subject);
			Map<String, Object> map = new HashMap<>();
			// 获取日期并格式化
			Date date = new Date();
			DateFormat bf = new SimpleDateFormat("yyyy-MM-dd E a HH:mm:ss");
			String str = bf.format(date);
			map.put("date", str);
			String content = VelocityEngineUtils.mergeTemplateIntoString(velocityEngine, "email.vm", "UTF-8", map);
			mMessageHelper.setText(content, true);
			// 通过文件路径获取文件名字
			String filename = StringUtils.getFileName(location);
			// 定义要发送的资源位置
			File file = new File(location);
			FileSystemResource resource = new FileSystemResource(file);
			mMessageHelper.addAttachment(filename, resource);// 在邮件中添加一个附件
			// mMessageHelper.addAttachment("JavaApiRename.txt", resource2);//
			// 在邮件中添加一个附件
			javaMailSender.send(mMessage);// 发送邮件
		} catch (MessagingException e) {
			e.printStackTrace();
		} catch (IOException e) {
			// TODO Auto-generated catch block
			e.printStackTrace();
		}
		return "发送成功";
	}
复制代码
email.vm
<!DOCTYPE html>
<html>
<head lang="en">
    <meta charset="UTF-8">
    <title></title>

<body>
<h3>今天的日期是:${date}</h3>

</body>
</html>
复制代码
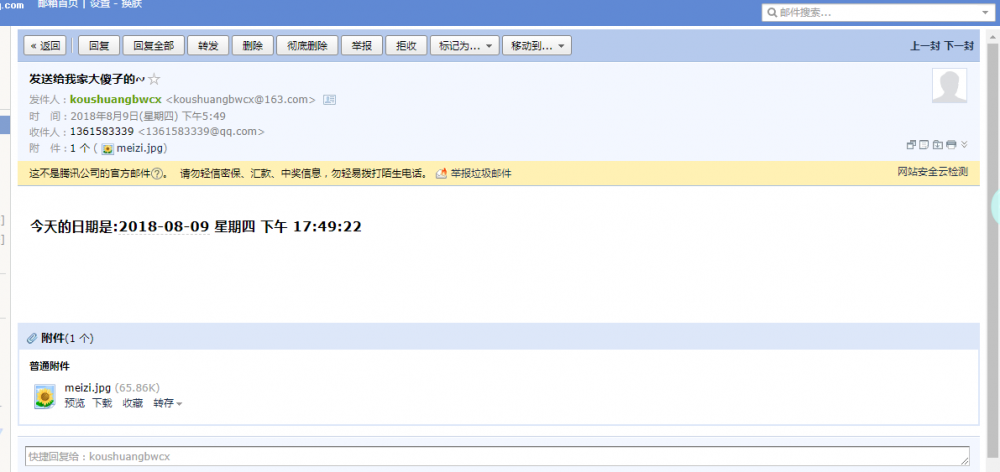
效果:
controller层
/**
 * 测试邮件发送controller
 * @author Snailclimb
 */
@RestController
@RequestMapping("mail")
public class SendMailController {
	@Autowired
	private JavaMailSender javaMailSender;// 在spring中配置的邮件发送的bean
	@Autowired
	private Configuration configuration;
	@Autowired
	private VelocityEngine velocityEngine;

	// text
	@RequestMapping("send")
	public String sendEmail() {
		EmailUtils emailUtils = new EmailUtils();
		return emailUtils.sendMail("大傻子大傻子大傻子,你好!!!", "发送给我家大傻子的~", "D:/picture/meizi.jpg", "1361583339@qq.com",
				javaMailSender, false);
	}

	// html
	@RequestMapping("send2")
	public String sendEmail2() {
		EmailUtils emailUtils = new EmailUtils();
		return emailUtils.sendMail(
				"<p>大傻子大傻子大傻子,你好!!!</p><br/>" + "<a href='https://github.com/Snailclimb'>点击打开我的Github!</a><br/>",
				"发送给我家大傻子的~", "D:/picture/meizi.jpg", "1361583339@qq.com", javaMailSender, true);
	}

	// freemarker
	@RequestMapping("send3")
	public String sendEmail3() {
		EmailUtils emailUtils = new EmailUtils();
		return emailUtils.sendMailFreeMarker("发送给我家大傻子的~", "D:/picture/meizi.jpg", "1361583339@qq.com", javaMailSender,
				configuration);

	}

	// velocity
	@RequestMapping("send4")
	public String sendEmail4() {
		EmailUtils emailUtils = new EmailUtils();
		return emailUtils.sendMailVelocity("发送给我家大傻子的~", "D:/picture/meizi.jpg", "1361583339@qq.com", javaMailSender,
				velocityEngine);

	}
}

复制代码
四 总结
上面我们总结了Spring发送邮件的四种正确姿势,并且将核心代码提供给了大家。代码中有我很详细的注释,所以我对于代码以及相关类的讲解很少,感兴趣的同学可以自行学习。最后,本项目Github地址: github.com/Snailclimb/… 。
五 推荐一个自己的开源的后端文档
Java-Guide: Java面试通关手册(Java学习指南)。(star:1.4k)
Github地址: github.com/Snailclimb/…
文档定位:一个专门为Java后端工程师准备的开源文档,相信不论你是Java新手还是已经成为一名Java工程师都能从这份文档中收获到一些东西。
你若盛开,清风自来。 欢迎关注我的微信公众号:“Java面试通关手册”,一个有温度的微信公众号。公众号有大量资料,回复关键字“1”你可能看到想要的东西哦!

- 本文标签: src 互联网 API Property 解析 stream apache 总结 mail 配置 ACE 时间 AOP SpringMVC 协议 schema tar 管理 Freemarker HTML HashMap java 开发 pom Word map 代码 IO value ssl 企业 IDE message App 工程师 spring mybatis maven http 标题 GitHub ORM key 服务器 开源 https 数据 微信公众号 CTO id rmi REST classpath 主机 cat SDN bean XML 加密 web 百度 git UI 下载 注释 HTTP协议 软件 测试
- 版权声明: 本文为互联网转载文章,出处已在文章中说明(部分除外)。如果侵权,请联系本站长删除,谢谢。
- 本文海报: 生成海报一 生成海报二


![[HBLOG]公众号](https://www.liuhaihua.cn/img/qrcode_gzh.jpg)

