spring Ioc原理(2)
从具体实例分析Spring初始化流程
在博客中Spring初识中,我们介绍了Spring进行Bean管理的实例,我们简单回顾一下。在BookService中的代码首先新建ClassPathXmlApplicationContext实例,随后通过该实例的getBean()方法获取对象的实例。本篇博客中,我们直接从ClassPathXmlApplicationContext类入手详解Spring的初识化流程。
##ClassPathXmlApplicationContext类的继承关系
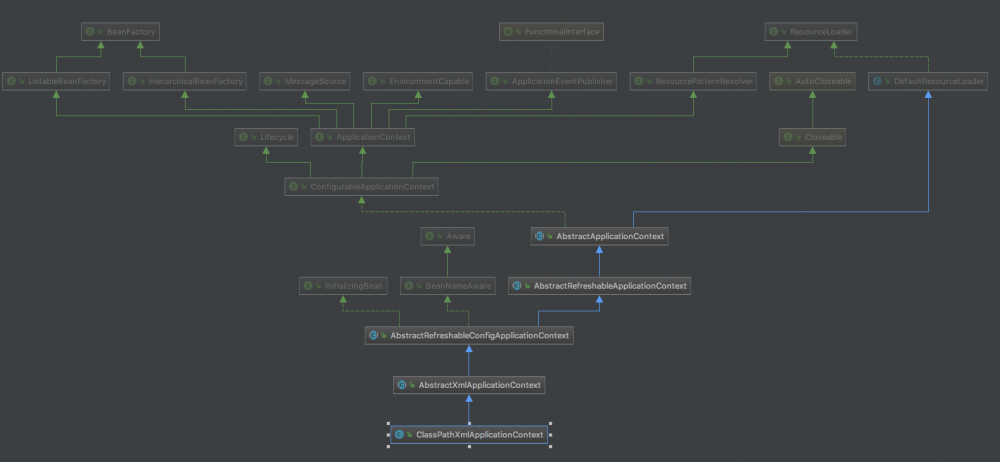
我们在IDEA中通过快捷键”Shift+option+command+U”就能看到类的继承关系图。

我们可以看出来,ClassPathXmlApplicationContext的继承关系为ClassPathXmlApplicationContext<-AbstractApplicationContext<-AbstractRefreshableConfigApplicationContext<-AbstractRefreshableApplicationContext<-AbstractApplicationContext
我们暂且记住这条继承线,后面的文章中能够用到。
##ClassPathXmlApplicationContext初始化流程
在前面的博客中,我们是通过如下的代码创建实例:
ApplicationContext ctx = new ClassPathXmlApplicationContext("IOCBean1.xml");
核心代码:
public ClassPathXmlApplicationContext(String configLocation) throws BeansException {
        this(new String[] {configLocation}, true, null);
}
该构造方法调用了同名构造方法:
public ClassPathXmlApplicationContext(
            String[] configLocations, boolean refresh, @Nullable ApplicationContext parent)
            throws BeansException {

        super(parent);
        setConfigLocations(configLocations);
        if (refresh) {
            refresh();
        }
    }
这个方法分为两个核心步骤
1、设置配置文件的位置
2、如果refresh标志设置为true,调用refresh方法。
下面我们重点分析refresh()方法。源代码如下:
public void refresh() throws BeansException, IllegalStateException {
    synchronized (this.startupShutdownMonitor) {
        // Prepare this context for refreshing.
        prepareRefresh();

        // Tell the subclass to refresh the internal bean factory.
        ConfigurableListableBeanFactory beanFactory = obtainFreshBeanFactory();

        // Prepare the bean factory for use in this context.
        prepareBeanFactory(beanFactory);

        try {
            // Allows post-processing of the bean factory in context subclasses.
            postProcessBeanFactory(beanFactory);

            // Invoke factory processors registered as beans in the context.
            invokeBeanFactoryPostProcessors(beanFactory);

            // Register bean processors that intercept bean creation.
            registerBeanPostProcessors(beanFactory);

            // Initialize message source for this context.
            initMessageSource();

            // Initialize event multicaster for this context.
            initApplicationEventMulticaster();

            // Initialize other special beans in specific context subclasses.
            onRefresh();

            // Check for listener beans and register them.
            registerListeners();

            // Instantiate all remaining (non-lazy-init) singletons.
            finishBeanFactoryInitialization(beanFactory);

            // Last step: publish corresponding event.
            finishRefresh();
        }

        catch (BeansException ex) {
            if (logger.isWarnEnabled()) {
                logger.warn("Exception encountered during context initialization - " +
                        "cancelling refresh attempt: " + ex);
            }

            // Destroy already created singletons to avoid dangling resources.
            destroyBeans();

            // Reset 'active' flag.
            cancelRefresh(ex);

            // Propagate exception to caller.
            throw ex;
        }

        finally {
            // Reset common introspection caches in Spring's core, since we
            // might not ever need metadata for singleton beans anymore...
            resetCommonCaches();
        }
    }
}
总体而言,refresh方法的核心流程如下:
1、prepareRefresh  ---准备refresh,设置标志位
2、obtainFreshFactory  ---提取bean信息,注册Bean
3、prepareBeanFactory  ---设置bean加载器
4、postProcessBeanFactory   ---留待子类的自定义实现
5、invokeBeanFactoryPostProcessors  ---调用BeanFactoryPostProcess
6、registerBeanPostProcessors  ---注册BeanPostProcess实现类
7、initMessageSource  ---国际化
8、initApplicationEventMulticaster  ---初始化ApplicationContext广播类
9、onRefresh  ---钩子方法,子类中进行特殊的Bean
10、registerListeners  ---注册监听器
11、finishBeanFactoryInitialization  ---初始化所有单例的实例
12、finishRefresh  ---初始化完成
这里我们主要看的方法,分别为prepareRefresh,obtainFreshFactory,invokeBeanFactoryPostProcessors,finishBeanFactoryInitialization
prepareRefresh
protected void prepareRefresh() {
    this.startupDate = System.currentTimeMillis();
    this.closed.set(false);
    this.active.set(true);

    if (logger.isDebugEnabled()) {
        logger.debug("Refreshing " + this);
    }

    // Initialize any placeholder property sources in the context environment
    initPropertySources();

    // Validate that all properties marked as required are resolvable
    // see ConfigurablePropertyResolver#setRequiredProperties
    getEnvironment().validateRequiredProperties();

    // Allow for the collection of early ApplicationEvents,
    // to be published once the multicaster is available...
    this.earlyApplicationEvents = new LinkedHashSet<>();
}
该方法的核心就是设置一些标志位,包括closed以及active,这两个属性都设置为AtomicBoolean。
obtainFreshFactory
接下来我们来看obtainFreshFactory方法,其代码如下:
protected ConfigurableListableBeanFactory obtainFreshBeanFactory() {
    refreshBeanFactory();
    return getBeanFactory();
}
这个方法有两个核心流程:
1、refreshBeanFactory
2、返回BeanFactory,类型为ConfigurableListableBeanFactory
对于当前类AbstractApplicationContext,refreshBeanFactory为接口方法,需要依赖子类的实现,我们下渗一层看到AbstractRefreshableApplicationContext类的对应方法
protected final void refreshBeanFactory() throws BeansException {
    if (hasBeanFactory()) {
        destroyBeans();
        closeBeanFactory();
    }
    try {
        DefaultListableBeanFactory beanFactory = createBeanFactory();
        beanFactory.setSerializationId(getId());
        customizeBeanFactory(beanFactory);
        loadBeanDefinitions(beanFactory);
        synchronized (this.beanFactoryMonitor) {
            this.beanFactory = beanFactory;
        }
    }
    catch (IOException ex) {
        throw new ApplicationContextException("I/O error parsing bean definition source for " + getDisplayName(), ex);
    }
}
这个方法中,主要的逻辑为:
1、判断是否存在BeanFactory,如果有的话销毁当前的BeanFactory。
2、创建新的 BeanFactory,加载 Bean 定义、注册 Bean 等等。
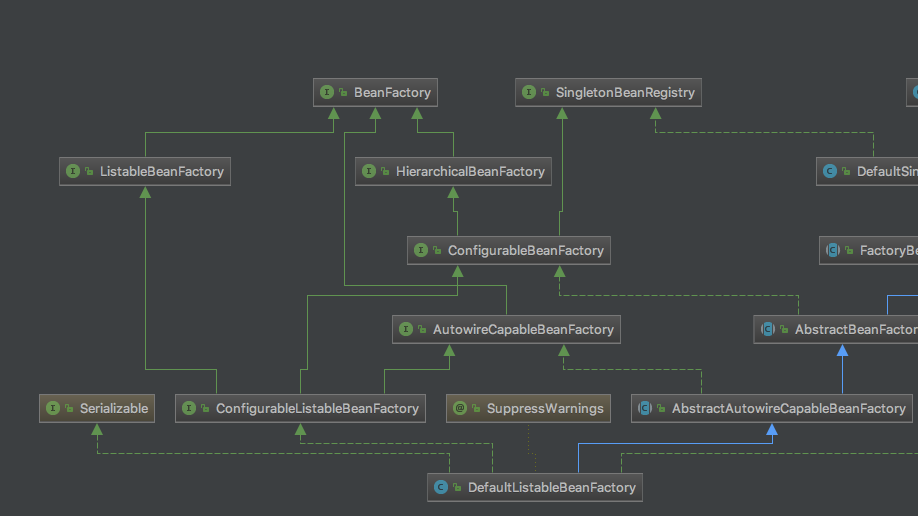
对于ApplicationContext,虽然他继承了BeanFactory但是并不能理解为其实现类,其内部有一个BeanFactory实例,对于BeanFactory(DefaultListableBeanFactory)的相关操作均委托给这个实例进行,然而为何要初始化这个类的实例呢,我们再一次回到继承图上,这次我们把目光聚焦在BeanFactory上

我们可以看到,BeanFactory的直接接口有三个,分别为ListableBeanFactory,HierarchicalBeanFactory,AutowireCapableBeanFactory,而对于这三个接口,ConfigurableListableBeanFactory则直接继承了这三个接口,对于AutowireCapableBeanFactory有一个直接实现类,AbstractAutowireCapableBeanFactory。然而这个实现类并不具有ConfigurableListableBeanFactory的属性。而DefaultListableBeanFactory既直接实现了ConfigurableListableBeanFactory,同时实现了ConfigurableListableBeanFactory,具有了上述BeanFactory的所有属性,因此ApplicationContext选择了使用这个类的实例来进行BeanFactory的相关操作。
这篇文章先讲到这里,下一篇中将详细介绍BeanFactory的一个核心数据结构BeanDefination,然后将继续介绍Spring的初始化流程以及Bean的创建流程。
谢谢你请我吃糖果
- 本文标签: bean git HashSet 管理 spring ioc message spring Collection cat App 博客 Service db synchronized IDE final 监听器 IO tar CTO http Property tab 构造方法 数据 list Listeners cache 代码 core BeanDefinition classpath bug UI XML 文章 ioc https GitHub src Atom update id 配置 实例 ACE
- 版权声明: 本文为互联网转载文章,出处已在文章中说明(部分除外)。如果侵权,请联系本站长删除,谢谢。
- 本文海报: 生成海报一 生成海报二


![[HBLOG]公众号](https://www.liuhaihua.cn/img/qrcode_gzh.jpg)

