WebSocket的故事(四)—— Spingboot中,如何利用WebSocket和STOMP快速构建点对点的消息模式(2)
最近事情太多,也有好久没有更新了。在此感谢大家的持续关注。如果有任何问题,都可以私信我一起讨论。
概述
本文是 WebSocket的故事 系列第三篇第二节,将针对上篇的代码介绍,给出一个STOMP实现点对点消息的简单例子。WebSocket的故事系列计划分六大篇,旨在由浅入深的介绍WebSocket以及在Springboot中如何快速构建和使用WebSocket提供的能力。
本系列计划包含如下几篇文章:
第一篇,什么是WebSocket以及它的用途
第二篇,Spring中如何利用STOMP快速构建WebSocket广播式消息模式
第三篇,Springboot中,如何利用WebSocket和STOMP快速构建点对点的消息模式(1)
第四篇,Springboot中,如何利用WebSocket和STOMP快速构建点对点的消息模式(2)
第五篇,Springboot中,自定义WebSocket消息代理
第六篇,Springboot中,实现更灵活的WebSocket
本篇的主线
上一篇由 @SendTo 和 @SendToUser 开始,深入Spring的WebSocket消息发送关键代码进行讲解。本篇将具体实现一个基于STOMP的点对点消息示例,并针对性的进行一些说明。
在本篇编写过程中,我也查看了一些网上的例子,多数都存在着或多或少的问题,能跑起来的很少,所以我也在文后给出了Github的示例链接,有需要的同学可以自取。
本篇适合的读者
想要了解STOMP协议,Spring内部代码细节,以及如何使用Springboot搭建WebSocket服务的同学。
实现一个点对点消息模式
一、引入 WebSecurity 实现用户管理
讲到点对点消息,想象一下常见的如微信、QQ这些聊天工具,都是有用户管理模块的,包括数据库等等实现。我们这里为了简化,采用 WebSecurity 实现一个基于内存的简单用户登录管理,即可在服务端,保存两个用户信息,即可让这两个用户互发信息。
1. 引入依赖
<!-- 引入security模块 -->
<dependency>
<groupId>org.springframework.boot</groupId>
    <artifactId>spring-boot-starter-security</artifactId>
</dependency>
复制代码
2. 实现 WebSecurityConfig
这里我们构建两个内存级别的用户账户,以便我们在后面模拟互发消息。
package com.xnpe.chat.config;

import org.springframework.context.annotation.Configuration;
import org.springframework.security.config.annotation.authentication.builders.AuthenticationManagerBuilder;
import org.springframework.security.config.annotation.web.builders.HttpSecurity;
import org.springframework.security.config.annotation.web.builders.WebSecurity;
import org.springframework.security.config.annotation.web.configuration.EnableWebSecurity;
import org.springframework.security.config.annotation.web.configuration.WebSecurityConfigurerAdapter;
import org.springframework.security.crypto.bcrypt.BCryptPasswordEncoder;

@Configuration
@EnableWebSecurity
public class WebSecurityConfig extends WebSecurityConfigurerAdapter{
    @Override
    protected void configure(HttpSecurity http) throws Exception {
        http
                .authorizeRequests()
                .antMatchers("/","/login").permitAll()
                .anyRequest().authenticated()
                .and()
                .formLogin()
                .loginPage("/login")
                .defaultSuccessUrl("/chat")
                .permitAll()
                .and()
                .logout()
                .permitAll();
    }

    //声明两个内存存储用户
    @Override
    protected void configure(AuthenticationManagerBuilder auth) throws Exception {
    		auth
                .inMemoryAuthentication().passwordEncoder(new BCryptPasswordEncoder())
                .withUser("Xiao Ming").password(new BCryptPasswordEncoder().encode("123")).roles("USER")
                .and().passwordEncoder(new BCryptPasswordEncoder())
                .withUser("Suby").password(new BCryptPasswordEncoder().encode("123")).roles("USER");
    }

    @Override
    public void configure(WebSecurity web){
        web.ignoring().antMatchers("/resources/static/**");
    }

}
复制代码
二、实现 WebSocket 和页面的配置
两个内存级别的用户账户建立好以后,我们来进行 WebSocket 和页面相关的配置。
1. 配置页面资源路由
package com.xnpe.chat.config;

import org.springframework.context.annotation.Configuration;
import org.springframework.web.servlet.config.annotation.*;

@Configuration
public class WebMvcConfig extends WebMvcConfigurerAdapter {

    @Override
    public void addViewControllers(ViewControllerRegistry registry) {
        registry.addViewController("/login").setViewName("login");
        registry.addViewController("/chat").setViewName("chat");
    }

    @Override
    public void addResourceHandlers(ResourceHandlerRegistry registry) {
        registry.addResourceHandler("/static/**").addResourceLocations("classpath:/static/");
    }
}
复制代码
2. 配置 WebSocket STOMP
这里我们注册一个Endpoint名为 Chat ,并注册一个消息代理,名为 queue 。
package com.xnpe.chat.config;

import org.springframework.context.annotation.Configuration;
import org.springframework.messaging.simp.config.MessageBrokerRegistry;
import org.springframework.web.socket.config.annotation.AbstractWebSocketMessageBrokerConfigurer;
import org.springframework.web.socket.config.annotation.EnableWebSocketMessageBroker;
import org.springframework.web.socket.config.annotation.StompEndpointRegistry;

@Configuration
@EnableWebSocketMessageBroker
public class WebSocketConfig extends AbstractWebSocketMessageBrokerConfigurer{

    @Override
    public void registerStompEndpoints(StompEndpointRegistry registry) {
        registry.addEndpoint("/Chat").withSockJS();
    }

    @Override
    public void configureMessageBroker(MessageBrokerRegistry registry) {
        registry.enableSimpleBroker("/queue");
    }
}
复制代码
三、实现 WebSocket 的消息处理
客户端会将消息发送到 chat 这个指定的地址,它会被 handleChat 捕获并处理。我们这里做了个硬逻辑,如果信息是由 Xiao Ming 发来的,我们会将它路由给 Suby 。反之亦然。
1. Controller的实现
这里强调一下,我们监听的Mapping地址是 chat ,所以后续在客户端发送消息的时候,要注意消息都是发到服务器的这个地址的。服务端在接收到消息后,会将消息路由给 /queue/notification 这个地址,那么也就是说,我们客户端WebSocket订阅的地址即为 /queue/notification 。
package com.xnpe.chat.controller;

import com.xnpe.chat.data.Info;
import org.springframework.beans.factory.annotation.Autowired;
import org.springframework.messaging.handler.annotation.MessageMapping;
import org.springframework.messaging.simp.SimpMessagingTemplate;
import org.springframework.stereotype.Controller;

import java.security.Principal;

@Controller
public class WebSocketController {

    @Autowired
    private SimpMessagingTemplate messagingTemplate;

    @MessageMapping("/chat")
    public void handleChat(Principal principal, Info info) {
        if (principal.getName().equals("Xiao Ming")) {
            messagingTemplate.convertAndSendToUser("Suby",
                    "/queue/notification", principal.getName() + " send message to you: "
                            + info.getInfo());
        } else {
            messagingTemplate.convertAndSendToUser("Xiao Ming",
                    "/queue/notification", principal.getName() + " send message to you: "
                            + info.getInfo());
        }
    }
}

复制代码
2. 消息Bean
用来承载互发的消息结构
package com.xnpe.chat.data;

public class Info {

    private String info;

    public String getInfo() {
        return info;
    }
}

复制代码
四、编写客户端Html页面
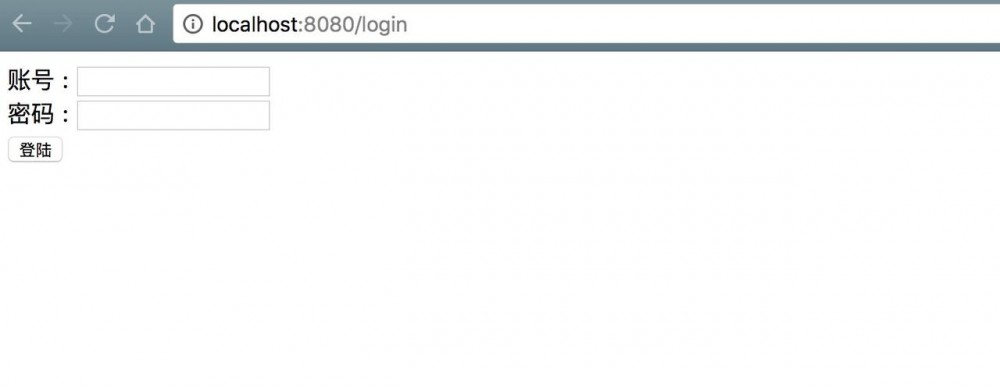
1. 实现登录页 login.html
<!DOCTYPE html>
<html xmlns="http://www.w3.org/1999/xhtml" xmlns:th="http://www.thymeleaf.org">
<meta charset="UTF-8" />
<head>
    <title>登陆页面</title>
</head>
<body>
<div th:if="${param.error}">
    无效的账号和密码
</div>
<div th:if="${param.logout}">
    你已注销
</div>
<form th:action="@{/login}" method="post">
    <div><label> 账号 : <input type="text" name="username"/> </label></div>
    <div><label> 密码: <input type="password" name="password"/> </label></div>
    <div><input type="submit" value="登陆"/></div>
</form>
</body>
</html>
复制代码
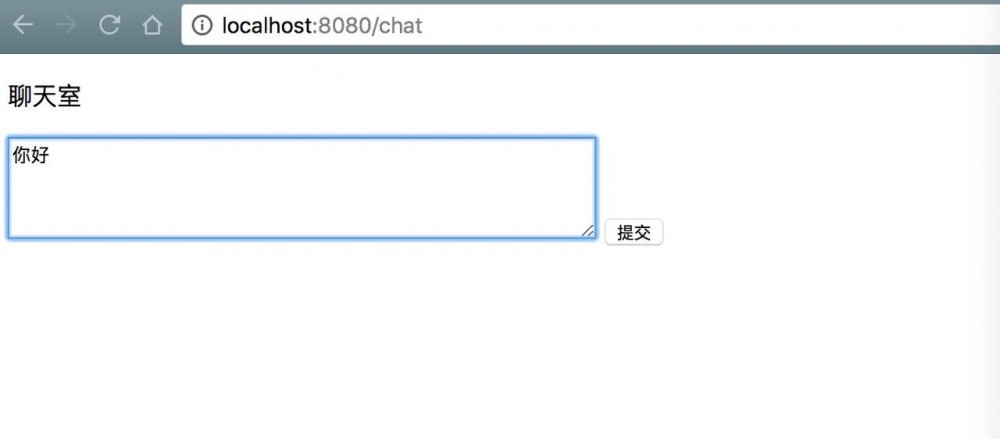
2. 实现聊天页 chat.html
强调一下两个要点:
- 连接WebSocket时,我们指定的是
Chat这个Endpoint。发送消息时,我们要将消息发送到服务器所mapping的地址上,即/chat。 - 由于服务端会将信息发到
/queue/notification这个消息代理上,所以我们订阅的也是这个地址,因为我们要实现的是一对一的消息(根据上一篇的内容,不理解的同学可以参考上一篇文章),这里在订阅时要加上user前缀。
<!DOCTYPE html>

<html xmlns:th="http://www.thymeleaf.org">
<meta charset="UTF-8" />
<head>
    <title>欢迎进入聊天室</title>
    <script th:src="@{sockjs.min.js}"></script>
    <script th:src="@{stomp.min.js}"></script>
    <script th:src="@{jquery.js}"></script>
</head>
<body>
<p>
    聊天室
</p>

<form id="chatForm">
    <textarea rows="4" cols="60" name="text"></textarea>
    <input type="submit"/>
</form>

<script th:inline="javascript">
    $('#chatForm').submit(function(e){
        e.preventDefault();
        var text = $('#chatForm').find('textarea[name="text"]').val();
        sendSpittle(text);
        $('#chatForm').clean();
    });
    //链接endpoint名称为 "/Chat" 的endpoint。
    var sock = new SockJS("/Chat");
    var stomp = Stomp.over(sock);
    stomp.connect('abc', 'abc', function(frame) {
        stomp.subscribe("/user/queue/notification", handleNotification);
    });

    function handleNotification(message) {
        $('#output').append("<b>Received: " + message.body + "</b><br/>")
    }

    function sendSpittle(text) {
        stomp.send("/chat", {}, JSON.stringify({ 'info': text }));
    }
    $('#stop').click(function() {sock.close()});
</script>

<div id="output"></div>
</body>
</html>
复制代码
演示点对点消息
以上,我们程序的所有关键代码均已实现了。启动后,访问localhost:8080/login即可进入到登录页。

分别打开两个页面,输入账号和密码(代码中硬编码的两个账户信息)。即可进入到chat页面。

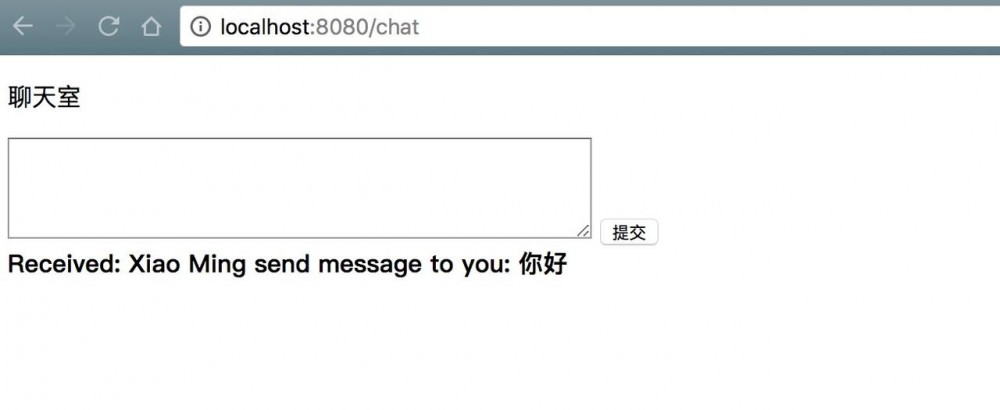
在输入框中输入信息,然后点击提交,消息会被发送到另一个用户处。

代码
本篇所用的代码工程已上传至Github,想要体验的同学自取。
GitHub-STOMP实现点对点消息
总结
本篇罗列了基于STOMP实现点对点消息的一个基本步骤,比较简单,注意客户端发送消息的地址和订阅的地址即可。由于采用STOMP,我们实现的点对点消息是基于用户地址的,即STOMP实现了用户地址到会话session的一个映射,这也帮助我们能够轻松的给对端用户发送消息,而不必关心底层实现的细节。但如果我们想自己封装更复杂的业务逻辑,管理用户的WebSocket session,更灵活的给用户发送信息,这就是我们下一篇所要讲述的内容,不使用STOMP,看看如何来实现更灵活的WebSocket点对点通信。
欢迎持续关注
小铭出品,必属精品
欢迎关注xNPE技术论坛,更多原创干货每日推送。

- 本文标签: ip map 代码 build JavaScript session java servlet cat GitHub 总结 Security springboot spring 数据库 管理 value queue id rmi authenticate find IDE XML message 服务端 logo tar 数据 json 文章 IO classpath js UI HTML Word ORM 协议 https jquery App http bean 服务器 git 配置 CTO src Action equals web
- 版权声明: 本文为互联网转载文章,出处已在文章中说明(部分除外)。如果侵权,请联系本站长删除,谢谢。
- 本文海报: 生成海报一 生成海报二


![[HBLOG]公众号](https://www.liuhaihua.cn/img/qrcode_gzh.jpg)

