Spring Security 快速入门
我曾经使用 Interceptor 实现了一个简单网站Demo的登录拦截和Session处理工作,虽然能够实现相应的功能,但是无疑Spring Security提供的配置方法更加简单明确,能够更好的保护Web应用。
Spring Security的相关结构
这里大家可以参考Spring Security的官方介绍文档: spring-security-architecture
简单的来说:
- Spring Security是一个单一的
Filter,其具体的类型是FilterChainProxy,其是作为@Bean在ApplicationContext中配置的。 - 从容器的角度来看,Spring Security是一个单一的Filter,但是在其中有很多额外的Filter,每一个都扮演着他们各自的角色,如下图所示:

- Spring Security的身份验证,主要由
AuthenticationManager这个接口完成,其验证的主要方法是authenticate()
public interface AuthenticationManager {

  Authentication authenticate(Authentication authentication)
    throws AuthenticationException;

}
复制代码
- 该方法可以完成三件事:
- 如果它可以验证输入代表一个有效的主体,就返回一个
Authentication(通常包含authenticated=true) - 如果它可以验证输入代表一个无效的主体,就throw一个
AuthenticationException - 如果它不能决断,就返回
null
- 如果它可以验证输入代表一个有效的主体,就返回一个
- 最常用的
AuthicationManager的实现是ProviderManager,它将其委托给AuthticationProvider这个实例,AuthenticationProvider和AuthenticationManager有一点像,但是含有一些额外的方法,来允许调用者来查询是否支持该Authenticaion形式。
public interface AuthenticationProvider {

	Authentication authenticate(Authentication authentication)
			throws AuthenticationException;

	boolean supports(Class<?> authentication);

}

复制代码
supports() 方法中的 Class<?> 参数是 Class<? extends Authentication> ,它只会询问其是否支持传递给 authenticate() 方法。
-
在同一个程序中,一个
ProviderManager通过委托一系列的AuthenticaitonProviders,以此来支支持多个不同的认证机制,如果ProviderManager无法识别一个特定的Authentication实例类型,则会跳过它。 -
很多时候,一个程序含有多个资源保护逻辑组,每一个组都有他们独有的
AuthenticationManager,通常他们共享父级,那么父级就成为了了一个"global"资源,作为所有provider的后背。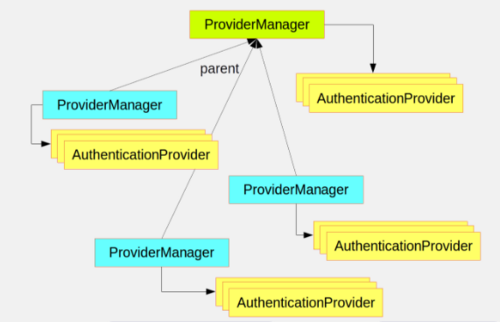
-
Spring Security提供了一些配置帮助我们快速的开启验证功能,最常用的就是
AuthenticationManagerBuiler,它在内存(in-memory)、JDBC、LDAP或者个人定制的UserDetailService这些领域都很擅长。
使用Spring Security实现访问和权限控制
注意:本后续代码以SpringBoot为框架实现,其DEMO Git:Spring-Security-Demo
- 主要通过重载WebSecurityConfigurerAdapter的configure方法进行访问和权限控制
| 方法 | 描述 |
|---|---|
| configure(WebSecurity) | 通过重载,配置Spring Security的Filter链 |
| configure(HttpSecurity) | 通过重载,配置如何拦截器保护请求 |
| configure(AuthenticationManagerBuilder) | 通过重载,配置user-detail服务 |
- 我们重写如下方法:
@Override
	protected void configure(HttpSecurity http) throws Exception {
		http
		.authorizeRequests()
		.antMatchers("/index").hasAnyAuthority("ROLE_USER","ROLE_ADMIN")
		.antMatchers("/oss").hasAuthority("ROLE_ADMIN")
		.antMatchers(HttpMethod.GET, "/login").permitAll()
		.anyRequest().authenticated()
		.and()
		.formLogin()
		.loginPage("/login")
		.permitAll()//.successHandler(successHandler)
		.and()
		.logout()
		.logoutSuccessUrl("/")
		.permitAll();
	}


	@Override
	protected void configure(AuthenticationManagerBuilder auth) throws Exception {
		auth.inMemoryAuthentication().passwordEncoder(new BCryptPasswordEncoder())
				.withUser("root").password(new BCryptPasswordEncoder().encode("root")).roles("USER","ADMIN").and()
				.withUser("normal").password(new BCryptPasswordEncoder().encode("normal")).roles("USER");
		//auth.authenticationProvider(userProvider);
		//auth.authenticationProvider(afterProvider);

	}
复制代码
- 通过`antMatchers()`进行URL匹配,再进行相应的处理,比如见上代码,我们将**/index**和**/oss**两个链接进行了拦截,并分别要求拥有`ROLE_USER`或`ROLE_ADMIN`、`ROLE_ADMIN`这两个身份才能访问。
- `anyRequest().authenticated()`指其他请求都会需要验证
- `formLogin()`使其有了登录页面,如果没有后面的`loginPage()`,则会默认生成一个Spring Security的页面,而后面注释掉的`successHandler`则是后续会讲到的。
- `permitAll()`则表示当前连接不需要认证。
- `logout()`会拦截所以的**/logout**请求,完成登出操作,`logoutSuccessUrl()`则是登出后的重定向地址。
- `and()`在其中起连接作用。
复制代码
-
一些常用的保护路径配置方法
- authenticated() : 允许认证过的用户访问
- denyAll() : 无条件拒绝所有访问
- fullyAuthenticated() : 如果用户是完整认证(不通过Remeber me)访问
- hasIpAdress(String) : 如果骑牛来自给定IP地址,就可以访问
- hasAnyAuthority(String ...) : 如果用于具备任意一个给定角色,就可以访问
- hasAnthority(String) : 如果用户具备给定角色,就可以访问
- permitAl() : 无条件允许方法
- remeberMe():如果用户是通过Remeber-me认证的,就可以访问
- 另外,与Autheority对应有一个Role,两者是一个概念,Autheority必须以“ROLE_”开头,而Role不需要,见上代码。
-
则此时我们的root账号既能够访问index也能够访问oss,而normal账号只能访问index,不能访问oss,如果访问oss会出现:
There was an unexpected error (type=Forbidden, status=403).
-
上面我们通过重载configure(AuthenticationManagerBuilder auth)生成了两个内存用户root和normal,我们也可以通过jdbc等方法实现。
通过AuthenticationSuccessHandler实现认证成功后的处理
- 通过实现AuthenticationSuccessHandler接口,我们可以在验证成功后执行相应的代码,比如
Token的设置等等,比如我现在打印一条登录信息,并将请求重定向到首页
@Component
public class SuccessHandler implements AuthenticationSuccessHandler{

	@Override
	public void onAuthenticationSuccess(HttpServletRequest request, HttpServletResponse response,
			Authentication authentication) throws IOException, ServletException {
		System.out.println(authentication.getName()+" is loging , role is"+authentication.getAuthorities());
		response.sendRedirect("/");

	}

复制代码
- 并将其添加到
formLogin()后,即:
.formLogin()
		.loginPage("/login")
		.permitAll().successHandler(successHandler)

复制代码
- 再次登录root账户,则会在控制台看到: root is loging , role is[ROLE_ADMIN, ROLE_USER]
通过AuthenticationProvider实现个性化认证
- 我们建立一个
UserAuthProvider,并让其实现AuthenticationProvider接口:
@Override
	public Authentication authenticate(Authentication authentication) throws AuthenticationException {

		System.out.println("-----------------------------------------------------------------------");
		System.out.println("This is UserAuthProvider");

		System.out.println("starting authenticate ... ...");
		System.out.println("Credentials:"+authentication.getCredentials());
		System.out.println("Name:"+authentication.getName());
		System.out.println("Class:"+authentication.getClass());
		System.out.println("Details:"+authentication.getDetails());
		System.out.println("Principal:"+authentication.getPrincipal());
		System.out.println("-----------------------------------------------------------------------");
		UsernamePasswordAuthenticationToken auth=new UsernamePasswordAuthenticationToken(authentication.getPrincipal(), authentication.getCredentials());
		return auth;
	}

	@Override
	public boolean supports(Class<?> authentication) {
		System.out.println("This is UserAuthProvider");
		System.out.println("starting supports");
		System.out.println(authentication.getClass());
		return false;
	}
复制代码
- 同时,我们注释掉以前的
auth.inMemoryAuthentication(),将UserAuthProvider加入到AuthenticationManagerBuilder中,即:
@Override
	protected void configure(AuthenticationManagerBuilder auth) throws Exception {
//		auth.inMemoryAuthentication().passwordEncoder(new BCryptPasswordEncoder())
//				.withUser("root").password(new BCryptPasswordEncoder().encode("root")).roles("USER","ADMIN").and()
//				.withUser("normal").password(new BCryptPasswordEncoder().encode("normal")).roles("USER");
		auth.authenticationProvider(userProvider);
		auth.authenticationProvider(afterProvider);

	}


复制代码
- 此时我们再次登录,会发现控制台会输出
This is UserAuthProvider
	starting supports
	 java.lang.  Class
复制代码
- 其原因是我们重写的
supports()方法,永远返回false,而返回false时,即不会再调用authenticate()进行认证操作(正如上面所介绍的),我们将supports()的返回值变成true,再次登录(username: root password: 1234),则控制台会输出
This is UserAuthProvider
starting supports
class java.lang.Class
-----------------------------------------------------------------------
This is UserAuthProvider
starting authenticate ... ...
Credentials:1234
Name:root
Class:class org.springframework.security.authentication.UsernamePasswordAuthenticationToken
Details:org.springframework.security.web.authentication.WebAuthenticationDetails@166c8: RemoteIpAddress: 0:0:0:0:0:0:0:1; SessionId: node04v47liue6knt1oghnzgiqb9dx0
Principal:root
-----------------------------------------------------------------------
root is loging , role is[]

复制代码
-
即成功登录了,因为我们在
authenticate()方法中直接声明了一个Authentication的实例UsernamePasswordAuthenticationToken,并返回了,正如上面所说,当返回Authentication实例时,则默认为授权成功,而如果我们返回null,则说明无法判断,不会登录成功。 -
此时我们再创建一个对象
UserAfterProvider,其也实现AuthenticationProvider接口,并将UserAfterProvider和UserAuthProvider的authenticate()返回值都设置为null,我们再次使用上面的数据进行登录,控制台输出如下:
This is UserAuthProvider
starting supports
class java.lang.Class
-----------------------------------------------------------------------
This is UserAuthProvider
starting authenticate ... ...
Credentials:1234
Name:root
Class:class org.springframework.security.authentication.UsernamePasswordAuthenticationToken
Details:org.springframework.security.web.authentication.WebAuthenticationDetails@43458: RemoteIpAddress: 0:0:0:0:0:0:0:1; SessionId: node01m47f3t6xq5a470fu07jaipzb0
Principal:root
-----------------------------------------------------------------------
This is UserAfterProvider
starting supports
class java.lang.Class
-----------------------------------------------------------------------
This is UserAfterProvider
starting authenticate ... ...
Credentials:1234
Name:root
Class:class org.springframework.security.authentication.UsernamePasswordAuthenticationToken
Details:org.springframework.security.web.authentication.WebAuthenticationDetails@43458: RemoteIpAddress: 0:0:0:0:0:0:0:1; SessionId: node01m47f3t6xq5a470fu07jaipzb0
Principal:root
-----------------------------------------------------------------------

复制代码
- 即两个Porvider都进行了验证,都没有通过(返回null),说明所有加入
AuthenticationManagerBuilder的验证都会进行一遍,那么如果我们将其中一个Provider的authenticate()返回值还原为Authentication实例,再次登录,则控制台会输出如下结果:
This is UserAuthProvider
starting supports
class java.lang.Class
-----------------------------------------------------------------------
This is UserAuthProvider
starting authenticate ... ...
Credentials:1234
Name:root
Class:class org.springframework.security.authentication.UsernamePasswordAuthenticationToken
Details:org.springframework.security.web.authentication.WebAuthenticationDetails@166c8: RemoteIpAddress: 0:0:0:0:0:0:0:1; SessionId: node04v47liue6knt1oghnzgiqb9dx0
Principal:root
-----------------------------------------------------------------------
root is loging , role is[]
This is UserAuthProvider
starting supports
class java.lang.Class
-----------------------------------------------------------------------
This is UserAuthProvider
starting authenticate ... ...
Credentials:null
Name:root
Class:class org.springframework.security.authentication.UsernamePasswordAuthenticationToken
Details:org.springframework.security.web.authentication.WebAuthenticationDetails@166c8: RemoteIpAddress: 0:0:0:0:0:0:0:1; SessionId: node04v47liue6knt1oghnzgiqb9dx0
Principal:root
-----------------------------------------------------------------------
复制代码
-
因为我们重写了
AuthenticationSuccessHandler,所以验证成功后悔重定向到**/ ,而我Controller里对 / 又做了一次重定向到 /index**,所以发生了两次验证,而这次我们发现因为UserAuthProvider通过了,所以UserAfterProvider并没有进行验证,所以我们可以知道,只要有一个Provider通过了验证我们就可以认为通过了验证。 -
因此,我们可以通过实现
AuthenticationProvider来写入自己的一些认证逻辑,甚至可以@Autowire相关Service来辅助实现。
正文到此结束
- 本文标签: JDBC 注释 ACE web springboot db 配置 provider logo bean 认证 AIO https 代码 Word ssh Spring Security node 网站 参数 Service 定制 session git IDE http java id remote cat 实例 Security ldap 权限控制 ip 数据 src spring IO tab Proxy tar App Architect root token servlet UI build rmi ORM authenticate
- 版权声明: 本文为互联网转载文章,出处已在文章中说明(部分除外)。如果侵权,请联系本站长删除,谢谢。
- 本文海报: 生成海报一 生成海报二
热门推荐


相关文章

近期评论
-
谢谢
-
https://www.newcmy.com/register?aff=HBVX建议您试试草莓云机场,可以流畅观看youtube和tiktok,上reddit/x也没有问题,还有各种ai优化节点。
-
-
-
想购买您这个站,我的联系方式QQ741756694微信同步 能卖联系
-
-
-
-
-
https://www.liuhaihua.cn/archives/40657.html 这篇博客中的图片打不开了
Loading...
![[HBLOG]公众号](https://www.liuhaihua.cn/img/qrcode_gzh.jpg)

