Spring boot集成Redis(2)—RedisTemplate的使用来存储Map集合
前言:上一篇文章我们用的是StringRedisTemplate,但是它存在一点问题,也迫使我重新写了代码,问题是:在我们往缓存中存入数字形式的String类型时,我们在利用Spring could将获取到的数据发送到另一服务时,我们发现数据已经被强转为Integer类型了,因为我们可能传输的数据庞大,类型多样,为了统一类型,以及开发方便,所以我将缓存改成RedisTemplate这种类型,进行增删改查的操作,文中没有特别举例更新操作,其更新操作与添加操作一样,当key一样时进行添加就会覆盖原value值,完成更新。RedisTemplate需要我们自己去配置它并进行实例化。接下来,举例子,上代码:
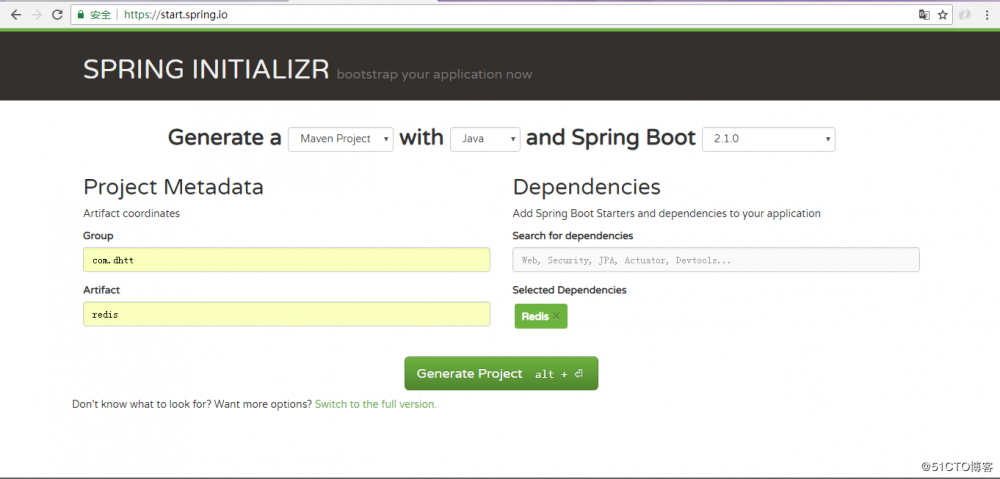
首先建立Spring boot项目添加Redis依赖

下载导入IDE,我们观察pom.xml文件:
<?xml version="1.0" encoding="UTF-8"?>
<project xmlns="http://maven.apache.org/POM/4.0.0" xmlns:xsi="http://www.w3.org/2001/XMLSchema-instance"
    xsi:schemaLocation="http://maven.apache.org/POM/4.0.0 http://maven.apache.org/xsd/maven-4.0.0.xsd">
    <modelVersion>4.0.0</modelVersion>

    <groupId>com.test</groupId>
    <artifactId>redis</artifactId>
    <version>0.0.1-SNAPSHOT</version>
    <packaging>jar</packaging>

    <name>redis</name>
    <description>Demo project for Spring Boot</description>

    <parent>
        <groupId>org.springframework.boot</groupId>
        <artifactId>spring-boot-starter-parent</artifactId>
        <version>2.1.0.RELEASE</version>
        <relativePath/> <!-- lookup parent from repository -->
    </parent>

    <properties>
        <project.build.sourceEncoding>UTF-8</project.build.sourceEncoding>
        <project.reporting.outputEncoding>UTF-8</project.reporting.outputEncoding>
        <java.version>1.8</java.version>
    </properties>

    <dependencies>
        <dependency>
            <groupId>org.springframework.boot</groupId>
            <artifactId>spring-boot-starter-data-redis</artifactId>
        </dependency>

        <dependency>
            <groupId>org.springframework.boot</groupId>
            <artifactId>spring-boot-starter-web</artifactId>
        </dependency>

        <dependency>
            <groupId>org.springframework.boot</groupId>
            <artifactId>spring-boot-starter-test</artifactId>
        </dependency>
    </dependencies>

    <build>
        <plugins>
            <plugin>
                <groupId>org.springframework.boot</groupId>
                <artifactId>spring-boot-maven-plugin</artifactId>
            </plugin>
        </plugins>
    </build>

</project>
1.配置application.properties
#redis
spring.redis.host=主机地址
spring.redis.password=admin
spring.redis.port=6379
spring.redis.timeout=10000
spring.redis.jedis.pool.max-idle=200
spring.redis.jedis.pool.min-idle=300000
spring.redis.jedis.pool.max-active=400
spring.redis.jedis.pool.max-wait=10000
2.我们写配置配置类实例化RedisTemplate
package com.test.redis.config;

import org.springframework.context.annotation.Bean;
import org.springframework.context.annotation.Configuration;
import org.springframework.data.redis.core.RedisTemplate;
import org.springframework.data.redis.serializer.GenericJackson2JsonRedisSerializer;
import org.springframework.data.redis.serializer.StringRedisSerializer;
import org.springframework.data.redis.connection.RedisConnectionFactory;

@Configuration
public class RedisConfig {

    /**
     * 实例化 RedisTemplate 对象
     *
     * @return
     */
    @Bean
    public RedisTemplate<String, Object> functionDomainRedisTemplate(RedisConnectionFactory redisConnectionFactory) {
        RedisTemplate<String, Object> redisTemplate = new RedisTemplate<>();
        initDomainRedisTemplate(redisTemplate, redisConnectionFactory);
        return redisTemplate;
    }

    /**
     * 设置数据存入 redis 的序列化方式,并开启事务
     *
     * @param redisTemplate
     * @param factory
     */
    private void initDomainRedisTemplate(RedisTemplate<String, Object> redisTemplate, RedisConnectionFactory factory) {
        // 如果不配置Serializer,那么存储的时候缺省使用String,如果用User类型存储,那么会提示错误User can't cast to
        // String!
        redisTemplate.setKeySerializer(new StringRedisSerializer());
        redisTemplate.setHashKeySerializer(new StringRedisSerializer());
        redisTemplate.setHashValueSerializer(new GenericJackson2JsonRedisSerializer());
        redisTemplate.setValueSerializer(new GenericJackson2JsonRedisSerializer());
        // 开启事务
        redisTemplate.setEnableTransactionSupport(true);
        redisTemplate.setConnectionFactory(factory);
    }

}
3.写缓存操作的Service层,进行增删改查方法的定义:
package cn.com.dhcc.idatabus.admin.console.service;

import java.util.List;
import java.util.Map;

import javax.annotation.Resource;

import org.springframework.data.redis.core.HashOperations;
import org.springframework.data.redis.core.RedisTemplate;
import org.springframework.data.redis.serializer.JdkSerializationRedisSerializer;
import org.springframework.stereotype.Service;

@Service
public class RedisService {

    @Resource
    private RedisTemplate<String,Object> template;

    /**
     * 存储数据或修改数据
     *
     * @param modelMap
     * @param mapName
     */
    public void setKey(String mapName, Map<String, Object> modelMap) {
        HashOperations<String, String, Object> hps = template.opsForHash();
        hps.putAll(mapName, modelMap);
    }

    /**
     * 获取数据Map
     *
     * @param mapName
     * @return
     */
    public Map<String, Object> getMapValue(String mapName) {
        HashOperations<String, String, Object> hps = this.template.opsForHash();
        return hps.entries(mapName);

    }

    /**
     * 获取数据value
     *
     * @param mapName
     * @param hashKey
     * @return
     */
    public Object getValue(String mapName, String hashKey) {
        HashOperations<String, String, Object> hps = this.template.opsForHash();
        return hps.get(mapName, hashKey);

    }

    /**
     * 批量删除缓存数据
     *
     * @param keys
     */
    public void deleteData(List<String> keys) {
        // 执行批量删除操作时先序列化template
        template.setKeySerializer(new JdkSerializationRedisSerializer());
        template.delete(keys);
    }

}
4.本次例子的实体类
package com.test.redis.entity;

public class User {
    private Integer id;
    private String name;
    private String password;

    public User() {
        super();
    }

    public User(Integer id, String name, String password) {
        super();
        this.id = id;
        this.name = name;
        this.password = password;
    }

    public Integer getId() {
        return id;
    }

    public void setId(Integer id) {
        this.id = id;
    }

    public String getName() {
        return name;
    }

    public void setName(String name) {
        this.name = name;
    }

    public String getPassword() {
        return password;
    }

    public void setPassword(String password) {
        this.password = password;
    }

    @Override
    public String toString() {
        return "User [id=" + id + ", name=" + name + ", password=" + password + "]";
    }

}
5.编写Controller层,来实现缓存的操作
package com.test.redis.web;

import java.util.ArrayList;
import java.util.HashMap;
import java.util.List;
import java.util.Map;

import javax.servlet.http.HttpServletRequest;

import org.springframework.beans.factory.annotation.Autowired;
import org.springframework.stereotype.Controller;
import org.springframework.web.bind.annotation.GetMapping;
import org.springframework.web.bind.annotation.ResponseBody;

import com.test.redis.entity.User;
import com.test.redis.service.RedisService;

@Controller
public class UserController {

    private static final String mapName="mapName";
    @Autowired
    private RedisService redisService;

    @GetMapping( "/templateAdd.do")
    @ResponseBody
    public Map<String, Object> addUser(HttpServletRequest request){
        Map<String, Object> modelMap=new HashMap<String,Object>();
        User user=new User();
        user.setName("hehename");
        user.setPassword("hehePassword");
        //存放hash值
        modelMap.put("name", user.getName());
        modelMap.put("password", user.getPassword());
        redisService.setKey(mapName, modelMap);
        //获取map集合
        Map<String, Object> modelMap1= redisService.getMapValue(mapName);
        Object value= redisService.getValue(mapName, "name");
        System.out.println(" value : "+value);
        modelMap1.put("从缓存中根据key取到的value", value);
        return modelMap1;
    }

    @GetMapping( "/templateDelete.do")
    @ResponseBody
    public Map<String, Object> deleteUser(HttpServletRequest request){
        //获取即将删除的key值,这里我们做的批量删除
        List<String> keys=new ArrayList<>();
        keys.add("heheanme");
        //开始执行删除操作
        redisService.deleteData(keys);
        //获取map集合
        Map<String, Object> modelMap1= redisService.getMapValue(mapName);
        Object value= redisService.getValue(mapName, "name");
        System.out.println(" value : "+value);
        modelMap1.put("从缓存中根据key取到的value", value);
        return modelMap1;
    }

}
接下来,我们访问Controller路径
(1) http://localhost:8081/templateAdd.do
结果:

(2) http://localhost:8081/templateDelete.do
结果:

正文到此结束
- 本文标签: IO NSA value servlet src connectionFactory 配置 HashMap DOM apache final http plugin IDE key pom dist 下载 map bus App java 开发 js 主机 bean redis tk XML maven build 文章 cat Spring Boot CTO spring dependencies https core Service 数据 缓存 json tab schema Word description id 代码 list ip entity Action UI ArrayList 实例 web Connection 删除 tar
- 版权声明: 本文为互联网转载文章,出处已在文章中说明(部分除外)。如果侵权,请联系本站长删除,谢谢。
- 本文海报: 生成海报一 生成海报二
热门推荐
相关文章
Loading...


![[HBLOG]公众号](https://www.liuhaihua.cn/img/qrcode_gzh.jpg)

