IDEA&Android Studio Plugin开发
如果敲代码时总是会有一些 规律、重复 和 浪费时间 的工作,那么你就可以好好考虑一下能否通过 脚本或插件 的方式提高工作效率。idea 本身自带众多实用代码插件,getter,setter,代码补全… 且其第三方插件采用 集中发布模式 ,可以让开发者快速安装和发布插件,这点要优于 eclipse。
开发插件之前,得看看idea平台给我提供了哪些接口给我们使用,使用接口前最好简单了解下背后的实现原理。
这篇文章包含:
- VFS(Virtual File System) 虚拟文件系统
- Program Structure Interface 程序结构接口
- 创建 idea plugin
- plugin 代码编写及安装
VFS
IDEA的文件系统 Virtual File System 目标:
The virtual file system (VFS) is a component of IntelliJ Platform that encapsulates most of its activity for working with files. It serves the following main purposes:
- Providing a universal API for working with files regardless of their actual location (on disk, in archive, on a HTTP server etc.)【提供一个通用的API处理文件,不论其位置(是在硬盘上,压缩文件里,网络服务器上等) 】
- Tracking file modifications and providing both old and new versions of the file content when a modification is detected.【跟踪文件的修改,并且在检测到修改时,提供文件内容的旧版本和新版本】
- Providing a possibility to associate additional persistent data with a file in the VFS.【 提供将持久数据与VFS中的文件关联的可能性 】
第一个目的和Linux的VFS差不多,都是为了提供 统一的上层接口,以此 屏蔽 底层各种不同的文件系统,对开发者透明,以及方便其他文件系统快速接入。
具体实现就是通过 快照 的方式,将快照作为中间层,提供文件的“多”读“一”写,并且适配不同的文件系统,给插件开发者 提供统一接口。新增类文件,写入代码等对文件的操作 都是通过 com.intellij.openapi.vfs.VirtualFile,基于二进制流进行读写,可以把它当做原生File类来类比。
VituralFile是作用域是应用级别(即使在 多个工程中打开,各工程展示的实例也由同一个虚拟文件实例代理 ), 对于一份快照,来自任何线程的数据读取都是允许的,但是只有主线程能够写入,官方称为 通用线程规则 ,使用一个单独的 读写锁 实现。需要注意的是当读取文件时候,应调用VirtualFile的isValid方法是否返回true,因为本地文件已经被移除了,但是对应的VirtualFile没有被回收。
几种获取VirtualFile的方式:
- 从一个 action : 通过调用 e.getData(PlatformDataKeys.VIRTUAL_FILE) 获取当前正在编辑的文件
- 从本地系统的路径 : LocalFileSystem.getInstance().findFileByIoFile()
- 从一个PSI文件: psiFile.getVirtualFile()
- 从文档 : FileDocumentManager.getInstance().getFile()
PSI
程序结构接口 Program Structure Interface, 负责解析文件,创建语法和语义代码模型。
PsiFile是将 文件内容按照特定编程语言的元素层次结构相对应进行代理的根结构。PsiFile是所有Psi文件的基类,一种语言会有特定的实现,例如 Java语言对应PsiJavaFile类,XML对应 XmlFile 类 。
PsiFile作用域是 应用级别 ,如果一个文件所属的不同项目同时打开,这个文件会被不同的PsiFile实例代理。
获取 PsiFile 的方式:
-
从action中:e.getData(LangDataKeys.PSI_FILE)
-
从虚拟文件中:PsiManager.getInstance(project).findFile()
-
从文档中:PsiDocumentManager.getInstance(project).getPsiFile()
-
从文件中的一个元素:psiElement.getContainingFile()
-
用FilenameIndex.getFilesByName(project, name, scope)方法在项目中找到一个指定名称的文件
PSI(程序结构接口)文件表示PSI元素的层次结构(所谓的PSI树), PsiElement 是所有PSI元素的基类,Psi元素可以是PsiClass Psi类,PsiMethod Psi方法,PsiImportList Psi导入列表,PsiParameter Psi参数,总之只要是Java类文件里有的结构,都用对应的Psi元素。元素之间可以相互嵌套,成树状结构。
获取 PsiElements
- 从 action中: e.getData(LangDataKeys.PSI_ELEMENT) 如果光标位于一个引用上,返回的是解析引用之后的元素。
- 从文件偏移: PsiFile.findElementAt() 返回的是最细级别的元素,如偏移量位于方法头中,返回的是PsiMethod,而不是PsiClass,虽然方法确实属于这个类.
- 通过遍历一个 PSI file : 使用 PsiRecursiveElementWalkingVisitor
- 通过解析一个引用 : PsiReference.resolve()
创建一个简单的Plugin
介绍完相关背景和知识后,我们实战开发2个plugin,现在开始先来实现第一个最简单的弹窗提示的Plugin,并将其 构建 打包 安装 到自己的idea中。
1. 准备环境。安装 idea Ultimate 2018版 ( 其他版本也可以 ),JDK8。
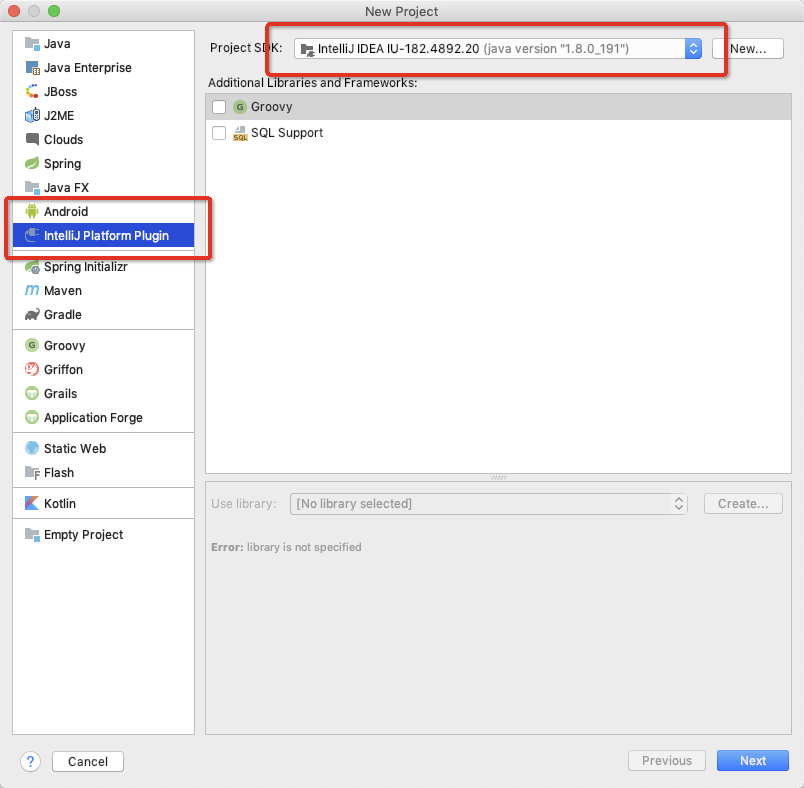
2.新建 Plugin工程 , 顶部菜单栏 File > New > Project… ,然后出现如下界面,选择 IntelliJ Platform Plugin,SDK检查一下有没有,没有的话,下载到电脑,手动选择目录。然后 点击 Next> 为工程命名 > Next
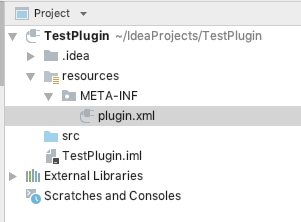
3.创建好后,工程结构 如下图,在src目录下新建一个自己的包,我这用的是 com.chenyi
- 在刚刚的包下 新建一个 HelloAction 类,继承自 AnAction (全类名com.intellij.openapi.actionSystem.AnAction) ,并重写 actionPerformed 方法,当用户点击插件提供的 菜单项 时会触发该方法。与此同时还可以重写 update 方法,该方法是要显示 插件菜单项 时会触发,主要用于控制菜单项的显示与隐藏,当你打开的是xml文件时,这个时候适用于Java的插件就应该变灰不可选或者隐藏。
- 编写一个弹消息的Java代码
package com.chenyi;

import com.intellij.openapi.actionSystem.AnAction;
import com.intellij.openapi.actionSystem.AnActionEvent;
import com.intellij.openapi.ui.Messages;

/**
 * @author: chenyi.zsq
 * @Date: 2018/11/5
 */
public class HelloAction extends AnAction{

    @Override
    public void actionPerformed(AnActionEvent anActionEvent) {
        Messages.showMessageDialog("Hello Plugin", "PluginTitle", null);
        // 以下代码用于输出当前java文件里的所有方法信息,在调试模式可以看到。
        VirtualFile virtualFile = e.getData(PlatformDataKeys.VIRTUAL_FILE);
        PsiFile psiFile = PsiManager.getInstance(e.getProject()).findFile(virtualFile);
        Arrays.stream(psiFile.getChildren())
            .filter(child -> child instanceof PsiClass)
            .map(child -> child.getChildren())
            .flatMap(psiChild -> Arrays.stream(psiChild))
            .filter(classChild -> classChild instanceof PsiMethod)
            .forEach(psiMethod -> {

                PsiMethod method = (PsiMethod)psiMethod;
                StringBuilder sb = new StringBuilder();
                sb.append("方法的名: ").append(method.getName())
                    .append(" 返回值类型:").append(method.getReturnType().getPresentableText())
                    .append(" 参数:").append(method.getParameters());
                System.out.println(sb.toString());
            });
    }

}
编写 resources/META-INF/plugin.xml 文件。在
<idea-plugin>
  <id>com.your.company.unique.plugin.id</id>
  <name>Plugin display name here</name>
  <version>1.0</version>
  <vendor email="support@yourcompany.com" url="http://www.yourcompany.com">YourCompany</vendor>

  <description><![CDATA[
      Enter short description for your plugin here.<br>
      <em>most HTML tags may be used</em>
    ]]></description>

  <change-notes><![CDATA[
      Add change notes here.<br>
      <em>most HTML tags may be used</em>
    ]]>
  </change-notes>

  <!-- please see http://www.jetbrains.org/intellij/sdk/docs/basics/getting_started/build_number_ranges.html for description -->
  <idea-version since-build="173.0"/>

  <!-- please see http://www.jetbrains.org/intellij/sdk/docs/basics/getting_started/plugin_compatibility.html
       on how to target different products -->
  <!-- uncomment to enable plugin in all products
  <depends>com.intellij.modules.lang</depends>
  -->

  <extensions defaultExtensionNs="com.intellij">
    <!-- Add your extensions here -->
  </extensions>

  <actions>
    <action class="com.chenyi.HelloAction" id="HelloAction" text="第一个插件">
      <add-to-group group-id="WindowMenu" anchor="first"/><!--添加到菜单栏的Window标签下,位置固定在第一位 -->
    </action>
  </actions>

</idea-plugin>
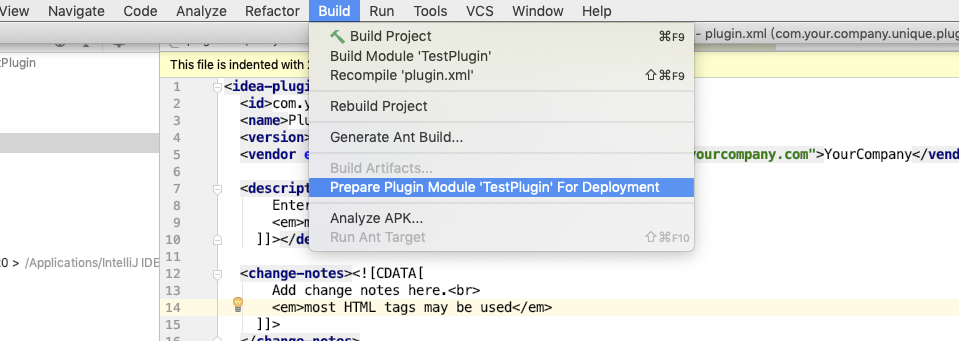
6. 编写完之后,可以点击运行或者调试,Idea将会另起一个进程自动安装插件,可以在此调试,但是debug模式中发现,对actionPerformed 方法没响应,对update事件有响应,最后调试时将代码写到update里运行,打正式包时把代码放回actionPerformed。如果想要正式包,需要点击构建打包,会在当前工程根目录下 生成一个 .jar文件。
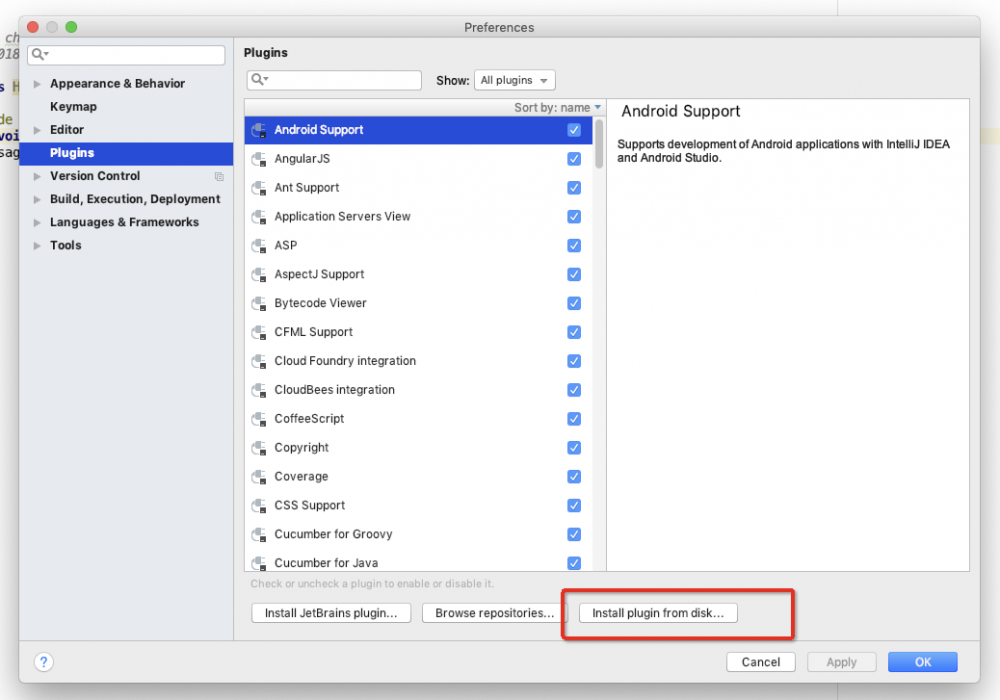
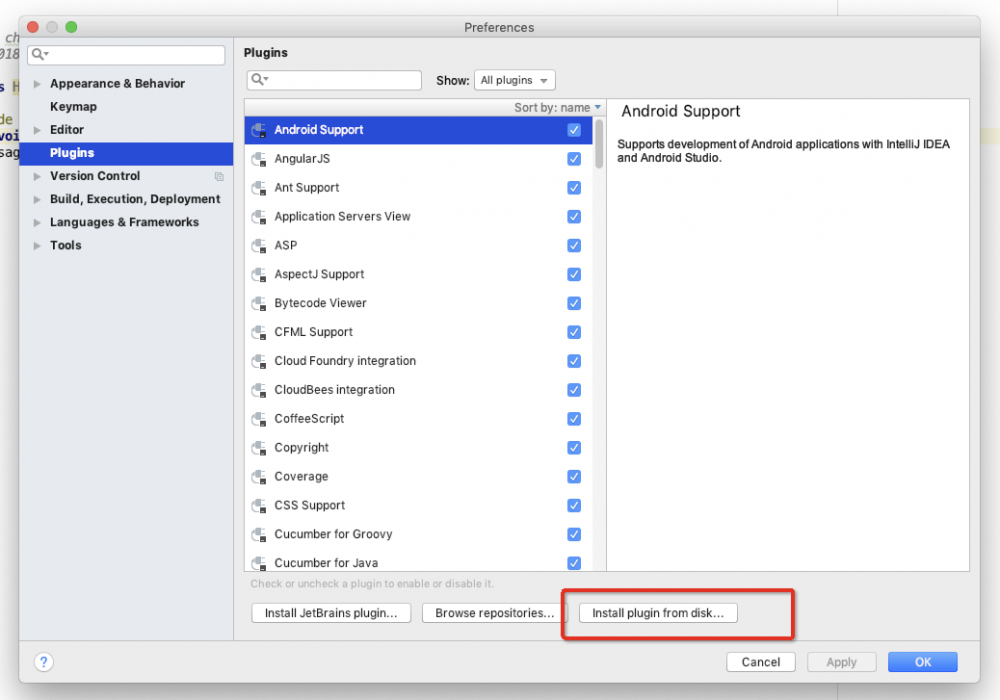
- 从本地磁盘安装Plugin , 打开首选项(或Setting)-> Plugins -> install Plugin from disk,重启
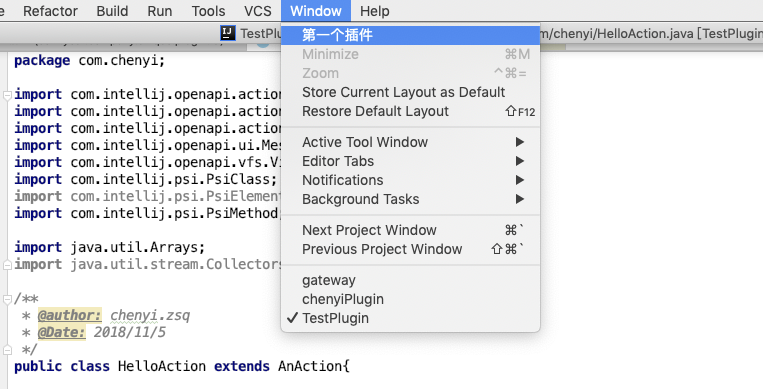
- 重启后可以在菜单栏下 Window标签看到刚刚开发的Plugin,点击之后会弹出消息,并显示当前编辑的文件名。

至此,一个简单的Plugin开发完啦,下一篇我们将基于现实需求开发一个自动生成格式化代码插件。
需求:进入公司后发现,在HSF(内部一个 分布式服务框架 ) 服务间会频繁的进行跨应用服务调用,由于规范性,每个服务在调用前 都要封装一层SPI代码。用于AOP拦截入参和结果,以及对异常的捕捉。而代码往往就是 Service类的一层封装,代码类似如下:
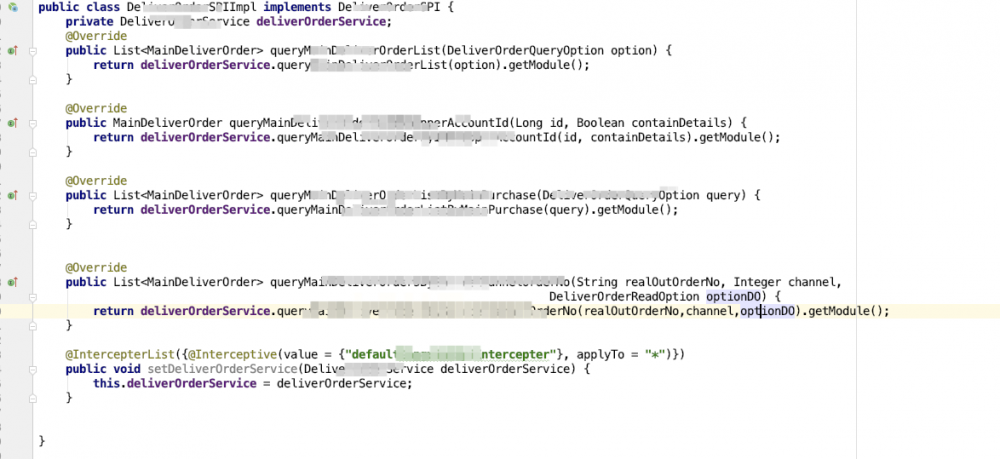
xxxSPI 和 xxxService方法名,参数都一样,返回值只要在xxxService返回值基础上getModule拆一下,开发人员同时需要创建 xxxServiceSPI和xxxServiceImplSPI,然后挨个把方法调用一遍,设置拦截器,我觉得完全可以将这部分时间省掉。
目前已完成大部分编码,GitHub地址: https://github.com/zhengshiqiang47/ChenyiSPIPlugin
- 本文标签: Java类 线程 IDE Service HTML 分布式 update 插件 https ACE 安装 代码 IO Document tag eclipse 锁 description 数据 Action App id java list git http map GitHub 自动生成 遍历 stream tab 开发 find 调试 message CEO 文件系统 目录 key struct src cat API plugin 解析 bug 插件开发 返回值类型 tar 开发者 下载 时间 MQ linux XML ip build 进程 Menu ORM Android 模型 服务器 参数 UI 文章 需求 AOP 实例 mail
- 版权声明: 本文为互联网转载文章,出处已在文章中说明(部分除外)。如果侵权,请联系本站长删除,谢谢。
- 本文海报: 生成海报一 生成海报二


![[HBLOG]公众号](https://www.liuhaihua.cn/img/qrcode_gzh.jpg)

