spring-boot下使用LogBack,使用HTTP协议将日志推送到日志服务器
当项目上线发生错误或是异常后,我们总是期望能够在第一时间内收到用户的详细反馈。当然,这也无疑会是一个非常好的提升软件质量的方法。但如果用户不愿意反馈呢?此时,我们便可以借助日志系统,比如:每隔一小时,服务器自动向我们报告一下当前的服务情况。当有错误或是警告或是异常信息时,及时向我们的报告等。
在基于上述的需求上,我们结合 spring-boot 内置的 LogBack ,来给出将 warn , error 信息发送到远程服务器的示例。
项目地址
https://github.com/mengyunzhi/sample/tree/master/spring-boot/log-back
开发环境: java1.8 + spring-boot:2.1.2
实现步骤
引入相关的依赖
pom.xml
<?xml version="1.0" encoding="UTF-8"?>
<project xmlns="http://maven.apache.org/POM/4.0.0" xmlns:xsi="http://www.w3.org/2001/XMLSchema-instance"
    xsi:schemaLocation="http://maven.apache.org/POM/4.0.0 http://maven.apache.org/xsd/maven-4.0.0.xsd">
    <modelVersion>4.0.0</modelVersion>
    <parent>
        <groupId>org.springframework.boot</groupId>
        <artifactId>spring-boot-starter-parent</artifactId>
        <version>2.1.2.RELEASE</version>
        <relativePath/> <!-- lookup parent from repository -->
    </parent>
    <groupId>com.mengyunzhi.sample</groupId>
    <artifactId>log-back</artifactId>
    <version>0.0.1-SNAPSHOT</version>
    <name>log-back</name>
    <description>Demo project for Spring Boot</description>

    <properties>
        <java.version>1.8</java.version>
    </properties>

    <dependencies>
        <dependency>
            <groupId>org.springframework.boot</groupId>
            <artifactId>spring-boot-starter-web</artifactId>
        </dependency>

        <dependency>
            <groupId>org.springframework.boot</groupId>
            <artifactId>spring-boot-starter-test</artifactId>
            <scope>test</scope>
        </dependency>
    </dependencies>

    <build>
        <plugins>
            <plugin>
                <groupId>org.springframework.boot</groupId>
                <artifactId>spring-boot-maven-plugin</artifactId>
            </plugin>
        </plugins>
    </build>

</project>
启动项目
控制台打印信息如下:
.   ____          _            __ _ _
 /// / ___'_ __ _ _(_)_ __  __ _ / / / /
( ( )/___ | '_ | '_| | '_ // _` | / / / /
 ///  ___)| |_)| | | | | || (_| |  ) ) ) )
  '  |____| .__|_| |_|_| |_/__, | / / / /
 =========|_|==============|___/=/_/_/_/
 :: Spring Boot ::        (v2.1.2.RELEASE)

2019-01-16 10:35:04.999  INFO 1571 --- [           main] c.m.sample.logback.LogBackApplication    : Starting LogBackApplication on panjiedeMac-Pro.local with PID 1571 (/Users/panjie/github/mengyunzhi/sample/spring-boot/log-back/target/classes started by panjie in /Users/panjie/github/mengyunzhi/sample/spring-boot/log-back)
2019-01-16 10:35:05.002  INFO 1571 --- [           main] c.m.sample.logback.LogBackApplication    : No active profile set, falling back to default profiles: default
2019-01-16 10:35:05.913  INFO 1571 --- [           main] o.s.b.w.embedded.tomcat.TomcatWebServer  : Tomcat initialized with port(s): 8080 (http)
2019-01-16 10:35:05.934  INFO 1571 --- [           main] o.apache.catalina.core.StandardService   : Starting service [Tomcat]
2019-01-16 10:35:05.935  INFO 1571 --- [           main] org.apache.catalina.core.StandardEngine  : Starting Servlet engine: [Apache Tomcat/9.0.14]
2019-01-16 10:35:05.940  INFO 1571 --- [           main] o.a.catalina.core.AprLifecycleListener   : The APR based Apache Tomcat Native library which allows optimal performance in production environments was not found on the java.library.path: [/Users/panjie/Library/Java/Extensions:/Library/Java/Extensions:/Network/Library/Java/Extensions:/System/Library/Java/Extensions:/usr/lib/java:.]
2019-01-16 10:35:06.008  INFO 1571 --- [           main] o.a.c.c.C.[Tomcat].[localhost].[/]       : Initializing Spring embedded WebApplicationContext
2019-01-16 10:35:06.008  INFO 1571 --- [           main] o.s.web.context.ContextLoader            : Root WebApplicationContext: initialization completed in 968 ms
2019-01-16 10:35:06.183  INFO 1571 --- [           main] o.s.s.concurrent.ThreadPoolTaskExecutor  : Initializing ExecutorService 'applicationTaskExecutor'
2019-01-16 10:35:06.335  INFO 1571 --- [           main] o.s.b.w.embedded.tomcat.TomcatWebServer  : Tomcat started on port(s): 8080 (http) with context path ''
2019-01-16 10:35:06.338  INFO 1571 --- [           main] c.m.sample.logback.LogBackApplication    : Started LogBackApplication in 1.616 seconds (JVM running for 2.093)
配置logback
新建 resources/logback-spring.xml ,初始化以下信息:
<?xml version="1.0" encoding="UTF-8"?>
<!--开启debug模式-->
<configuration debug="true">
</configuration>
启动项目,控制台打印信息如下:
10:33:41,053 |-INFO in ch.qos.logback.classic.joran.action.ConfigurationAction - End of configuration.
10:33:41,054 |-INFO in org.springframework.boot.logging.logback.SpringBootJoranConfigurator@55a1c291 - Registering current configuration as safe fallback point
10:33:41,067 |-WARN in Logger[org.springframework.boot.context.logging.ClasspathLoggingApplicationListener] - No appenders present in context [default] for logger [org.springframework.boot.context.logging.ClasspathLoggingApplicationListener].

  .   ____          _            __ _ _
 /// / ___'_ __ _ _(_)_ __  __ _ / / / /
( ( )/___ | '_ | '_| | '_ // _` | / / / /
 ///  ___)| |_)| | | | | || (_| |  ) ) ) )
  '  |____| .__|_| |_|_| |_/__, | / / / /
 =========|_|==============|___/=/_/_/_/
 :: Spring Boot ::        (v2.1.2.RELEASE)
如何判断配置成功了?
我们比较上面两个日志,第一个是没有配置 logback-spring.xml ,第二个是配置 logback-spring.xml 了。是的,如果我们发现 spring 大LOG 打印前,在控制台中打印了 ch.qos... 输出的日志信息,则说明 logback-spring.xml 。同时,如果 logback-spring.xml 起作用的话,我们还发现 spring 大LOG 下面,一行日志也没有了。
是的,由于 logback-spring.xml 对日志输出进行了控制,而配置信息中,我们又没有写任何的信息,为空。所以 spring 大LOG 后面当然就不显示任何日志了信息了。
查看 spring-boot 的默认配置
我们使用IDEA的打开文件快捷键 commod+shift+o ,输入 base.xml ,然后再使用查看文件位置快捷键 option+F1 来查看文件位置。更来到了 spring-boot 的默认配置。
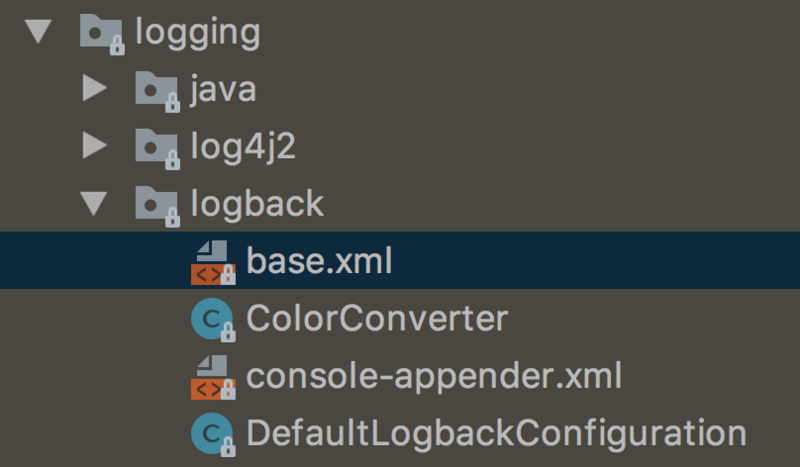
上述文件,即为 spring-boot 的默认配置。下面,我们将以上配置引入到我们的 logback-spring.xml 中,来实现 spring-boot 的默认日志效果。
实现默认效果
复制相应的代码至 logback-spring.xml 中:
<?xml version="1.0" encoding="UTF-8"?>
<!--启用debug模式后,将在`spring-boot 大LOG`上方打印中logBack的配置信息-->
<configuration debug="true">
    <!--包含配置文件 org/springframework/boot/logging/logback/defaults.xml-->
    <include resource="org/springframework/boot/logging/logback/defaults.xml" />

    <!--定义变量LOG_FILE,值为${LO...}-->
    <property name="LOG_FILE" value="${LOG_FILE:-${LOG_PATH:-${LOG_TEMP:-${java.io.tmpdir:-/tmp}}}/spring.log}"/>

    <!--包含配置文件,该配置文件中,定义了 控制台日志是按什么规则,什么形式输出的-->
    <include resource="org/springframework/boot/logging/logback/console-appender.xml" />

    <!--包含配置文件,该配置文件中,定义了 文件日志是按什么规则,什么形式输出的-->
    <include resource="org/springframework/boot/logging/logback/file-appender.xml" />

    <!--定义日志等级-->
    <root level="INFO">
        <!--启用第一个appender为CONSOLE, 该名称定义于org/springframework/boot/logging/logback/console-appender.xml中-->
        <appender-ref ref="CONSOLE" />

        <!--启用第二个appender为FILE, 该名称定义于org/springframework/boot/logging/logback/file-appender.xml中-->
        <appender-ref ref="FILE" />
    </root>
</configuration>
然后我们再次启动项目,会发现与原 spring-boot 相比较,在 spring 大LOGO 前多一些日志相关的配置信息输出,其它的信息是一致的。
实现http日志appender
appender
通过上面的注释,我们猜测: appender 这个东西,能够把日志处理成我们想要的样子。
在进行 官方文档 的学习中,我们发现了很多已经存在的 appender 。与我们的需求比较相近的是 SyslogAppender 。
liunx 有标准的syslog服务,用于接收syslog日志。
通过查询相关资料,我们获悉,此 syslog 服务,一身作用于514端口上。直接使用 UDP 或 TCP 协议发送 MESSAGE 。而我们此时想用更熟悉的 http 协议。所以暂时放弃。
小于1024的均为已知端口,可以通过端口号来查询对应的协议或服务名称。
第三方http appender
除了按官方的教程来写自己的 http appender ,还有一些比较好的第三方 appender 可以使用,比如: LogglyAppender 。找到官方文档,并引入:
pom.xml
<dependency>
            <groupId>org.logback-extensions</groupId>
            <artifactId>logback-ext-loggly</artifactId>
            <version>0.1.5</version>
        </dependency>
logback-spring.xml
<?xml version="1.0" encoding="UTF-8"?>
<!--启用debug模式后,将在`spring-boot 大LOG`上方打印中logBack的配置信息-->
<configuration debug="true">
    <!--包含配置文件 org/springframework/boot/logging/logback/defaults.xml-->
    <include resource="org/springframework/boot/logging/logback/defaults.xml" />

    <!--定义变量LOG_FILE,值为${LO...}-->
    <property name="LOG_FILE" value="${LOG_FILE:-${LOG_PATH:-${LOG_TEMP:-${java.io.tmpdir:-/tmp}}}/spring.log}"/>

    <!--包含配置文件,该配置文件中,定义了 控制台日志是按什么规则,什么形式输出的-->
    <include resource="org/springframework/boot/logging/logback/console-appender.xml" />

    <!--包含配置文件,该配置文件中,定义了 文件日志是按什么规则,什么形式输出的-->
    <include resource="org/springframework/boot/logging/logback/file-appender.xml" />

    <!--引入第三方appender, 起名为http-->
    <appender name="HTTP" class="ch.qos.logback.ext.loggly.LogglyAppender">
        <!--请求的地址-->
        <endpointUrl>http://localhost:8081/log</endpointUrl>
    </appender>

    <!--定义日志等级-->
    <root level="INFO">
        <!--启用第一个appender为CONSOLE, 该名称定义于org/springframework/boot/logging/logback/console-appender.xml中-->
        <appender-ref ref="CONSOLE" />

        <!--启用第二个appender为FILE, 该名称定义于org/springframework/boot/logging/logback/file-appender.xml中-->
        <appender-ref ref="FILE" />

        <!--启用第三个appender为HTTP-->
        <appender-ref ref="HTTP" />
    </root>
</configuration>
测试
测试方法如图:
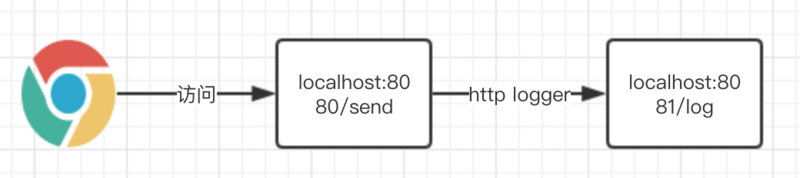
- 使用浏览器来访问当前项目的'/send'地址
-
send中我们加入logger。 - 再新建一个新项目,用来接收
http appender发送过来的日志。
建立测试方法
LogBackApplication.java
package com.mengyunzhi.sample.logback;

import org.slf4j.Logger;
import org.slf4j.LoggerFactory;
import org.springframework.boot.SpringApplication;
import org.springframework.boot.autoconfigure.SpringBootApplication;
import org.springframework.stereotype.Controller;
import org.springframework.web.bind.annotation.RequestMapping;
import org.springframework.web.bind.annotation.RestController;

import javax.servlet.http.HttpServletRequest;

@SpringBootApplication
@RestController
public class LogBackApplication {
    private static final Logger logger = LoggerFactory.getLogger(LogBackApplication.class);

    public static void main(String[] args) {
        SpringApplication.run(LogBackApplication.class, args);
    }

    @RequestMapping("send")
    public void send() {
        logger.info("info");
        logger.warn("warn");
        logger.error("error");
    }
}
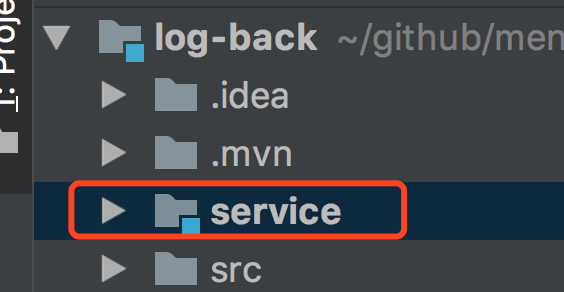
接收模块
新建一个 spring boot 项目,然后设置端口为8081。
server.port=8081
package com.mengyunzhi.sample.logback.service;

import org.slf4j.Logger;
import org.slf4j.LoggerFactory;
import org.springframework.boot.SpringApplication;
import org.springframework.boot.autoconfigure.SpringBootApplication;
import org.springframework.http.HttpRequest;
import org.springframework.web.bind.annotation.RequestMapping;
import org.springframework.web.bind.annotation.RestController;

import javax.servlet.http.HttpServletRequest;

@SpringBootApplication
@RestController
public class ServiceApplication {
    private final static Logger logger = LoggerFactory.getLogger(ServiceApplication.class);
    public static void main(String[] args) {
        SpringApplication.run(ServiceApplication.class, args);
    }

    @RequestMapping("log")
    public void log(HttpServletRequest httpServletRequest) {
        logger.info(httpServletRequest.toString());
    }
}
启动测试
使用debug模式来启动两个项目,项目启动后,打开浏览器,输入: http://localhost:8080/send ,并在 8081 端口上的接收位置打断点。

查看断点信息:

此时我们发现两项信息,也证明数据的确是发送和接收成功了:
- 请求方法: POST
- 请求的协议:http
查看发送过来的MESSAGE
@RequestMapping("log")
    public void log(HttpServletRequest httpServletRequest) throws IOException {
        logger.info(httpServletRequest.toString());
        BufferedReader bufferedReader = httpServletRequest.getReader();
        String str, wholeStr = "";
        while((str = bufferedReader.readLine()) != null) {
            wholeStr += str;
        }
        logger.info(wholeStr);
    }
如下:
2019-01-16T06:06:49.707Z INFO [http-nio-8080-exec-1] org.apache.catalina.core.ContainerBase.[Tomcat].[localhost].[/]: Initializing Spring DispatcherServlet 'dispatcherServlet'
正文到此结束
- 本文标签: IO 代码 2019 协议 value tomcat lib Service 配置 Spring Boot java TCP maven dependencies tar http NIO GitHub Logback 服务器 XML servlet build map Action id spring 注释 端口 REST https ask executor IDE JVM root App schema apr Property Master logo 时间 classpath 软件 git core plugin 数据 bug web CTO 质量 final cat message HTTP协议 需求 测试 list ip src ORM UI springboot apache UDP pom 开发 description Logging
- 版权声明: 本文为互联网转载文章,出处已在文章中说明(部分除外)。如果侵权,请联系本站长删除,谢谢。
- 本文海报: 生成海报一 生成海报二
热门推荐


相关文章

近期评论
-
谢谢
-
https://www.newcmy.com/register?aff=HBVX建议您试试草莓云机场,可以流畅观看youtube和tiktok,上reddit/x也没有问题,还有各种ai优化节点。
-
-
-
想购买您这个站,我的联系方式QQ741756694微信同步 能卖联系
-
-
-
-
-
https://www.liuhaihua.cn/archives/40657.html 这篇博客中的图片打不开了
Loading...
![[HBLOG]公众号](https://www.liuhaihua.cn/img/qrcode_gzh.jpg)

