java通过smtp服务 给指定邮箱发送邮件含附件

用程序发邮件首先需要一个smtp服务器,
虽然说网上也有自建服务器的教程,但是由于工程量大,
还要兼容各大邮箱厂商,有可能发送失败或被归为垃圾邮件。
所以不推荐自建smtp服务器实现。
推荐是有2种方法来实现 第三方邮箱发邮件
1、买类似阿里云的smtp资源包(阿里云 1000条 / 2元)
2、申请一个腾讯、网易163的邮箱,开通smtp服务端口,借由他们的服务器来转发。
(其中部分第三方邮箱可以实现用自己的域名来接发邮件,例如service@baidu.com)
本文中介绍的是第二种方法,用腾讯企业邮箱为例
参考借鉴的大神的原文地址: https://www.cnblogs.com/LUA123/p/5575134.html
这里重点只说明一下,腾讯企业邮箱 + javamail 来实现发邮件,代码的部分。
其他邮箱,例如个人的qq邮箱 163邮箱也可以用这个方法实现,申请和设置方法借鉴百度吧
补充一下!腾讯企业邮箱和qq邮箱方法有几个不同,我在末尾加了qq邮箱的方案
正文开始
先说腾讯企业邮箱
maven
<dependency>
    <groupId>javax.mail</groupId>
    <artifactId>mail</artifactId>
    <version>1.4.7</version>
</dependency>
另外我用到了一个 StringUtils.isNotBlank() 方法 可以选择引入以下maven依赖,也可以改写成 xxx != null && !"".equals(xxx) 等价的代码
<dependency>
    <groupId>org.apache.commons</groupId>
    <artifactId>commons-lang3</artifactId>
    <version>3.7</version>
</dependency>
java 工具类
需要把 用户名、密码、发件人别名 等参数填成你自己申请的
package com.gemini.common.utils;


import com.sun.mail.util.MailSSLSocketFactory;
import org.apache.commons.lang.StringUtils;

import java.io.IOException;
import java.io.UnsupportedEncodingException;
import java.security.GeneralSecurityException;
import java.util.Date;
import java.util.Properties;

import javax.mail.Authenticator;
import javax.mail.Message;
import javax.mail.MessagingException;
import javax.mail.Multipart;
import javax.mail.PasswordAuthentication;
import javax.mail.Session;
import javax.mail.Transport;
import javax.mail.internet.InternetAddress;
import javax.mail.internet.MimeBodyPart;
import javax.mail.internet.MimeMessage;
import javax.mail.internet.MimeMultipart;

public class EmailUtils {

    // 腾讯企业邮箱 也可以换成别家的
    private static final String protocol = "smtp";// 协议
    private static final String host = "smtp.exmail.qq.com";// 地址
    private static final String port = "465";// 端口
    private static final String account = "用户名";// 用户名
    private static final String pass = "密码";// 密码
    private static final String personal = "发件人别名(选填)";// 发件人别名,不需要设为空串或null

    // 权限认证
    static class MyAuthenricator extends Authenticator {
        String u = null;
        String p = null;

        public MyAuthenricator(String u, String p) {
            this.u = u;
            this.p = p;
        }
        @Override
        protected PasswordAuthentication getPasswordAuthentication() {
            return new PasswordAuthentication(u, p);
        }
    }

    /**
     * 发送邮件工具方法
     *
     * @param recipients 收件人
     * @param subject    主题
     * @param content    内容
     * @param fileStr    附件路径
     * @return true/false 发送成功
     */
    public static boolean sendEmail(String recipients, String subject, String content, String fileStr) {
        Properties prop = new Properties();
        //协议
        prop.setProperty("mail.transport.protocol", protocol);
        //服务器
        prop.setProperty("mail.smtp.host", host);
        //端口
        prop.setProperty("mail.smtp.port", port);
        //使用smtp身份验证
        prop.setProperty("mail.smtp.auth", "true");
        //使用SSL,企业邮箱必需!
        //开启安全协议
        MailSSLSocketFactory mailSSLSocketFactory = null;
        try {
            mailSSLSocketFactory = new MailSSLSocketFactory();
            mailSSLSocketFactory.setTrustAllHosts(true);
        } catch (GeneralSecurityException e1) {
            e1.printStackTrace();
        }
        prop.put("mail.smtp.ssl.enable", "true");
        prop.put("mail.smtp.ssl.socketFactory", mailSSLSocketFactory);

        Session session = Session.getDefaultInstance(prop, new MyAuthenricator(account, pass));
        session.setDebug(true);
        MimeMessage mimeMessage = new MimeMessage(session);
        try {
            //发件人
            if (StringUtils.isNotBlank(personal))
                mimeMessage.setFrom(new InternetAddress(account, personal));//可以设置发件人的别名
            else
                mimeMessage.setFrom(new InternetAddress(account));//如果不需要就省略
            //收件人
            mimeMessage.addRecipient(Message.RecipientType.TO, new InternetAddress(recipients));
            //主题
            mimeMessage.setSubject(subject);
            //时间
            mimeMessage.setSentDate(new Date());
            //容器类,可以包含多个MimeBodyPart对象
            Multipart mp = new MimeMultipart();

            //MimeBodyPart可以包装文本,图片,附件
            MimeBodyPart body = new MimeBodyPart();
            //HTML正文
            body.setContent(content, "text/html; charset=UTF-8");
            mp.addBodyPart(body);

            //添加图片&附件
            if(StringUtils.isNotBlank(fileStr)){
                body = new MimeBodyPart();
                body.attachFile(fileStr);
                mp.addBodyPart(body);
            }

            //设置邮件内容
            mimeMessage.setContent(mp);
            //仅仅发送文本
            //mimeMessage.setText(content);
            mimeMessage.saveChanges();
            Transport.send(mimeMessage);
            // 发送成功
            return true;
        } catch (MessagingException e) {
            e.printStackTrace();
        } catch (UnsupportedEncodingException e) {
            e.printStackTrace();
        } catch (IOException e) {
            e.printStackTrace();
        }
        return false;
    }

    public static void main(String[] args) {
        sendEmail("你的邮箱地址","test","test",null);
    }
}
关于上述方案,适用于一般的邮箱申请(腾讯企业邮箱、网易邮箱),但不适用于qq邮箱,原因是qq邮箱目前只接受授权码方案登录,官方的解释是“温馨提示:在第三方登录QQ邮箱,可能存在邮件泄露风险,甚至危害Apple ID安全,建议使用QQ邮箱手机版登录。 继续获取授权码登录第三方客户端邮箱 。”
使用上述方法登录qq邮箱会遇到报错
javax.mail.AuthenticationFailedException: 535 Error: ÇëʹÓÃÊÚȨÂëµÇ¼¡£ÏêÇéÇë¿´: http://service.mail.qq.com/cgi-bin/help?subtype=1&&id=28&&no=1001256
如图

意思就是不支持直接用默认密码登录,必须去申请一个授权码作为密码登录
其实流程和工具类都一样就重点说 2个不一样的地方
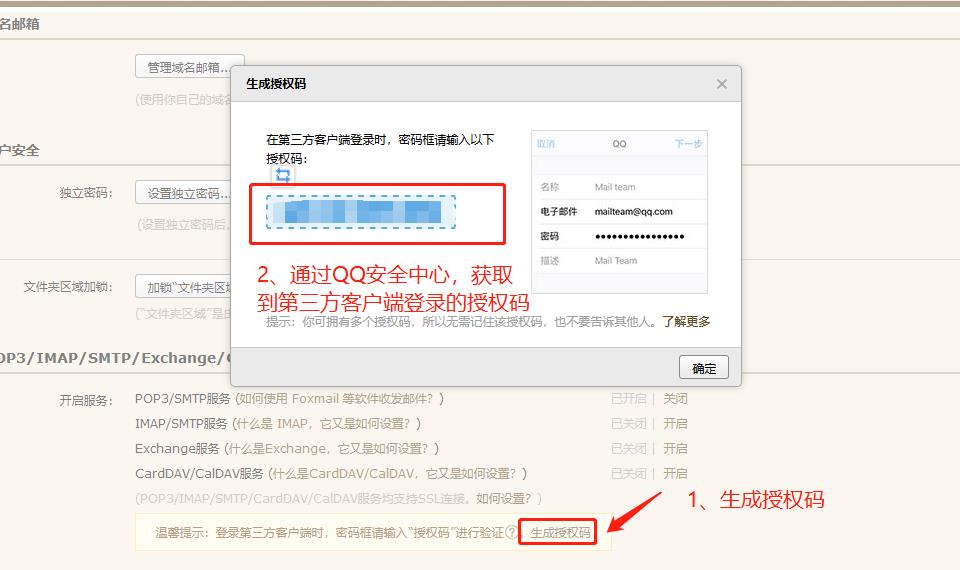
1、密码不是你的邮箱密码了,而是授权码。
获取方式 [登录邮箱] - [设置] - [账户] ,然后如下图找到POP3/SMTP服务的下面,有一句温馨提示 先点 [生成授权码] ,再根据提示获取到授权码。
授权码就是javamail里的 password

2、host不同
腾讯企业邮箱的host是
private static final String host = "smtp.exmail.qq.com";// 地址
普通qq邮箱的host是
private static final String host = "smtp.qq.com";// 地址
修改这两个地方即可适用于个人普通的qq邮箱
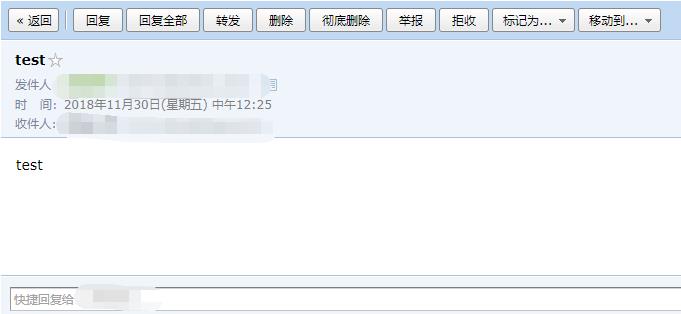
最终效果如下

另外本文也发布在了我的个人博客: https://zzzmh.cn/single?id=49


![[HBLOG]公众号](https://www.liuhaihua.cn/img/qrcode_gzh.jpg)

