Java&Android开发-浅析ServiceLoader类
了解ServiceLoader,需要先了解 SPI (Service Provider Interface)
SPI的简单来说就是在程序设计时将一个功能服务的接口与实现分离,在程序运行时通过JVM机制自动找到服务接口的实现类并创建,以达到解耦的目的,提高程序的可拓展性; 比如JDBC
2.ServiceLoader
ServiceLoader就是 Java平台提供的一个简单的 Service Provder Framework 。使用ServiceLoader有简单的以下几个步骤
- 创建服务接口
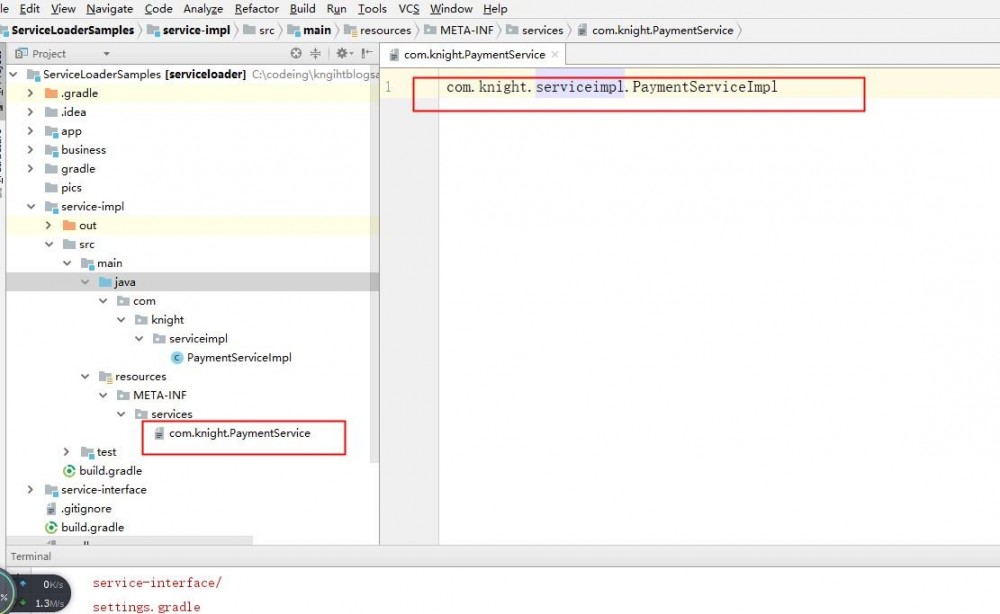
- 在服务接口的实现模块中,创建一个实现类实现对应的服务接口,并通过在项目的resource/META-INF/services文件夹下面创建一个对应该服务 接口全限定名 的文本文件,在该文本文件写入该服务接口实现类的全限定名,以此达到一个注册服务的作用(项目打包后在jar文件里也得存在该文件)
- 服务调用方(需求方)通过ServiceLoader类的load方法加载服务并得到服务的实现类
2.1 一个简单ServiceLoader场景实例
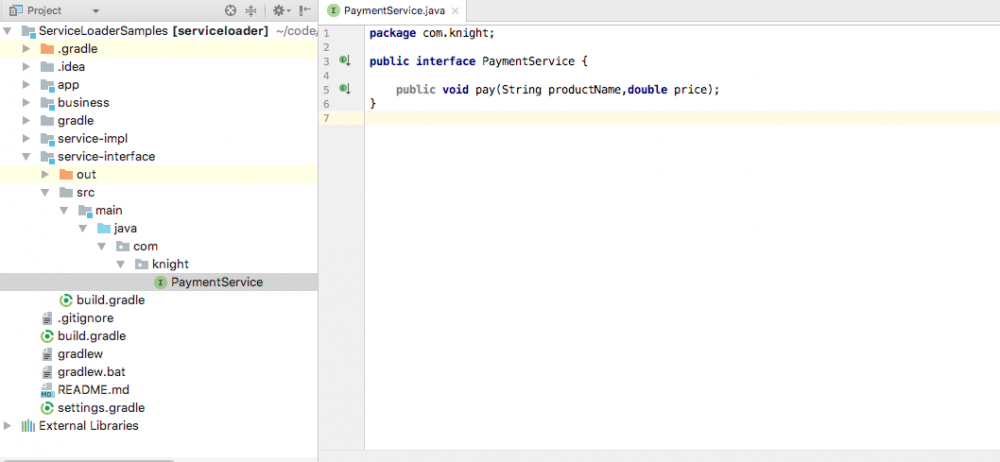
这里以一个简单虚拟支付场景为例。 有一个业务模块目前需要使用支付服务,所以我们首先创建了一个PaymenService抽象接口表示 支付服务,接口类中有一个抽象方法**pay(String productName,double price)**表示支付某个商品 ###创建服务实现模块
package com.knight.serviceimpl;

import com.knight.PaymentService;

public class PaymentServiceImpl implements PaymentService {
    @Override
    public void pay(String productName, double price) {
        System.out.println("支付模块:购买产品 "+productName +",价格"+price);
    }
}

复制代码
在IDEA中的结构如下

创建服务接口类

通过ServiceLoader获取服务
业务模块中直接通过ServiceLoader类及PaymentService接口获取服务实例并实现业务逻辑(业务模块一般是不包含服务的实现模块的)
package com.knight.business;

import com.knight.PaymentService;

import java.util.Iterator;
import java.util.ServiceLoader;

public class BusinessModule {
    public static void run(){
        Iterator<PaymentService> serviceIterator = ServiceLoader.load(PaymentService.class).iterator();
        if (serviceIterator.hasNext()){
            PaymentService paymentService = serviceIterator.next();
            paymentService.pay("Q币充值",100.00);
        }else {
            System.out.println("未找到支付模块");
        }
    }
}

复制代码
以上的核心代码是 通过 ServiceLoader的load方法,传入PaymentService接口类,会返回一个ServiceLoader的实例对象,通过该对象的**iterator()**方法会返回一个 Iterator 的迭代器,可以通过这个迭代器得到所有PaymentService的实现对象。
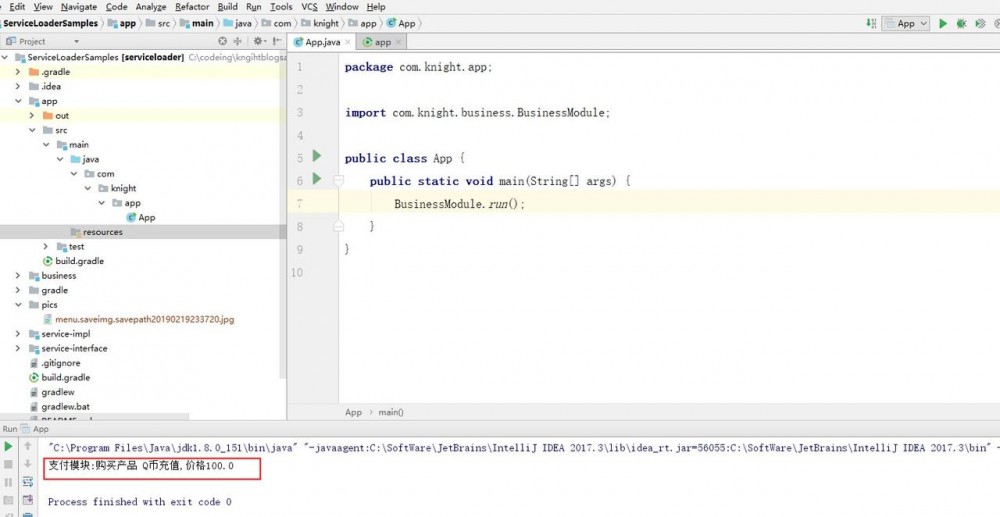
最后 我们再创建一个app模块运行业务代码逻辑,app模块包含service、service-impl、business、3个模块。

以上所有代码已上传 git
ServiceLoader 核心源码简单解析
ServiceLoader内部细节 1.首先通过静态方法load获取对应服务接口的ServiceLoader实例; 2.ServiceLoader类继承了Iterabale接口,内部实现了一个服务实例懒加载的迭代器;迭代器内部通过classLoader读 取对应META-INF/service/文件夹下的服务配置文件获取到所有的实现类类名称,当通过iterator()方法获取迭代器后,就可以依次实例化service的实现并将实现对象加入到缓存中。 3.解析配置文件的过程就是按行读取,每一行的文本都是一个服务实现类的全限定名,获取到类名就可以通过反射实例化对象了
public final class ServiceLoader<S>
    implements Iterable<S>
{
    //Service配置文件的资源路径
    private static final String PREFIX = "META-INF/services/";

    // The class or interface representing the service being loaded
    private final Class<S> service;

    // 负责service配置资源加载,实例化service
    private final ClassLoader loader;

        // 服务实例的缓存,已被迭代被创建过的会加到这个cache中
    private LinkedHashMap<String,S> providers = new LinkedHashMap<>();

        private ServiceLoader(Class<S> svc, ClassLoader cl) {
        service = Objects.requireNonNull(svc, "Service interface cannot be null");
        loader = (cl == null) ? ClassLoader.getSystemClassLoader() : cl;
        reload();
    }
    //重载load, 删除缓存并重新实例化iterator
        public void reload() {
        providers.clear();
        lookupIterator = new LazyIterator(service, loader);
    }

    //懒加载的service迭代器
        private class LazyIterator
        implements Iterator<S>
    {

        Class<S> service;
        ClassLoader loader;
        Enumeration<URL> configs = null;
        Iterator<String> pending = null;
        String nextName = null;

        private LazyIterator(Class<S> service, ClassLoader loader) {
            this.service = service;
            this.loader = loader;
        }

        private boolean hasNextService() {
            if (nextName != null) {
                return true;
            }
            //读取配置文件,最终转换成一个配置文件内容元素迭代器
            if (configs == null) {
                try {
                    String fullName = PREFIX + service.getName();
                    if (loader == null)
                        configs = ClassLoader.getSystemResources(fullName);
                    else
                        configs = loader.getResources(fullName);
                } catch (IOException x) {
                    fail(service, "Error locating configuration files", x);
                }
            }
            while ((pending == null) || !pending.hasNext()) {
                if (!configs.hasMoreElements()) {
                    return false;
                }
                pending = parse(service, configs.nextElement());
            }
            //获取配置文件中的下一个元素
            nextName = pending.next();
            return true;
        }

        private S nextService() {
            if (!hasNextService())
                throw new NoSuchElementException();
            String cn = nextName;
            nextName = null;
            Class<?> c = null;
            try {
                c = Class.forName(cn, false, loader);
            } catch (ClassNotFoundException x) {
                fail(service,
                     "Provider " + cn + " not found");
            }
            if (!service.isAssignableFrom(c)) {
                fail(service,
                     "Provider " + cn  + " not a subtype");
            }
            try {
                S p = service.cast(c.newInstance());
                providers.put(cn, p);
                return p;
            } catch (Throwable x) {
                fail(service,
                     "Provider " + cn + " could not be instantiated",
                     x);
            }
            throw new Error();          // This cannot happen
        }

        public boolean hasNext() {
            return hasNextService();
        }

        public S next() {
            return nextService();
        }


    }
    //按行读取文件,每一行都是服务实现类的接口名
    private Iterator<String> parse(Class<?> service, URL u)throws ServiceConfigurationError
        {
            InputStream in = null;
            BufferedReader r = null;
            ArrayList<String> names = new ArrayList<>();
            try {
                in = u.openStream();
                r = new BufferedReader(new InputStreamReader(in, "utf-8"));
                int lc = 1;
                while ((lc = parseLine(service, u, r, lc, names)) >= 0);
            } catch (IOException x) {
                fail(service, "Error reading configuration file", x);
            } finally {
                try {
                    if (r != null) r.close();
                    if (in != null) in.close();
                } catch (IOException y) {
                    fail(service, "Error closing configuration file", y);
                }
            }
            return names.iterator();
        }
}
复制代码
Google autoService
以上 当注册服务实现时如果需要手动创建文件并写入服务实现类名称 难免有些繁琐,我们可以使用谷歌提供的 AutoService 库简化这一过程
使用方式
- gradle 引入autoService
dependencies {
    compileOnly 'com.google.auto.service:auto-service:1.0-rc2'
    annotationProcessor 'com.google.auto.service:auto-service:1.0-rc2'
}
复制代码
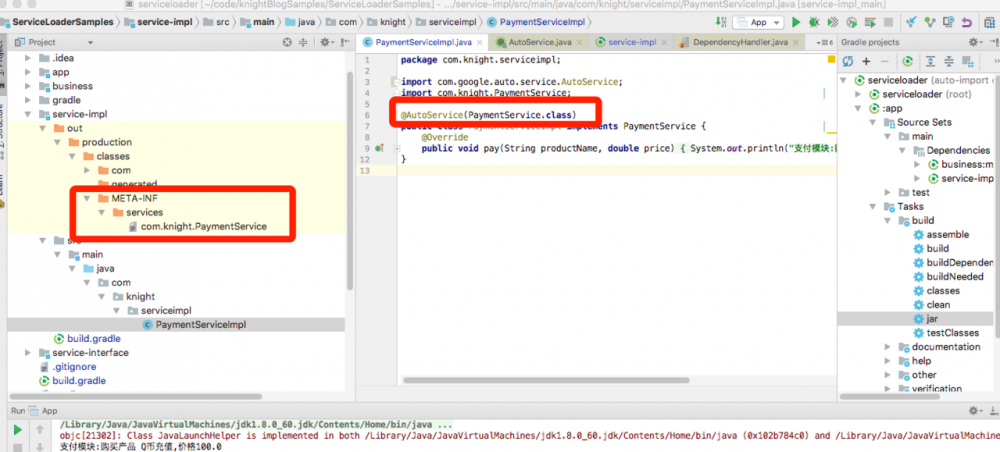
- 服务实现类上加上@AutoService注解,参数为服务抽象类
package com.knight.serviceimpl;

import com.google.auto.service.AutoService;
import com.knight.PaymentService;

@AutoService(PaymentService.class)
public class PaymentServiceImpl implements PaymentService {
    @Override
    public void pay(String productName, double price) {
        System.out.println("支付模块:购买产品 "+productName +",价格"+price);
    }
}

复制代码
3.项目编译触发auto-service注解处理过程后自动生成了配置文件


![[HBLOG]公众号](https://www.liuhaihua.cn/img/qrcode_gzh.jpg)

