shiro入门笔记
关于 Apache Shiro 概念基本都粘自官网 http://shiro.apache.org/
Shiro 简介
Apache Shiro是一个功能强大且灵活的开源安全框架,可以清晰地处理身份验证,授权,企业会话管理和加密。
以下是Apache Shiro可以做的一些事情:
- 验证用户以验证其身份
- 为用户执行访问控制
- 在任何环境中使用Session API,即使没有Web容器或EJB容器也是如此。
- ......
功能简介
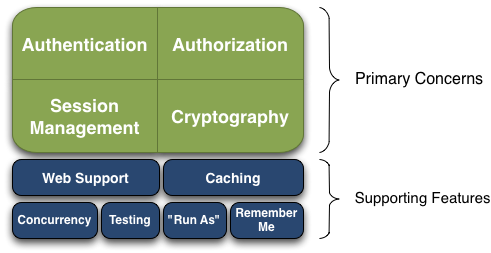
- Authentication: 身份认证/登录,验证用户是不是拥有相应的身份;
- Authorization: 授权,即权限验证,验证某个已认证的用户是否拥有某个权限;即判断用户是否能进行什么操作,如:验证某个用户是否拥有某个角色。或者细粒度的验证某个用户对某个资源是否具有某个权限;
- Session Manager: 会话管理,即用户登录后就是一次会话,在没有退出之前,它的所有信息都在会话中;会话可以是普通 JavaSE 环境,也可以是 Web 环境的;
- Cryptography: 加密,保护数据的安全性,如密码加密存储到数据库,而不是明文存储;
- Web Support: Web 支持,可以非常容易的集成到Web 环境;
- Caching: 缓存,比如用户登录后,其用户信息、拥有的角色/权限不必每次去查,这样可以提高效率;
- Concurrency: Shiro 支持多线程应用的并发验证,即如在一个线程中开启另一个线程,能
- 把权限自动传播过去;
- Testing: 提供测试支持;
- Run As: 允许一个用户假装为另一个用户(如果他们允许)的身份进行访问;
- Remember Me: 记住我,这个是非常常见的功能,即一次登录后,下次再来的话不用登录了
Shiro 详细的架构
可以参考官方文档: http://shiro.apache.org/archi...
Shiro web工程搭建
1.Maven 架包依赖
缓存架包先用 ehcache
<dependency>
  <groupId>org.apache.shiro</groupId>
  <artifactId>shiro-all</artifactId>
  <version>1.3.2</version>
</dependency>

<dependency>
  <groupId>net.sf.ehcache</groupId>
  <artifactId>ehcache</artifactId>
  <version>2.10.6</version>
</dependency>
2.ehcache 缓存xml文件配置
<?xml version="1.0" encoding="UTF-8"?>
<ehcache>
    <!-- mac 电脑, 跟 win 设置路径有点不一样 示例: path="d:/ehcache/" -->
    <diskStore path="${user.home}/Downloads/ehcache" />

    <!-- 默认缓存配置 没有特别指定就用这个配置 -->
    <defaultCache maxElementsInMemory="10000"
                  eternal="false"
                  timeToIdleSeconds="3600"
    timeToLiveSeconds="3600"
    overflowToDisk="true"
    maxElementsOnDisk="10000000"
    diskPersistent="false"
    memoryStoreEvictionPolicy="LRU"
    diskExpiryThreadIntervalSeconds="120" />
</ehcache>
3.web.xml中shiro拦截器配置
<!-- 1. 配置 shiro 拦截器 -->
<filter>
    <filter-name>shiroFilter</filter-name>
    <filter-class>org.springframework.web.filter.DelegatingFilterProxy</filter-class>
    <init-param>
        <param-name>targetFilterLifecycle</param-name>
        <param-value>true</param-value>
    </init-param>
</filter>
<filter-mapping>
    <filter-name>shiroFilter</filter-name>
    <url-pattern>/*</url-pattern>
</filter-mapping>
4.spring文件配置
<!-- 2. 配置shiro的核心组件 SecurityManager -->
<bean id="securityManager" class="org.apache.shiro.web.mgt.DefaultWebSecurityManager">
    <!-- 配置缓存 -->
    <property name="cacheManager" ref="cacheManager" />
    <property name="realm" ref="realm" />
</bean>

<bean id="cacheManager" class="org.apache.shiro.cache.ehcache.EhCacheManager">
    <property name="cacheManagerConfigFile" value="classpath:ehcache.xml"></property>
</bean>

<bean id="realm" class="com.ogemray.shiro.MyShiroRealm">
    <property name="credentialsMatcher">
        <bean class="com.ogemray.shiro.MyCredentialsMatcher"></bean>
    </property>
</bean>

<!-- 3. 配置shiroFilter,配置shiro的一些基本规则信息,id必须和web.xml中配置的拦截器名字一样(DelegatingFilterProxy 通过名字去spring容器中找注入的拦截器) -->
<bean id="shiroFilter" class="org.apache.shiro.spring.web.ShiroFilterFactoryBean">
    <property name="securityManager" ref="securityManager"/>
    <property name="loginUrl" value="/login.html"/> <!-- loginUrl 表示登录页面地址 -->
    <property name="successUrl" value="/admin/main.html"/> <!-- successUrl 表示登录成功后跳转的页面 -->
    <property name="unauthorizedUrl" value="/unauthorized.html"></property> <!-- 配置没有授权跳转页面 -->
    <property name="filterChainDefinitions">
        <value>
            <!--/logout.action=logout --> <!-- logout 表示登出, 清空session, 这里不需要了, 因为已经在登出对象的方法里手动清空了 [ SecurityUtils.getSubject().logout() ] -->
            /admin/userlist*=roles[user]
            /admin/adduser*=roles["user,admin"] <!-- 表示拥有 user 角色 并且 拥有 admin 角色 -->
            /admin/editRPRelation*=roles[admin],perms[user:insert,user:update,user:select,user:delete]
            /admin/editURRelation*=perms[user:select]
            /admin/**=authc
            /**=anon
        </value>
    </property>
</bean>
5.自定义realm
public class MyShiroRealm extends AuthorizingRealm {

    @Override
    protected AuthenticationInfo doGetAuthenticationInfo(AuthenticationToken authenticationToken) throws AuthenticationException {
        System.out.println("********************* 进行登录认证 *********************");

        String username = (String) authenticationToken.getPrincipal(); //获取提交的用户名
        User user = userRepository.findByUsername(username);

        if (user == null) throw new UnknownAccountException("用户不存在, 请先注册然后再来登录");
        if (user.getState() == 1) throw new LockedAccountException("该用户已经被管理员禁用, 请换个账号登录");

        //接下来进行密码的比对
        SimpleAuthenticationInfo info = new SimpleAuthenticationInfo(user, user.getPassword(), getName());
        return info;
    }

    @Override
    protected AuthorizationInfo doGetAuthorizationInfo(PrincipalCollection principalCollection) {
        System.out.println("********************* 进行授权认证 *********************");

        User user = (User) principalCollection.asList().get(0);

        Set<String> roles = new HashSet<>();
        Set<String> permissions = new HashSet<>();

        user.getRoles().forEach(role -> {
            roles.add(role.getRoleName());
            role.getPermissions().forEach(permission -> {
                permissions.add(permission.getPermissionName());
            });
        });

        SimpleAuthorizationInfo info = new SimpleAuthorizationInfo();
        info.setRoles(roles);
        info.setStringPermissions(permissions);
        return info;
    }

    @Autowired
    private UserRepository userRepository;
}
6.自定义密码匹对方案
前端密码加密规则:ciphertext_pwd = AES.encrypt(MD5(password))
后端解密密码规则:md5_password = AES.desEncrypt(ciphertext_pwd)
后端匹对密码规则:(md5_password + 用户名做盐值) 进行 1024 次 MD5 转换,然后与数据库取出密码做比对
public class MyCredentialsMatcher implements CredentialsMatcher {

    @Override
    public boolean doCredentialsMatch(AuthenticationToken token, AuthenticationInfo info) {

        String tokenCredentials = Arrays.toString((char[]) token.getCredentials()); //前端传过来的密码
        String accountCredentials = (String) info.getCredentials(); //数据库查询到的密码

        //首先对前端传过来的密码进行AES解密 -> 清空 session 里面的key
        Session session = SecurityUtils.getSubject().getSession();
        String key = (String) session.getAttribute("AESKey");

        try {
            tokenCredentials = AesEncryptUtil.desEncrypt(tokenCredentials, key, key);
        } catch (Exception e) {
            throw new IncorrectCredentialsException("可能受到重放攻击, AES 解密失败");
        }
        session.removeAttribute("AESKey");

        //加密方式 待加密数据 加密盐值 加密次数
        SimpleHash simpleHash = new SimpleHash("MD5", tokenCredentials, token.getPrincipal(), 1024);

        return simpleHash.toString().equals(accountCredentials);
    }
}
7.登录和注册接口的调用
@Service("userService")
public class UserServiceImpl implements UserService {

    @Override
    public void registerUser(User user) {
        if (userRepository.existsByUsername(user.getUsername())) {
            throw new RuntimeException("用户名已经被注册, 请换个用户名");
        }
        user.setState((byte) 0);
        //密码进行加密
        SimpleHash simpleHash = new SimpleHash("MD5", user.getPassword(), user.getUsername(), 1024);
        user.setPassword(simpleHash.toString());
        userRepository.save(user);
    }

    @Override
    public void login(User user) {
        Subject currentUser = SecurityUtils.getSubject();
        if (currentUser.isAuthenticated() == false) { //没有登录过需要进行登录验证
            UsernamePasswordToken token = new UsernamePasswordToken(user.getUsername(), user.getPassword(), false);
            currentUser.login(token);
        }
    }

    @Autowired
    private UserRepository userRepository;
}
正文到此结束
- 本文标签: 多线程 开源 web Service UI Proxy Select rmi authenticate Word 线程 Collection API HashSet list apache https Action 配置 equals HTML logo 认证 http 数据库 IO 管理 加密 value update ip Property map session App classpath src find cache IDE 并发 key java maven Security 安全 token CTO 测试 企业 tar bean 数据 缓存 XML spring db Authorization cat id
- 版权声明: 本文为互联网转载文章,出处已在文章中说明(部分除外)。如果侵权,请联系本站长删除,谢谢。
- 本文海报: 生成海报一 生成海报二
热门推荐


相关文章

近期评论
-
谢谢
-
https://www.newcmy.com/register?aff=HBVX建议您试试草莓云机场,可以流畅观看youtube和tiktok,上reddit/x也没有问题,还有各种ai优化节点。
-
-
-
想购买您这个站,我的联系方式QQ741756694微信同步 能卖联系
-
-
-
-
-
https://www.liuhaihua.cn/archives/40657.html 这篇博客中的图片打不开了
Loading...
![[HBLOG]公众号](https://www.liuhaihua.cn/img/qrcode_gzh.jpg)

