Spring Boot 2 - CommandLineRunner与ApplicationRunner
本篇文章我们将探讨CommandLineRunner和ApplicationRunner的使用。
在阅读本篇文章之前,你可以新建一个工程,写一些关于本篇内容代码,这样会加深你对本文内容的理解,关于如何快速创建新工程,可以参考我的这篇博客:
Spring Boot 2 - 创建新工程
概述
CommandLineRunner和ApplicationRunner是Spring Boot所提供的接口,他们都有一个run()方法。所有实现他们的Bean都会在Spring Boot服务启动之后自动地被调用。
由于这个特性,它们是一个理想地方去做一些初始化的工作,或者写一些测试代码。
CommandLineRunner
使用Application实现
在我们新建好工程后,为了简单我们直接使用Application类实现CommandLineRunner接口,这个类的注解@SpringBootApplication会为我们自动配置。
package cn.examplecode.sb2runner;

import org.slf4j.Logger;
import org.slf4j.LoggerFactory;
import org.springframework.boot.CommandLineRunner;
import org.springframework.boot.SpringApplication;
import org.springframework.boot.autoconfigure.SpringBootApplication;

@SpringBootApplication
public class Sb2runnerApplication implements CommandLineRunner {

    private static Logger logger = LoggerFactory.getLogger(Sb2runnerApplication.class);

    public static void main(String[] args) {
        SpringApplication.run(Sb2runnerApplication.class, args);
    }

    @Override
    public void run(String... args) throws Exception {
        logger.info("服务已启动,执行command line runner。");

        for (int i = 0; i < args.length; ++i) {
            logger.info("args[{}]: {}", i, args[i]);
        }
    }
}
接下来我们直接启动服务,查看日志如下,发现run()方法被正常地执行了:
Tomcat started on port(s): 8080 (http) with context path ''
Started Sb2runnerApplication in 2.204 seconds (JVM running for 3.161)
服务已启动,执行command line runner。
参数传递
run()方法有个可变参数args,这个参数是用来接收命令行参数的,我们下面来加入参数来测试一下:

然后重启服务,观察日志,可以看到参数被正常地接收到了:
Tomcat started on port(s): 8080 (http) with context path ''
Started Sb2runnerApplication in 1.888 seconds (JVM running for 2.41)
服务已启动,执行command line runner。
args[0]: --param=sth
命令行参数传递
之前我们说过使用Spring Boot的一大优势就是可以将工程直接打包成一个jar包而不需要单独部署。打包成jar包后可以直接执行该jar包进行服务的启动,这样在执行jar包时我们就可以传入命令行参数,让CommandLineRunner接收参数。
这种场景在服务器上特别常用。比如我们想执行某个操作,又不想对外部暴露,此时可以使用CommandLineRunner作为该操作的入口。
下面我们就打成jar包来演示一下。
-
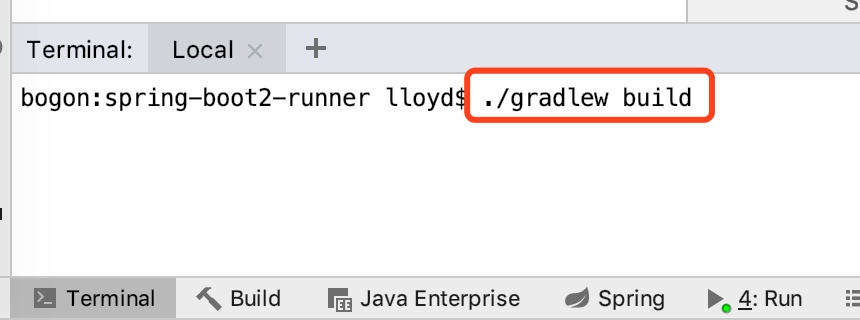
进入终端界面,开始打包

-
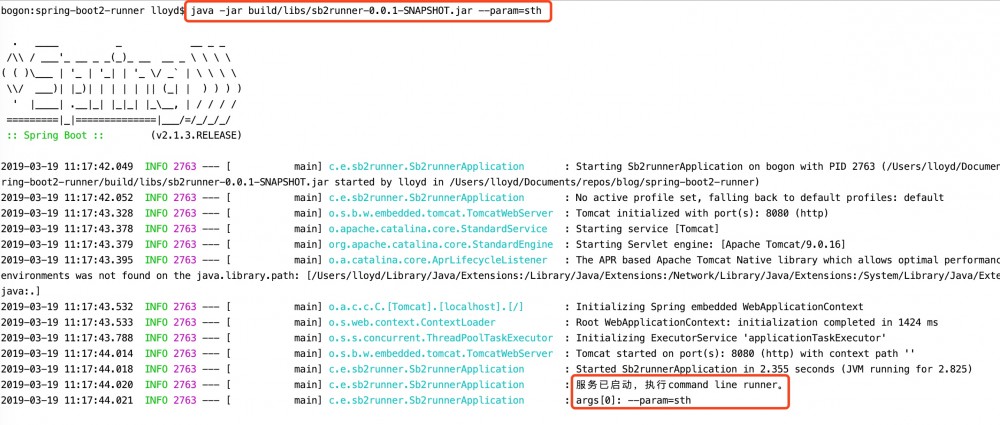
打包完成后,执行该jar包,记得先把IDE的服务停掉。

可以从日志中看到我们也正常地获取到了参数。通过传递参数,在业务逻辑上我们可以根据不同的参数而执行不同的操作。
上面我们提到的只是一个CommandLineRunner,如果我们有多个CommandLineRunner怎么办呢?怎么控制它们执行的顺序呢?
下面我们就来介绍如何指定执行的顺序。
指定执行顺序
Spring Boot为我们提供了一个注解”@Order”,可以用来指定执行的顺序,比如我们工程里面有三个CommandLineRunner:
@Component
@Order(1)
public class CommandRunner1 implements CommandLineRunner {

    private static Logger logger = LoggerFactory.getLogger(CommandRunner1.class);

    @Override
    public void run(String... args) throws Exception {
        logger.info("执行第一个command line runner...");
    }

}


@Component
@Order(2)
public class CommandRunner2 implements CommandLineRunner {

    private static Logger logger = LoggerFactory.getLogger(CommandRunner2.class);

    @Override
    public void run(String... args) throws Exception {
        logger.info("执行第二个command line runner...");
    }

}

@Component
@Order(3)
public class CommandRunner3 implements CommandLineRunner {

    private static Logger logger = LoggerFactory.getLogger(CommandRunner3.class);

    @Override
    public void run(String... args) throws Exception {
        logger.info("执行第三个command line runner...");
    }

}
我们可以在该类的上面直接加入@Order注解,然后Spring Boot就会按照我们注解指定的顺序从小到大的执行了。很简单,是不是?
Tomcat started on port(s): 8080 (http) with context path ''
Started Sb2runnerApplication in 1.764 seconds (JVM running for 2.292)
执行第一个command line runner...
执行第二个command line runner...
执行第三个command line runner...
ApplicationRunner
ApplicationRunner与CommandLineRunner做的事情是一样的,也是在服务启动之后其run()方法会被自动地调用,唯一不同的是ApplicationRunner会封装命令行参数,可以很方便地获取到命令行参数和参数值。
@Component
public class ApplicationRunner1 implements ApplicationRunner {

    private static Logger logger = LoggerFactory.getLogger(ApplicationRunner1.class);

    @Override
    public void run(ApplicationArguments args) throws Exception {
        logger.info("执行application runner...");
        logger.info("获取到参数: " + args.getOptionValues("param"));
    }
}
执行结果:

我们可以发现,通过run()方法的参数ApplicationArguments可以很方便地获取到命令行参数的值。
所以如果你的工程需要获取命令行参数的话,建议你使用ApplicationRunner。
总结
无论是CommandLineRunner还是ApplicationRunner,它们的目的都是在服务启动之后执行一些操作。如果需要获取命令行参数时则建议使用ApplicationRunner。
另一种场景是我们在服务器上需要执行某个操作,比如修正数据库用户的数据,而又找不到合适的执行入口,那么这就是它们理想的使用场景了。
我的博客中其他关于Spring Boot的所有文章可以点击这里找到,欢迎关注!
如果有问题可以留言,或者给我发邮件lloyd@examplecode.cn,期待我们共同学习与成长!


![[HBLOG]公众号](https://www.liuhaihua.cn/img/qrcode_gzh.jpg)

