Nacos解读:配置中心与Spring Cloud的整合
之前这篇文章介绍了Nacos Config Client的实现,今天继续聊下Nacos Config Client与Spring Cloud的结合。
官方示例
引入依赖
在 dependencyManagement 中添加如下配置。
<dependencyManagement>
    <dependencies>
        <dependency>
            <groupId>org.springframework.cloud</groupId>
            <artifactId>spring-cloud-alibaba-dependencies</artifactId>
            <version>0.2.1.RELEASE</version>
            <type>pom</type>
            <scope>import</scope>
        </dependency>
    </dependencies>
</dependencyManagement>
引入 Nacos Config Starter。
<dependency>
    <groupId>org.springframework.cloud</groupId>
    <artifactId>spring-cloud-starter-alibaba-nacos-config</artifactId>
</dependency>
配置Nacos Config元数据
在 bootstrap.properties 配置文件中配置Nacos Config元数据。
spring.application.name=nacos-config-example
spring.cloud.nacos.config.server-addr=127.0.0.1:8848
使用配置
应用会从Nacos Config中获取dataId为 nacos-config-example.properties ,group为 DEFAULT_GROUP 的配置,并添加在 Spring Environment 的 PropertySources 中。可以使用 @Value 注解来将对应的配置注入到相应字段,并添加 @RefreshScope 打开动态刷新功能。
@RefreshScope
class SampleController {

	@Value("${user.name}")
	String userName;

	@Value("${user.age}")
	int age;
}
可选配置
现把目前支持的配置项总结如下,配置前缀为 spring.cloud.nacos.config. 。
| key | 默认值 | 说明 |
|---|---|---|
| server-addr | 服务端地址 | |
| prefix | {spring.application.name} | DataId前缀 |
| group | DEFAULT_GROUP | Group |
| file-extension | properties | dataID后缀及内容文件格式 |
| encode | UTF-8 | 配置的编码 |
| timeout | 3000 | 获取配置的超时时间,单位为 ms |
| namespace | 配置的命名空间 | |
| access-key | 阿里云AccessKey | |
| secret-key | 阿里云SecretKey | |
| context-path | 服务端 API 的相对路径 | |
| endpoint | 服务端接入点 | |
| cluster-name | 集群名 | |
| name | 如果未配置prefix,会把该值当prefix | |
| sharedDataids | 共享配置的dataId,逗号分隔 | |
| refreshableDataids | 共享配置中允许自动刷新的dataId | |
| extConfig | 额外配置项 | |
| refresh.enabled | true | 是否开启监听和自动刷新 |
spring.factories
在聊 Nacos Naming与Spring Cloud的结合 时,曾简单介绍了自动装配的背景知识。Nacos Config的spring.factories配置如下。
org.springframework.cloud.bootstrap.BootstrapConfiguration=/
org.springframework.cloud.alibaba.nacos.NacosConfigBootstrapConfiguration
org.springframework.boot.autoconfigure.EnableAutoConfiguration=/
org.springframework.cloud.alibaba.nacos.NacosConfigAutoConfiguration,/
org.springframework.cloud.alibaba.nacos.endpoint.NacosConfigEndpointAutoConfiguration
org.springframework.boot.diagnostics.FailureAnalyzer=/
org.springframework.cloud.alibaba.nacos.diagnostics.analyzer.NacosConnectionFailureAnalyzer
其中有一些之前没有提过的类型,在此简单介绍一下,想要详细了解可以参考我给出的链接。
FailureAnalyzer
FailureAnalyzer是用于启动失败时,向控制台输出一些有用的信息以帮助排查问题的。简单来看下Nacos的实现。
public class NacosConnectionFailureAnalyzer
		extends AbstractFailureAnalyzer<NacosConnectionFailureException> {

	@Override
	protected FailureAnalysis analyze(Throwable rootFailure,
			NacosConnectionFailureException cause) {
		return new FailureAnalysis("Application failed to connect to Nacos server",
				"check your nacos server config", cause);
	}
}
当连接Nacos服务端失败抛出 NacosConnectionFailureException 时,会向控制台输出如代码中的信息。但是,目前版本中并没有任何地方会抛出 NacosConnectionFailureException ,因此目前FailureAnalysis实际是无效的,可能会在后续版本中增加吧。
可参考:
FailureAnalysis Example
Spring Boot DocumentBootstrapConfiguration
Spring Cloud引入了 Bootstrap Application Context , Bootstrap Application Context 作为应用的 Main Application Context 的父Context,优先于 Main Application Context 初始化。不同于 Main Application Context 加载 application.properties (或 application.yml ), Bootstrap Application Context 会使用 bootstrap.properties (或 bootstrap.yml ),所以在上面的示例中可以看到Nacos Config的相关配置放在了 bootstrap.properties 中。
spring.factories 中 BootstrapConfiguration 类似于 EnableAutoConfiguration 等配置,但 BootstrapConfiguration 配置的类注册的Bean会在 Main Application Context 初始化之前创建。
可参考:
Bootstrap Application Context
Customizing the Bootstrap ConfigurationBeans
接下来我们看一下Nacos Config注册了哪些Bean。如 spring.factories 所示,Nacos Config有 NacosConfigBootstrapConfiguration 、 NacosConfigAutoConfiguration 、 NacosConfigEndpointAutoConfiguration 、 NacosConnectionFailureAnalyzer 四个配置类,最后一个 NacosConnectionFailureAnalyzer 上面已经简单分析过并且目前实质也没有用到,这里就不再重复。重点分析其他三个配置类。
NacosConfigBootstrapConfiguration
NacosConfigBootstrapConfiguration注册了2个Bean, NacosConfigProperties 和 NacosPropertySourceLocator 。
@Bean
@ConditionalOnMissingBean
public NacosConfigProperties nacosConfigProperties() {
	return new NacosConfigProperties();
}

@Bean
public NacosPropertySourceLocator nacosPropertySourceLocator(
		NacosConfigProperties nacosConfigProperties) {
	return new NacosPropertySourceLocator(nacosConfigProperties);
}
NacosConfigProperties 即对应上文提到的那些可选配置。
NacosPropertySourceLocator 实现了 PropertySourceLocator 接口, PropertySourceLocator 接口只有一个 locate(Environment environment) 方法,返回值为 PropertySource ,Spring会把返回的 PropertySource 添加到Spring的Environment中,所有我们才可以在程序中通过 @Value 使用这些配置。可参考: Customizing the Bootstrap Property Sources
Nacos Config的实现如下。
@Override
public PropertySource<?> locate(Environment env) {
	// 省略...
	CompositePropertySource composite = new CompositePropertySource(
			NACOS_PROPERTY_SOURCE_NAME);

	loadSharedConfiguration(composite);
	loadExtConfiguration(composite);
	loadApplicationConfiguration(composite, dataIdPrefix, nacosConfigProperties, env);

	return composite;
}
Nacos Config返回的是一个 CompositePropertySource , CompositePropertySource 支持添加多个PropertySource,获取配置时会依照添加的顺序依次获取。
Nacos Config的配置可以分为3种: SharedConfiguration 、 ExtConfiguration 、 ApplicationConfiguration 。
代码的实现虽然是按照 SharedConfiguration -> ExtConfiguration -> ApplicationConfiguration 的顺序依次加载的,但向 CompositePropertySource 添加时调用的是 addFirstPropertySource() 方法,会把配置添加到首位。
因此,配置使用的实际顺序是 ApplicationConfiguration -> ExtConfiguration -> SharedConfiguration 。
而这几种配置的获取实际就是利用了Nacos Config Client提供的API,调用 String getConfig(String dataId, String group, long timeoutMs) 方法从Nacos服务端获取,
关于这几个不同配置类型的使用大家还可以参考didi大佬的教程—— Spring Cloud Alibaba基础教程:Nacos配置的多文件加载与共享配置 。
NacosConfigAutoConfiguration
NacosConfigAutoConfiguration中注册的几个Bean主要是用于动态刷新配置。关键的Bean是 NacosContextRefresher 。之前介绍Nacos Config Client时介绍过支持设置Listener来监听配置的变化,这里的动态刷新也是利用这个来实现的。
注册监听
NacosContextRefresher会监听 ApplicationReadyEvent 事件,注册Nacos各个配置项的监听是在接收到 ApplicationReadyEvent 事件时进行的。
@Override
public void onApplicationEvent(ApplicationReadyEvent event) {
	// many Spring context
	if (this.ready.compareAndSet(false, true)) {
		this.registerNacosListenersForApplications();
	}
}

private void registerNacosListenersForApplications() {
	if (refreshProperties.isEnabled()) {
		for (NacosPropertySource nacosPropertySource : NacosPropertySourceRepository
				.getAll()) {

			if (!nacosPropertySource.isRefreshable()) {
				continue;
			}

			String dataId = nacosPropertySource.getDataId();
			registerNacosListener(nacosPropertySource.getGroup(), dataId);
		}
	}
}
从代码可以看到只会对开启了动态刷新的dataId注册监听。对于不同的配置类型策略不同。
spring.cloud.nacos.config.ext-config[0].refresh=true
spring.cloud.nacos.config.refreshableDataids
如果需要关闭所有的动态刷新,可以将 spring.cloud.nacos.config.refresh.enabled 设置为false。
Listener
注册的Listener代码如下。
@Override
public void receiveConfigInfo(String configInfo) {
	refreshCountIncrement();
	String md5 = "";
	if (!StringUtils.isEmpty(configInfo)) {
		try {
			MessageDigest md = MessageDigest.getInstance("MD5");
			md5 = new BigInteger(1, md.digest(configInfo.getBytes("UTF-8")))
					.toString(16);
		}
		catch (NoSuchAlgorithmException | UnsupportedEncodingException e) {
			log.warn("[Nacos] unable to get md5 for dataId: " + dataId, e);
		}
	}
	refreshHistory.add(dataId, md5);
	applicationContext.publishEvent(
			new RefreshEvent(this, null, "Refresh Nacos config"));
	if (log.isDebugEnabled()) {
		log.debug("Refresh Nacos config group " + group + ",dataId" + dataId);
	}
}
刷新配置的关键代码是 applicationContext.publishEvent(new RefreshEvent(this, null, "Refresh Nacos config")); ,分发了一个 RefreshEvent 事件。
之后就交由Spring Cloud处理了, RefreshEvent 事件与调用 /refresh 的Endpoint是一样的,会重建Environment,从而会再次调用 PropertySourceLocator 接口的 locate 方法,Nacos就会把更新后的 PropertySource 返回。其他信息可以参考 Refresh Scope 相关文档或其他文章。
NacosConfigEndpointAutoConfiguration
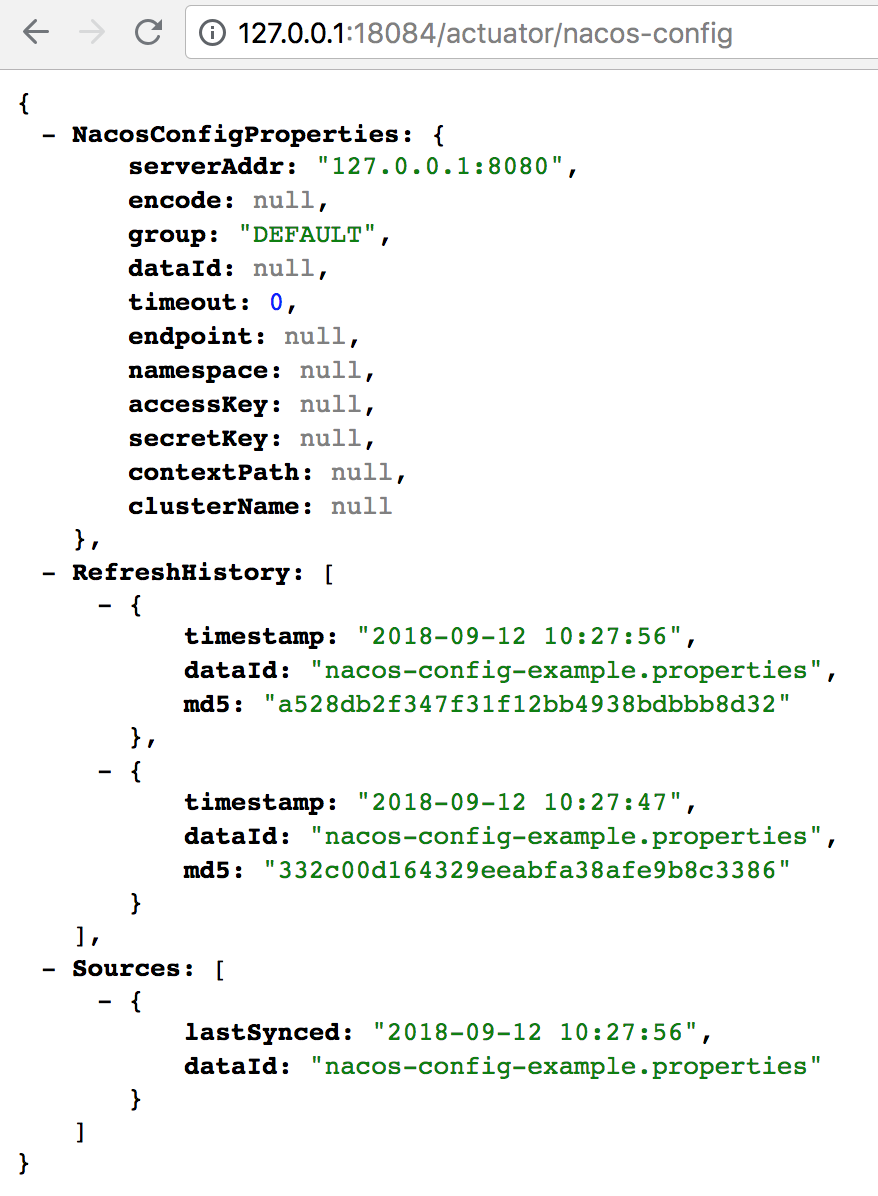
NacosConfigEndpointAutoConfiguration用于暴露Endpoint,path为 /nacos_config 【Spring Boot 1.x】或 /actuator/nacos-config 【Spring Boot 2.x】返回的信息包括3个部分:
- NacosConfigProperties:Nacos Config Starter 本身的配置。
- Sources:表示此客户端从哪些 Nacos Config 配置项中获取了信息。
- RefreshHistory:表示动态刷新的历史记录,最多保存20条,
见官网文档的示例:

actuator
总结
Nacos Config借助Spring提供的特性实现了配置中心所需的两大功能:
PropertySourceLocator
RefreshEvent
- 本文标签: 数据 bug Document client tar bean 代码 BigInteger 阿里云 root ACE UI Spring Boot App example https Property API EnableAutoConfiguration list spring http 配置 id CTO Connection message Bootstrap 配置中心 value 云 src 集群 服务端 空间 2019 总结 pom Listeners IDE Spring cloud key lib cat IO 时间 tk dependencies tab 文章
- 版权声明: 本文为互联网转载文章,出处已在文章中说明(部分除外)。如果侵权,请联系本站长删除,谢谢。
- 本文海报: 生成海报一 生成海报二


![[HBLOG]公众号](https://www.liuhaihua.cn/img/qrcode_gzh.jpg)

