Spring Boot之EmbeddedTomcat篇
在上文中我们介绍了 Spring Boot 的一些基本概要以及我在这个系列中会讲到的一些东西,正如上文所述,这篇会讲解 EmbeddedTomcat 的原理。
传统 Tomcat
写过 Java 的同学应该知道,在 Spring Boot 之前,我们一般会使用 Tomcat 等 web容器 来管理我们的 web 项目,类似于 nginx ,但又有所区别。
虽然 nginx 和 tomcat 最终所做的事情大致一样,但是我们给 nginx 的定义是 web服务器 ,而 tomcat 是 web容器 , tomcat 是实现了 servlet 接口的开源项目,把我们需要自定义 servlet 的基础架构给抽离出来。
内嵌 Tomcat
那么内嵌 Tomcat 有是什么呢?
内嵌 Tomcat 可以让我们把 Tomcat 内嵌于我们的项目中,让我们的项目更方便部署、方便调试。
实现原理
正如我在上文所说,我们会以「逆向」的方式来帮助大家快速了解其原理。在 Spring Boot 中,给我们提供了配置诸如 server.port 的能力。我们不妨先修改 server.port 试试,看看最终 tomcat 是否以另外一个端口执行:
server.port=8081
果然,执行端口更改了:
2019-04-01 21:08:57.644 INFO 28714 --- [ main] o.s.b.w.embedded.tomcat.TomcatWebServer : Tomcat started on port(s): 8081 (http) with context path ''
我们不妨点开 server.port ,发现跳转到了 ServerProperties :
public Integer getPort() {
    return this.port;
}

public void setPort(Integer port) {
    this.port = port;
}
既然我们是通过 setPort 来设置端口,那么就意味着在调用的时候是从 getPort 来获取端口。我们不妨点击查看 getPort 这个方法被谁调用了:

ReactiveWebServerFactoryCustomizer 先不管,我们先看看 ServletWebServerFactoryCustomizer :
@Override
    public void customize(ConfigurableServletWebServerFactory factory) {
        PropertyMapper map = PropertyMapper.get().alwaysApplyingWhenNonNull();
        map.from(this.serverProperties::getPort).to(factory::setPort);
        map.from(this.serverProperties::getAddress).to(factory::setAddress);
        map.from(this.serverProperties.getServlet()::getContextPath)
                .to(factory::setContextPath);
        map.from(this.serverProperties.getServlet()::getApplicationDisplayName)
                .to(factory::setDisplayName);
        map.from(this.serverProperties.getServlet()::getSession).to(factory::setSession);
        map.from(this.serverProperties::getSsl).to(factory::setSsl);
        map.from(this.serverProperties.getServlet()::getJsp).to(factory::setJsp);
        map.from(this.serverProperties::getCompression).to(factory::setCompression);
        map.from(this.serverProperties::getHttp2).to(factory::setHttp2);
        map.from(this.serverProperties::getServerHeader).to(factory::setServerHeader);
        map.from(this.serverProperties.getServlet()::getContextParameters)
                .to(factory::setInitParameters);
    }
我们可以看到某个地方调度了 customize 来注入 ConfigurableServletWebServerFactory 的一个实现,谁调用了 customize 我们可以先放在一边,我们先看看 ConfigurableServletWebServerFactory 有哪些实现:

我们看到了非常熟悉的几个类,因为我们已经通过 console 得知了最终执行的是 tomcat 的结论,那么我们现在需要证明的是为什么调用了 TomcatServletWebServerFactory 。
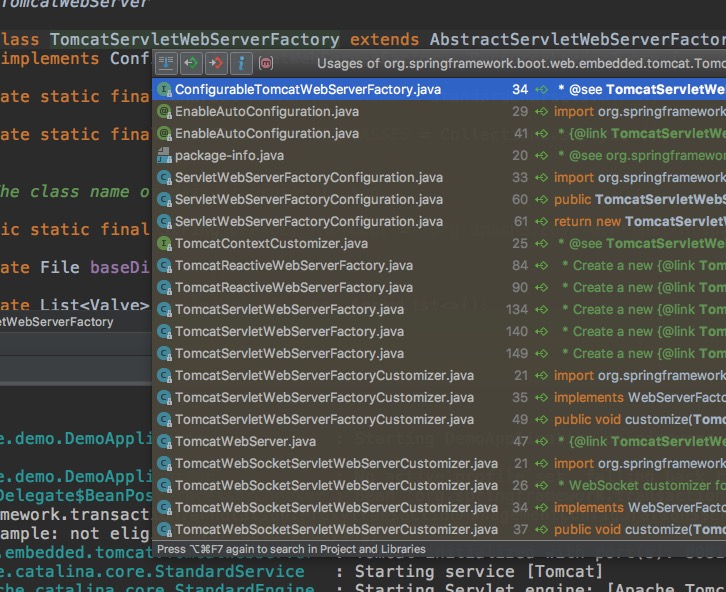
我们可以看到,调用的地方很多,在查看之前,我们不妨先思考一下,假如你是设计者,有 tomcat 、 jetty 等需要根据用户的自定义来调度,那么你去设计这个类,是不是至少在名字上不应该跟 tomcat 、 jetty 有关?因此,我们不妨先去 ServletWebServerFactoryConfiguration 去验证一下我们的想法是否正确。
@Configuration
class ServletWebServerFactoryConfiguration {

    @Configuration
    @ConditionalOnClass({ Servlet.class, Tomcat.class, UpgradeProtocol.class })
    @ConditionalOnMissingBean(value = ServletWebServerFactory.class, search = SearchStrategy.CURRENT)
    public static class EmbeddedTomcat {

        @Bean
        public TomcatServletWebServerFactory tomcatServletWebServerFactory() {
            return new TomcatServletWebServerFactory();
        }

    }

    /**
     * Nested configuration if Jetty is being used.
     */
    @Configuration
    @ConditionalOnClass({ Servlet.class, Server.class, Loader.class,
            WebAppContext.class })
    @ConditionalOnMissingBean(value = ServletWebServerFactory.class, search = SearchStrategy.CURRENT)
    public static class EmbeddedJetty {

        @Bean
        public JettyServletWebServerFactory JettyServletWebServerFactory() {
            return new JettyServletWebServerFactory();
        }

    }

    /**
     * Nested configuration if Undertow is being used.
     */
    @Configuration
    @ConditionalOnClass({ Servlet.class, Undertow.class, SslClientAuthMode.class })
    @ConditionalOnMissingBean(value = ServletWebServerFactory.class, search = SearchStrategy.CURRENT)
    public static class EmbeddedUndertow {

        @Bean
        public UndertowServletWebServerFactory undertowServletWebServerFactory() {
            return new UndertowServletWebServerFactory();
        }

    }

}
我们发现其中有一个注解 ConditionalOnClass (原理在自动装配篇会讲),故名知意,就是说在存在这个类的时候才会执行,同时,我们可以看到最后会注册成一个 bean 。
当注册 TomcatServletWebServerFactory 之后,我们似乎没有了头绪,我们不妨可以思考一下, 不管最终注册了哪个 bean ,最终肯定是通过某个接口来完成这个 bean 的调度,因此,一方面我们可以查看这个类实现了哪个接口,同时也可以看这个类里面会有接口方法的重写 。
通过上述理论,我们不难发现 TomcatServletWebServerFactory 实现了 ServletWebServerFactory ,并重写了 getWebServer 方法。
@Override
    public WebServer getWebServer(ServletContextInitializer... initializers) {
        Tomcat tomcat = new Tomcat();
        File baseDir = (this.baseDirectory != null) ? this.baseDirectory
                : createTempDir("tomcat");
        tomcat.setBaseDir(baseDir.getAbsolutePath());
        Connector connector = new Connector(this.protocol);
        tomcat.getService().addConnector(connector);
        customizeConnector(connector);
        tomcat.setConnector(connector);
        tomcat.getHost().setAutoDeploy(false);
        configureEngine(tomcat.getEngine());
        for (Connector additionalConnector : this.additionalTomcatConnectors) {
            tomcat.getService().addConnector(additionalConnector);
        }
        prepareContext(tomcat.getHost(), initializers);
        return getTomcatWebServer(tomcat);
    }

protected TomcatWebServer getTomcatWebServer(Tomcat tomcat) {
        return new TomcatWebServer(tomcat, getPort() >= 0);
    }
随之,我们不难查到 ServletWebServerApplicationContext 调度了 getWebServer 方法:
private void createWebServer() {
        WebServer webServer = this.webServer;
        ServletContext servletContext = getServletContext();
        if (webServer == null && servletContext == null) {
            ServletWebServerFactory factory = getWebServerFactory();
            this.webServer = factory.getWebServer(getSelfInitializer());
        }
        else if (servletContext != null) {
            try {
                getSelfInitializer().onStartup(servletContext);
            }
            catch (ServletException ex) {
                throw new ApplicationContextException("Cannot initialize servlet context",
                        ex);
            }
        }
        initPropertySources();
    }

//通过ServletWebServerFactory获取bean,也就是TomcatServletWebServerFactory
protected ServletWebServerFactory getWebServerFactory() {
        // Use bean names so that we don't consider the hierarchy
        String[] beanNames = getBeanFactory()
                .getBeanNamesForType(ServletWebServerFactory.class);
        if (beanNames.length == 0) {
            throw new ApplicationContextException(
                    "Unable to start ServletWebServerApplicationContext due to missing "
                            + "ServletWebServerFactory bean.");
        }
        if (beanNames.length > 1) {
            throw new ApplicationContextException(
                    "Unable to start ServletWebServerApplicationContext due to multiple "
                            + "ServletWebServerFactory beans : "
                            + StringUtils.arrayToCommaDelimitedString(beanNames));
        }
        return getBeanFactory().getBean(beanNames[0], ServletWebServerFactory.class);
    }
当我们获取 TomcatServletWebServerFactory 之后,会调度 getWebServer 方法,最后会返回一个 TomcatWebServer 。
public TomcatWebServer(Tomcat tomcat, boolean autoStart) {
Assert.notNull(tomcat, "Tomcat Server must not be null");
this.tomcat = tomcat;
this.autoStart = autoStart;
initialize();
}
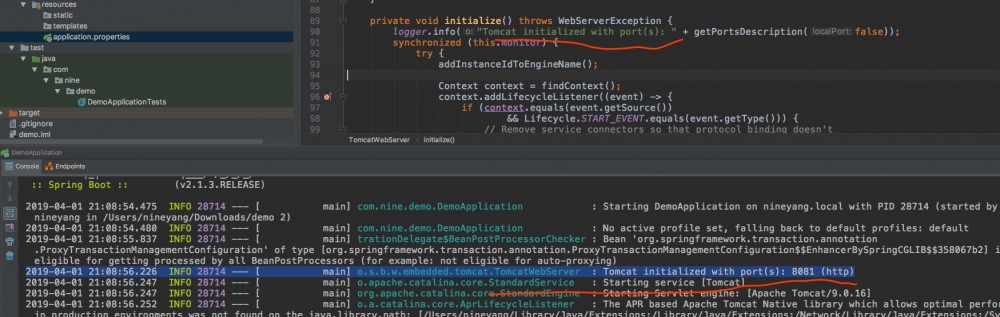
private void initialize() throws WebServerException {
logger.info("Tomcat initialized with port(s): " + getPortsDescription(false));
synchronized (this.monitor) {
try {
addInstanceIdToEngineName();
Context context = findContext();
context.addLifecycleListener((event) -> {
if (context.equals(event.getSource())
&& Lifecycle.START_EVENT.equals(event.getType())) {
// Remove service connectors so that protocol binding doesn't
// happen when the service is started.
removeServiceConnectors();
}
});
// Start the server to trigger initialization listeners
this.tomcat.start();
// We can re-throw failure exception directly in the main thread
rethrowDeferredStartupExceptions();
try {
ContextBindings.bindClassLoader(context, context.getNamingToken(),
getClass().getClassLoader());
}
catch (NamingException ex) {
// Naming is not enabled. Continue
}
// Unlike Jetty, all Tomcat threads are daemon threads. We create a
// blocking non-daemon to stop immediate shutdown
startDaemonAwaitThread();
}
catch (Exception ex) {
stopSilently();
throw new WebServerException("Unable to start embedded Tomcat", ex);
}
}
}
看到这里,我们就大概有一个比较清晰的思路了,我们看到 TomcatWebServer 有一个 initialize 方法,在构造的时候执行,输出的内容与我们在 console 看到的一致:
然后我们通过 ServletWebServerApplicationContext 的 createWebServer 方法一层一层的往上追溯,发现是 SpringApplication 的 refresh 方法调度了 ServletWebServerApplicationContext 的 onRefresh 方法,而 SpringApplication 的 refresh 方法又是通过 run 方法来调度的:
public ConfigurableApplicationContext run(String... args) {
        StopWatch stopWatch = new StopWatch();
        stopWatch.start();
        ConfigurableApplicationContext context = null;
        Collection<SpringBootExceptionReporter> exceptionReporters = new ArrayList<>();
        configureHeadlessProperty();
        SpringApplicationRunListeners listeners = getRunListeners(args);
        listeners.starting();
        try {
            ApplicationArguments applicationArguments = new DefaultApplicationArguments(
                    args);
            ConfigurableEnvironment environment = prepareEnvironment(listeners,
                    applicationArguments);
            configureIgnoreBeanInfo(environment);
            Banner printedBanner = printBanner(environment);
            context = createApplicationContext();
            exceptionReporters = getSpringFactoriesInstances(
                    SpringBootExceptionReporter.class,
                    new Class[] { ConfigurableApplicationContext.class }, context);
            prepareContext(context, environment, listeners, applicationArguments,
                    printedBanner);
            refreshContext(context);
            afterRefresh(context, applicationArguments);
            stopWatch.stop();
            if (this.logStartupInfo) {
                new StartupInfoLogger(this.mainApplicationClass)
                        .logStarted(getApplicationLog(), stopWatch);
            }
            listeners.started(context);
            callRunners(context, applicationArguments);
        }
        catch (Throwable ex) {
            handleRunFailure(context, ex, exceptionReporters, listeners);
            throw new IllegalStateException(ex);
        }

        try {
            listeners.running(context);
        }
        catch (Throwable ex) {
            handleRunFailure(context, ex, exceptionReporters, null);
            throw new IllegalStateException(ex);
        }
        return context;
    }
最后,就到了我们 Spring Boot 的入口:
@SpringBootApplication
public class DemoApplication {

    public static void main(String[] args) {
        SpringApplication.run(DemoApplication.class, args);
    }

}
那么问题就来了,为什么 SpringApplication 能指定到 ServletWebServerApplicationContext 这个上下文?
protected ConfigurableApplicationContext createApplicationContext() {
        Class<?> contextClass = this.applicationContextClass;
        if (contextClass == null) {
            try {
                switch (this.webApplicationType) {
                case SERVLET:
                    contextClass = Class.forName(DEFAULT_SERVLET_WEB_CONTEXT_CLASS);
                    break;
                case REACTIVE:
                    contextClass = Class.forName(DEFAULT_REACTIVE_WEB_CONTEXT_CLASS);
                    break;
                default:
                    contextClass = Class.forName(DEFAULT_CONTEXT_CLASS);
                }
            }
            catch (ClassNotFoundException ex) {
                throw new IllegalStateException(
                        "Unable create a default ApplicationContext, "
                                + "please specify an ApplicationContextClass",
                        ex);
            }
        }
        return (ConfigurableApplicationContext) BeanUtils.instantiateClass(contextClass);
    }
原因就在于创建的时候会指定我们的上下文。
至此,我们还有一个问题没有解决,也就是我们上面说到的,谁调度了 ServletWebServerFactoryCustomizer 的 customize 方法?
我们往上追溯,发现是 WebServerFactoryCustomizerBeanPostProcessor 的 postProcessBeforeInitialization 方法调度了,而这个类实现了 BeanPostProcessor , postProcessBeforeInitialization 方法就好比一个 hook ,当你在注册 bean 的时候会执行。
@Override
    public Object postProcessBeforeInitialization(Object bean, String beanName)
            throws BeansException {
        if (bean instanceof WebServerFactory) {
            postProcessBeforeInitialization((WebServerFactory) bean);
        }
        return bean;
    }
至此,我们的内嵌 tomcat 的执行流程原理就完成了。
总结
我们来做一个小结,大致的运行过程就是 SpringApplication 执行 run 方法,他会根据指定的 context ,然后会调度 ServletWebServerApplicationContext 的 refresh 方法,然后通过自己的父类调度 onRefresh 方法去创建我们的 webserver ,在创建的过程中,会执行 getWebServerFactory 方法,来根据 ServletWebServerFactory 返回我们自定义的 bean ,比如默认的就是 TomcatServletWebServerFactory ,最后通过这个类去返回一个 TomcatWebServer 的类,来完成我们内嵌 webserver 的调度。
本文由nine 创作,采用 知识共享署名4.0 国际许可协议进行许可
本站文章除注明转载/出处外,均为本站原创或翻译,转载前请务必署名
最后编辑时间为: Apr 1, 2019 at 11:49 pm
正文到此结束
- 本文标签: Nginx list trigger Spring Boot cat 时间 翻译 client bean https ArrayList UI PHP value jetty 文章 id description 2019 管理 协议 开源 Service ip session 配置 web App db http Collection find 部署 开源项目 ssl 总结 Property tomcat token map java CTO 端口 DDL IO tar synchronized IDE 服务器 BeanUtils servlet Listeners springboot apr spring CEO tab src mapper js equals 调试
- 版权声明: 本文为互联网转载文章,出处已在文章中说明(部分除外)。如果侵权,请联系本站长删除,谢谢。
- 本文海报: 生成海报一 生成海报二
热门推荐


相关文章

近期评论
-
ws0132613@gmail.comhttps://getmacos.com/gopanel/william smith
-
谢谢
-
https://www.newcmy.com/register?aff=HBVX建议您试试草莓云机场,可以流畅观看youtube和tiktok,上reddit/x也没有问题,还有各种ai优化节点。
-
-
-
想购买您这个站,我的联系方式QQ741756694微信同步 能卖联系
-
-
-
-
Loading...
![[HBLOG]公众号](https://www.liuhaihua.cn/img/qrcode_gzh.jpg)

