Spring Boot + Activiti示例 - Websparrow
在本教程中,我们将演示Spring Boot + Activiti示例。Activiti是一个开源工作流引擎,可以执行 BPMN 2.0中 描述的业务流程。Activiti引擎的核心目标是采用由人工任务和服务调用组成的流程定义,并按特定顺序执行。
在这里,我们将设计一个 BMPN工作流程图 和Spring Boot应用程序,它有助于管理流程,如下所示:
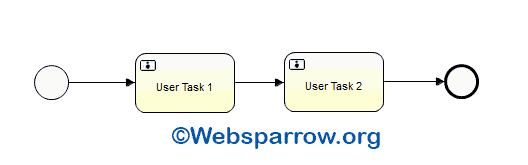
然后我们将使用Spring JPA创建员工列表并将其详细信息存储到数据库中,并通过调用Activiti API将任务分配给员工。员工将完成第一项任务和第二项任务。
技术列表:
- Spring Tool Suite 3
- JDK 8
- Spring Boot 1.5.3.RELEASE
- Activiti 5.22.0
- H2(内存中)数据库
- Spring JPA
使用Spring Boot + Activiti工作流流程引擎需要以下依赖项。将以下内容添加到您的pom.xml中。
<properties>
    <java.version>1.8</java.version>
    <activiti.version>5.22.0</activiti.version>
</properties>
<dependencies>
    <dependency>
        <groupId>org.springframework.boot</groupId>
        <artifactId>spring-boot-starter-web</artifactId>
    </dependency>
    <dependency>
        <groupId>org.activiti</groupId>
        <artifactId>activiti-spring-boot-starter-basic</artifactId>
        <version>${activiti.version}</version>
    </dependency>
    <dependency>
        <groupId>org.activiti</groupId>
        <artifactId>activiti-spring-boot-starter-jpa</artifactId>
        <version>${activiti.version}</version>
    </dependency>
    <dependency>
        <groupId>com.h2database</groupId>
        <artifactId>h2</artifactId>
    </dependency>
</dependencies>
BPMN流程定义
将BPMN 2.0流程定义放入src / main / resources / processes文件夹中。此处放置的所有进程将自动部署(即解析并使其可执行)到Activiti引擎。流程定义文件扩展名可以是bpmn20.xml或bpmn,如simple-process.bpmn20.xml或simple-process.bpmn。(这是由Activiti可视化界面生成的xml文件)
<?xml version=<font>"1.0"</font><font> encoding=</font><font>"UTF-8"</font><font>?>
<definitions xmlns=</font><font>"http://www.omg.org/spec/BPMN/20100524/MODEL"</font><font> xmlns:xsi=</font><font>"http://www.w3.org/2001/XMLSchema-instance"</font><font> xmlns:xsd=</font><font>"http://www.w3.org/2001/XMLSchema"</font><font> xmlns:activiti=</font><font>"http://activiti.org/bpmn"</font><font> xmlns:bpmndi=</font><font>"http://www.omg.org/spec/BPMN/20100524/DI"</font><font> xmlns:omgdc=</font><font>"http://www.omg.org/spec/DD/20100524/DC"</font><font> xmlns:omgdi=</font><font>"http://www.omg.org/spec/DD/20100524/DI"</font><font> typeLanguage=</font><font>"http://www.w3.org/2001/XMLSchema"</font><font> expressionLanguage=</font><font>"http://www.w3.org/1999/XPath"</font><font> targetNamespace=</font><font>"Examples"</font><font>>
  <process id=</font><font>"simple-process"</font><font> name=</font><font>"Simple Process"</font><font> isExecutable=</font><font>"true"</font><font>>
    <startEvent id=</font><font>"start"</font><font> name=</font><font>"Start"</font><font>></startEvent>
    <userTask id=</font><font>"userTask1"</font><font> name=</font><font>"User Task 1"</font><font> activiti:assignee=</font><font>"${employee.name}"</font><font>>
      <documentation>Complete user task 1 first.</documentation>
    </userTask>
    <userTask id=</font><font>"userTask2"</font><font> name=</font><font>"User Task 2"</font><font> activiti:assignee=</font><font>"${employee.name}"</font><font>>
      <documentation>Work <b>for</b> the second task.</documentation>
    </userTask>
    <endEvent id=</font><font>"theEnd"</font><font>></endEvent>
    <sequenceFlow id=</font><font>"flow1"</font><font> sourceRef=</font><font>"userTask2"</font><font> targetRef=</font><font>"theEnd"</font><font>></sequenceFlow>
    <sequenceFlow id=</font><font>"flow3"</font><font> sourceRef=</font><font>"userTask1"</font><font> targetRef=</font><font>"userTask2"</font><font>></sequenceFlow>
    <sequenceFlow id=</font><font>"flow4"</font><font> sourceRef=</font><font>"start"</font><font> targetRef=</font><font>"userTask1"</font><font>></sequenceFlow>
  </process>
</definitions>
</font>
activiti:assignee属性 ${employee.name}是被分配到任务的雇员。
模型和存储库类
创建Employee数据模型类。
@Entity
<b>public</b> <b>class</b> Employee {

    @Id
    @GeneratedValue
    <b>private</b> Long id;
    <b>private</b> String name;
    <b>private</b> String designation;
<font><i>// generate getters and setters...</i></font><font>

    <b>public</b> Employee() {
    }

    <b>public</b> Employee(String name, String designation) {

        <b>this</b>.name = name;
        <b>this</b>.designation = designation;
    }
}
</font>
创建EmployeeRepository实现接口JpaRepository<T, ID>的findByName(String name )Employee方法,实现从数据库查询的雇员。
<b>public</b> <b>interface</b> EmployeeRepository <b>extends</b> JpaRepository<Employee, Long> {

    <b>public</b> Employee findByName(String name);

}
服务类
EmployeeService班负责员工加入到数据库中。应用程序启动时将调用此服务类。
@Service
<b>public</b> <b>class</b> EmployeeService {

    @Autowired
    <b>private</b> EmployeeRepository employeeRepository;

    <font><i>// create the list of Employees into the database who perform the task</i></font><font>
    <b>public</b> <b>void</b> createEmployee() {

        <b>if</b> (employeeRepository.findAll().size() == 0) {

            employeeRepository.save(<b>new</b> Employee(</font><font>"Prince"</font><font>, </font><font>"Software Enginner"</font><font>));
            employeeRepository.save(<b>new</b> Employee(</font><font>"Gaurav"</font><font>, </font><font>"Technical Lead"</font><font>));
            employeeRepository.save(<b>new</b> Employee(</font><font>"Abhinav"</font><font>, </font><font>"Test Lead"</font><font>));
        }
    }
}
</font>
而ProcessService类是负责启动的过程中,给员工分配任务,检索分配给员工的任务,并通过ID完成特定的任务。
@Service
<b>public</b> <b>class</b> ProcessService {

    @Autowired
    <b>private</b> EmployeeRepository employeeRepository;

    @Autowired
    <b>private</b> RuntimeService runtimeService;

    @Autowired
    <b>private</b> TaskService taskService;

    @Autowired
    <b>private</b> RepositoryService repositoryService;

    <font><i>// start the process and set employee as variable</i></font><font>
    <b>public</b> String startTheProcess(String assignee) {

        Employee employee = employeeRepository.findByName(assignee);

        Map<String, Object> variables = <b>new</b> HashMap<>();
        variables.put(</font><font>"employee"</font><font>, employee);

        runtimeService.startProcessInstanceByKey(</font><font>"simple-process"</font><font>, variables);

        <b>return</b> processInformation();
    }

    </font><font><i>// fetching process and task information</i></font><font>
    <b>public</b> String processInformation() {

        List<Task> taskList = taskService.createTaskQuery().orderByTaskCreateTime().asc().list();

        StringBuilder processAndTaskInfo = <b>new</b> StringBuilder();

        processAndTaskInfo.append(</font><font>"Number of process definition available: "</font><font>
                + repositoryService.createProcessDefinitionQuery().count() + </font><font>" | Task Details= "</font><font>);

        taskList.forEach(task -> {

            processAndTaskInfo.append(</font><font>"ID: "</font><font> + task.getId() + </font><font>", Name: "</font><font> + task.getName() + </font><font>", Assignee: "</font><font>
                    + task.getAssignee() + </font><font>", Description: "</font><font> + task.getDescription());
        });

        <b>return</b> processAndTaskInfo.toString();
    }

    </font><font><i>// fetch task assigned to employee</i></font><font>
    <b>public</b> List<Task> getTasks(String assignee) {
        <b>return</b> taskService.createTaskQuery().taskAssignee(assignee).list();
    }

    </font><font><i>// complete the task</i></font><font>
    <b>public</b> <b>void</b> completeTask(String taskId) {
        taskService.complete(taskId);
    }
}
</font>
控制器类
ProcessController类处理HTTP请求,调用相应的ProcessService类的方法,和响应的具体结果。
@RestController
<b>public</b> <b>class</b> ProcessController {

    @Autowired
    <b>private</b> ProcessService processService;

    <font><i>/*
     * Method will start the Activiti process engine and set employee to perform
     * the task
     */</i></font><font>
    @RequestMapping(value = </font><font>"/process"</font><font>)
    <b>public</b> String startProcessInstance(@RequestParam String assignee) {
        <b>return</b> processService.startTheProcess(assignee);
    }

    </font><font><i>// Retrieve the tasks assigned to an employee</i></font><font>
    @RequestMapping(value = </font><font>"/tasks"</font><font>)
    <b>public</b> String getTasks(@RequestParam String assignee) {
        List<Task> tasks = processService.getTasks(assignee);
        <b>return</b> tasks.toString();
    }

    </font><font><i>// Complete the task by their ID</i></font><font>
    @RequestMapping(value = </font><font>"/completetask"</font><font>)
    <b>public</b> String completeTask(@RequestParam String taskId) {
        processService.completeTask(taskId);
        <b>return</b> </font><font>"Task with id "</font><font> + taskId + </font><font>" has been completed!"</font><font>;
    }
}
</font>
运行应用程序
最后,创建一个App类,该类调用在启动应用程序时创建员工EmployeeSerice的createEmployee()方法。
@SpringBootApplication
<b>public</b> <b>class</b> App {

    <b>public</b> <b>static</b> <b>void</b> main(String[] args) {
        SpringApplication.run(App.<b>class</b>, args);
    }

    @Bean
    <b>public</b> CommandLineRunner init(<b>final</b> EmployeeService employeeService) {

        <b>return</b> <b>new</b> CommandLineRunner() {
            <b>public</b> <b>void</b> run(String... strings) throws Exception {
                employeeService.createEmployee();
            }
        };
    }
}
要使用用户标识和密码保护您的应用程序,请在App类中添加以下代码。
@Bean
InitializingBean usersAndGroupsInitializer(<b>final</b> IdentityService identityService) {

    <b>return</b> <b>new</b> InitializingBean() {
        <b>public</b> <b>void</b> afterPropertiesSet() throws Exception {

            Group group = identityService.newGroup(<font>"user"</font><font>);
            group.setName(</font><font>"users"</font><font>);
            group.setType(</font><font>"security-role"</font><font>);
            identityService.saveGroup(group);

            User admin = identityService.newUser(</font><font>"admin"</font><font>);
            admin.setPassword(</font><font>"admin"</font><font>);
            identityService.saveUser(admin);
        }
    };
}
</font>
测试应用程序
1. 分配任务给员工:
http://localhost:8080/process?assignee=Prince
2. 显示分配给Prince的任务
http://localhost:8080/tasks?assignee=Prince
3. 按任务ID完成分配给Prince的任务。
http://localhost:8080/completetask?taskId=9
4. 再次检查分配给Prince的任务
http://localhost:8080/tasks?assignee=Prince
5. 再次完成任务
http://localhost:8080/completetask?taskId=12
正文到此结束
- 本文标签: map ORM Document schema web find 数据模型 管理 springboot list entity pom cat bean 解析 开源 java tar ACE IDE Spring Boot value src db 进程 Service App 部署 final spring Word https 数据 id key build tab 数据库 Security 代码 HashMap dependencies http ip UI IO XML example 测试 description JPA API 模型 REST ask
- 版权声明: 本文为互联网转载文章,出处已在文章中说明(部分除外)。如果侵权,请联系本站长删除,谢谢。
- 本文海报: 生成海报一 生成海报二
热门推荐


相关文章


Loading...
![[HBLOG]公众号](https://www.liuhaihua.cn/img/qrcode_gzh.jpg)

