学习微服务:ServiceComb + Spring Cloud Hystrix
点击蓝色文字添加关注! 推荐指数 ★★★★★
在分布式环境中,许多服务依赖项中的一些不可避免地会失败。Hystrix是一个Java类库,可通过添加容错逻辑来帮助您控制这些分布式服务之间的交互。Hystrix通过隔离服务之间的访问点,阻止它们之间的级联故障以及提供后备选项来实现这一目标,所有这些都可以提高系统的整体弹性。
ServiceComb内置了组件handler-bizkeeper实现和服务降级相关的功能,比如隔离、熔断、容错。开发者可以非常简单的使用。handler-bizkeeper组件基于Netflix Hystrix实现。具体可参考官方网址↓↓↓
https://docs.servicecomb.io/java-chassis/zh_CN/build-provider/configuration/downgrade-strategy.html
SpringCloud也有基于Netflix Hystrix实现的一套服务降级工具Spring Cloud Hystrix。
开发者在ServiceComb框架中可以自由选择使用其中一个库。

下面通过一个场景演示ServiceComb结合Spring Cloud Hystrix的使用
使用步骤
-
排除ServiceComb的内置组件handler-bizkeeper(注意依赖传递)
-
添加依赖org.springframework.cloud:spring-cloud-starter-hystrix
完成以上步骤后即可使用spring-cloud-starter-hystrix。(注意spring-cloud-starter-hystrix本身生效应加的配置,如EnableCircuitBreaker注解)
示例
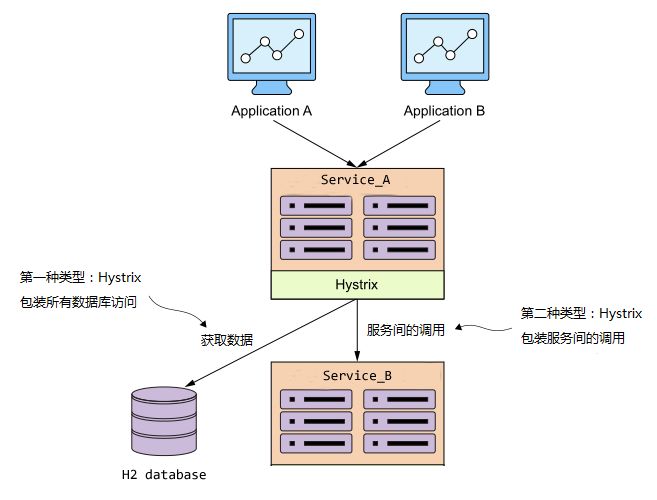
本篇以典型的服务间调用超时,和数据库服务调用超时来演示服务降级的使用。如下图所示,在服务Service_A当中使用Hystrix分别封装了数据库访问和服务间的调用。为方便起见,使用内存数据库H2 (如下图)

完整示例地址:https://github.com/lisenwork/servicecomb-demo/blob/master/servicecomb-hystrix
一. 启动ServiceCenter注册中心
开发者可参考官方README https://github.com/apache/servicecomb-service-center/blob/master/README.md 进行下载安装和启动
二. 服务消费者Service_A
1. 添加依赖
新建pom.xml文件,加入以下关键依赖
<dependency>
    <groupId>org.springframework.cloud</groupId>
    <artifactId>spring-cloud-starter-hystrix</artifactId>
    <version>1.4.4.RELEASE</version>
</dependency>

<dependency>
    <groupId>org.apache.servicecomb</groupId>
    <artifactId>spring-boot-starter-provider</artifactId>
    <version>1.1.0</version>
    <exclusions>
        <exclusion>
            <groupId>org.apache.servicecomb</groupId>
            <artifactId>handler-bizkeeper</artifactId>
        </exclusion>
    </exclusions>
</dependency>

<!-- 内存数据库 -->
<dependency>
    <groupId>com.h2database</groupId>
    <artifactId>h2</artifactId>
</dependency>

<!-- 数据库ORM框架 -->
<dependency>
    <groupId>org.springframework.boot</groupId>
    <artifactId>spring-boot-starter-data-jpa</artifactId>
</dependency>
完整pom.xml文件请见
https://github.com/lisenwork/servicecomb-demo/blob/master/servicecomb-hystrix/Service_A/pom.xml
2. 配置
(1) 在resources目录下新建ServiceComb配置文件microservice.yaml,添加微服务定义信息
APPLICATION_ID: service-hystrix  # 应用名,注意与网关服务器的应用名保持一致
service_description:
  name: service_a  # 微服务名
  version: 0.0.4     # 微服务版本号
servicecomb:
  service:
    registry:
      address: http://127.0.0.1:30100  # 服务注册中心(重要)
  rest:
      address: 0.0.0.0:8989   # 微服务启动端口
(2) 在resources目录下新建ServiceComb配置文件application.yml,添加数据库配置信息
spring:
  datasource:
    url: jdbc:h2:mem:h2test;DB_CLOSE_DELAY=-1;DB_CLOSE_ON_EXIT=FALSE
    platform: h2
    username: sa
    password:
    driverClassName: org.h2.Driver
    schema: classpath:db/schema.sql
    data: classpath:db/data.sql
  jpa:
    database-platform: org.hibernate.dialect.H2Dialect
    hibernate:
      ddl-auto: update
    properties:
      hibernate:
        show_sql: true
        use_sql_comments: true
        format_sql: true
logging:
  level: debug
(3) 添加数据库初始化脚本。在resources/db目录下新建data.sql和schema.sql。
schema.sql
CREATE TABLE t_user( id INTEGER NOT NULL,name VARCHAR(25) NOT NULL, age INTEGER DEFAULT NULL)
data.sql
INSERT INTO t_user(id,name,age)VALUES ('1','张三',18);
INSERT INTO t_user(id,name,age)VALUES ('2','李四',19);
3 .项目入口
新建启动类Application。其中EnableCircuitBreaker是为了使Spring-Cloud-Hystrix生效。EnableServiceComb是使ServiceComb生效。RestTemplate对象用于后面的服务间接口调用↓↓↓
@SpringBootApplication
@EnableServiceComb
@EnableCircuitBreaker
public class Application {

    public static void main(String[] args) {
        SpringApplication.run(Application.class, args);
    }

    @LoadBalanced
    @Bean
    public RestTemplate getRestTemplate(){
        return new RestTemplate();
    }

}
4. 模拟业务代码
新建AController类提供对外的接口↓↓↓
@RestSchema(schemaId = "aController")
@RequestMapping("/")
public class AController
{

    @Autowired
    private  AService aService;

    @GetMapping("/getSomethingFromServiceB")
    public String getSomethingFromServiceB(){
        return aService.getSomethingFromServiceB();
    }

    @GetMapping("/getSomethingFromDataSource")
    public List<User> getSomethingFromDataSource(){
        return aService.getSomethingFromDataSource();
    }

}
新建AService类模拟业务逻辑
-
访问数据库,随机加延时。模拟调用超时降级
-
访问其它微服务(Service_B),模拟调用超时降级 (延时逻辑在被调用的微服务代码里,在本文章即Service_B)
@Service
public class AService {

    @Autowired
    LoadBalancerClient loadBalancerClient;
    @Autowired
    RestTemplate restTemplate;
    @Autowired
    private UserRepository userRepository;

    @HystrixCommand(
            fallbackMethod = "errorHandler",
            commandProperties = {
                    @HystrixProperty(name = "execution.isolation.thread.timeoutInMilliseconds", value = "1000")
            }
    )
    public String getSomethingFromServiceB() {
        ServiceInstance serviceInstance = loadBalancerClient.choose("service_b");
        String url = "http://" + serviceInstance.getHost() + ":" + serviceInstance.getPort()+"/getSomething";
        System.out.println(url);
        return restTemplate.getForObject(url, String.class);
    }

    @HystrixCommand(fallbackMethod = "defaultStores",
            commandProperties = {
                    @HystrixProperty(name = "execution.isolation.thread.timeoutInMilliseconds", value = "500")
            }
    )
    public List<User> getSomethingFromDataSource() {

        randomlyRunLong();
        List<User> userList = userRepository.findAll();
        userList.forEach(System.out::println);
        return userList;
    }

    public List<User> defaultStores() {
        System.out.println("defaultStores");
        return new ArrayList<>();
    }

    public String errorHandler(Throwable throwable){
        return throwable.toString();
    }


    private void randomlyRunLong(){
        Random rand = new Random();
        int randomNum = rand.nextInt((3 - 1) + 1) + 1;
        if (randomNum==3) sleep();
    }

    private void sleep(){
        try {
            Thread.sleep(20000);
        } catch (InterruptedException e) {
            e.printStackTrace();
        }
    }

}
三. 服务提供者Service_B
Service_B的代码比较简单,只是对外提供一个接口,并加了随机延时
接口定义如下↓↓↓
@RestSchema(schemaId = "bController")
@RequestMapping("/")
public class BController {

    @GetMapping("/getSomething")
    public String getSomething(){
        randomlyRunLong();
        return "Hello";
    }

    private void randomlyRunLong(){
        Random rand = new Random();
        int randomNum = rand.nextInt((3 - 1) + 1) + 1;
        if (randomNum==3) sleep();
    }

    private void sleep(){
        try {
            Thread.sleep(20000);
        } catch (InterruptedException e) {
            e.printStackTrace();
        }
    }
}
完整Service_B项目代码请参考 https://github.com/lisenwork/servicecomb-demo/blob/master/servicecomb-hystrix/Service_B/pom.xml
四. 演示
> > > >
启动服务Service_A和Service_B
在浏览器(或Postman)访问http://localhost:8989/getSomethingFromDataSource,多次后会出现返回空数组的现象。
在浏览器(或Postman)访问http://localhost:8989/getSomethingFromServiceB,多次后会出现返回异常信息的现象
文末小结
本文向社区读者从使用角度阐述了ServiceComb是如何支持 Spring Cloud Hystrix的。
我们也非常欢迎爱好者们向社区提问和贡献代码:)
如果在阅读代码时有任何疑问想交流,欢迎扫码加入进微信群。
期待志同道合的朋友们加入
ServiceComb的大门为你们敞开~
扫描二维码,添加微服务小助手
▼ 
用心做开源/不忘初衷


前期阅读
[学习微服务]
ServiceComb之Java-Chassis启动流程分析
[学习微服务第10天]
Service-Center 启动流程分析
[学习微服务第9天]
Service-Center使用入门
[学习微服务-第8天]
ServiceComb内置负载均衡组件handler-loadbalance
[学习微服务第7天]
ServiceComb+SpringCloud Ribbon源码解读
[学习微服务-第6天]
负载均衡之ServiceComb + SpringCloud Ribbon
[学习微服务-第5天]
ServiceComb+Zipkin源码解读
[学习微服务-第4天]
ServiceComb+Zipkin
[学习微服务-第3天]
ServiceComb内置高性能网关服务
[每天学习微服务-源码解读]
ServiceComb+SpringCloud Zuul
[每天学习微服务-网关]
ServiceComb+SpringCloud Zuul
了解更多信息请访问:
官方网站 http://servicecomb.apache.org/
Github代码仓库 https://github.com/apache?q=ServiceComb

好看你就 点点 我

赶紧点击阅读原文阅读相关源码
并给ServiceComb点个“Star”吧
- 本文标签: http 微服务 description Service 开发者 value bug 服务器 schema 注册中心 git 文章 sql 代码 Master spring 开发 springcloud 端口 DDL JDBC find Property UI XML springboot apache dataSource zuul ip 朋友们 网站 GitHub IO 目录 REST token tab src ArrayList tar Logging 配置 DOM zipkin zip Java类 Netflix ACE cat IDE ORM 二维码 数据库访问 源码 client 提问 负载均衡 JPA 安装 HTML 分布式 update provider ribbon pom Word rand 数据库 bean 数据 list Hystrix classpath build 服务注册 https 下载 map App id java 开源 Spring cloud db
- 版权声明: 本文为互联网转载文章,出处已在文章中说明(部分除外)。如果侵权,请联系本站长删除,谢谢。
- 本文海报: 生成海报一 生成海报二


![[HBLOG]公众号](https://www.liuhaihua.cn/img/qrcode_gzh.jpg)

