Spring Boot源码分析-启动过程
Spring Boot 作为目前最流行的Java开发框架,秉承“约定优于配置”原则,大大简化了 Spring MVC 繁琐的 XML 文件配置,基本实现零配置启动项目。
本文基于 Spring Boot 2.1.0.RELEASE 版本了解 Spring Boot 如何启动
首先让我们看一下最简单的 Spring Boot 启动代码
@SpringBootApplication
public class DemoApplication {

    public static void main(String[] args) {
        SpringApplication.run(DemoApplication.class, args);
    }
}
复制代码
每一个使用过 Spring Boot 的同学对于上面的代码应该都非常熟悉了,通过这段代码即可启动 Spring Boot 应用。那么 SpringApplication.run(DemoApplication.class, args) 内部到底做了什么事情呢?
在查看具体代码之前,我们先了解一下 SpringApplication 内部大概的执行流程,如下图
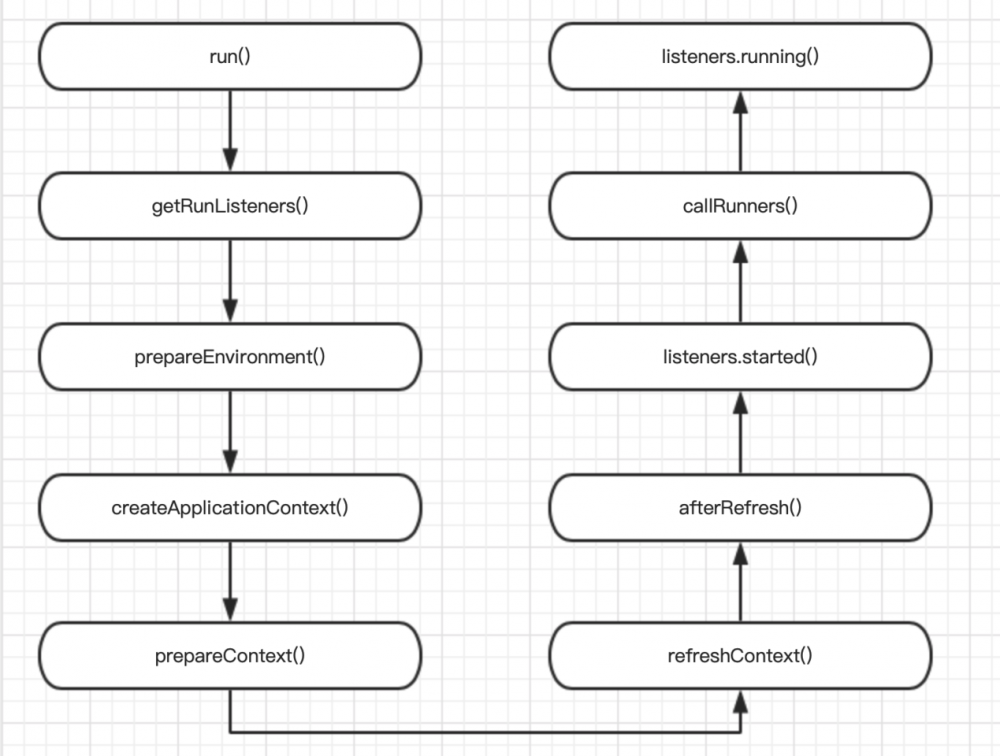
从上图中可以看出 run() 是整个应用的入口,接着初始化 SpringApplicationRunListener , Environment 等实例,然后创建应用上下文对象,“准备”并“刷新”上下文,到这里 Spring 容器已基本启动完成,最后发送事件通知各个组件作出相应动作。
源码分析
在了解完大概的流程之后,下面开始深入源码分析 Spring Boot 具体的启动过程,首先进入入口方法 run
public ConfigurableApplicationContext run(String... args) {
    StopWatch stopWatch = new StopWatch();
    stopWatch.start();
    ConfigurableApplicationContext context = null;
    Collection<SpringBootExceptionReporter> exceptionReporters = new ArrayList<>();
    configureHeadlessProperty();
    SpringApplicationRunListeners listeners = getRunListeners(args);
    listeners.starting();
    // ...
复制代码
StopWatch 主要是用来统计每项任务执行时长,例如 Spring Boot 启动占用总时长。
Started DemoApplication in 4.241 seconds (JVM running for 5.987)
getRunListeners() 完成了 SpringApplicationRunListener 实例化工作,如何完成的呢?进入方法内部查看
private SpringApplicationRunListeners getRunListeners(String[] args) {
		Class<?>[] types = new Class<?>[] { SpringApplication.class, String[].class };
    return new SpringApplicationRunListeners(logger, getSpringFactoriesInstances(
				SpringApplicationRunListener.class, types, this, args));
}
复制代码
SpringApplicationRunListeners 和 SpringApplicationRunListener 不是同一个类,它们名称非常相似
查看 SpringApplicationRunListeners 源码
SpringApplicationRunListeners(Log log,
			Collection<? extends SpringApplicationRunListener> listeners) {
	this.log = log;
	this.listeners = new ArrayList<>(listeners);
}

public void starting() {
	for (SpringApplicationRunListener listener : this.listeners	 {
		listener.starting();
	}
}
public void environmentPrepared() {
	// ....
}
public void contextPrepared() {
	// ....
}
public void contextLoaded() {
	// ....
}
public void started() {
	// ....
}
public void running() {
	// ....
}
复制代码
它是 SpringApplicationRunListener 的一个集合
观察 SpringApplicationRunListeners 所有方法,可以看出,它实际是一个用来发送 SpringApplicationRunListener 相关事件的工具类
接着继续观察 getSpringFactoriesInstances 源码,看它是如何实例化对象的(此方法后续多处使用)
private <T> Collection<T> getSpringFactoriesInstance(Class<T> type,
		Class<?>[] parameterTypes, Object... args) {
	ClassLoader classLoader = getClassLoader();
	// 加载对象名称
	Set<String> names = new LinkedHashSet<>(
			SpringFactoriesLoader.loadFactoryNames(type,classLoader));
	List<T> instances = createSpringFactoriesInstances(type parameterTypes,
			classLoader, args, names);
	AnnotationAwareOrderComparator.sort(instances);
	return instances;
}
复制代码
这里通过 SpringFactoriesLoader.loadFactoryNames 获取 type 对应的 FactoryNames ,不明白有什么用处?进入方法内部查看
public static List<String> loadFactoryNames(Class<?>factoryClass, @Nullable ClassLoader classLoader) {
	String factoryClassName = factoryClass.getName();
	return loadSpringFactories(classLoader).getOrDefaul(factoryClassName, Collections.emptyList());
}
复制代码
继续进入 loadSpringFactories 方法内部
public static final String FACTORIES_RESOURCE_LOCATION ="META-INF/spring.factories";
private static Map<String, List<String>> loadSpringFactorie(@Nullable ClassLoader classLoader) {
	MultiValueMap<String, String> result = cache.ge(classLoader);
	if (result != null) {
		return result;
	}
	try {
		// 获取 META-INF/spring.factories 对应的资源
		Enumeration<URL> urls = (classLoader != null ?
				classLoader.getResource(FACTORIES_RESOURCE_LOCATION) :
				ClassLoader.getSystemResource(FACTORIES_RESOURCE_LOCATION));
		result = new LinkedMultiValueMap<>();
		while (urls.hasMoreElements()) {
			URL url = urls.nextElement();
			UrlResource resource = new UrlResource(url);
			// 读取文件内容
			Properties properties =PropertiesLoaderUtils.loadProperties(resource);
			for (Map.Entry<?, ?> entry : properties.entrySe()) {
				String factoryClassName = ((String)entry.getKey()).trim();
				for (String factoryName :StringUtils.commaDelimitedListToStringArray(String) entry.getValue())) {
					// 获取 factoryClassName 对应的多个valu(多个value用逗号分隔)
					result.add(factoryClassName,factoryName.trim());
				}
			}
		}
		// 缓存已经读取到的内容
		cache.put(classLoader, result);
		return result;
	}
	catch (IOException ex) {
		throw new IllegalArgumentException("Unable to loadfactories from location [" +
				FACTORIES_RESOURCE_LOCATION + "]", ex);
	}
}
复制代码
看到这里可能会疑惑 META-INF/spring.factories 文件在哪里?文件里面有什么内容?
其实这个文件存放在 Spring Boot 和 Spring Boot autoconfigure 的jar包内部(有兴趣的同学可以自行下载jar包并解压查看), Spring Boot 中的文件内容如下:
# 完整内容请查看原文件

# Run Listeners
org.springframework.boot.SpringApplicationRunListener=/
org.springframework.boot.context.event.EventPublishingRunListener

# Application Listeners
org.springframework.context.ApplicationListener=/
org.springframework.boot.ClearCachesApplicationListener,/
org.springframework.boot.builder.ParentContextCloserApplicationListener,/
org.springframework.boot.context.FileEncodingApplicationListener,/
org.springframework.boot.context.config.AnsiOutputApplicationListener,/
org.springframework.boot.context.config.ConfigFileApplicationListener,/
org.springframework.boot.context.config.DelegatingApplicationListener,/
org.springframework.boot.context.logging.ClasspathLoggingApplicationListener,/
org.springframework.boot.context.logging.LoggingApplicationListener,/
org.springframework.boot.liquibase.LiquibaseServiceLocatorApplicationListener
复制代码
可以看到 SpringApplicationRunListener 对应的值是 EventPublishingRunListener
回到 SpringFactoriesLoader.loadFactoryNames 方法内部,可以发现方法获取的值实际上是 factoryClass 在 META-INF/spring.factories 中对应的实现类的集合
明白这个方法之后,再回到 getSpringFactoriesInstances 方法
private <T> Collection<T> getSpringFactoriesInstance(Class<T> type,
		Class<?>[] parameterTypes, Object... args) {
	ClassLoader classLoader = getClassLoader();
	// 获取 SpringApplicationRunListener 对应的实现类的名称集合
	Set<String> names = new LinkedHashSet<>(
			SpringFactoriesLoader.loadFactoryNames(type,classLoader));
	// 通过反射实例化对象
	List<T> instances = createSpringFactoriesInstances(type parameterTypes,
			classLoader, args, names);
	AnnotationAwareOrderComparator.sort(instances);
	return instances;
}
复制代码
到此为止 getRunListeners 完成了 SpringApplicationRunListener 对应实现类的实例化,并回调其 starting 方法
SpringApplicationRunListeners listeners getRunListeners(args);
listeners.starting();
复制代码
从上面分析得知,实际上调用的是 EventPublishingRunListener 的 starting 方法,那么方法内部做了什么呢?
public void starting() {
	this.initialMulticaster.multicastEvent(
			new ApplicationStartingEvent(this.application,this.args));
}
复制代码
发送了一个 ApplicationStartingEvent 事件
继续查找 ApplicationStartingEvent 事件的消费者,从 spring.factories 中可以找到所有预定义的事件消费者
# Application Listeners
org.springframework.context.ApplicationListener=/
org.springframework.boot.ClearCachesApplicationListener,/
org.springframework.boot.builder.ParentContextCloserApplicationListener,/
org.springframework.boot.context.FileEncodingApplicationListener,/
org.springframework.boot.context.config.AnsiOutputApplicationListener,/
org.springframework.boot.context.config.ConfigFileApplicationListener,/
org.springframework.boot.context.config.DelegatingApplicationListener,/
org.springframework.boot.context.logging.ClasspathLoggingApplicationListener,/
org.springframework.boot.context.logging.LoggingApplicationListener,/
org.springframework.boot.liquibase.LiquibaseServiceLocatorApplicationListener
复制代码
# Application Listeners
org.springframework.context.ApplicationListener=/
org.springframework.boot.autoconfigure.BackgroundPreinitializer
复制代码
接下来要做的就是从这些消费者中找出 ApplicationStartingEvent 事件的消费者(查找过程省略),找到以下两个消费者
-
LoggingApplicationListener 初始化日志系统
-
LiquibaseServiceLocatorApplicationListener (参数liquibase.servicelocator.ServiceLocator)如果存在,则使用springboot相关的版本进行替代
了解完 ApplicationStartingEvent 事件之后,回到 run 方法继续往下探究 prepareEnvironment
private ConfigurableEnvironment prepareEnvironment(
		SpringApplicationRunListeners listeners,
		ApplicationArguments applicationArguments) {
	// 创建Environment对象
	ConfigurableEnvironment environment =getOrCreateEnvironment();
	configureEnvironment(environment,applicationArguments.getSourceArgs());
	// 发布ApplicationEnvironmentPreparedEvent事件
	listeners.environmentPrepared(environment);
	bindToSpringApplication(environment);
	if (!this.isCustomEnvironment) {
		environment = new EnvironmentConverte(getClassLoader())
				.convertEnvironmentIfNecessary(environment,deduceEnvironmentClass());
	}
	ConfigurationPropertySources.attach(environment);
	return environment;
}
复制代码
这里又发布了一个 ApplicationEnvironmentPreparedEvent 事件,继续查找事件监听对象
Spring
private void onApplicationEnvironmentPreparedEvent(
		ApplicationEnvironmentPreparedEvent event) {
	List<EnvironmentPostProcessor> postProcessors =loadPostProcessors();
	postProcessors.add(this);
	AnnotationAwareOrderComparator.sort(postProcessors);
	for (EnvironmentPostProcessor postProcessor :postProcessors) {
		postProcessor.postProcessEnvironmen(event.getEnvironment(),
				event.getSpringApplication());
	}
}

List<EnvironmentPostProcessor> loadPostProcessors() {
	return SpringFactoriesLoader.loadFactorie(EnvironmentPostProcessor.class,
			getClass().getClassLoader());
}
复制代码
通过 spring.factories ,可以看到这里加载以下 EnvironmentPostProcessor 对象
- CloudFoundryVcapEnvironmentPostProcessor
- SpringApplicationJsonEnvironmentPostProcessor
- SystemEnvironmentPropertySourceEnvironmentPostProcessor
- ConfigFileApplicationListener
很多同学可能会疑问 ConfigFileApplicationListener 并不存在 spring.factories 文件中,这里为什么会有它呢?
实际上 ConfigFileApplicationListener 在 onApplicationEnvironmentPreparedEvent 方法中,将自身添加到 EnvironmentPostProcessor 对象列表中。
我们主要关注 ConfigFileApplicationListener 的 postProcessEnvironment 方法
public void postProcessEnvironment(ConfigurableEnvironmentenvironment,
		SpringApplication application) {
	addPropertySources(environment,application.getResourceLoader());
}
protected void addPropertySources(ConfigurableEnvironmentenvironment,
		ResourceLoader resourceLoader) {
	RandomValuePropertySource.addToEnvironment(environment);
	// 读取applicaiton.yml, application.properties等配置文件
	new Loader(environment, resourceLoader).load();
}
复制代码
ConfigFileApplicationListener 监听到 ApplicationEnvironmentPreparedEvent 事件之后开始读取本地配置文件
关于 Spring 如何读取本地配置文件,请前往 Spring Boot源码分析-配置文件加载原理
创建 ApplicationContext 对象
protected ConfigurableApplicationContextcreateApplicationContext() {
	Class<?> contextClass = this.applicationContextClass;
	if (contextClass == null) {
		try {
			// 根据webApplicationType创建对应上下文对象
			switch (this.webApplicationType) {
			case SERVLET:
				contextClass = Class.forNam(DEFAULT_SERVLET_WEB_CONTEXT_CLASS);
				break;
			case REACTIVE:
				contextClass = Class.forNam(DEFAULT_REACTIVE_WEB_CONTEXT_CLASS);
				break;
			default:
				contextClass = Class.forNam(DEFAULT_CONTEXT_CLASS);
			}
		}
		catch (ClassNotFoundException ex) {
			throw new IllegalStateException(
					"Unable create a defaultApplicationContext, "
							+ "please specify anApplicationContextClass",
					ex);
		}
	}
	return (ConfigurableApplicationContext)BeanUtils.instantiateClass(contextClass);
}
复制代码
这里是根据 webApplicationType 决定创建什么类型的 ApplicationContext 对象,那么 webApplicationType 是何时赋值的呢?
public SpringApplication(ResourceLoader resourceLoader,Class<?>... primarySources) {
	this.resourceLoader = resourceLoader;
	Assert.notNull(primarySources, "PrimarySources must notbe null");
	this.primarySources = new LinkedHashSet<>(Arrays.asLis(primarySources));
	// 初始化webApplicationType
	this.webApplicationType =WebApplicationType.deduceFromClasspath();
	setInitializers((Collection) getSpringFactoriesInstance(
			ApplicationContextInitializer.class));
	setListeners((Collection) getSpringFactoriesInstance(ApplicationListener.class));
	this.mainApplicationClass = deduceMainApplicationClass(;
}
复制代码
从上面可以看出是通过 WebApplicationType.deduceFromClasspath 方法初始化的 webApplicationType ,继续跟踪代码
private static final String WEBFLUX_INDICATOR_CLASS = "org."
			+ "springframework.web.reactive.DispatcherHandler";
private static final String WEBMVC_INDICATOR_CLASS = "org.springframework."
			+ "web.servlet.DispatcherServlet";
private static final String JERSEY_INDICATOR_CLASS = "org.glassfish.jersey.servlet.ServletContainer";
private static final String[] SERVLET_INDICATOR_CLASSES = { "javax.servlet.Servlet",
			"org.springframework.web.context.ConfigurableWebApplicationContext" };

static WebApplicationType deduceFromClasspath() {
	if (ClassUtils.isPresent(WEBFLUX_INDICATOR_CLASS, null)
			&& !ClassUtils.isPresent(WEBMVC_INDICATOR_CLASS null)
			&& !ClassUtils.isPresent(JERSEY_INDICATOR_CLASS null)) {
		return WebApplicationType.REACTIVE;
	}
	for (String className : SERVLET_INDICATOR_CLASSES) {
		if (!ClassUtils.isPresent(className, null)) {
			return WebApplicationType.NONE;
		}
	}
	return WebApplicationType.SERVLET;
}
复制代码
从上面代码中可以看出 Spring 是通过当前 classpath 下是否存在相应的类,从而决定 webApplicationType 类型
初始化 ApplicationContext 对象
private void prepareContext(ConfigurableApplicationContextcontext,
		ConfigurableEnvironment environment,SpringApplicationRunListeners listeners,
		ApplicationArguments applicationArguments, BannerprintedBanner) {
	// 初始化context
	context.setEnvironment(environment);
	postProcessApplicationContext(context);
	applyInitializers(context);
	// 发送ApplicationContextInitializedEvent消息
	listeners.contextPrepared(context);
	if (this.logStartupInfo) {
		logStartupInfo(context.getParent() == null);
		logStartupProfileInfo(context);
	}
	// Add boot specific singleton beans
	ConfigurableListableBeanFactory beanFactory =context.getBeanFactory();
	beanFactory.registerSingleto("springApplicationArguments", applicationArguments);
	if (printedBanner != null) {
		beanFactory.registerSingleton("springBootBanner",printedBanner);
	}
	if (beanFactory instanceof DefaultListableBeanFactory) {
		((DefaultListableBeanFactory) beanFactory)
				.setAllowBeanDefinitionOverridin(this.allowBeanDefinitionOverriding);
	}
	Set<Object> sources = getAllSources();
	Assert.notEmpty(sources, "Sources must not be empty");
	// 注册DemoApplication
	load(context, sources.toArray(new Object[0]));
	listeners.contextLoaded(context);
}
复制代码
这里注册了 DemoApplication 到 Spring 容器中,为后续bean扫描做准备
接下来继续深入 refreshContext 方法,可以发现实际上是执行了 AbstractApplicationContext.refresh 方法
public void refresh() throws BeansException,IllegalStateException {
	synchronized (this.startupShutdownMonitor) {
		prepareRefresh();
		ConfigurableListableBeanFactory beanFactory =obtainFreshBeanFactory();
		prepareBeanFactory(beanFactory);
		try {
			postProcessBeanFactory(beanFactory);
			// 完成bean的加载
			invokeBeanFactoryPostProcessors(beanFactory);
			registerBeanPostProcessors(beanFactory);
			initMessageSource();
			initApplicationEventMulticaster();
			onRefresh();
			registerListeners();
			finishBeanFactoryInitialization(beanFactory);
			finishRefresh();
		}
		catch (BeansException ex) {
			if (logger.isWarnEnabled()) {
				logger.warn("Exception encountered duringcontext initialization - " +
						"cancelling refresh attempt: " + ex;
			}
			destroyBeans();
			cancelRefresh(ex);
			throw ex;
		}
		finally {
			resetCommonCaches();
		}
	}
}
复制代码
refresh 方法内部做了很多事情。比如:完成 BeanFactory 设置, BeanFactoryPostProcessor 、 BeanPostProcessor 接口回调, Bean 加载,国际化配置等。
到此为止 Spring 基本完成了容器的初始化工作,最后在调用 callRunners 方法,执行 ApplicationRunner 、 CommandLineRunner 接口。
private void callRunners(ApplicationContext context,ApplicationArguments args) {
	List<Object> runners = new ArrayList<>();
	runners.addAll(context.getBeansOfTyp(ApplicationRunner.class).values());
	runners.addAll(context.getBeansOfTyp(CommandLineRunner.class).values());
	AnnotationAwareOrderComparator.sort(runners);
	for (Object runner : new LinkedHashSet<>(runners)) {
		if (runner instanceof ApplicationRunner) {
			callRunner((ApplicationRunner) runner, args);
		}
		if (runner instanceof CommandLineRunner) {
			callRunner((CommandLineRunner) runner, args);
		}
	}
}
复制代码
整个启动过程的核心方法是 refresh ,此方法内部承载大部分容器启动所需的工作。由于篇幅原因,后续再进行 refresh 内部源码分析,了解 Spring Boot 加载 Bean 的整个过程。
正文到此结束
- 本文标签: BeanUtils Listeners db UI Collection Collections tk build ssl Property App ArrayList list 下载 tab IO 配置 json HashSet final web BeanDefinition js CTO springboot value http 源码 cache map 实例 缓存 开发 java message https CEO Spring Boot key 统计 classpath bean cat URLs synchronized 参数 spring Logging servlet 代码 id XML rand src 启动过程 Service tar DOM JVM
- 版权声明: 本文为互联网转载文章,出处已在文章中说明(部分除外)。如果侵权,请联系本站长删除,谢谢。
- 本文海报: 生成海报一 生成海报二
热门推荐


相关文章

近期评论
-
谢谢
-
https://www.newcmy.com/register?aff=HBVX建议您试试草莓云机场,可以流畅观看youtube和tiktok,上reddit/x也没有问题,还有各种ai优化节点。
-
-
-
想购买您这个站,我的联系方式QQ741756694微信同步 能卖联系
-
-
-
-
-
https://www.liuhaihua.cn/archives/40657.html 这篇博客中的图片打不开了
Loading...
![[HBLOG]公众号](https://www.liuhaihua.cn/img/qrcode_gzh.jpg)

