深入浅出Spring Boot 起步依赖和自动配置

我们知道 Spring Boot 能快速的搭建起一个应用,简化了大量的配置过程,那到底有多”简”呢?
我们通过一个例子来说明,平时我们通过 Spring 和 Spring MVC 搭建一个 helloword 的 Web 应用,需要做以下工作:
-
- 配置 pom.xml 添加
Spring、Spring MVC框架的依赖,同时还需要考虑这些不同的框架的不同版本是否存在不兼容的问题。
- 配置 pom.xml 添加
-
- 配置 Web.xml,加载 Spring、Spring MVC。
-
- 配置 Spring 。
-
- 配置 Spring MVC。
-
- 编写业务逻辑代码。
而使用 Spring Boot 搭建的话,需要做以下工作:
-
- 配置 pom.xml 继承 Spring Boot 的
pom.xml,添加 Web 起步依赖。
- 配置 pom.xml 继承 Spring Boot 的
-
- 创建启动引导类。
-
- 编写业务逻辑代码。
单从步骤数量上看就知道通过 Spring、Spring MVC 搭建比通过 Spring Boot 搭建更复杂,需要编写大量的配置,这还仅仅是在很少框架和 Spring 整合情况下,如果需要将多个第三方框架和 Spring 整合,恐怕就要陷入”配置地狱”了,此外这些配置基本都是固化的,也就是搭建新的应用,你仍然需要再次编写相同的配置信息,特别是在微服务这么火的当下,一个应用可能由十几个甚至几十个小型服务无组成,如果每个小型服务都重复的做着这些配置工作……。
那有没有什么办法解决这个局面呢?答案是有的,那就是使用 Spring Boot ,上从上面的例子就可以发现,使用 Spring Boot 的最大优点就是减少了配置的工作,那么是不是说使用 Spring Boot 就不需要这些配置过程了?当然不是,而是 Spring Boot 帮我们把这些工作给做了。
那 Spring Boot 是如何帮我们把这些配置工作给做了呢?这就是本文需要探讨的问题了,在探讨之前,我们需要了解两个概念 起步依赖 和 自动配置 ,这里暂且知道这两个东西是 Spring Boot 的核心、是 Spring Boot 的精华所在、是我们不需要再进行大量配置工作的原因所在就行了。
起步依赖
起步依赖说白了就是 Spring Boot 通过对常用的依赖进行再一次封装,例如我们平时需要搭建一个 Web 应用的时候,一般都会导入以下几个依赖:
<dependency>
    <groupId>org.springframework</groupId>
    <artifactId>spring-webmvc</artifactId>
    <version>5.1.3.RELEASE</version>
</dependency>

<dependency>
    <groupId>org.springframework</groupId>
    <artifactId>spring-web</artifactId>
    <version>5.1.3.RELEASE</version>
</dependency>
也就是需要将 spring-web 和 spring mvc 分别导入,而使用 Spring Boot 的话只需要导入一个:
<dependency>
    <groupId>org.springframework.boot</groupId>
    <artifactId>spring-boot-starter-web</artifactId>
</dependency>
也就是只需要导入一个名为 web 的起步依赖即可,我们点 spring-boot-starter-web 进去可以看到,其实这个起步依赖集成了常用的 web 依赖,如下:
<dependency>
  <groupId>org.springframework.boot</groupId>
  <artifactId>spring-boot-starter</artifactId>
  <version>2.1.4.RELEASE</version>
  <scope>compile</scope>
</dependency>
<dependency>
  <groupId>org.springframework.boot</groupId>
  <artifactId>spring-boot-starter-json</artifactId>
  <version>2.1.4.RELEASE</version>
  <scope>compile</scope>
</dependency>
<dependency>
  <groupId>org.springframework.boot</groupId>
  <artifactId>spring-boot-starter-tomcat</artifactId>
  <version>2.1.4.RELEASE</version>
  <scope>compile</scope>
</dependency>
<dependency>
  <groupId>org.hibernate.validator</groupId>
  <artifactId>hibernate-validator</artifactId>
  <version>6.0.16.Final</version>
  <scope>compile</scope>
</dependency>
<dependency>
  <groupId>org.springframework</groupId>
  <artifactId>spring-web</artifactId>
  <version>5.1.6.RELEASE</version>
  <scope>compile</scope>
</dependency>
<dependency>
  <groupId>org.springframework</groupId>
  <artifactId>spring-webmvc</artifactId>
  <version>5.1.6.RELEASE</version>
  <scope>compile</scope>
</dependency>
也就是前面所说的,Spring Boot的起步依赖说白了就是对常用的依赖进行再一次封装,方便我们引入,简化了 pom.xml 配置,但是更重要的是将依赖的管理交给了 Spring Boot,我们无需关注不同的依赖的不同版本是否存在冲突的问题,Spring Boot 都帮我们考虑好了,我们拿来用即可!
在使用 Spring Boot 的起步依赖之前,我们需要在 pom.xml 中添加配置:
<parent>
    <groupId>org.springframework.boot</groupId>
    <artifactId>spring-boot-starter-parent</artifactId>
    <version>2.1.4.RELEASE</version>
    <relativePath/> <!-- lookup parent from repository -->
</parent>
即让 pom.xml 继承 Spring Boot 的 pom.xml ,而 Spring Boot 的 pom.xml 里面定义了常用的框架的依赖以及相应的版本号。
总结一下 Spring Boot 的起步依赖的优点:
-
- 无需考虑不同框架的不同版本的冲突问题。
-
- 简化了
pom.xml配置。
- 简化了
自动配置
如果将开发一个应用比喻成装修房子的过程,那么 Spring Boot 就像是一个全能型公司一样存在,而起步依赖可以比喻成购买装修用品的过程,自动配置比喻成用装修用品进行装修的过程。
我们可以通过 Spring Boot 的起步依赖获取到你想要的涂料、瓷砖、装饰品等, Spring Boot 公司会根据最佳的组合将这些装修用品打包好给我们,我们无需考虑各种装修用品是否搭配、是否冲突等问题。
通过起步依赖我们获取到了想要的装修用品,那接下来我们需要做的就是进行装修了,前面我们说过 Spring Boot 就像一个全能型公司一样,所以我们在他那里购买装修用品之后, 他不仅将装修用品送上门还会帮我们完成装修(自动配置) ,让我们享受一站式的服务,从购买装饰品(起步依赖)到装修完成(自动配置)都不用我们考虑,我们只需要在装修完成之后入住(编写自己的业务逻辑代码)即可。
说了这么多,我们还不知道 Spring Boot 是如何完成自动配置的,接下来我们来分析 Spring Boot 神奇的自动配置!
首先我们知道 Spring Boot 启动需要有一个启动引导类,这个类除了是应用的入口之外,还发挥着配置的 Spring Boot 的重要作用。下面是一个简单的启动引导类:
@SpringBootApplication
public class DemoApplication {

    public static void main(String[] args) {
        SpringApplication.run(DemoApplication.class, args);
    }

}
我们发现有一个名为 @SpringBootApplication 的注解,点击进去可以发现,这个注解发挥着多个注解的作用:
@Target({ElementType.TYPE})
@Retention(RetentionPolicy.RUNTIME)
@Documented
@Inherited
@SpringBootConfiguration
@EnableAutoConfiguration
@ComponentScan(
    excludeFilters = {@Filter(
    type = FilterType.CUSTOM,
    classes = {TypeExcludeFilter.class}
), @Filter(
    type = FilterType.CUSTOM,
    classes = {AutoConfigurationExcludeFilter.class}
)}
)
这里简要的说下 @SpringBootConfiguration 和 @ComponentScan 注解。前者实质为 @Configuration 注解,这个注解相比大家都接触过,也就是起到声明这个类为配置类的作用,而后者起到开启自动扫描组件的作用。
这里需要重点分析的是 @EnableAutoConfiguration 这个注解,这个注解的作用是开启 Spring Boot 的自动配置功能,我们来分析一下它是如何开启的,点击进去可以看到:
@Target({ElementType.TYPE})
@Retention(RetentionPolicy.RUNTIME)
@Documented
@Inherited
@AutoConfigurationPackage
@Import({AutoConfigurationImportSelector.class})
public @interface EnableAutoConfiguration {
    String ENABLED_OVERRIDE_PROPERTY = "spring.boot.enableautoconfiguration";

    Class<?>[] exclude() default {};

    String[] excludeName() default {};
}
@EnableAutoConfiguration 这个注解同样发挥着多个注解的功能,我们重点分析 @Import({AutoConfigurationImportSelector.class}) 这个注解,我们知道 @import 的作用是将组件添加到 Spring 容器中,而在这里即是将 AutoConfigurationImportSelector 这个组件添加到 Spring 容器中。
我们进一步分析 AutoConfigurationImportSelector
protected AutoConfigurationImportSelector.AutoConfigurationEntry getAutoConfigurationEntry(AutoConfigurationMetadata autoConfigurationMetadata, AnnotationMetadata annotationMetadata) {
    if (!this.isEnabled(annotationMetadata)) {
        return EMPTY_ENTRY;
    } else {
        AnnotationAttributes attributes = this.getAttributes(annotationMetadata);
        List<String> configurations = this.getCandidateConfigurations(annotationMetadata, attributes);
        configurations = this.removeDuplicates(configurations);
        Set<String> exclusions = this.getExclusions(annotationMetadata, attributes);
        this.checkExcludedClasses(configurations, exclusions);
        configurations.removeAll(exclusions);
        configurations = this.filter(configurations, autoConfigurationMetadata);
        this.fireAutoConfigurationImportEvents(configurations, exclusions);
        return new AutoConfigurationImportSelector.AutoConfigurationEntry(configurations, exclusions);
    }
}

protected List<String> getCandidateConfigurations(AnnotationMetadata metadata, AnnotationAttributes attributes) {
    List<String> configurations = SpringFactoriesLoader.loadFactoryNames(this.getSpringFactoriesLoaderFactoryClass(), this.getBeanClassLoader());
    Assert.notEmpty(configurations, "No auto configuration classes found in META-INF/spring.factories. If you are using a custom packaging, make sure that file is correct.");
    return configurations;
}
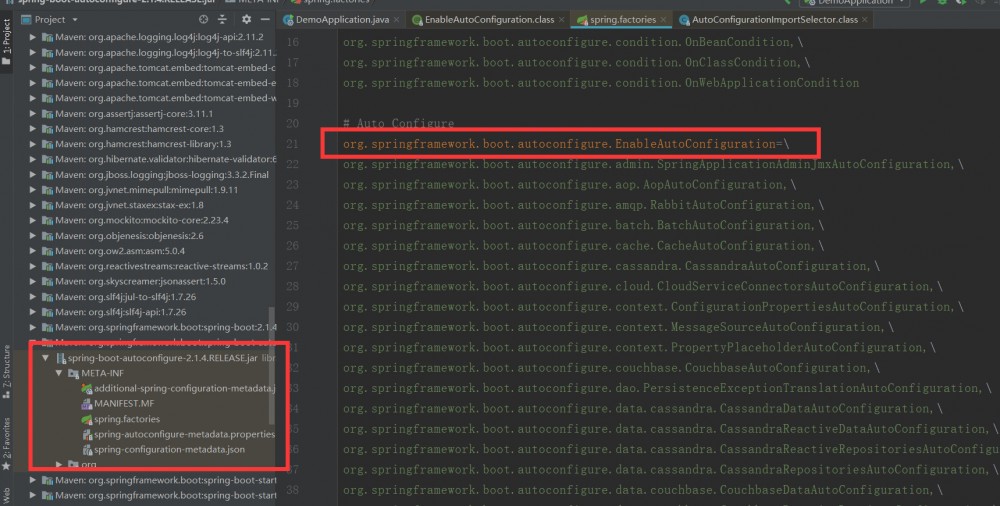
有一个名为 getAutoConfigurationEntry 的方法,这个方法发挥的作用是扫描 ClassPath 下的所有 jar 包的 spring.factories 文件,将 spring.factories 文件 key 为 EnableAutoConfiguration 的所有值取出,然后这些值其实是类的全限定名, 也就是自动配置类的全限定名 ,然后 Spring Boot 通过这些全限定名进行类加载(反射),将这些自动配置类添加到 Spring 容器中。
那这些自动配置类有哪些?发挥什么作用呢?我们接着往下看,我们找到一个名为 spring-boot-autoconfigure-2.1.4.RELEASE.jar 的 jar 包,打开它的 spring.factories 文件,发现这个文件有 key 为 EnableAutoConfiguration 的键值对

# Auto Configure
org.springframework.boot.autoconfigure.EnableAutoConfiguration=/
org.springframework.boot.autoconfigure.admin.SpringApplicationAdminJmxAutoConfiguration,/
org.springframework.boot.autoconfigure.aop.AopAutoConfiguration,/
org.springframework.boot.autoconfigure.amqp.RabbitAutoConfiguration,/
org.springframework.boot.autoconfigure.batch.BatchAutoConfiguration,/
org.springframework.boot.autoconfigure.cache.CacheAutoConfiguration,/
org.springframework.boot.autoconfigure.cassandra.CassandraAutoConfiguration,/
org.springframework.boot.autoconfigure.cloud.CloudServiceConnectorsAutoConfiguration,/

......
也就是这个 jar 包有自动配置类,可以发现这些自动配置配都是以 xxxAutoConfiguration 的命名规则来取名的,这些自动配置类包含我了们常用的框架的自动配置类,比如 aop 、 elasticsearch 、 redis 和 web 等等,基本能满足我们日常开发的需求。
那这些自动配置类又是如何发挥配置作用的呢,我们取一个较为简单的配置类进行分析,名为 HttpEncodingAutoConfiguration ,它的部分代码如下:
@Configuration  //声明这个类为配置类
@EnableConfigurationProperties({HttpProperties.class})  //开启ConfigurationProperties功能,同时将配置文件和HttpProperties.class绑定起来
@ConditionalOnWebApplication(  //只有在web应用下自动配置类才生效
    type = Type.SERVLET
)
@ConditionalOnClass({CharacterEncodingFilter.class}) //只有存在CharacterEncodingFilter.class情况下 自动配置类才生效
@ConditionalOnProperty( //判断配置文件是否存在某个配置spring.http.encoding,如果存在其值为enabled才生效,如果不存在这个配置类也生效。
    prefix = "spring.http.encoding",
    value = {"enabled"},
    matchIfMissing = true
)

//将字符编码过滤器组件添加到 Spring 容器中
@Bean
@ConditionalOnMissingBean
public CharacterEncodingFilter characterEncodingFilter() {
    CharacterEncodingFilter filter = new OrderedCharacterEncodingFilter();
    filter.setEncoding(this.properties.getCharset().name());
    filter.setForceRequestEncoding(this.properties.shouldForce(org.springframework.boot.autoconfigure.http.HttpProperties.Encoding.Type.REQUEST));
    filter.setForceResponseEncoding(this.properties.shouldForce(org.springframework.boot.autoconfigure.http.HttpProperties.Encoding.Type.RESPONSE));
    return filter;
}

@Bean
public HttpEncodingAutoConfiguration.LocaleCharsetMappingsCustomizer localeCharsetMappingsCustomizer() {
    return new HttpEncodingAutoConfiguration.LocaleCharsetMappingsCustomizer(this.properties);
}
首先它同样有许多注解,我们一个一个分析:
- Configuration:这个注解声明了这个类为配置类(和我们平时写的配置类一样,同样是在类上加这个注解)。
- EnableConfigurationProperties:开启
ConfigurationProperties功能,也就是将配置文件和HttpProperties.class这个类绑定起来,将配置文件的相应的值和HttpProperties.class的变量关联起来,可以点击HttpProperties.class进去看看,下面截取了部分代码进行分析:@ConfigurationProperties( prefix = "spring.http" ) public static final Charset DEFAULT_CHARSET; private Charset charset; private Boolean force; private Boolean forceRequest; private Boolean forceResponse; private Map<Locale, Charset> mapping;
通过 ConfigurationProperties 指定前缀,将配置文件 application.properties 前缀为 spring.http 的值和 HttpProperties.class 的变量关联起来,通过类的变量可以发现,我们可以设置的属性是 charset 、 force 、 forceRequest 、 forceResponse 和 mapping 。也就是我们除了使用 Spring Boot 默认提供的配置信息之外,我们还可以通过配置文件指定配置信息。
CharacterEncodingFilter
可以发现后面几个注解都是 ConditionalXXXX 的命名规则,这些注解是 Spring 制定的条件注解,只有在符合条件的情况下自动配置类才会生效。
接下来的 characterEncodingFilter 方法,创建一个 CharacterEncodingFilter 的对象,也就是字符编码过滤器,同时设置相关属性,然后将对象返回,通过 @Bean 注解,将返回的对象添加到 Spring 容器中。这样字符编码过滤器组件配置好了,而平时的话,我们需要在 web.xml 进行如下配置:
<filter>
     <filter-name>springUtf8Encoding</filter-name>
     <filter-class>org.springframework.web.filter.CharacterEncodingFilter</filter-class>
     <init-param>
         <param-name>encoding</param-name>
         <param-value>utf-8</param-value>
     </init-param>
     <init-param>
         <param-name>forceEncoding</param-name>
         <param-value>true</param-value>
     </init-param>
  </filter>
  <filter-mapping>
     <filter-name>springUtf8Encoding</filter-name>
     <url-pattern>/*</url-pattern>
 </filter-mapping>
到这里是不是感受到了 Spring Boot 自动配置带来的好处了?
接下来的 localeCharsetMappingsCustomizer 方法同理,就不分析了。
最后我们用一句话总结一下 Spring Boot 的自动配置:Spring Boot 启动的时候,会扫描 ClassPath 下的所有 jar 包,将其 spring.factories 文件中 key 为 EnableAutoConfiguration 的所有值取出,然后这些值其实是类的全限定名, 也就是自动配置类的全限定名 ,然后 Spring Boot 通过这些全限定名进行类加载(反射),将这些自动配置类添加到 Spring 容器中。这些自动配置类根据不同的条件(@ConditionalXXX)决定自动配置类是否生效,生效的话自动配置类会将相关组件添加到 Spring 容器中,也就不用我们再进行配置!
总结
看了网上挺多的文章都说的不是很清楚,所以按照自己的理解写下了这篇总结,有误之处欢迎指出。
- 本文标签: ssl tar 代码 XML http cache Elasticsearch web js 管理 json src bean springboot spring https IDE Select 总结 Service validator tomcat redis Document final Property Spring Boot servlet UI Cassandra 开发 文章 id 2019 配置 App list 用品 MQ 微服务 pom map CTO value ACE AOP EnableAutoConfiguration classpath cat 需求 key Word IO amqp
- 版权声明: 本文为互联网转载文章,出处已在文章中说明(部分除外)。如果侵权,请联系本站长删除,谢谢。
- 本文海报: 生成海报一 生成海报二


![[HBLOG]公众号](https://www.liuhaihua.cn/img/qrcode_gzh.jpg)

