Java NIO用法详解 原 荐
对于Java NIO,其主要由三个组件组成:Channel、Selector和Buffer。关于这三个组件的作用主要如下:
- Channel是客户端连接的一个抽象,当每个客户端连接到服务器时,服务器都会为其生成一个Channel对象;
- Selector则是Java NIO实现高性能的关键,其本质上使用了IO多路复用的原理,通过一个线程不断的监听多个Channel连接来实现多所有这些Channel事件进行处理,这样的优点在于只需要一个线程就可以处理大量的客户端连接,当有客户端事件到达时,再将其分发出去交由其它线程处理;
- Buffer从字面上讲是一个缓存,本质上其是一个字节数组,通过Buffer,可以从Channel上读取数据,然后交由下层的处理器进行处理。这里的Buffer的优点在于其封装了一套非常简单的用于读取和写入数据Api。
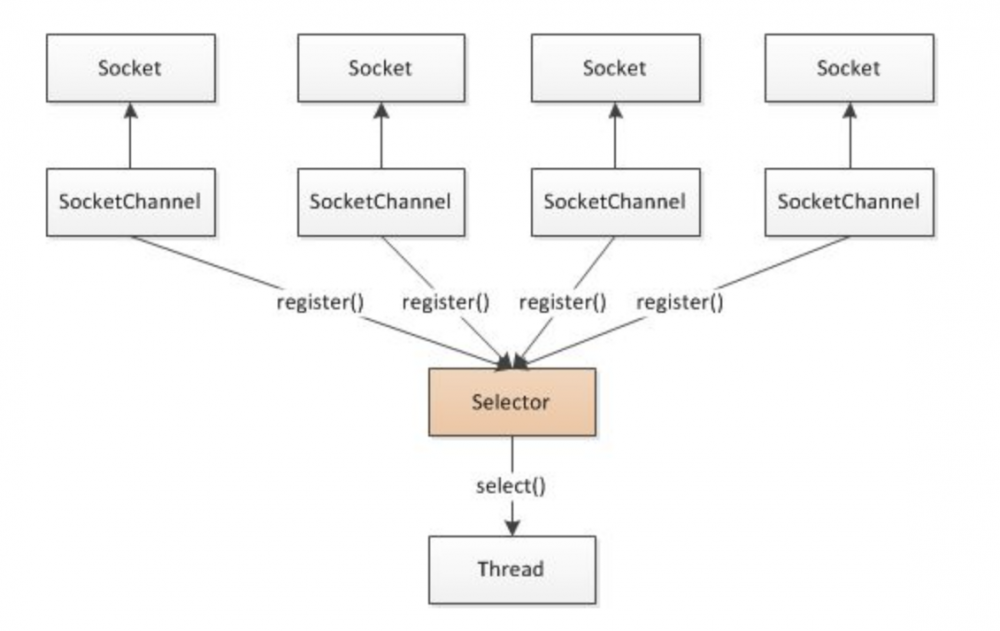
关于Channel和Selector的整体结构,可以通过下图进行的理解,这也是IO多路复用的原理图:

可以看到,对于每个Channel对象,其只要注册到Selector上,那么Selector上监听的线程就会监听这个Channel的事件,当任何一个Channel有对应的事件到达时,Selector就会将该事件分发到下层的应用进行处理。
本文首先会对Channel,Selector和Buffer的主要Api进行讲解,然后会结合一个服务器与客户端的例子来具体讲解它们三者的使用方式。
1. 核心Api
1.1 Channel
对于Channel,其主要的api如下:
// 服务器端:
// 用于创建一个供服务器使用的ServerSocketChannel实例
ServerSocketChannel.open();
// 绑定一个服务器端口,从而提供对外的服务
ServerSocketChannel.bind();
// 获取一个客户端的Channel连接
ServerSocketChannel.accept();

// 客户端:
// 用于创建一个供客户端使用的SocketChannel实例
SocketChannel.open();
// 连接参数中指定地址和端口对应的服务器
SocketChannel.connect();

// ServerSocketChannel和SocketChannel两者兼备的方法
// 用于指定服务器处理请求的方式是阻塞的还是非阻塞的,对于Java NIO都是以非阻塞的方式进行处理的
Channel.configureBlocking();
// 将当前channel注册到一个Selector上,该方法会返回注册之后得到的SelectionKey对象。
// 这里在注册Channel的时候可以选择Selector将关注该Channel的哪些事件,可选的有如下几种:
// SelectionKey.OP_CONNECT:监听Channel建立连接事件
// SelectionKey.OP_READ:监听Channel的可读取事件,也即客户端已经发送数据过来,此时可以读取
// SelectionKey.OP_WRITE:监听Channel的可写事件,即当前可以写入数据到Channel中
Channel.register(Selector, int);
1.2 Selector
对于Selector,其主要的api如下:
// 创建一个Selector实例
Selector.open();
// 监听所有注册的Channel,一直阻塞知道有任何一个客户端Channel有相应的事件到达,
// 需要注意的是,这里的select()方法返回的是当前接收到是事件数目,而不是具体的事件,
// 具体的事件要通过selectedKeys()方法获取
Selector.select();
// 获取当前所有有事件到达的客户端Channel对应的SelectionKey实例
Selector.selectedKeys();
1.3 SelectionKey
// 判断当前收到的Channel的事件是否为OP_CONNECT事件
SelectionKey.isConnectable();
// 判断当前收到的Channel的事件是否为OP_READ事件
SelectionKey.isReadable();
// 判断当前收到的Channel的事件是否为OP_WRITE事件
SelectionKey.isWritable();
// 返回当前SelectionKey中所封装的Channel对象
SelectionKey.channel();
从上面的API中可以看出,这里关于Channel处理的大致流程是,首先由SocketChannel或者ServerSocketChannel调用open()方法创建一个Channel对象;然后调用Channel.register()方法将当前Channel注册到Selector中;接着通过Selector.select()方法监听所有注册的Channel的连接,如果有任何一个有事件到达,此时这些事件会封装到当前客户端Channel对应的SelectionKey中,最后通过SelectionKey判断具体是什么类型的事件,然后对这些事件进行处理。
2. 用法示例
2.1 服务器
服务器端使用的是ServerSocketChannel,这里主要是通过监听客户端Channel,获取数据进行打印,然后返回一段数据给客户端。如下是具体的示例:
public class Server {

  public static void main(String[] args) throws IOException {
    new Server().start();
  }

  private void start() throws IOException {
    // 创建一个服务器ServerSocketChannel对象
    ServerSocketChannel serverSocketChannel = ServerSocketChannel.open();
    // 将当前服务器绑定到8080端口
    serverSocketChannel.bind(new InetSocketAddress(8080));
    // 设置当前channel为非阻塞的模式
    serverSocketChannel.configureBlocking(false);

    // 创建一个Selector对象
    Selector selector = Selector.open();
    // 将服务器ServerSocketChannel注册到Selector上,并且监听与客户端建立连接的事件
    serverSocketChannel.register(selector, SelectionKey.OP_ACCEPT);
    while (true) {
      // 监听ServerSocketChannel上的事件,每秒钟循环一次,
      // 这里select()方法返回的是当前监听得到的事件数目,为0表示当前没有任何事件到达
      if (selector.select(1000) == 0) {
        System.out.println("has no message...");
        continue;
      }

      // 走到这里说明当前有监听的事件到达,获取所有监听的Channel所对应的SelectionKey对象,
      // 这里需要注意的是,前面我们已经将ServerSocketChannel注册到Selector中了,
      // 因而对于ServerSocketChannel,其监听得到的则是SelectionKey.OP_CONNECT事件。
      // 但是下面的代码中,我们也会将与客户端建立的连接Channel注册到Selector中,
      // 因而这里Selector中也会存在接收到的SelectionKey.OP_READ和OP_WRITE事件。
      Set<SelectionKey> selectionKeys = selector.selectedKeys();
      // 对监听到的事件进行遍历
      Iterator<SelectionKey> iterator = selectionKeys.iterator();
      while (iterator.hasNext()) {
        SelectionKey key = iterator.next();
        // 这里需要注意的是,Selector在为每个有事件到达的Channel建立SelectionKey对象
        // 之后,其并不会将其移除,如果我们不进行移除,那么下次循环时该事件还会再被处理一次,
        // 因而这里要调用remove()方法移除该SelectionKey
        iterator.remove();

        // 如果是有新的客户端Channel连接建立,则处理该事件
        if (key.isAcceptable()) {
          accept(key, selector);
        }

        // 如果客户端连接中有可读取的数据,则处理该事件
        if (key.isReadable()) {
          read(key);
        }

        // 如果可往客户端连接中写入数据,则处理该事件
        if (key.isValid() && key.isWritable()) {
          write(key);
        }
      }
    }
  }

  private void accept(SelectionKey key, Selector selector) throws IOException {
    // 这里由于只有ServerSocketChannel才会有客户端连接建立事件,因而这里可以直接将
    // Channel强转为ServerSocketChannel对象
    ServerSocketChannel serverChannel = (ServerSocketChannel) key.channel();
    // 获取客户端的连接
    SocketChannel socketChannel = serverChannel.accept();
    socketChannel.configureBlocking(false);
    // 将客户端连接Channel注册到Selector中,并且监听该Channel的OP_READ事件,
    // 也即等待客户端发送数据到服务器端
    socketChannel.register(selector, SelectionKey.OP_READ);
  }

  private void read(SelectionKey key) throws IOException {
    // 这里只有客户端才会发送数据到服务器,因而可将其强转为SocketChannel对象
    SocketChannel clientChannel = (SocketChannel) key.channel();
    ByteBuffer buffer = ByteBuffer.wrap(new byte[1024]);
    // 从客户端Channel中读取数据,这里read()方法返回读取到的数据长度,
    // 如果为-1,则表示客户端断开连接了
    int len = clientChannel.read(buffer);
    if (len == -1) {
      clientChannel.close();
      return;
    }

    // 处理客户端数据
    System.out.println("**********server: read message**********");
    System.out.println(new String(buffer.array(), 0, len));
    // 由于已经读取了客户端数据,因而这里将对该Channel感兴趣的事件修改为
    // SelectionKey.OP_READ	和OP_WRITE,用于服务器往该Channel中写入数据
    key.interestOps(SelectionKey.OP_READ | SelectionKey.OP_WRITE);
  }

  private void write(SelectionKey key) throws IOException {
    String message = "message from server";
    ByteBuffer buffer = ByteBuffer.wrap(message.getBytes());
    // 由于上面为客户端Channel设置了可供写入数据的事件,因而这里可以往客户端Channel写入数据
    SocketChannel clientChannel = (SocketChannel) key.channel();

    if (clientChannel.isOpen()) {
      System.out.println("**********server: write message**********");
      System.out.println(message);
      // 往客户端Channel写入数据
      clientChannel.write(buffer);
    }

    // 写入完成后,监听客户端会继续发送的数据
    if (!buffer.hasRemaining()) {
      key.interestOps(SelectionKey.OP_READ);
    }

    buffer.compact();
  }
}
2.2 客户端
客户端使用SocketChannel连接服务器,并且会往服务器中写入数据,然后等待服务器返回数据并且打印出来。如下是客户端代码:
public class Client {

  public static void main(String[] args) throws IOException {
    new Client().start();
  }

  private void start() throws IOException {
    // 创建一个客户端SocketChannel对象
    SocketChannel channel = SocketChannel.open();
    // 设置客户端Channel为非阻塞模式
    channel.configureBlocking(false);

    // 创建一个供给客户端使用的Selector对象
    Selector selector = Selector.open();
    // 注册客户端Channel到Selector中,这里客户端Channel首先监听的是OP_CONNECT事件,
    // 因为其首先必须与服务器建立连接,然后才能发送和读取数据
    channel.register(selector, SelectionKey.OP_CONNECT);
    // 调用客户端Channel.connect()方法连接服务器,需要注意的是,该方法的调用必须放在
    // 上述Channel.register()方法之后,否则在注册之前客户端就已经注册完成,
    // 此时Selector就无法收到SelectionKey.OP_CONNECT事件了
    channel.connect(new InetSocketAddress("127.0.0.1", 8080));
    while (true) {
      // 监听客户端Channel的事件,这里会一直等待,直到有监听的事件到达。
      // 对于客户端,首先监听到的应该是SelectionKey.OP_CONNECT事件,
      // 然后在后续代码中才会将SelectionKey.OP_READ和WRITE事件注册
      // 到Selector中
      selector.select();
      Set<SelectionKey> selectionKeys = selector.selectedKeys();
      Iterator<SelectionKey> iterator = selectionKeys.iterator();
      while (iterator.hasNext()) {
        SelectionKey key = iterator.next();
        iterator.remove();

        // 监听到客户端Channel的SelectionKey.OP_CONNECT事件,并且处理该事件
        if (key.isConnectable()) {
          connect(key, selector);
        }

        // 监听到客户端Channel的SelectionKey.OP_WRITE事件,并且处理该事件
        if (key.isWritable()) {
          write(key, selector);
        }

        // 监听到客户端Channel的SelectionKey.OP_READ事件,并且处理该事件
        if (key.isReadable()) {
          read(key);
        }
      }
    }
  }

  private void connect(SelectionKey key, Selector selector) throws IOException {
    // 由于是客户端Channel,因而可以直接强转为SocketChannel对象
    SocketChannel channel = (SocketChannel) key.channel();
    channel.finishConnect();
    // 连接建立完成后就监听该Channel的WRITE事件,以供客户端写入数据发送到服务器
    channel.register(selector, SelectionKey.OP_WRITE);
  }

  private void write(SelectionKey key, Selector selector) throws IOException {
    SocketChannel channel = (SocketChannel) key.channel();
    String message = "message from client";
    System.out.println("**********client: write message**********");
    System.out.println(message);
    // 客户端写入数据到服务器Channel中
    channel.write(ByteBuffer.wrap(message.getBytes()));
    // 数据写入完成后,客户端Channel监听OP_READ事件,以等待服务器发送数据过来
    channel.register(selector, SelectionKey.OP_READ);
  }

  private void read(SelectionKey key) throws IOException {
    System.out.println("**********client: read message**********");
    SocketChannel channel = (SocketChannel) key.channel();
    ByteBuffer buffer = ByteBuffer.wrap(new byte[1024]);
    // 接收到客户端Channel的SelectionKey.OP_READ事件,说明服务器发送数据过来了,
    // 此时可以从Channel中读取数据,并且进行相应的处理
    int len = channel.read(buffer);
    if (len == -1) {
      channel.close();
      return;
    }

    System.out.println(new String(buffer.array(), 0, len));
  }
}
2.3 运行结果
服务器:
has no message...
has no message...
has no message...
has no message...
**********server: read message**********
message from client
**********server: write message**********
message from server
客户端:
**********client: write message**********
message from client
**********client: read message**********
message from server
3. 小结
本文首先讲解了Java NIO中三大组件的作用,然后讲解了各个组件主要的方法及其注意事项,最后通过一个客户端和服务器实例详细讲解了Java NIO是如何使用的


![[HBLOG]公众号](https://www.liuhaihua.cn/img/qrcode_gzh.jpg)

