【从零入门系列-5】Spring Boot 之 前端展示
文章系列
- 【从零入门系列-0】Spring Boot 之 Hello World
- 【从零入门系列-1】Spring Boot 之 程序结构设计说明
- 【从零入门系列-2】Spring Boot 之 数据库实体类
- 【从零入门系列-3】Spring Boot 之 数据库操作类
- 【从零入门系列-4】Spring Boot 之 WEB接口设计实现
- 【从零入门系列-5】Spring Boot 之 前端展示
前言
前一章已经实现了对图书管理常用的Web接口的功能服务,这一步将使用 bootstrap 和 bootstrap-table 等前端技术整合后台提供的服务功能完成一个图书管理页的功能设计,提供一个功能较为完善的图书馆书籍管理功能页。
对于前端不熟的同学可以自行完成对 bootstrap 的学习,主要包括布局、模态框、表格分页、JQuery的学习,然后再回过头来实践本篇涉及内容。
访问页设计实现
第一步我们先建立好该页面的路径和结构,首先能够让前端能够直接访问到该页面,由于这里的页面内容为Html页面,非上一篇文章提及的Json内容,因此我们需要区别对待。
因为该页面为前端展示页内容,我们可以把该接口单独设计到另外一个层-View层,即页面展示层,该层提供对外访问的页面内容。但是,为了项目简单,而且这里只有一个页面,我们在本项目中依然将该页面接口放到控制层,代码如下:
@RestController
@RequestMapping(path = "/library")
public class BookController {
    @Autowired
    private BookJpaRepository bookJpaRepository;

    @Autowired
    private BookService bookService;

    /**
     * 图书管理页
     * @return 返回图书管理页面内容
     */
    @RequestMapping(value = "")
    public ModelAndView index(){
        return new ModelAndView("index");
    }

    /* 其他已有的代码省略 */
}
在这里,我们使用 @RequestMapping(value = "") 关联Web的访问路径,指定可以接收任意类型(GET和POST等)的Web请求,且访问路径问 /library 。
对应的该处理函数返回的类型为 ModelAndView ,因为 @RestController 注解后类的接口返回的默认是Json类型,当我们需要返回渲染的Html文件内容时,则需要使用 ModelAndView 了,上述代码中返回的 index 是一个html文件,默认路径为 项目路径/src/main/resources/templates ,因此我们需要在 templates 目录下新建一个 index.html 文件,文件内容如下:
<!DOCTYPE html>
<html>
<head>
    <meta charset="UTF-8">
    <title>图书馆</title>
</head>
<body>

</body>
</html>
为了测试页面访问路径的通路,减少干扰项,目前这个页面内容为空,只设置了页面标题名。
然后我们启动程序,访问地址 http://localhost:8080/library 就可以发现能正常访问到我们这里的 index.html 文件内容了。
引入依赖的第三方组件
引入我们的页面即将要使用到 bootstrap 和 bootstrap-table 的 css 和 js 相关的文件,注意由于 bootstrap 需要使用到 jquery ,所以我们需要在引入 bootstrap 的JS前先将 jquery 引入,代码内容如下:
<!DOCTYPE html>
<html xmlns:th="http://www.thymeleaf.org">
<head>
    <meta charset="UTF-8">
    <title>图书馆</title>
    <link href="http://cdn.static.runoob.com/libs/bootstrap/3.3.7/css/bootstrap.min.css" rel="stylesheet">
    <link href="https://cdn.bootcss.com/bootstrap-table/1.14.2/bootstrap-table.css" rel="stylesheet">
</head>
<body>
    <!-- jQuery文件。务必在bootstrap.min.js 之前引入 -->
    <script src="http://cdn.static.runoob.com/libs/jquery/2.1.1/jquery.min.js"></script>

    <!-- 最新的 Bootstrap 核心 JavaScript 文件 -->
    <script src="http://cdn.static.runoob.com/libs/bootstrap/3.3.7/js/bootstrap.min.js"></script>

    <!-- bootstrap-table -->
    <script src="https://cdn.bootcss.com/bootstrap-table/1.14.2/bootstrap-table.js"></script>
    <script src="https://cdn.bootcss.com/bootstrap-table/1.14.2/locale/bootstrap-table-zh-CN.js"></script>
</body>
</html>
为了偷懒,我们这里引入的第三方库文件都是采用CDN的方式,也可以选择把库下载到本地然后再引用。
注意到 <html xmlns:th="http://www.thymeleaf.org"> 采用的是 thymeleaf 语法特性,并引入 thymeleaf 支持,相关 thymeleaf 知识可以自行搜索学习,本项目基本不涉及 thymeleaf 知识点。
分页表格数据展示
我们项目使用 b ,如果你还没使用过该组件,可参考 此处 学习,代码如下:
<body>
    <!-- 表工具栏 -->
    <div id="toolbar" class="btn-group">
        <button id="btn_add" type="button" class="btn btn-default" data-toggle="modal">
            <span class="glyphicon glyphicon-plus" aria-hidden="true"></span>新增
        </button>
    </div>

    <!-- 表结构 -->
    <div class="panel panel-default">
        <table id="book_table" >
            <!-- js实现表结构 -->
        </table>
    </div>

    <!-- jQuery文件。务必在bootstrap.min.js 之前引入 -->
    <script src="http://cdn.static.runoob.com/libs/jquery/2.1.1/jquery.min.js"></script>

    <!-- 最新的 Bootstrap 核心 JavaScript 文件 -->
    <script src="http://cdn.static.runoob.com/libs/bootstrap/3.3.7/js/bootstrap.min.js"></script>

    <!-- bootstrap-table -->
    <script src="https://cdn.bootcss.com/bootstrap-table/1.14.2/bootstrap-table.js"></script>
    <script src="https://cdn.bootcss.com/bootstrap-table/1.14.2/locale/bootstrap-table-zh-CN.js"></script>

    <!--两种方法引用JS文件-->
    <!--1.原生引用-->
    <!-- <script src="/js/index.js"></script> -->
    <!--2.thymeleaf模版引用-->
    <script th:src="@{/js/comm.js}"></script>
    <script th:src="@{/js/index.js}"></script>
</body>
这里需要新建两个JS文件,其中 index.js 为处理 index.html 页面相关的JS内容, comm.js 为通用的JS相关代码,由于我们按项目的默认配置引用文件,因此在 static 目录下新建相对应的路径即可:
项目路径/src/main/resources/static/js/index.js
项目路径/src/main/resources/static/js/comm.js
bootstrap-table 的使用主要在JS部分,在JS完成对表格的配置及初始化, index.js 相关代码为:
var $table;

//初始化bootstrap-table的内容
function InitMainTable () {
    //记录页面bootstrap-table全局变量$table,方便应用
    $table = $('#book_table').bootstrapTable({
        url: '/library/search',
        method: 'post',
        contentType:"application/x-www-form-urlencoded; charset=UTF-8",
        toolbar: '#toolbar',
        dataType: "json",
        striped: true,                       // 设置为 true 会有隔行变色效果
        undefinedText: "空",                 // 当数据为 undefined 时显示的字符
        pagination: true,                    // 分页
        sortable: true,                      // 是否启用排序
        sortOrder: "asc",                    // 排序方式
        sidePagination: "server",            // 分页方式: client 客户端分页, server  服务端分页(*)
        showPaginationSwitch:true,           // 是否显示 数据条数选择框
        showColumns: "true",                 // 是否显示 内容列下拉框
        showRefresh: true,                   // 是否显示刷新按钮
        pageNumber: 1,                       // 如果设置了分页,首页页码
        pageSize: 3,                         // 如果设置了分页,页面数据条数
        pageList: [3, 5, 7],
        paginationPreText: '上一页',         // 指定分页条中上一页按钮的图标或文字,这里是<
        paginationNextText: '下一页',        // 指定分页条中下一页按钮的图标或文字,这里是>
        data_local: "zh-US",                 // 表格汉化
        clickToSelect: true,
        queryParams: function (params) {     // 得到查询的参数
            var param = getFormParam($('#formSearch'));
            // 页大小
            param["pageSize"] =  params.limit;
            // 页码
            param["pageNumber"] =  (params.offset / params.limit);
            // 排序类型
            param["sortDir"] = params.order;
            // 排序字段
            param["ordName"] = params.sort;
            return param;
        },
        idField: "id",                       // 指定主键列
        columns: [
            {
                field: 'id',
                title: '书ID'
            }, {
                field: 'name',
                title: '书名'
            }, {
                field: 'author',
                title: '作者'
            },{
                field: 'image',
                title: '封面',
                formatter: function (value, row, index) {
                    return '<img src='+value+' alt="图片加载失败" >'
                }
            },{
                title: '操作',
                field: 'operate',
                align: 'center',
                formatter: operateFormatter,
                events: operateEvents
            }
        ]
    });
};

//操作栏的格式化
function operateFormatter(value, row, index) {
    var result = "";
    result += "<a type='button' id='cell_view'  data-toggle='modal' class='btn btn-xs yellow' title='查看'><span class='glyphicon glyphicon-search'></span></a>";
    result += "<a type='button' id='cell_edit'  data-toggle='modal' class='btn btn-xs yellow' title='编辑'><span class='glyphicon glyphicon-pencil'></span></a>";
    result += "<a type='button' id='cell_remove' data-toggle='modal' class='btn btn-xs blue' title='删除'><span class='glyphicon glyphicon-remove'></span></a>";
    return result;
}

//指定table表体操作事件
window.operateEvents = {
    'click #cell_edit': function(e, value, row, index) {
    },
    'click #cell_view': function(e, value, row, index) {
    },
    'click #cell_remove': function(e, value, row, index) {
    }
};

// 页面初始化
$(function(){
    InitMainTable();
    $table.bootstrapTable('refresh');
});
注意,表格数据源是我们实现的Web搜索查询接口 /library/search ,数据类型为Json,请求方式:
method: 'post',
contentType:"application/x-www-form-urlencoded; charset=UTF-8",
其中获取参数的函数封装在 comm.js 文件中,代码如下:
function getFormParam(form) {
    var param = {};
    form.find('[name]').each(function () {
        var value = $(this).val();
        if(value != '') {
            param[$(this).attr('name')] = value;
        }
    });
    return param;
}
此时运行程序访问页面我们已经可以看到页面了,如下所示:
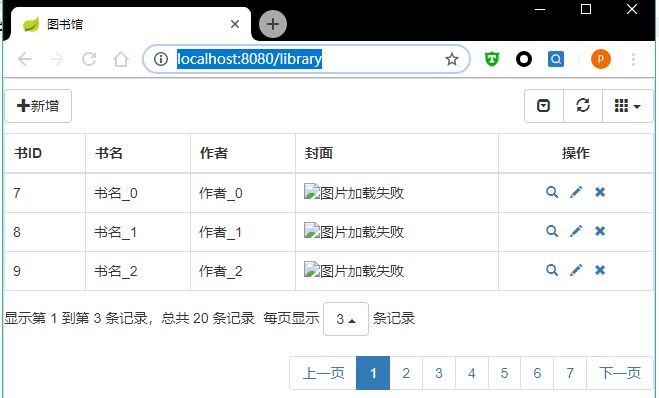
页面已经出来了,能看到数据正常展示,而且也有分页也生效了。
新增记录
新增按钮在表格的工具栏,设计成用户点击新增后弹框让用户输入信息,完成书籍录入。
在Html文件中,新增模态框内容部分,然后新增按钮关联模态框即可,Html代码如下:
<div class="panel panel-default">
    <!-- 模态新增框 -->
    <div class="modal fade" id="modeAdd" tabindex="-1" role="dialog" aria-labelledby="modeAddTitle">
        <div class="tile modal-dialog">
            <div class="modal-content">
                <div class="modal-header">
                    <button type="button" class="close" data-dismiss="modal" aria-hidden="true">×</button>
                    <h3 class="modal-title" id="modeAddTitle">添加书籍</h3>
                </div>
                <div class="modal-body">
                    <form class="form-horizontal" id="formAdd" method="post">
                        <div class="form-group row">
                            <label class="control-label col-md-3">书名</label>
                            <div class="col-md-8">
                                <input class="form-control" id="add_name" type="text" placeholder="请输入书籍名称" name="name" required>
                            </div>
                        </div>
                        <div class="form-group row">
                            <label class="control-label col-md-3">作者</label>
                            <div class="col-md-8">
                                <input class="form-control" id="add_author" type="text" placeholder="请输入作者名称" name="author" required>
                            </div>
                        </div>
                        <div class="form-group row">
                            <label class="control-label col-md-3">封面</label>
                            <div class="col-md-8">
                                <input class="form-control" id="add_image" type="text" placeholder="请输入封面地址" name="image" required>
                            </div>
                        </div>
                    </form>
                </div>
                <div class="modal-footer">
                    <button type="button" class="btn btn-primary" onclick="onBtnAdd()">添加书籍</button>
                    <button type="button" class="btn btn-default" data-dismiss="modal">关闭</button>
                </div>
            </div>
        </div>
    </div>

    <!-- 表工具栏 -->
    <div id="toolbar" class="btn-group">
        <button id="btn_add" type="button" class="btn btn-default" data-toggle="modal" data-target="#modeAdd">
            <span class="glyphicon glyphicon-plus" aria-hidden="true"></span>新增
        </button>
    </div>

    <!-- 表结构 -->
    <div class="panel panel-default">
        <table id="book_table" >
            <!-- js实现表结构 -->
        </table>
    </div>
</div>
在表工具栏部分,对新增按钮新增属性 data-toggle="modal" data-target="#modeAdd" 即可关联新增模态框 @modeAdd ,此时运行程序在页面点击新增时,即可看到弹出的新增对话框。
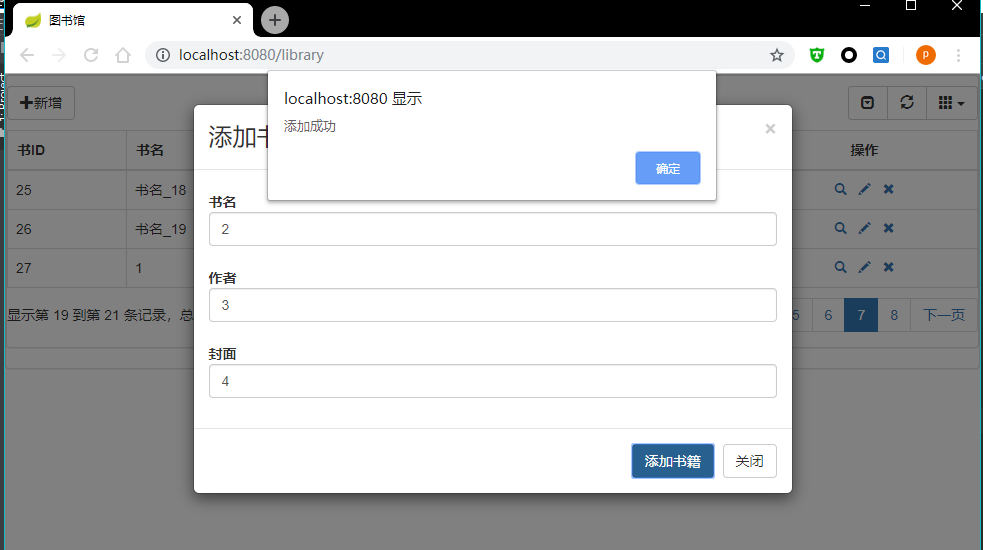
此外,在用户点击 添加书籍 按钮时绑定的处理函数是 onBtnAdd() ,我们还需要在JS文件中新增该处理函数,内容如下:
function onBtnAdd() {
    var mod = $('#modeAdd');

    var para = getFormParam($('#formAdd'));

    $.ajax({
        type: "POST",
        url: "/book/save",
        data: para,
        success: function(data){
            if(!data.bid){
                alert('添加失败' );
            }
            else {
                mod.modal('hide');
                $table.bootstrapTable('refresh');
                alert('添加成功');
            }
        },
        fail: function (e) {
            alert("执行异常," + e);
        }
    });
}
运行测试结果如下:
修改记录
模态编辑框代码:
<!-- 模态编辑框 -->
<div class="modal fade" id="modeEdit" tabindex="-1" role="dialog" aria-labelledby="modeEditTitle">
    <div class="tile modal-dialog">
        <div class="modal-content">
            <div class="modal-header">
                <button type="button" class="close" data-dismiss="modal" aria-hidden="true">×</button>
                <h3 class="modal-title" id="modeEditTitle">编辑书籍信息</h3>
            </div>
            <div class="modal-body">
                <form class="form-horizontal" id="formEdit" method="post">
                    <div class="form-group row">
                        <label class="control-label col-md-3">书ID</label>
                        <div class="col-md-8">
                            <input  class="form-control" id="edit_id" type="text" placeholder="请输入书籍ID" name="id" readonly>
                        </div>
                    </div>
                    <div class="form-group row">
                        <label class="control-label col-md-3">书名</label>
                        <div class="col-md-8">
                            <input  class="form-control" id="edit_name" type="text" placeholder="请输入书籍名称" name="name" required>
                        </div>
                    </div>
                    <div class="form-group row">
                        <label class="control-label col-md-3">作者</label>
                        <div class="col-md-8">
                            <input  class="form-control" id="edit_author" type="text" placeholder="请输入作者名称" name="author" required>
                        </div>
                    </div>
                    <div class="form-group row">
                        <label class="control-label col-md-3">封面</label>
                        <div class="col-md-8">
                            <input class="form-control" id="edit_image" type="text" placeholder="请输入封面地址" name="image" required>
                        </div>
                    </div>
                </form>
            </div>
            <div class="modal-footer">
                <button type="button" class="btn btn-primary" onclick="onBtnEdit()">确定</button>
                <button type="button" class="btn btn-default" data-dismiss="modal">关闭</button>
            </div>
        </div>
    </div>
</div>
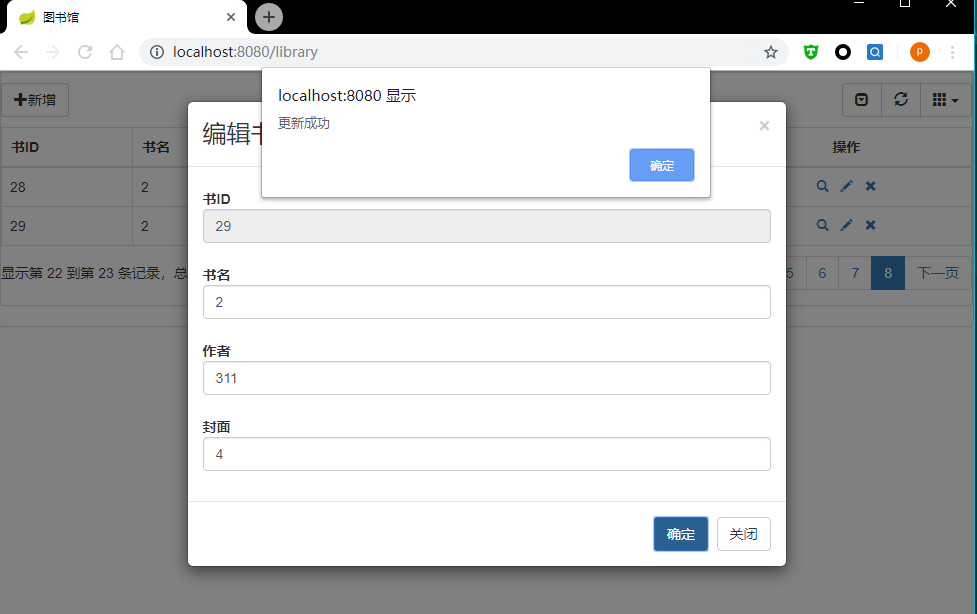
在 operateEvents 实现对编辑按钮的响应,填入编辑数据并弹出模态框,确定后通过提供的Web编辑接口完成数据更新,其相关JS代码如下:
//指定table表体操作事件
window.operateEvents = {
    'click #cell_edit': function(e, value, row, index) {
        $('#edit_id').val(row['id']);
        $('#edit_name').val(row['name']);
        $('#edit_author').val(row['author']);
        $('#edit_image').val(row['image']);

        $('#modeEdit').modal('show');
    },
    'click #cell_view': function(e, value, row, index) {
    },
    'click #cell_remove': function(e, value, row, index) {
    }
};

// 编辑书籍
function onBtnEdit() {
    var mod = $('#modeEdit');
    var para = getFormParam($('#formEdit'));

    $.ajax({
        type: "POST",
        url: "/library/edit/" + para["id"],
        data: para,
        success: function(data){
            if(data["code"] != 0){
                alert('更新失败' );
            }
            else {
                mod.modal('hide');
                $table.bootstrapTable('refresh');
                alert('更新成功');
            }
        },
        fail: function (e) {
            alert("执行异常," + e);
        }
    });
}
测试结果如下:
查看记录
模态框代码:
<!-- 模态查询框 -->
<div class="modal fade" id="modeView" tabindex="-1" role="dialog" aria-labelledby="modeViewTitle">
    <div class="tile modal-dialog">
        <div class="modal-content">
            <div class="modal-header">
                <button type="button" class="close" data-dismiss="modal" aria-hidden="true">×</button>
                <h3 class="modal-title" id="modeViewTitle">查看书籍信息</h3>
            </div>
            <div class="modal-body">
                <form class="form-horizontal" id="formView" method="post">
                    <div class="form-group row">
                        <label class="control-label col-md-2">书ID</label>
                        <div class="col-md-10">
                            <input  class="form-control" id="view_id" type="text" placeholder="请输入书籍ID" name="id" readonly>
                        </div>
                    </div>
                    <div class="form-group row">
                        <label class="control-label col-md-2">书名</label>
                        <div class="col-md-10">
                            <input  class="form-control" id="view_name" type="text" placeholder="请输入书籍名称" name="name" readonly>
                        </div>
                    </div>
                    <div class="form-group row">
                        <label class="control-label col-md-2">作者</label>
                        <div class="col-md-10">
                            <input  class="form-control" id="view_author" type="text" placeholder="请输入作者名称" name="author" readonly>
                        </div>
                    </div>
                    <div class="form-group row">
                        <label class="control-label col-md-2">封面</label>
                        <div class="col-md-10">
                            <input class="form-control" id="view_image" type="text" placeholder="请输入封面地址" name="image" readonly>
                            <img class="form-control" id="view_image_show" alt="图片显示失败" src="" style="width: auto; height: auto; max-width: 80%; max-height: 80%;"/>
                        </div>

                    </div>
                </form>
            </div>
            <div class="modal-footer">
                <button type="button" class="btn btn-default" data-dismiss="modal">确定</button>
            </div>
        </div>
    </div>
</div>
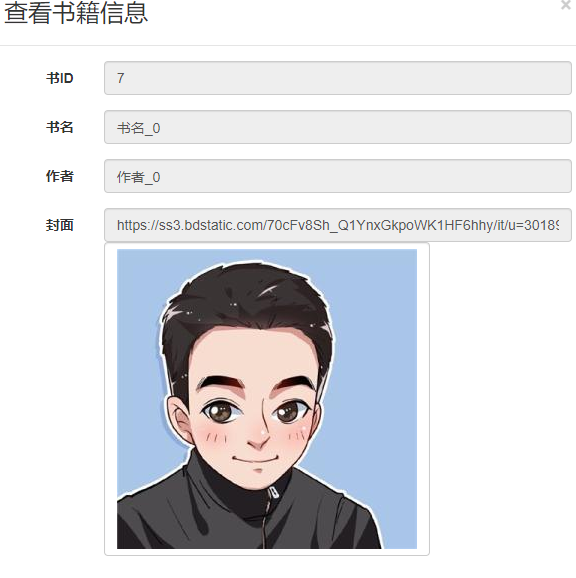
相关的JS处理代码:
//指定table表体操作事件
window.operateEvents = {
    'click #cell_edit': function(e, value, row, index) {
        $('#edit_id').val(row['id']);
        $('#edit_name').val(row['name']);
        $('#edit_author').val(row['author']);
        $('#edit_image').val(row['image']);

        $('#modeEdit').modal('show');
    },
    'click #cell_view': function(e, value, row, index) {
        onBtnView(row["id"]);
    },
    'click #cell_remove': function(e, value, row, index) {
    }
};


// 查看书籍信息
function onBtnView(id){
    $.ajax({
        type: "GET",
        url: "/library/view/" + id,
        success: function(data){
            if(data["code"] != 0){
                alert('查询失败' );
            }
            else {
                var row = data["data"];
                $('#view_id').val(row['id']);
                $('#view_name').val(row['name']);
                $('#view_author').val(row['author']);
                $('#view_image').val(row['image']);
                $("#view_image_show").attr('src',row["image"]);
                $('#modeView').modal('show');
            }
        },
        fail: function (e) {
            alert("执行异常," + e);
        }
    });
}
运行测试结果:
删除记录
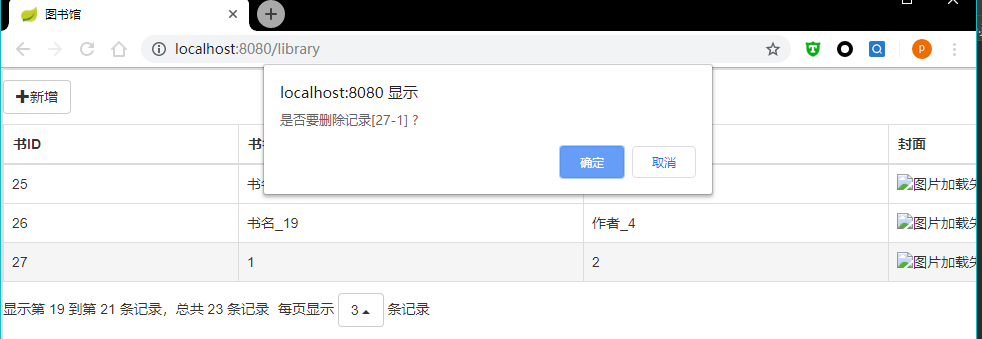
删除时,弹出一个框提示用户确认即可,因此只需要JS代码,代码如下:
//指定table表体操作事件
window.operateEvents = {
    'click #cell_edit': function(e, value, row, index) {
        $('#edit_id').val(row['id']);
        $('#edit_name').val(row['name']);
        $('#edit_author').val(row['author']);
        $('#edit_image').val(row['image']);

        $('#modeEdit').modal('show');
    },
    'click #cell_view': function(e, value, row, index) {
        onBtnView(row["id"]);
    },
    'click #cell_remove': function(e, value, row, index) {
        if(confirm("是否要删除记录[" + row["id"] + "-" + row["name"] + "] ?")) {
            onBtnRemove(row["id"]);
        }
    }
};

// 删除书籍
function onBtnRemove(id) {
    $.ajax({
        type: "get",
        url: "/library/remove/" + id,
        success: function(data){
            $table.bootstrapTable('refresh');
            alert('删除成功');
        },
        fail: function (e) {
            alert("删除失败," + e);
        }
    });
}
运行测试结果:
搜索查询
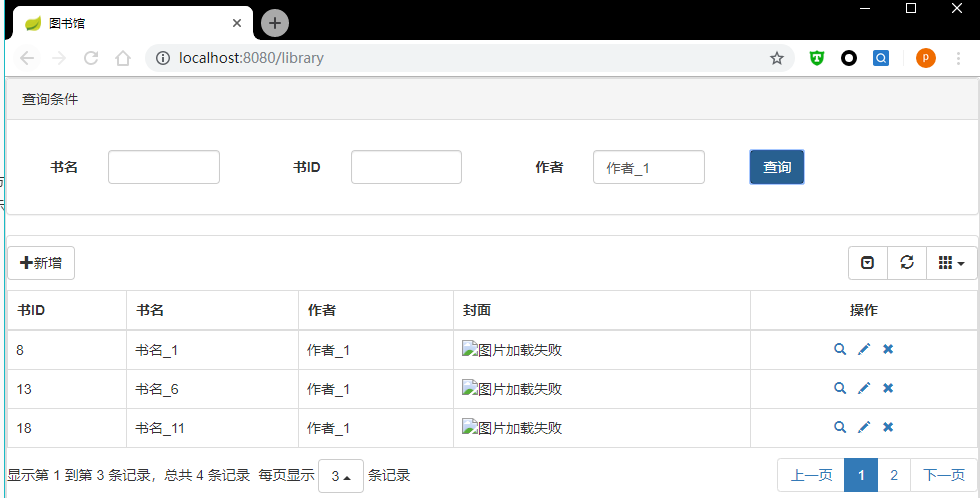
提供搜索查询功能,查询页面代码如下:
<!-- 查询面板 -->
<div class="panel panel-default">
    <div class="panel-heading">查询条件</div>
    <div class="panel-body">
        <form id="formSearch" class="form-horizontal" method="get">
            <div class="form-group" style="margin-top:15px">
                <div class="col-sm-3">
                    <label class="control-label col-sm-4" for="txt_search_name">书名</label>
                    <div class="col-sm-8">
                        <input type="text" class="form-control" name="name" id="txt_search_name">
                    </div>
                </div>

                <div class="col-sm-3">
                    <label class="control-label col-sm-4" for="txt_search_id" valign="center">书ID</label>
                    <div class="col-sm-8">
                        <input type="text" class="form-control" name="id"  id="txt_search_id">
                    </div>
                </div>

                <div class="col-sm-3">
                    <label class="control-label col-sm-4" for="txt_author" valign="center">作者</label>
                    <div class="col-sm-8">
                        <input type="text" class="form-control" name="author"  id="txt_author">
                    </div>
                </div>

                <div class="col-sm-3">
                    <button class="btn btn-round btn-primary" type="button" id="btn_query" onclick="onTableSearch()">查询</button>
                </div>
            </div>
        </form>
    </div>
</div>

<!-- 表工具栏 -->
<div id="toolbar" class="btn-group">
    <button id="btn_add" type="button" class="btn btn-default" data-toggle="modal" data-target="#modeAdd">
        <span class="glyphicon glyphicon-plus" aria-hidden="true"></span>新增
    </button>
</div>
搜索处理JS的代码如下:
// 查询搜索
function onTableSearch(){
    $table.bootstrapTable('refresh');
};
搜索查询结果测试:
结束语
到这里,整个项目已经完成,已根据此前设计完成了书籍页的管理,谢谢您的关注。
项目地址
- 本文标签: tab find 数据 HTML文件 参数 文章 服务端 测试 tar UI HTML 分页 ACE IO 汉化 jquery App REST 删除 图片 web CDN 配置 代码 list http ORM java js map 管理 value src Service https 标题 CSS XML lib JavaScript spring ip cat Bootstrap json client JPA Spring Boot 目录 db 数据库 IDE Select Ajax 下载 id
- 版权声明: 本文为互联网转载文章,出处已在文章中说明(部分除外)。如果侵权,请联系本站长删除,谢谢。
- 本文海报: 生成海报一 生成海报二


![[HBLOG]公众号](https://www.liuhaihua.cn/img/qrcode_gzh.jpg)

