Android OKHttp系列5-ConnectInterceptor
文章将会被同步至微信公众号:Android部落格
Android OKHttp系列皆为本人原创文章,未经允许严禁转载
概述
选定连接接口,并开始连接目标
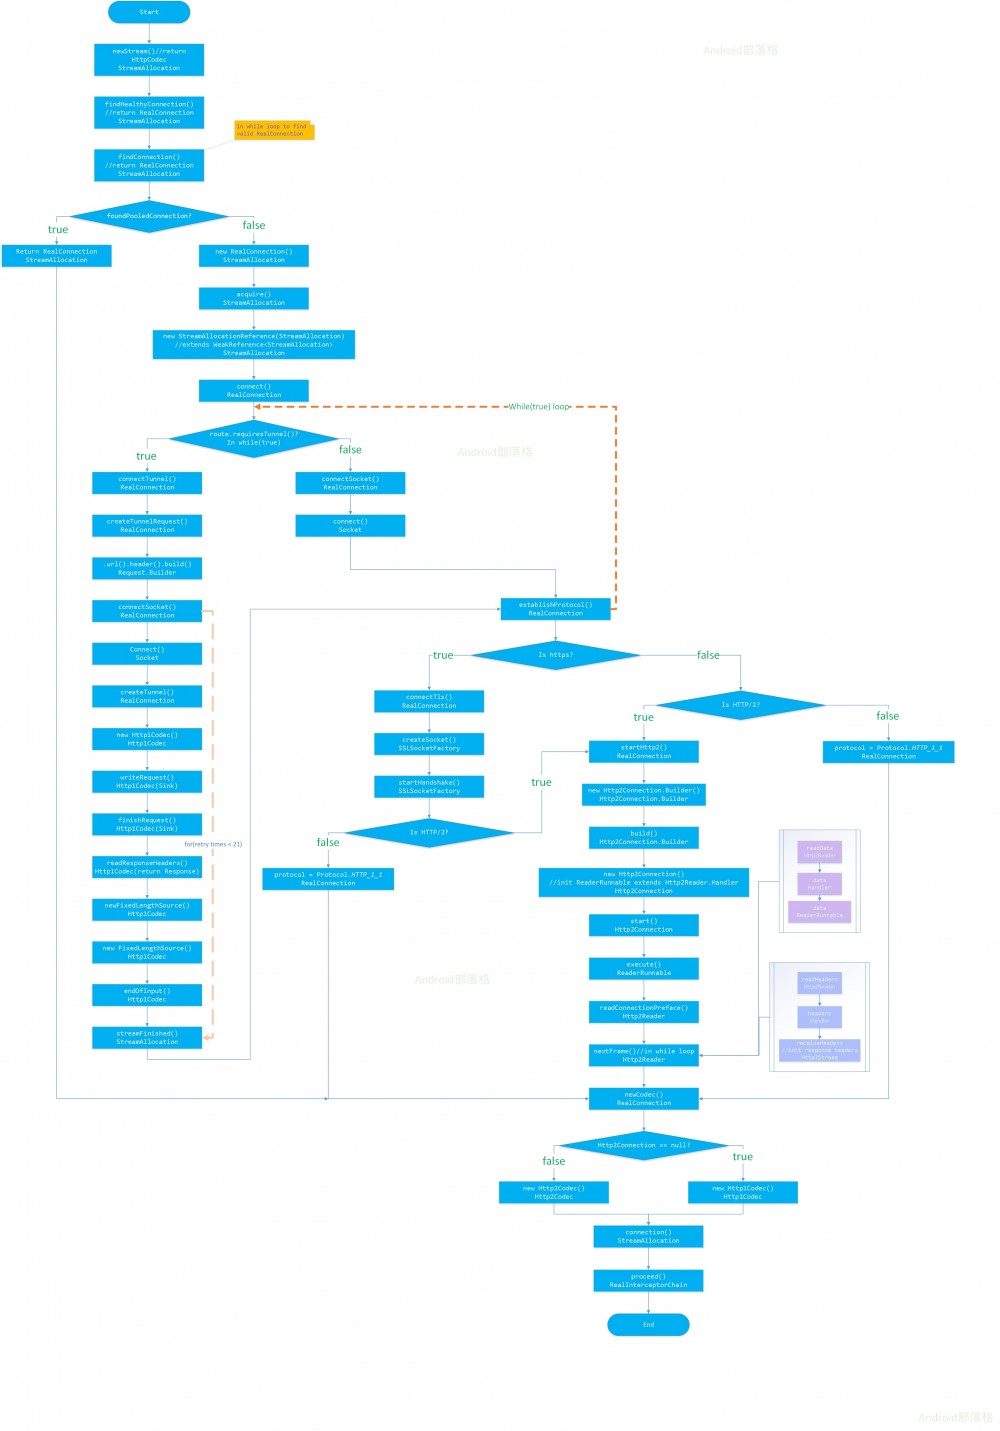
流程图如下:

okhttp-ConnectInterceptor.jpg
原图片地址: http://i66.tinypic.com/rjqglx.jpg
1、找RealConnection
选择合适的HttpCodec,为什么要选择呢?因为涉及到Http版本的问题,此处需要兼容,先看代码:
boolean doExtensiveHealthChecks = !request.method().equals("GET");
HttpCodec httpCodec = streamAllocation.newStream(client, chain, doExtensiveHealthChecks);
RealConnection connection = streamAllocation.connection();
第二行代码就是在选择HttpCodec,看看 newStream 方法做了什么:
RealConnection resultConnection = findHealthyConnection(connectTimeout, readTimeout,
          writeTimeout, pingIntervalMillis, connectionRetryEnabled, doExtensiveHealthChecks);
HttpCodec resultCodec = resultConnection.newCodec(client, chain, this);
仅仅两行代码牵涉了很多逻辑。
第一步选择一个健康的连接 findHealthyConnection ,或者叫根据前置条件,选择一个合适的连接。这个代码里面核心的代码就一行:
RealConnection candidate = findConnection(connectTimeout, readTimeout, writeTimeout,
          pingIntervalMillis, connectionRetryEnabled);
这个方法里面就干了一件事,找 RealConnection 对象,如果这个对象已经存在,就直接返回,否则的话,就new一个,并连接再返回。
创建这个对象很简单:
new RealConnection(connectionPool, selectedRoute);
然后开始连接 connect ,在 RealConnection 类中有初始化一个List,List的子类型是 ConnectionSpec ,代表传输协议:
List<ConnectionSpec> connectionSpecs = route.address().connectionSpecs();
需要注意以下几个问题:
-
TLS协议
这个值请求的时候如果不设置的话,默认是:
static final List<ConnectionSpec> DEFAULT_CONNECTION_SPECS = Util.immutableList(
      ConnectionSpec.MODERN_TLS, ConnectionSpec.CLEARTEXT);
连接过程采用TLS协议还是明文传递呢?
TLS协议可以参考 http://www.ruanyifeng.com/blog/2014/02/ssl_tls.html
- Https SSL认证
参考 http://frank-zhu.github.io/android/2014/12/26/android-https-ssl/
一般客户端验证SSL有两种方式,一种是通过SSLSocketFactory方式创建,需要设置域名及端口号(适应于HttpClient请求方式),一种是通过SSLContext方式创建(适用于HttpsURLConnection请求方式).
sdk里面采用SSLSocketFactory,如果用户不设置的话,默认在 RetryAndFollowUpInterceptor 类的 createAddress 方法中会初始化:
private Address createAddress(HttpUrl url) {
    SSLSocketFactory sslSocketFactory = null;
    HostnameVerifier hostnameVerifier = null;
    CertificatePinner certificatePinner = null;
    if (url.isHttps()) {
      sslSocketFactory = client.sslSocketFactory();
      hostnameVerifier = client.hostnameVerifier();
      certificatePinner = client.certificatePinner();
    }

    return new Address(url.host(), url.port(), client.dns(), client.socketFactory(),
        sslSocketFactory, hostnameVerifier, certificatePinner, client.proxyAuthenticator(),
        client.proxy(), client.protocols(), client.connectionSpecs(), client.proxySelector());
}
下面三个参数只在是https请求的时候才设置:
-
sslSocketFactory是SSL认证;如果请求的时候不设置,sdk在
OkHttpClient类中默认设置:
if (builder.sslSocketFactory != null || !isTLS) {
  this.sslSocketFactory = builder.sslSocketFactory;
  this.certificateChainCleaner = builder.certificateChainCleaner;
} else {
  X509TrustManager trustManager = systemDefaultTrustManager();
  this.sslSocketFactory = systemDefaultSslSocketFactory(trustManager);
  this.certificateChainCleaner = CertificateChainCleaner.get(trustManager);
}
-
hostnameVerifier是主机名称验证;
一、概述
位于javax.net.ssl包下。声明:public interface HostnameVerifier
此类是用于主机名验证的基接口。
在握手期间,如果 URL 的主机名和服务器的标识主机名不匹配,则验证机制可以回调此接口的实现程序来确定是否应该允许此连接。
策略可以是基于证书的或依赖于其他验证方案。
当验证 URL 主机名使用的默认规则失败时使用这些回调。
二、方法
public boolean verify(String hostname,SSLSession session)
参数:
hostname-主机名
session - 到主机的连接上使用的 SSLSession
返回值:
如果主机名是可接受,则返回true;
请求的时候不设置的话,sdk在 OKHttpClient 的 Builder 中默认设置:
hostnameVerifier = OkHostnameVerifier.INSTANCE;
//对应OkHostnameVerifier类
private OkHostnameVerifier() {
}
-
certificatePinner来限制哪些证书和证书颁发机构可以被信任
请求的时候不设置的话,sdk在 OKHttpClient 的 Builder 中默认设置:
certificatePinner = CertificatePinner.DEFAULT;
//对应CertificatePinner类
CertificatePinner(Set<Pin> pins, @Nullable CertificateChainCleaner certificateChainCleaner) {
    this.pins = pins;
    this.certificateChainCleaner = certificateChainCleaner;
}
2、开始连接
可以认为是握手过程
核心代码是:
while (true) {
  try {
    if (route.requiresTunnel()) {
      connectTunnel(connectTimeout, readTimeout, writeTimeout, call, eventListener);
      if (rawSocket == null) {
        // We were unable to connect the tunnel but properly closed down our resources.
        break;
      }
    } else {
      connectSocket(connectTimeout, readTimeout, call, eventListener);
    }
    establishProtocol(connectionSpecSelector, pingIntervalMillis, call, eventListener);
    eventListener.connectEnd(call, route.socketAddress(), route.proxy(), protocol);
    break;
  } catch (IOException e) {
  }
}
-
是否需要隧道连接
对应的代码片段是
route.requiresTunnel:
public boolean requiresTunnel() {
    return address.sslSocketFactory != null && proxy.type() == Proxy.Type.HTTP;
}
大概意思是:我虽然是http请求,但是我想通过SSL认证传输,这时就需要隧道连接了。
参考 https://cizixs.com/2017/03/22/http-tunnel-proxy-and-golang-implementation/
为什么需要隧道连接?
普通代理的局限,比如无法代理 HTTPS 的报文,此外普通代理也只能代理 HTTP 协议报文,无法支持其他协议的数据转发。对于这些问题 HTTP 可以通过隧道(tunnel)代理来解决。
隧道连接的过程是什么样的?
(a)客户端先发送 CONNECT 请求到隧道代理服务器,告诉它建立和服务器的 TCP 连接(因为是 TCP 连接,只需要 ip 和端口就行,不需要关注上层的协议类型)
(b,c)代理服务器成功和后端服务器建立 TCP 连接
(d)代理服务器返回 HTTP 200 Connection Established 报文,告诉客户端连接已经成功建立
(e)这个时候就建立起了连接,所有发给代理的 TCP 报文都会直接转发,从而实现服务器和客户端的通信
如果需要隧道连接的话运行 connectTunnel 方法:
Request tunnelRequest = createTunnelRequest();
HttpUrl url = tunnelRequest.url();
for (int i = 0; i < MAX_TUNNEL_ATTEMPTS; i++) {
  connectSocket(connectTimeout, readTimeout, call, eventListener);
  tunnelRequest = createTunnel(readTimeout, writeTimeout, tunnelRequest, url);
}
三个步骤,创建隧道请求对象,创建socket对象并连接(rowSocket),开始创建隧道。
如果不需要隧道连接就一步,创建socket对象并连接。
2、获取Http协议版本
核心是分条件创建两个实现HttpCodec接口的类,分别是Http1Codec(HTTP/1.1)和Http2Codec(HTTP/2)。
他们的区别是: https://mjd507.github.io/2018/01/20/HTTP-Versions/
选择协议版本
- 是否包含
Protocol.H2_PRIOR_KNOWLEDGE
参考 https://http2.github.io/http2-spec/#known-http
A client MUST send the connection preface (Section 3.5) and then MAY immediately send HTTP/2 frames to such a server; servers can identify these connections by the presence of the connection preface. This only affects the establishment of HTTP/2 connections over cleartext TCP; implementations that support HTTP/2 over TLS MUST use protocol negotiation in TLS [TLS-ALPN].
客户端必须发送一个连接前言,紧接着可能要迅速发送HTTP/2的帧数据到服务端,服务端可以通过前言识别出连接。这只对HTTP/2 下TCP明文连接的建立有效,如果需要通过TLS协议进行HTTP/2连接,则必须通过TLS握手。
可见这种情况下要使用HTTP/2协议。
- 没有初始化sslSocketFactory且没有
Protocol.H2_PRIOR_KNOWLEDGE
直接使用HTTP_1_1("http/1.1")
- 以上条件都不符合就采用https的连接(HTTP/2)
connectTls(connectionSpecSelector);
if (protocol == Protocol.HTTP_2) {
    startHttp2(pingIntervalMillis);
}
connectTls 预示着开始握手验证吧。
总共有几个步骤:
1.通过sslSocketFactory创建sslSocket
sslSocket = (SSLSocket) sslSocketFactory.createSocket(
          rawSocket, address.url().host(), address.url().port(), true /* autoClose */);
2.获取验证协议
ConnectionSpec connectionSpec = connectionSpecSelector.configureSecureSocket(sslSocket);
3.开始握手
sslSocket.startHandshake();
4.验证主机名称
address.hostnameVerifier().verify(address.url().host(), sslSocketSession)
5.验证证书
address.certificatePinner().check(address.url().host(),
          unverifiedHandshake.peerCertificates());
6.上述都通过的话就可以获取到协议版本了
String maybeProtocol = connectionSpec.supportsTlsExtensions()
          ? Platform.get().getSelectedProtocol(sslSocket)
          : null;
顺带的,如果是HTTP_2协议的话,就开始连接并等待返回( Http2Connection ),这个过程中如果需要填写前言,就填写preface数据:
private void startHttp2(int pingIntervalMillis) throws IOException {
    socket.setSoTimeout(0); // HTTP/2 connection timeouts are set per-stream.
    http2Connection = new Http2Connection.Builder(true)
        .socket(socket, route.address().url().host(), source, sink)
        .listener(this)
        .pingIntervalMillis(pingIntervalMillis)
        .build();
    http2Connection.start();
}
看看start方法:
void start(boolean sendConnectionPreface) throws IOException {
    if (sendConnectionPreface) {
      writer.connectionPreface();
      writer.settings(okHttpSettings);
      int windowSize = okHttpSettings.getInitialWindowSize();
      if (windowSize != Settings.DEFAULT_INITIAL_WINDOW_SIZE) {
        writer.windowUpdate(0, windowSize - Settings.DEFAULT_INITIAL_WINDOW_SIZE);
      }
    }
    new Thread(readerRunnable).start(); // Not a daemon thread.
}
先检查是否需要写前言数据,这个前言数据的定义是( Http2 中):
static final ByteString CONNECTION_PREFACE
  = ByteString.encodeUtf8("PRI * HTTP/2.0/r/n/r/nSM/r/n/r/n");
这里开一个读线程开始等待读取服务端返回的数据:
@Override protected void execute() {
  try {
    reader.readConnectionPreface(this);
    while (reader.nextFrame(false, this)) {
    }
  } catch (IOException e) {
  } finally {
    try {
      close(connectionErrorCode, streamErrorCode);
    } catch (IOException ignored) {
    }
    Util.closeQuietly(reader);
  }
}
返回的数据还是回调在这个线程中处理。
3、创建HttpCodec对象
通过返回的协议版本可以创建对应的Http协议对象了:
public HttpCodec newCodec(OkHttpClient client, Interceptor.Chain chain,
  StreamAllocation streamAllocation) throws SocketException {
    if (http2Connection != null) {
      return new Http2Codec(client, chain, streamAllocation, http2Connection);
    } else {
      socket.setSoTimeout(chain.readTimeoutMillis());
      source.timeout().timeout(chain.readTimeoutMillis(), MILLISECONDS);
      sink.timeout().timeout(chain.writeTimeoutMillis(), MILLISECONDS);
      return new Http1Codec(client, streamAllocation, source, sink);
    }
}
创建好了HttpCodec对象之后,就可以调用 realChain.proceed(request, streamAllocation, httpCodec, connection) 方法,到 CallServerInterceptor 中开始请求服务器并返回数据了。
微信公众号二维码:

image
- 本文标签: 认证 build tar ORM retry 代码 java REST ip ECS UI 服务端 HTML 协议 Connection 微信公众号 Proxy GitHub 二维码 端口 主机 cat HTTP协议 CTO ssl 同步 DNS 文章 equals HTTP/2 list windows src 线程 IO 域名 服务器 final https ACE session IDE Select tab client find 图片 stream TCP update 参数 git http id 数据 Android
- 版权声明: 本文为互联网转载文章,出处已在文章中说明(部分除外)。如果侵权,请联系本站长删除,谢谢。
- 本文海报: 生成海报一 生成海报二


![[HBLOG]公众号](https://www.liuhaihua.cn/img/qrcode_gzh.jpg)

