Java 元注解及 Spring 组合注解应用
Java 1.5(Tiger) 个人认为最为激动人心的两个特性是泛型与注解( Java Versions, Features and History )。泛型自然是不必说了,注解对 Java 世界的改变比泛型伟大的多(现在框架的注解配置),在 Java 1.5 之前我们只能在 Javadoc 注释中做文章,于是只能用 XDoclet 那样不伦不类的东西。Java 的注解发展到现在几乎可以使用在书写代码时的任何地方,见 java.lang.annotation.ElementType 中的类型,囊括了 TYPE, FIELD, METHOD, PARAMETER, CONSTRUCTOR, LOCAL_VARIABLE, ANNOTATION_TYPE, PACKAGE, TYPE_PARAMETER(since 1.8), TYPE_USE(since 1.8)。
Java 1.5 基本确定了注解的基本框架,包括元注解(meta-annotation); 直到 Java 8 又扩展了注解的使用范围,列举如下:
创建类实例
new@Interned MyObject();
类型映射
myString = (@NonNull String) str;
implements 语句中
class UnmodifiableList<T> implements@Readonly List<@Readonly T> { ... }
throw exception声明
void monitorTemperature() throws@Critical TemperatureException { ... }
解析前面 ElementType Java 8 增加的 TYPE_PARAMETER和 TYPE_USE 注解使用新场合。ElementType.TYPE_PARAMETER 表示该注解能写在类型变量的声明语句中。ElementType.TYPE_USE 表示该注解能写在使用类型的任何语句中(如: 声明语句、泛型和强制转换语句中的类型)
另外就是更方便使用的重复注解 -- @Repeatable
本文不会讲解 Java 注解的基本知识和创建自定的注解,主要关注标题中的 Java 元注解及 Spring 对元注解的广泛应用 -- 即 Spring 组合注解
Java 元注解(meta-annotation)
所谓的元注解(meta-annotation) 也就是注解的注解,注解本身就是元数据,像 meta-data。具体到 Java 的注解就是注解可以应用到别的注解上去,@Target 包含了 ANNOTATION_TYPE。所以在我们定义普通注解时用到的 @Retention, @Target, @Documented, @Inherited, @Repeatable 就是一拨 Java 内置元注解,下面是 @Target 的定义
@Documented
@Retention(RetentionPolicy.RUNTIME)
@Target(ElementType.ANNOTATION_TYPE)
public @interface Retention {
    RetentionPolicy value();
}
体验一下 @Inherited 注解的作用
@Inherited 标明注解是能够被传递到子类的,即注解在父类的注解也会作用到它的子类上去,比如 Spring 的 @Transactional 注解就被 @Inherited 标识了
@Target({ElementType.METHOD, ElementType.TYPE})
@Retention(RetentionPolicy.RUNTIME)
@Inherited
@Documented
public @interface Transactional {
    ......
}
具体表现就是
@Transactional
public class BaseRepository {
    ......
}

public class UserRepository extends BaseRepository {
    ......
}
UserRepository 继承了 BaseRepository, 所以 UserRepository 也就启用了事物。
自己来一下
@Target({ElementType.TYPE})
@Retention(RetentionPolicy.RUNTIME)
@Inherited
@interface BB {
}

@BB
class Parent {
}

class Child extends Parent {
}

public class Test {
    public static void main(String[] args) {
        BB bb = Child.class.getAnnotation(BB.class);
        System.out.println(bb); //BB 注解没有 @Inherited 的话,bb 将为 null
    }
}
在注解中如果去掉 @Inherited , 上面的 Child.class.getAnnotation(BB.class) 将返回 null .
要是换成实现一个接口,事情就不一样了
@BB
interface Parent {
}

class Child implements Parent {
}

//Child.class.getAnnotation(BB.class) 总是为 null 值
Child 不管是在 @BB 有没有 @Inherited 标识都继承不到 @BB 注解。
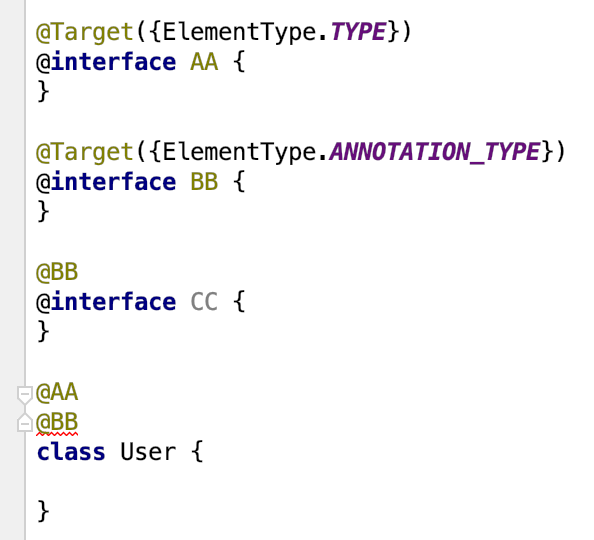
@Target({ElementType.ANNOTATION_TYPE})
ElementType.ANNOTATION_TYPE 的用处,好像也就是一个约束,只限定被它声明了注解只能用于其他的注解类型上去,看下面的图片

User 类上的 @BB 处报错: '@BB' not applicable to type. 就是说 @Target 为 ElementType.ANNOTATION_TYPE 的注解只能用于其他注解上,而 @Target 为 ElementType.TYPE 可以用在许多地方,类,接口,枚举或其他注解上。除此之外,ElementType.ANNOTATION_TYPE 也没别的太多意思,它与下面的组合注解没有什么关系。
Spring 中的元注解与组合注解
再重新回味一下,Java 原生的元注解(Meta-annotations) 基本就是指内置的 @Retention, @Target, @Documented, @Inherited, @Repeatable 那一干注解,以及自定义注解加上 @Target({ElementType.ANNOTATION_TYPE}) 实现的自定义元注解。而 Spring 的元注解概念是不一样的,它认为能用于注解的注解就是元注解,即 @Target({ElementType.Type}) 标识的也是元注解,因为其他的注解也是 Type.
Spring 中元注解与组合注解又是很紧密的两个概念,从官方的文档中
@Target({ElementType.TYPE})
@Retention(RetentionPolicy.RUNTIME)
@Documented
@Component
public @interface Service {
    String value() default "";
}
由于 @Component 注解到了 @Service 注解,所以这里的 @Component 称之元注解,而 @Service 而称之为组合注解,即组合了 @Component 的注解,当然还能组合更多的元注解。在 Spring 中有大量组合注解的例子,像 @GetMapping
@Target({ElementType.METHOD})
@Retention(RetentionPolicy.RUNTIME)
@Documented
@RequestMapping(     //这里的 @RequestMapping 就是 @GetMapping 的元注解
    method = {RequestMethod.GET}
)
public @interface GetMapping {
    ....
}
为什么说 @Component 和 @RequestMapping 不是一般意义上 Java 的元注解呢,只要查看下 @Component 的定义就知道,
@Target({ElementType.TYPE})    //它的 Target 并不需要有 ElementType.ANNOTATION_TYPE, 这不并妨碍它应用于别的注解上
@Retention(RetentionPolicy.RUNTIME)
@Documented
public @interface Component {
    String value() default "";
}
创建自己的组合注解
比如想要声明一个 Lazy 的 Bean,在 JavaConfig 方法上要同时用到两个注解 @Lazy 和 @Bean
@Lazy
@Bean(name = "newName")
public String testLazyBean() {
    return "hello world";
}
那么我们是否能创建一个组合注解,只用一个注解就能声明出一个 Lazy 的 Bean 来呢,没问题,就是下面的 @LazyBean
@Target({ElementType.METHOD})
@Retention(RetentionPolicy.RUNTIME)
@Bean
@Lazy
public @interface LazyBean {

    @AliasFor(annotation = Bean.class, attribute = "value")
    String[] name() default {};
}
然后前面的声明 Bean 的代码就能够写成
@LazyBean(name = "newName")
public String testLazyBean() {
    return "hello world";
}
节约了一行代码,简洁明了,表现力也增强了。如果需要组合更多的元注解时,代码效果上就会更佳了。
从 Spring 组合注解的结果推导出它的内部实现,被 @LazyBean 标的 bean, 相当于同时被 @Bean 和 @Lazy 标注了。
借机加强理解一下 Spring 中元注解与组合注解的概念:
- 这儿的 @Bean 和 @Lazy 是用来注解 @LazyBean 的,所以 @Bean 和 @Lazy 称之为元注解
- @LazyBean 是由 @Bean 和 @Lazy 组合而成的,因此 @LazyBean 就是一个组合注解
Spring 的组合注解是如何工作的
如果使用正常的 Java 注解反射 API getAnnotation() 和 isAnnotationPresent() 只能发现组合后的注解 @LazyBean, 而元注解是这样得不到的。但 Spring 在发现注解的时候走入的更深,注解的注解(元注解)和组合后的注解都能捞出来。看下面的例子
@Retention(RetentionPolicy.RUNTIME)
@Target({ElementType.TYPE})
@interface AA {
}

@Retention(RetentionPolicy.RUNTIME)
@Target({ElementType.TYPE})
@interface BB {
}

@Retention(RetentionPolicy.RUNTIME)
@AA
@BB
@interface CC {
}

@CC
class User {
}

public class Test {
    public static void main(String[] args) {
        User.class.getAnnotation(CC.class);       // @yanbin.blog.CC()
        User.class.getAnnotation(AA.class);       // null
        User.class.getAnnotation(BB.class);       // null

        User.class.isAnnotationPresent(CC.class); //true
        User.class.isAnnotationPresent(AA.class); //false
        User.class.isAnnotationPresent(BB.class); //false
    }
}
上面的 @CC 由 @AA 和 @BB 组合而成,用 @CC 注解到 User 类上,常规的 Java 反射类只能找到 @CC,要反射出 @AA 和 @BB,必须对 @CC 类进一步反射。而 Spring 提供了 AnnotationUtils 和 AnnotatedElementUtils 工具类来查找注解类,如下
AnnotationUtils.findAnnotation(User.class, CC.class);               // @yanbin.blog.CC()
AnnotationUtils.findAnnotation(User.class, AA.class);               // @yanbin.blog.AA()
AnnotationUtils.findAnnotation(User.class, BB.class);               // @yanbin.blog.BB()

AnnotationUtils.isAnnotationMetaPresent(CC.class, AA.class);        // true
AnnotationUtils.isAnnotationMetaPresent(CC.class, BB.class);        // true

AnnotatedElementUtils.getMergedAnnotation(User.class, CC.class);    // @yanbin.blog.CC()
AnnotatedElementUtils.getMergedAnnotation(User.class, AA.class);    // @yanbin.blog.AA()
AnnotatedElementUtils.getMergedAnnotation(User.class, BB.class);    // @yanbin.blog.BB()

AnnotatedElementUtils.findMergedAnnotation(User.class, CC.class);   // @yanbin.blog.CC()
AnnotatedElementUtils.findMergedAnnotation(User.class, AA.class);   // @yanbin.blog.AA()
AnnotatedElementUtils.findMergedAnnotation(User.class, BB.class);   // @yanbin.blog.BB()
如某个类(User) 被某个组合注解(@CC) 修饰了,Spring 认该类(User) 被组成 @CC 的所有元注解(@AA 和 @BB) 修饰了。
组合注解时的属性值传递与覆盖
如果组合注解的元注解有属性值时,直接写就行了,例如:
@Target({ElementType.METHOD})
@Retention(RetentionPolicy.RUNTIME)
@Bean("FixedLazyBean")
@Lazy
public @interface LazyBean {
}
用上面的组合注解 @LazyBean 标注到某个方法上,注册 SpringBean 时的名称就是 @Bean("FixedLazyBean") 中的 "FixedLazyBean"。
假如在使用 @LazyBean 注解时还要能够动态指定 Spring bean 名称,那么 @LazyBean 中就需要一个属性覆盖 @Bean 的 value 属性(或者说传递给 @Bean 的 value 属性),这时修又要用到一个 Spring 特定的注解 @AliasFor -- Spring 4.2 新加的特性( New Features and Enhancements in Spring Framework 4.2 )。对合并属性的获得也是用 AnnotatedElementUtils 中的方法 findMergedAnnotationAttributes(...) , 还是看例子:
@Target({ElementType.METHOD, ElementType.ANNOTATION_TYPE})
@Retention(RetentionPolicy.RUNTIME)
@Bean
@Lazy
public @interface LazyBean {

    @AliasFor(annotation = Bean.class, attribute = "name")
    String[] name() default {};      //@LazyBean 的 name 值传递给元注解 @Bean 的 name 属性
}
应用 @LazyBean 时指定 Bean name
@LazyBean(name = "newName")
public String testLazyBean() {
    return "hello";
}
这样就会向 Spring 上下文中注册一个名称为 "newName" 的字符串。
Spring 的 @AliasFor 使用时有不少要求,请参见它的 Javadoc 文档 Annotation Type AliasFor . 创建一个组合注解后最好在使用之前测试它是否完全达到预期,尤其是在覆盖注解的 value 属性时要多加留意。
链接:
- Java 8 新特性:扩展注解(类型注解和重复注解)
- 1.10.2. Using Meta-annotations and Composed Annotations
- Implementing custom annotations for Spring MVC
- Spring Annotation Programming Model
- Spring 4 Meta Annotations


![[HBLOG]公众号](https://www.liuhaihua.cn/img/qrcode_gzh.jpg)

