浅谈Netty中的ChannelPipeline
Netty中另外两个重要组件—— ChannelHandle,ChannelHandleContext,Pipeline。Netty中I/O事件的传播机制以及数据的过滤和写出均由它们负责。
pipeline的初始化
步骤
- pipeline在创建Channel的时候被创建
- AbstractChannel中 pipeline = newChannelPipeline()-DefaultChannelPipeline
- pipeline节点数据结构:ChannelHandlerContext的双向链表
- pipeline中的两大哨兵:head和tail
分析
- pipeline在创建Channel的时候被创建
- 在服务端Channel和客户端Channel创建的时候,调用父类AbstractChannel初始化时候会对pipeline进行初始化。
// AbstractChannel(..)
    protected AbstractChannel(Channel parent) {
        ...
        // 创建pipeline
        pipeline = newChannelPipeline();
    }
    // newChannelPipeline()
    protected DefaultChannelPipeline newChannelPipeline() {
        return new DefaultChannelPipeline(this);
    }
    // DefaultChannelPipeline(..)
    protected DefaultChannelPipeline(Channel channel) {
        ...
        tail = new TailContext(this);
        head = new HeadContext(this);
        head.next = tail;
        tail.prev = head;
    }
复制代码
- 看下HeadContext和TailContext构造方法
final class HeadContext extends AbstractChannelHandlerContext
implements ChannelOutboundHandler, ChannelInboundHandler {
        ...
        HeadContext(DefaultChannelPipeline pipeline) {
            super(pipeline, null, HEAD_NAME, false, true);
        ...
    }
    final class TailContext extends AbstractChannelHandlerContext implements ChannelInboundHandler {
        TailContext(DefaultChannelPipeline pipeline) {
            super(pipeline, null, TAIL_NAME, true, false);
            ...
    }
    abstract class AbstractChannelHandlerContext extends DefaultAttributeMap
        implements ChannelHandlerContext, ResourceLeakHint {
      ...
      AbstractChannelHandlerContext(DefaultChannelPipeline pipeline, EventExecutor executor, String name,boolean inbound, boolean outbound) {
          this.name = ObjectUtil.checkNotNull(name, "name");
          this.pipeline = pipeline;
          this.executor = executor;
          this.inbound = inbound;
          this.outbound = outbound;
          ...
      }
复制代码
head与tail它们都会调用父类AbstractChannelHandlerContext构造器去完成初始化,由此我们可以预见ChanelPipeline里面存放的是一个个ChannelHandlerContext,根据DefaultChannelPipeline构造方法我们可以知道它们数据结构为双向链表,根据AbstractChannelHandlerContext构造方法,我们可以发现head指定的为出栈处理,而tail指定的为入栈处理器。
- pipeline中的两大哨兵:head和tail

pipeline里面的事件传播机制我们接下来验证,但是我们可以推测出入栈从head开始传播,因为它是出栈处理器,所以它只管往下传播不做任何处理,一直到tail会结束。出栈从tail开始传播,因为他是入栈处理器,所以它只管往下传播事件即可,也不做任何处理。这么看来对于入栈,从head开始到tail结束;对于出栈恰恰相反,从tail开始到head结束。
添加删除ChannelHandler
步骤
- 添加ChannelHandler流程
- 判断是否重复添加
- filterName(..)
- 创建节点并添加至链表
- 回调添加完成事件
- callHandlerAdded0(..)
- 判断是否重复添加
- 删除ChannelHandler流程
- 找到节点
- 链表的删除
- 回调删除handler事件
分析
- 判断是否重复添加
// filterName(..)
    private String filterName(String name, ChannelHandler handler) {
        if (name == null) {
            return generateName(handler);
        }
        checkDuplicateName(name);
        return name;
    }
    // 判断重名
    private void checkDuplicateName(String name) {
        if (context0(name) != null) {
            throw new IllegalArgumentException("Duplicate handler name: " + name);
        }
    }
    // 找有没有同名的context
    private AbstractChannelHandlerContext context0(String name) {
        AbstractChannelHandlerContext context = head.next;
        while (context != tail) {
            if (context.name().equals(name)) {
                return context;
            }
            context = context.next;
        }
        return null;
    }
复制代码
- 创建节点并添加至链表
// 插入到链表中tail节点的前面。
    private void addLast0(AbstractChannelHandlerContext newCtx) {
        AbstractChannelHandlerContext prev = tail.prev;
        newCtx.prev = prev;
        newCtx.next = tail;
        prev.next = newCtx;
        tail.prev = newCtx;
    }
复制代码
- 顺着callHandlerAdded0(..)方法一直跟到AbstractChannelHandlerContext的callHandlerAdded(..)
final void callHandlerAdded() throws Exception {
        ...
        if (setAddComplete()) {
            // 调用具体handler的handlerAdded方法
            handler().handlerAdded(this);
        }
    }
复制代码
- 删除ChannelHandler流程
- 找到节点
private AbstractChannelHandlerContext getContextOrDie(ChannelHandler handler) {
        AbstractChannelHandlerContext ctx = (AbstractChannelHandlerContext) context(handler);
        if (ctx == null) {
            throw new NoSuchElementException(handler.getClass().getName());
        } else {
            return ctx;
        }
    }
    // 相同堆内地址即为找到
    public final ChannelHandlerContext context(ChannelHandler handler) {
        if (handler == null) {
            throw new NullPointerException("handler");
        }
        AbstractChannelHandlerContext ctx = head.next;
        for (;;) {

            if (ctx == null) {
                return null;
            }

            if (ctx.handler() == handler) {
                return ctx;
            }

            ctx = ctx.next;
        }
    }
复制代码
- 链表的删除
private static void remove0(AbstractChannelHandlerContext ctx) {
        AbstractChannelHandlerContext prev = ctx.prev;
        AbstractChannelHandlerContext next = ctx.next;
        prev.next = next;
        next.prev = prev;
    }
复制代码
- 回调handler remove方法
final void callHandlerRemoved() throws Exception {
        try {
            // Only call handlerRemoved(...) if we called handlerAdded(...) before.
            if (handlerState == ADD_COMPLETE) {
                handler().handlerRemoved(this);
            }
        } finally {
            // Mark the handler as removed in any case.
            setRemoved();
        }
    }
复制代码
事件和异常的传播
步骤
- inBound事件的传播
- ChannelRead事件的传播
- SimpleInBoundHandler处理器
- outBound事件的传播
- write事件的传播
- 异常的传播
- 异常触发链
分析
- inBound事件的传播分析
// 省略代码
    ...
    serverBootstrap
    ...
    .childHandler(new ChannelInitializer<SocketChannel>() {
                    @Override
                    protected void initChannel(SocketChannel ch) {
                        ChannelPipeline pipeline = ch.pipeline();
                        pipeline.addLast(new Inbound1())
                                .addLast(new InBound2())
                                .addLast(new Inbound3());
                    }
    });
    ...
    public class Inbound1 extends ChannelInboundHandlerAdapter {
        @Override
        public void channelRead(ChannelHandlerContext ctx, Object msg) throws Exception {
            System.out.println("at InBound1: " + msg);
            ctx.fireChannelRead(msg);
        }
        @Override
        public void channelActive(ChannelHandlerContext ctx) throws Exception {
            ctx.channel().pipeline().fireChannelRead("hello cj");
        }
    }
    public class Inbound2 extends ChannelInboundHandlerAdapter {
        @Override
        public void channelRead(ChannelHandlerContext ctx, Object msg) throws Exception {
            System.out.println("at InBound2: " + msg);
            ctx.fireChannelRead(msg);
        }

    }
    public class Inbound3 extends ChannelInboundHandlerAdapter {
        @Override
        public void channelRead(ChannelHandlerContext ctx, Object msg) throws Exception {
            System.out.println("at InBound3: " + msg);
            ctx.fireChannelRead(msg);
        }
    }
复制代码
- 我们来画一下现在客户端接入做入栈处理时,客户端Channel的pipeline中的情况:

从head开始一直向下一个inboud传播直到tail结束,也可以看到ChannelHandlerContext起到的正是中间纽带的作用, 它能拿到handle也可以向上获取到channel与pipeline,一个channel只会有一个pipeline,一个pipeline可以有多个入栈handler和出栈handler,而且每个handler都会被ChannelHandlerContext包裹着。事件传播依赖的ChannelHandlerContext的fire*方法。
- 我们来运行下代码验证下: telnet创建一个客户端连接

- 控制台打印

按照我们上边说的那样 InBoud1 -> InBound2 -> InBoud3
- outBound事件的传播分析
public class Outbound1 extends ChannelOutboundHandlerAdapter {

    @Override
    public void write(ChannelHandlerContext ctx, Object msg, ChannelPromise promise) {
        System.out.println("oubound1 write:" + msg);
        ctx.write(msg, promise);
    }

}

public class Outbound2 extends ChannelOutboundHandlerAdapter {

    @Override
    public void write(ChannelHandlerContext ctx, Object msg, ChannelPromise promise) {
        System.out.println("oubound2 write:" + msg);
        ctx.write(msg, promise);
    }

    @Override
    public void handlerAdded(ChannelHandlerContext ctx) throws Exception {
        ctx.executor().schedule(()-> {
            ctx.channel().pipeline().write("hello cj...");
        }, 5, TimeUnit.SECONDS);
    }

}

public class Outbound3 extends ChannelOutboundHandlerAdapter {

    @Override
    public void write(ChannelHandlerContext ctx, Object msg, ChannelPromise promise) {
        System.out.println("oubound3 write:" + msg);
        ctx.write(msg, promise);
    }

}
复制代码
- 我们来画一下现在向客户端写出时间做出栈处理时,客户端Channel的pipeline中的情况:

与入栈事件传递顺序是完全相反的,也就是从链表尾部开始。
- 我们验证下结果

- 异常的传播
public class Inbound1 extends ChannelInboundHandlerAdapter {

    @Override
    public void exceptionCaught(ChannelHandlerContext ctx, Throwable cause) throws Exception {
        System.out.println("Inbound1...");
        super.exceptionCaught(ctx, cause);
    }

    @Override
    public void channelRead(ChannelHandlerContext ctx, Object msg) throws Exception {
        throw new RuntimeException("cj test throw caught...");
    }
}
public class Inbound3 extends ChannelInboundHandlerAdapter {

    @Override
    public void exceptionCaught(ChannelHandlerContext ctx, Throwable cause) throws Exception {
        System.out.println("Inbound2...");
        super.exceptionCaught(ctx, cause);
    }

}
public class Outbound1 extends ChannelOutboundHandlerAdapter {

    @Override
    public void exceptionCaught(ChannelHandlerContext ctx, Throwable cause) throws Exception {
        System.out.println("Outbound1...");
        super.exceptionCaught(ctx, cause);
    }

}
public class Outbound2 extends ChannelOutboundHandlerAdapter {

    @Override
    public void exceptionCaught(ChannelHandlerContext ctx, Throwable cause) throws Exception {
        System.out.println("Outbound2...");
        super.exceptionCaught(ctx, cause);
    }

}
public class Outbound3 extends ChannelOutboundHandlerAdapter {

    @Override
    public void exceptionCaught(ChannelHandlerContext ctx, Throwable cause) throws Exception {
        System.out.println("Outbound3...");
        super.exceptionCaught(ctx, cause);
    }

}
复制代码
异常的传播过程是从head一直遍历到tail结束,并在tail中将其打印出来。
- 直接验证下结果

- 对于ctx.write()和ctx.pipeline().write()有和不同
ctx.write("hello cj...");
  ctx.pipeline().write("hello cj...");
复制代码
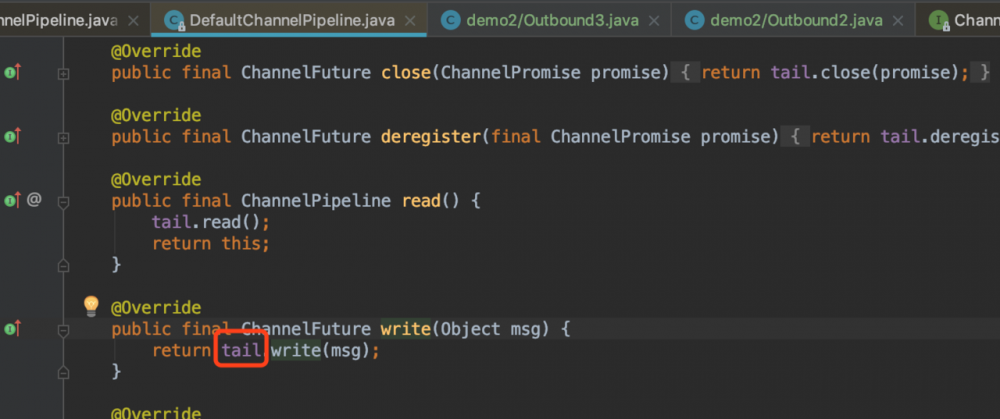
ctx.write(..) 我们按照上面的内容是可以想到的,ctx.write其实是直接激活当前节点的下一个节点write,所以它不会从尾部开始向前遍历所有的outbound,而ctx.pipeline().write(..)我们看源码可以知道,它先调用pipeline的write方法,跟踪源码(下图)可以发现,他是从tail开始遍历的,所有的outboud会依次被执行。同理inbound也是如此


![[HBLOG]公众号](https://www.liuhaihua.cn/img/qrcode_gzh.jpg)

