LinkedHashMap 源码分析
前面对HashMap 的源码做了分析,我们知道 HashMap 内部的数据结构是数组+单链表/红黑树实现的,这种数据结构是不能保证数据插入的有序性的,因为会对传入的 key 做 hash 运算,然后再做取模运算,通过链表指向的方法去存储数据,这样就导致了遍历数据的时候无法根据我们存入的顺序来读取。
而 LinkedHashMap 重新实现了内部链表节点,为每个节点增加了前置节点和后置节点,从而实现一个双向链表解决了 HashMap 无序的问题,并且可以在创建 LinkedHashMap 的时候设置 accessOrder 这个 final 类型的常量来控制访问内部元素的时候是根据插入顺序(值为false)还是根据访问顺序(值为 true)的,如果是 true 就会在每次调用 get() 方法的时候移动数据,最近访问的元素下次优先访问。
LinkedHashMap 的介绍
先看下介绍:

可以看到 LinkedHashMap 继承于 HashMap 的,他继承了 HashMap 的方法和特性,比如内部的默认初始容量、默认负载因子、扩容机制等。但是 LinkedHashMap 在此基础上又进行了扩展,主要提供了元素的访问顺序上进行了加强。
官方的描述:
Hash table and linked list implementation of the Map interface, with predictable iteration order. This implementation differs from HashMap in that it maintains a doubly-linked list running through all of its entries. This linked list defines the iteration ordering, which is normally the order in which keys were inserted into the map (insertion-order). Note that insertion order is not affected if a key is re-inserted into the map. (A key k is reinserted into a map m if m.put(k, v) is invoked when m.containsKey(k) would return true immediately prior to the invocation.)
使用哈希表和链表实现了 Map 接口,具备有序的迭代特性,这种实现和 HashMap 不同的是内部使用了一个贯穿所有条目的双向链表,这个链表定义了迭代排序,通常是按照插入 Map 时的顺序,如果在调用 put 方法插入值的时候,如果 Map 中存在值,则覆盖原来的值,如果不存在则执行插入。
这里列下 LinkedHashMap 的特性:
- 允许key 为 null ,value 为 null
- key 不可以重复,value 可以重复
- 内部是以数组+双向链表实现的,JDK8 以后加入了红黑树
- 内部键值对的存储是 有序 的(需要注意初始化的时候 accessOrder 属性的设置)。
- 初始容量为 16,负载因子为 0.75,也就是当容量达到 容量*负载因子 的时候会扩容,一次扩容增加一倍。
- 内部的键值对要重写 key 对象重写 hashCode 方法、equals 方法。
- 线程不安全的,如果想要线程安全,有三种方法
- SynchronizedMap 使用
Map<String, String> map1 = Collections.synchronizedMap(new LinkedHashMap<String, String>(16,0.75f,true));来获得一个线程安全的 LinkedHashMap,SynchronizedMap内部也是使用的 Synchronized 实现线程安全的
- SynchronizedMap 使用
LinkedHashMap 分析
前面讲了 LinkedHashMap 是几继承于 HashMap 的,实现了双向链表,并且通过accessOrder 可以控制访问顺序,来看下是怎么实现的:
public class LinkedHashMap<K,V> extends HashMap<K,V> implements Map<K,V>
{
    // 双向链表的头结点
    transient LinkedHashMapEntry<K,V> head;
    //双向链表尾结点
    transient LinkedHashMapEntry<K,V> tail;
    // 控制访问顺序,如果为 true 顺序为访问顺序,如果为 false,为插入顺序
    final boolean accessOrder;
}
复制代码
这里在 HashMap 基础上多扩展了三个字段,分别双向链表的头结点 head,尾节点 tail,和控制访问顺序的 accessOrder ,先看下头节点和尾节点的类 LinkedHashMapEntry:
/**
 * 继承于 HashMap Node 节点的 LinkedHashMap 的条目
 * HashMap.Node subclass for normal LinkedHashMap entries.
 */
static class LinkedHashMapEntry<K,V> extends HashMap.Node<K,V> {
    // 定义了当前节点的前置节点 before 和后置节点 after
    LinkedHashMapEntry<K,V> before, after;
    LinkedHashMapEntry(int hash, K key, V value, Node<K,V> next) {
        super(hash, key, value, next);
    }
}
复制代码
可以看到 LinkedHashMapEntry 在 HashMap 的 Node 节点上多增加了 两个属性:
- 节点前置节点 指向上一个节点
- 节点后置节点 指向下个节点
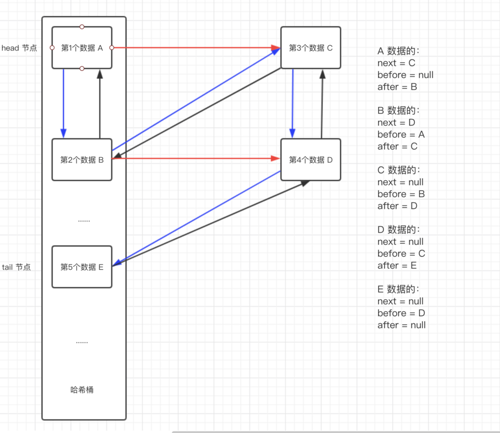
这里可能会有疑问,HashMap.Node 节点已经有了 next 属性,这里为什么还要定义 after 属性?
这是因为 next 属性里面保存的是一个哈希桶位置的当前链表的当前节点的下个节点应用,是在一个链表内的,我们可以通过哈希桶和单链表的 next 快速的找出要查找的元素。
而 after 也是执行下个节点的,不同的是,这里的 after 可以通过不同的哈希桶位置将不同的节点关联起来。
这个图理解下:

黑色 before 指向 蓝色 after 指向 红色 next 指向
before 和 after 将每个节点全部串联了起来,是保证 LinkedHashMap 顺序的关键。
构造方法
// 定义初始化容量和负载因子,默认按照插入顺序排序
    public LinkedHashMap(int initialCapacity, float loadFactor) {
        super(initialCapacity, loadFactor);
        accessOrder = false;
    }

    //定义初始化容量、使用默认负载因子,默认按照插入顺序排序
    public LinkedHashMap(int initialCapacity) {
        super(initialCapacity);
        accessOrder = false;
    }

    //使用默认初始化容量、使用默认负载因子,默认按照插入顺序排序
    public LinkedHashMap() {
        super();
        accessOrder = false;
    }

    //传入一个 Map 初始化,默认按照插入顺序排序
    public LinkedHashMap(Map<? extends K, ? extends V> m) {
        super();
        accessOrder = false;
        putMapEntries(m, false);
    }

    // 定义初始化容量和负载因子,使用访问顺序排序
    public LinkedHashMap(int initialCapacity,
                         float loadFactor,
                         boolean accessOrder) {
        super(initialCapacity, loadFactor);
        this.accessOrder = accessOrder;
    }
复制代码
可以看到,每个构造方法都初始化了 accessOrder ,这个 accessOrder 是final 类型的,一经赋值不能修改,并且是个关键属性,所以只能在构造函数才能保证一定能初始化。
存入数据
LinkedHashMap 里面没有重写 put 方法,继续使用的 HashMap 的 put 方法。
那 LinkedHashMap 是怎么在插入新数据的时候保证插入的顺序的呢?
我们前面讲了,LinkedHashMap 内部的元素多了两个属性来保证顺序访问的,那么肯定是在新建节点的时候对不同节点间进行了关联。在 HashMap 的 putval 方法里面创建新节点是使用 newNode 方法的,自然 LinkedHashMap 只需要重写下 newNode 方法即可。
// LinkedHashMapEntry 是继承于Node 的
 Node<K,V> newNode(int hash, K key, V value, Node<K,V> e) {
     LinkedHashMapEntry<K,V> p =
         new LinkedHashMapEntry<K,V>(hash, key, value, e);
     linkNodeLast(p);
     return p;
 }
复制代码
主要分为三步:创建 p 节点,关联节点,返回节点 创建 p 节点倒是没什么特别的操作,依旧和 HashMap 里面的一样,主要的操作在关联节点 linkNodeLast 中:
// 把节点关联到链表尾部
private void linkNodeLast(LinkedHashMapEntry<K,V> p) {
    // 拿到尾节点赋值给 临时变量 last
    LinkedHashMapEntry<K,V> last = tail;
    // 把创建的节点赋值给尾节点。
    tail = p;
    // 如果之前的尾节点为空,说明链表为空,头节点也赋值为 p
    if (last == null)
        head = p;
    // 不为空,说明有值,新节点的 before 指向以前的尾节点
    // 以前的尾节点的 after 指向 新节点
    else {
        p.before = last;
        last.after = p;
    }
}
复制代码
可以看到,在 linkNodeLast() 函数的内部给节点的 before 和 after属性赋值,也就把节点给串联了起来。
所以 LinkedHashMap 保证插入顺序的关键就是在 newNode 方法里面,也是比 HashMap 多的一些操作都在里面。
你可能在 HashMap 的 putVal 方法里面发现了这个方法 afterNodeInsertion:
final V putVal(int hash, K key, V value, boolean onlyIfAbsent,
                   boolean evict) {
    ++modCount;
    if (++size > threshold)
        resize();
    afterNodeInsertion(evict);
    return null;
}
复制代码
这里的 afterNodeInsertion 在 HashMap 里面是空方法,专门为 LinkedHashMap 准备的,与之类似的还有两个方法:
// Callbacks to allow LinkedHashMap post-actions
// 在新增、替换、查找的时候,如果 accessOrder 为 true 会执行。
void afterNodeAccess(Node<K,V> p) { }
// 新增元素后会在 LinkedHashMap 中调用
void afterNodeInsertion(boolean evict) { }
// 删除元素后会在 LinkedHashMap 中调用
void afterNodeRemoval(Node<K,V> p) { }
复制代码
afterNodeInsertion 方法
void afterNodeInsertion(boolean evict) { // possibly remove eldest
    LinkedHashMapEntry<K,V> first;
    //如果头节点不为 null,根据removeEldestEntry返回值判断是否移除最近最少被访问的节点
    if (evict && (first = head) != null && removeEldestEntry(first)) {
        K key = first.key;
        removeNode(hash(key), key, null, false, true);
    }
}

// 移除最近最少被访问条件之一,通过覆盖此方法可实现不同策略的缓存
protected boolean removeEldestEntry(Map.Entry<K,V> eldest) {
    return false;
}
复制代码
删除数据
和 put 方法一样,LinkedHashMap 没有实现 remove 方法,依旧调用的就是 HashMap 的 remove 方法。
我们知道, LinkedHashMap 不仅在新增的时候改变节点的 before 和 after 的值,也要在删除的时候也要改变节点的 before 和 after 的值。那是怎么实现的呢?
在 HashMap 源码里面有:
final Node<K,V> removeNode(int hash, Object key, Object value,
                               boolean matchValue, boolean movable) {
                // 省略部分代码
                afterNodeRemoval(node);
                return node;
                // 省略部分代码
}
复制代码
这里的 afterNodeRemoval 前面讲了,在 HashMap 里面是空方法,专门为 LinkedHashMap 准备的。
afterNodeRemoval 方法
// HashMap 的 remove 方法中调用,传入删除的节点
void afterNodeRemoval(Node<K,V> e) { // unlink
    // 把删除节点 e 赋值给 p
    // b 删除节点的前置节点
    // a 删除节点的后置节点
    LinkedHashMapEntry<K,V> p =
        (LinkedHashMapEntry<K,V>)e, b = p.before, a = p.after;
    // 首先将删除节点的引用置为 null
    p.before = p.after = null;
    // 如果删除节点前置节点是空,说明是头节点,删除后后置节点设置为头节点
    if (b == null)
        head = a;
    // 如果删除节点前置节点不是空,将删除节点的前置节点的 after 指向 删除节点的后置节点
    else
        b.after = a;
    // 如果是尾节点,则将删除节点的前一个指向节点置为 尾节点
    if (a == null)
        tail = b;
    // 如果是尾节点,将删除节点的后置节点的前指向节点指向 删除节点的前置节点
    else
        a.before = b;
}
复制代码
这样就完成了一次删除操作。
获取操作
LinkedHashMap 重写了 get 方法:
public V get(Object key) {
    Node<K,V> e;
    // 通过 getNode 查找节点
    if ((e = getNode(hash(key), key)) == null)
        return null;
    if (accessOrder)
        afterNodeAccess(e);
    return e.value;
}
复制代码
首先通过,getNode 查找节点,但是在 LinkedHashMap 方法中并没有这个 getNode 方法,可见是调用的 HashMap 的 getNode 方法,可以去HashMap 源码分析 里面去看下 getNode 方法的实现,这里不再介绍。
需要注意的是,在调用 getNode 方法以后,如果 accessOrder 为 true ,会接着调用 afterNodeAccess 方法,这个方法前面讲了,是在 HashMap 中定义,在 LinkedHashMap 中实现的:
afterNodeAccess 方法
void afterNodeAccess(Node<K,V> e) { // move node to last
    // 最后一个节点
    LinkedHashMapEntry<K,V> last;
    // 如果 accessOrder 为 true,并且 尾节点不是 e,进入 if 代码块
    if (accessOrder && (last = tail) != e) {
        // 把删除节点 e 赋值给 p
        // b 删除节点的前置节点
        // a 删除节点的后置节点
        LinkedHashMapEntry<K,V> p =
            (LinkedHashMapEntry<K,V>)e, b = p.before, a = p.after;
        // 将当前节点的后置节点引用置为 null,因为要把 当前节点作为尾节点,尾节点的后置节点为 null
        p.after = null;
        // 如果当前节点是头节点,将 a 作为头节点。
        if (b == null)
            head = a;
        // 将当前节点的前置和后置节点关联
        else
            b.after = a;
        // 如果 当前节点的后置节点不为尾节点,将当前节点的后置节点和前置节点关联
        if (a != null)
            a.before = b;
        //当前节点是尾节点 ,将 b 作为尾节点
        else
            last = b;
        // 如果尾节点为 null,头节点也设置为当前节点 ,因为链表就一个节点
        if (last == null)
            head = p;
        //否则 更新当前节点p的前置节点为 原尾节点last, last的后置节点是p
        else {
            p.before = last;
            last.after = p;
        }
        // 将当前节点设置为尾节点,
        tail = p;
        ++modCount;
    }
}
复制代码
一句话描述就是:把当前操作的节点移到最后,作为尾节点。
这样的话,就会改变我们插入时候的元素的顺序,也就实现了按照访问和插入实现元素的排序。
遍历
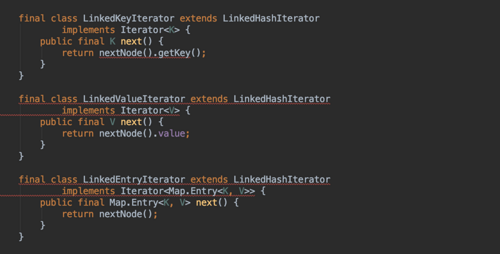
看过源码的可能注意到了,在 LinkedHashMap 内部定义了一些内部类,分别为:


可以看到 LinkedKeyIterator、 LinkedValueIterator、LinkedEntryIterator 都是继承于 LinkedHashIterator 迭代器,在 next 方法返回对应迭代器的值。
来看下被是哪个类继承的 LinkedHashIterator 干了些啥:
abstract class LinkedHashIterator {
    // 下个节点
    LinkedHashMapEntry<K, V> next;
    //当前节点
    LinkedHashMapEntry<K, V> current;
    //期待的修改次数
    int expectedModCount;

    LinkedHashIterator() {
        //初始化 next 为头节点,默认从头节点开始
        next = head;
        //使用 HashMap 的 modCOunt
        expectedModCount = modCount;
        //当前为 null
        current = null;
    }

    // 如果 next 头节点 不为空,就说明 LinkedHashMap 内部有值.返回 true
    public final boolean hasNext() {
        return next != null;
    }

    // 查找下个节点
    final LinkedHashMapEntry<K, V> nextNode() {
        LinkedHashMapEntry<K, V> e = next;
        //判断fail-fast
        if (modCount != expectedModCount)
            throw new ConcurrentModificationException();
        //如果要返回的节点是null,异常
        if (e == null)
            throw new NoSuchElementException();
        // 就是一个使用临时变量 e 把next 赋值给 current,然后 next 代表current 的下个节点.
        current = e;
        next = e.after;
        return e;
    }

    //移除遍历的节点,调用 HashMap 中的方法。
    public final void remove() {
        Node<K, V> p = current;
        if (p == null)
            throw new IllegalStateException();
        if (modCount != expectedModCount)
            throw new ConcurrentModificationException();
        current = null;
        K key = p.key;
        removeNode(hash(key), key, null, false, false);
        expectedModCount = modCount;
    }
}
复制代码
那这些是做什么的呢?
其实这里的几个迭代器都是为 LinkedHashMap 里面的keySet()、values()、entrySet()方法准备的,就拿 entrySet 来讲:
public Set<Map.Entry<K, V>> entrySet() {
    Set<Map.Entry<K, V>> es;
    return (es = entrySet) == null ? (entrySet = new LinkedEntrySet()) : es;
}
复制代码
在 entrySet() 方法里面,如果 entrySet 为空,就创建 LinkedEntrySet 对象,来看下 LinkedEntrySet 类做了些什么:
final class LinkedEntrySet extends AbstractSet<Map.Entry<K, V>> {
    public final int size() {
        return size;
    }
    public final void clear() {
        LinkedHashMap.this.clear();
    }
    public final Iterator<Map.Entry<K, V>> iterator() {
        return new LinkedEntryIterator();
    }
    public final boolean contains(Object o) {
        if (!(o instanceof Map.Entry))
            return false;
        Map.Entry<?, ?> e = (Map.Entry<?, ?>) o;
        Object key = e.getKey();
        Node<K, V> candidate = getNode(hash(key), key);
        return candidate != null && candidate.equals(e);
    }
    public final boolean remove(Object o) {
        if (o instanceof Map.Entry) {
            Map.Entry<?, ?> e = (Map.Entry<?, ?>) o;
            Object key = e.getKey();
            Object value = e.getValue();
            return removeNode(hash(key), key, value, true, true) != null;
        }
        return false;
    }
    public final Spliterator<Map.Entry<K, V>> spliterator() {
        return Spliterators.spliterator(this, Spliterator.SIZED |
                Spliterator.ORDERED |
                Spliterator.DISTINCT);
    }
    public final void forEach(Consumer<? super Map.Entry<K, V>> action) {
        if (action == null)
            throw new NullPointerException();
        int mc = modCount;
        // Android-changed: Detect changes to modCount early.
        for (LinkedHashMapEntry<K, V> e = head; (e != null && mc == modCount); e = e.after)
            action.accept(e);
        if (modCount != mc)
            throw new ConcurrentModificationException();
    }
}
复制代码
可以看到 iterator() 方法 返回了
public final Iterator<Map.Entry<K, V>> iterator() {
    return new LinkedEntryIterator();
}
复制代码
LinkedEntryIterator 就是继承于前面分析的 LinkedHashIterator,只是在 next 方法里面使用调用 nextNode 方法返回 Entry 而已:
public final Map.Entry<K, V> next() {
    return nextNode();
}
复制代码
其他的两种遍历 key 或者 value 的原理类似,就不在分析。
最后
关于 LinkedHashMap 的分析就先到这里,最后再来写一下 LinkedHashMap 的特点:
- 允许key 为 null ,value 为 null
- key 不可以重复,value 可以重复
- 内部是以数组+双向链表实现的,JDK8 以后加入了红黑树
- 内部键值对的存储是 有序 的(需要注意初始化的时候 accessOrder 属性的设置)。
- accessOrder 为 true,那么内部元素的顺序会根据最近访问方式排序,如果为 false,就会按照元素插入的顺序排序
- 初始容量为 16,负载因子为 0.75,也就是当容量达到 容量*负载因子 的时候会扩容,一次扩容增加一倍。
- 内部的键值对要重写 key 对象重写 hashCode 方法、equals 方法。
- 线程不安全的,如果想要线程安全,有三种方法
- SynchronizedMap 使用
Map<String, String> map1 = Collections.synchronizedMap(new LinkedHashMap<String, String>(16,0.75f,true));来获得一个线程安全的 LinkedHashMap,SynchronizedMap内部也是使用的 Synchronized 实现线程安全的
- SynchronizedMap 使用
有兴趣的可以去看下另外的几篇文章:
Java常用集合框架
ArrayList 源码分析
LinkedList 源码分析
HashMap 源码分析


![[HBLOG]公众号](https://www.liuhaihua.cn/img/qrcode_gzh.jpg)

