Java之AQS原理浅析
AQS全称 AbstractQueuedSynchronizer ,它是实现 JCU 包中几乎所有的有关锁、多线程并发以及线程同步器等重要组件的基石, 其核心思想就是 volatile int state 这个属性配合 Unsafe 这个工具类来实现对当前锁的状态进行修改 。
1、AQS原理简述
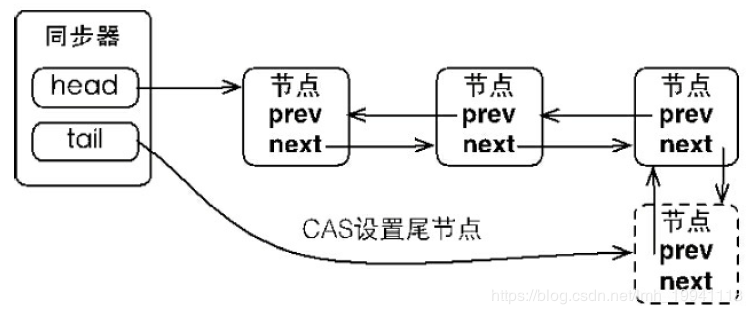
AQS内部维护着一个FIFO的CLH队列,该队列的基本结构如下。

在该队列中,每一个节点代表一个线程,但都不是线程的,只有头结点才会进行线程安全处理。
1.1、Node节点
AQS中使用Node来表示CLH队列的每个节点,源码如下:
static final class Node {
        //表示共享模式(共享锁)
        static final Node SHARED = new Node();
        //表示独占模式(独占锁)
        static final Node EXCLUSIVE = null;

        //表示线程已取消
        static final int CANCELLED =  1;
        //表示当前结点的后继节点需要被唤醒
        static final int SIGNAL    = -1;
        //线程(处在Condition休眠状态)在等待Condition唤醒
        static final int CONDITION = -2;
        //表示锁的下一次获取可以无条件传播,在共享模式头结点有可能处于这种状态
        static final int PROPAGATE = -3;

        //线程等待状态
        volatile int waitStatus;

        //当前节点的前一个节点
        volatile Node prev;

        //当前节点的下一个节点
        volatile Node next;

        //当前节点所代表的的线程
        volatile Thread thread;

        //可以理解为当前是独占模式还是共享模式
        Node nextWaiter;

        //如果节点在共享模式下等待,则返回true。
        final boolean isShared() {
            return nextWaiter == SHARED;
        }
        //获取前一个节点
        final Node predecessor() throws NullPointerException {
            Node p = prev;
            if (p == null)
                throw new NullPointerException();
            else
                return p;
        }
        ...
    }
复制代码
1.2、入队
如果当前线程通过CAS获取锁失败,AQS会将该线程以及等待状态等信息打包成一个Node节点,并将其加入同步队列的尾部,同时将当前线程挂起。
public final void acquire(int arg) {
        //tryAcquire是子类重写的方法
        if (!tryAcquire(arg) &&
            acquireQueued(addWaiter(Node.EXCLUSIVE), arg))
            selfInterrupt();
    }
    //将线程及状态信息打包成一个节点
    private Node addWaiter(Node mode) {
        Node node = new Node(Thread.currentThread(), mode);
        // Try the fast path of enq; backup to full enq on failure
        Node pred = tail;
        if (pred != null) {
            node.prev = pred;
            //快速的将节点插入队列尾部,
            if (compareAndSetTail(pred, node)) {
                pred.next = node;
                return node;
            }
        }
        //快速插入失败,通过轮询来插入尾部,性能比快速插入消耗要大一些
        enq(node);
        return node;
    }
    //通过轮询方式将节点插入队列尾部
    private Node enq(final Node node) {
        for (;;) {
            Node t = tail;
            if (t == null) { // Must initialize
                if (compareAndSetHead(new Node()))
                    tail = head;
            } else {
                node.prev = t;
                if (compareAndSetTail(t, node)) {
                    t.next = node;
                    return t;
                }
            }
        }
    }
    //挂起当前线程
    final boolean acquireQueued(final Node node, int arg) {
        boolean failed = true;
        try {
            boolean interrupted = false;
            for (;;) {
                final Node p = node.predecessor();
                if (p == head && tryAcquire(arg)) {
                    setHead(node);
                    p.next = null; // help GC
                    failed = false;
                    return interrupted;
                }
                //通过LockSupport来挂起当前线程
                if (shouldParkAfterFailedAcquire(p, node) &&
                    parkAndCheckInterrupt())
                    interrupted = true;
            }
        } finally {
            if (failed)
                cancelAcquire(node);
        }
    }
复制代码
总体流程图如下。

1.3、出队
当释放锁时,执行出队操作及唤醒后继节点。
public final boolean release(int arg) {
        //tryRelease是子类实现的方式
        if (tryRelease(arg)) {
            Node h = head;
            if (h != null && h.waitStatus != 0)
                //线程唤醒及出队操作
                unparkSuccessor(h);
            return true;
        }
        return false;
    }
复制代码
总体流程图如下。

1.4、同步状态管理
或许对图中的同步器有所疑惑。它到底是什么?其实很简单,它就是给首尾两个节点加上 volatile 同步域,如下。
private transient volatile Node head;
    private transient volatile Node tail;
    private volatile int state;
复制代码
上面三个变量是AQS中非常重要的三个变量,前面两个变量好理解,下面就来说一下 state 变量,该变量是一个计数器,在独占锁情况下,获取锁后,state的值就会为1,释放锁时就设置为0(这种锁属于不可重入锁);在共享锁情况下,每一个线程获取到锁,就会state++,释放锁时就state--;在可重入锁情况下(获取的锁都是同一把锁),每获取一次锁会state++,释放锁时state--。
protected final int getState() {
        return state;
    }
    protected final void setState(int newState) {
        state = newState;
    }
    //使用CAS
    protected final boolean compareAndSetState(int expect, int update) {
        // See below for intrinsics setup to support this
        return unsafe.compareAndSwapInt(this, stateOffset, expect, update);
    }
复制代码
2、自定义独占锁及共享锁
通过上一节的讲解,想必对AQS有了一定的了解,下面就通过AQS来实现一个独占锁及共享锁。
AQS非常强大,只需要重写 tryAcquire 、 tryRelease 这两个方法就可以实现一个独占锁。代码如下:
public class SingleLock implements Lock {
    //自定义的独占锁
    static class Sync extends AbstractQueuedSynchronizer {
        //独占锁
        @Override
        protected boolean tryAcquire(int arg) {
            if (compareAndSetState(0, 1)) {
                setExclusiveOwnerThread(Thread.currentThread());
                return true;
            }
            return false;
        }

        //独占锁
        @Override
        protected boolean tryRelease(int arg) {
            setExclusiveOwnerThread(null);
            setState(0);
            return true;
        }
        //判断是是否是独占锁。
        @Override
        protected boolean isHeldExclusively() {
            return getState() == 1;
        }

        Condition newCondition() {
            return new ConditionObject();
        }
    }

    private Sync sync;

    public SingleLock() {
        sync = new Sync();
    }
    //加锁
    @Override
    public void lock() {
        sync.acquire(1);
    }
    //获取可中断锁
    @Override
    public void lockInterruptibly() throws InterruptedException {
        sync.acquireInterruptibly(1);
    }
    //获取锁,可能失败
    @Override
    public boolean tryLock() {
        return sync.tryAcquire(1);
    }
    //在time时间内不能获取锁则失败
    @Override
    public boolean tryLock(long time, TimeUnit unit) throws InterruptedException {
        return sync.tryAcquireNanos(1, unit.toNanos(time));
    }
    //释放锁
    @Override
    public void unlock() {
        sync.release(1);
    }
    //Condition来实现阻塞唤醒机制
    @Override
    public Condition newCondition() {
        return sync.newCondition();
    }
}
复制代码
很简单的代码就实现了一个独占锁, SingleLock 拥有 ReentrantLock 的大部分功能,并且用法一模一样。是不是很简单...
JUC包中提供的 闭锁(CountDownLatch) 及信号量(Semaphore)就是典型的共享锁的实现。共享锁的实现也很简单,需要重写 tryAcquireShared 、 tryReleaseShared 这两个方法。下面就来实现一个共享锁。代码如下:
public class ShareLock implements Lock {
    static class Sync extends AbstractQueuedSynchronizer {
        private int count;

        Sync(int count) {
            this.count = count;
        }

        @Override
        protected int tryAcquireShared(int arg) {
            for (; ; ) {
                int current = getState();
                int newCount = current - arg;
                if (newCount < 0 || compareAndSetState(current, newCount)) {
                    return newCount;
                }
            }
        }

        @Override
        protected boolean tryReleaseShared(int arg) {
            for (; ; ) {
                int current = getState();
                int newCount = current + arg;
                if (compareAndSetState(current, newCount)) {
                    return true;
                }
            }
        }

        Condition newCondition() {
            return new ConditionObject();
        }
    }

    private int count;
    private Sync sync;

    public ShareLock(int count) {
        this.count = count;
        sync = new Sync(count);
    }

    @Override
    public void lock() {
        sync.acquireShared(1);
    }

    @Override
    public void lockInterruptibly() throws InterruptedException {
        sync.acquireSharedInterruptibly(1);
    }

    @Override
    public boolean tryLock() {
        return sync.tryAcquireShared(1) >= 0;
    }

    @Override
    public boolean tryLock(long time, TimeUnit unit) throws InterruptedException {
        return sync.tryAcquireSharedNanos(1, unit.toNanos(time));
    }

    @Override
    public void unlock() {
        sync.releaseShared(1);
    }

    @Override
    public Condition newCondition() {
        return sync.newCondition();
    }
}
复制代码
ShareLock 允许 count 个线程同时获取锁,它的实现也很简单吧。通过上面这两个例子,我们就可以按照自己需求来实现不同的锁,但JUC包中提供的类基本上能满足绝大部分需求了。
3、锁的可重入性
SingleLock 是我们自己实现的一种独占锁,但如果把它用在递归中,就会产生死锁。因为 SingleLock 不具备可重入性。那么该如何实现可重入性尼?来看 ReentrantLock 的实现。
final boolean nonfairTryAcquire(int acquires) {
        final Thread current = Thread.currentThread();
        int c = getState();
            if (c == 0) {
            if (compareAndSetState(0, acquires)) {
                setExclusiveOwnerThread(current);
                return true;
            }
        }
        //可重入性的实现,如果当前线程已拿到锁
        else if (current == getExclusiveOwnerThread()) {
            //状态加1
            int nextc = c + acquires;
            if (nextc < 0) // overflow
                 throw new Error("Maximum lock count exceeded");
            //重新设置状态
            setState(nextc);
            return true;
        }
         return false;
    }

复制代码
可以发现可重入性的实现还是蛮简单的,首先判断当前线程是不是已经拿到锁,如果已经拿到锁就将state的值加1。可重入性这一点非常重要,否则会产生不必要的死锁问题, Synchronize 也具备可重入性。
4、锁的公平性
SingleLock 属于一个非公平锁,那么如何实现公平锁尼?其实这更简单,只需要加个判断即可。来看 ReentrantLock 的公平锁的实现。
protected final boolean tryAcquire(int acquires) {
            final Thread current = Thread.currentThread();
            int c = getState();
            if (c == 0) {
                //如果当前线程之前还有节点则hasQueuedPredecessors返回true,就不会去竞争锁
                if (!hasQueuedPredecessors() &&
                    compareAndSetState(0, acquires)) {
                    setExclusiveOwnerThread(current);
                    return true;
                }
            }
            else if (current == getExclusiveOwnerThread()) {
                int nextc = c + acquires;
                if (nextc < 0)
                    throw new Error("Maximum lock count exceeded");
                setState(nextc);
                return true;
            }
            return false;
        }
复制代码
hasQueuedPredecessors 就是判断锁是否公平的关键,如果在当前线程之前还有排队的线程就返回true,这时候当前线程就不会去竞争锁。从而保证了锁的公平性。


![[HBLOG]公众号](https://www.liuhaihua.cn/img/qrcode_gzh.jpg)

