Spring Boot 集成 Swagger 生成 RESTful API 文档
https://swagger.io
- 接口的文档自动生成
- 功能测试
API 风格
添加依赖
pom.xml 引入 Swagger 依赖:
<dependency>
    <groupId>io.springfox</groupId>
    <artifactId>springfox-swagger2</artifactId>
    <version>${swagger.version}</version>
</dependency>
<!-- swagger2 ui -->
<dependency>
    <groupId>io.springfox</groupId>
    <artifactId>springfox-swagger-ui</artifactId>
    <version>${swagger.version}</version>
</dependency>
使用 property 定义了 swagger 的版本,因此还需要添加:
<swagger.version>2.9.2</swagger.version>
springfox-swagger2
springfox-swagger-ui
Swagger 配置类
使用注解 @Configuration 编写 Swagger 配置类—— SwaggerConfig 。
新建 config 的包,创建 SwaggerConifg 的配置类:
//通过@Configuration注解,让Spring来加载该类配置
@Configuration
//通过@EnableSwagger2注解来启用Swagger2
@EnableSwagger2
//@ConditionalOnExpression 为Spring的注解,用户是否实例化本类,用于是否启用Swagger的判断(生产环境需要屏蔽Swagger)
@ConditionalOnExpression("${swagger.enable:true}")
public class SwaggerConfig {

    // select()函数返回一个ApiSelectorBuilder实例用来控制哪些接口暴露给Swagger来展现,本例采用指定扫描的包路径来定义,
    // Swagger会扫描该包下所有Controller定义的API,并产生文档内容(除了被@ApiIgnore指定的请求)
    @Bean
    public Docket createRestApi() {
        // apiInfo()用来创建该Api的基本信息(这些基本信息会展现在文档页面中
        ApiInfo apiInfo = new ApiInfoBuilder()
                .title("Title: RESTful APIs User 模块")
                .description("Description: Spring Boot Swagger 练习")
                .termsOfServiceUrl("https://michael728.github.io/")
                .version("1.0")
                .build();

        Docket docket = new Docket(DocumentationType.SWAGGER_2)
                .apiInfo(apiInfo)
                // select()函数返回一个ApiSelectorBuilder实例
                .select()
                // 决定了暴露哪些接口给 Swagger
                .paths(regex("/api/.*"))
                .build()
                .useDefaultResponseMessages(false);
        return docket;
    }
}
-
apiInfo()用来创建该 API 的基本信息(这些基本信息会展现在文档页面中)。 -
@ConditionalOnExpression("${swagger.enable:true}")这个注解控制了是否启用 Swagger,我们需要在appplication.properties中加上swagger.enable=true
编写控制器类——Controller 类
我们先介绍一下在用 Swagger 时的常用注解:
-
@API类的注解,用在请求的类上,代表了这个类是 Swagger 的资源value tags
-
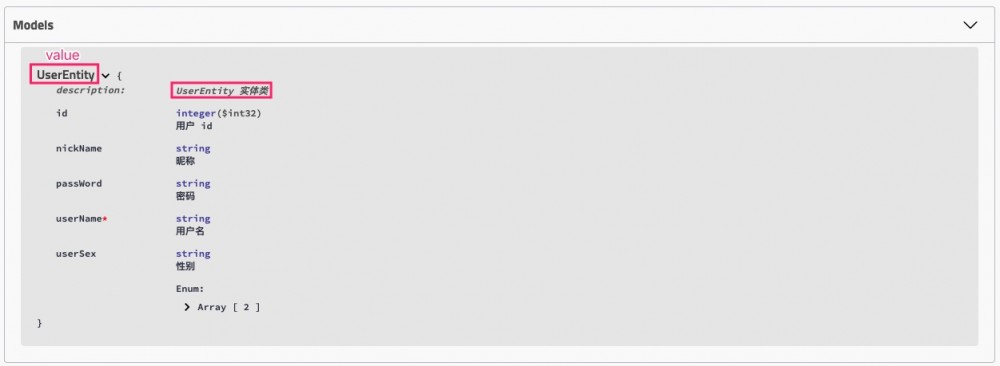
@ApiModel类注解,用于响应实体类,说明实体作用-
value:Model 展示时的名称,默认是 实体类的名称,比如UserEntity; -
description:实体类的描述
-

类成员变量的的注解:
-
@ApiModelProperty用在实体类的属性上value required
方法的注解:
-
@ApiOperation描述方法的用途value notes
-
@ApiImplicitParam描述参数信息-
value -
dataType:参数数据类型,参数的数据类型 只作为标志说明,并没有实际验证 -
required:默认 false,参数是否必传 -
paramType参数类型,表示参数放在哪里-
query,默认值,请求参数的获取:@RequestParam -
path,路径参数,请求参数的获取:@PathVariable -
header, 请求参数的获取:@RequestHeader
-
-
-
@PathVariable路径参数,给类似@GetMappIng("/user/{id}")参数通过路径传入
其他:
@ApiIgnore()
@Profile({"dev","test"})
实体类示例:
@Data
@ApiModel(value = "用户实体")
public class UserEntity {
    public static final long serialVersionUID = 1L;
    @ApiModelProperty(value = "用户 id")
    private int id;
    @ApiModelProperty(value = "用户名", required = true)
    private String userName;
    @ApiModelProperty(value = "密码" )
    private String passWord;
    @ApiModelProperty(value = "性别")
    private UserSexEnum userSex;
    @ApiModelProperty(value = "昵称" )
    private String nickName;

    public UserEntity(Integer id, String userName, String passWord) {
        this.id = id;
        this.userName = userName;
        this.passWord = passWord;
    }
}
下面是一个控制类的示例:
@RestController
@RequestMapping("/api/v1/")
@Api(value = "用户模块", tags = {"demo"})
public class UserController {

    // 模拟数据库
    public static List<UserEntity> users = new ArrayList<>();

    static {
        UserEntity user1 = new UserEntity(1, "michael", "123");
        UserEntity user2 = new UserEntity(2, "qq", "123");
        UserEntity user3 = new UserEntity(3, "hh", "123");
        users.add(user1);
        users.add(user2);
        users.add(user3);
    }

    @ApiOperation(value = "获取用户列表", notes = "获取全部用户信息")
    @RequestMapping(value = "/users", method = RequestMethod.GET)
    public List<UserEntity> getUsers() {
        return users;
    }

    @ApiOperation(value = "查询单用户", notes = "根据用户id 查询其信息")
    @ApiImplicitParam(name = "id", value = "用户id", paramType = "query", dataType = "int")
    @GetMapping("/user/{id}")
    public UserEntity getUser(@PathParam("id") Integer id) {
        UserEntity user = users.get(id);
        return user;
    }

    @ApiOperation(value = "存储用户信息", notes = "存储用户详细信息")
    @RequestMapping(value = "/user", method = RequestMethod.POST)
    public UserEntity saveUser(@RequestBody UserEntity user) {
        users.add(user);
        return user;
    }

    @ApiOperation(value = "删除用户", notes = "根据用户id删除用户信息")
    @ApiImplicitParam(name = "id", value = "用户id", paramType = "path")
    @RequestMapping(value = "/user/{id}", method = RequestMethod.DELETE)
    public int deleteUser(@PathVariable("id") int id) {
        users.remove(id);
        return id;
    }


    @ApiOperation(value = "更新用户信息", notes = "更新用户的个人信息")
    @PutMapping("/user/")
    public UserEntity updateUser(@RequestBody UserEntity user) {
        int id = user.getId();
        UserEntity oldUser = users.get(id);
        users.set(id, user);
        return user;
    }
}
正文到此结束
- 本文标签: 配置 ArrayList Select src spring 自动生成 https API list Word 测试 Spring Boot map Document build bean git RESTful value 删除 update id cat App final Service ip 数据 2019 XML http XEN IO 数据库 CTO 参数 Property UI tag 实例 entity java 个人信息 description GitHub REST message pom
- 版权声明: 本文为互联网转载文章,出处已在文章中说明(部分除外)。如果侵权,请联系本站长删除,谢谢。
- 本文海报: 生成海报一 生成海报二
热门推荐
相关文章
Loading...


![[HBLOG]公众号](https://www.liuhaihua.cn/img/qrcode_gzh.jpg)

