Spring 源码学习(十) Spring mvc
经过前面的 AOP (面向切面编程) 和 Transaction (事务管理),这次来到了 MVC (Web 应用,进行请求分发和处理)
Spring MVC 定义:
分离了控制器(Controller)、模型(Model)、分配器(Adapter)、视图(View)和处理程序对象(Handler,实际上调用的是 Controller 中定义的逻辑)。
基于 Servlet 功能实现,通过实现了 Servlet 接口的 DispatcherServlet 来封装其核心功能实现,通过将请求分派给处理程序,同时带有可配置的处理程序映射、视图解析、本地语言、主题解析以及上传文件支持。
同样老套路,本篇按照以下思路展开:
(1) 介绍如何使用
(2) 辅助工具类 ContextLoaderContext
(3) DispatcherServlet 初始化
(4) DispatcherServlet 处理请求
Table of Contents generated with DocToc
如何使用
代码结构如下:(详细代码可在文章末尾下载)
├── java
│   ├── domains
│   └── web
│       └── controller
│           └── BookController.java
├── resources
│   └── configs
└── webapp
│   └── WEB-INF
│       ├── views
│       │   ├── bookView.jsp
│       │   └── index.jsp
├──     ├── applicationContext.xml
│       ├── spring-mvc.xml
│       └── web.xml
└── build.gradle
(1)配置 web.xml
在该文件中,主要配置了两个关键点:
1. contextConfigLocation :使 Web 和 Spring 的配置文件相结合的关键配置
2. DispatcherServlet : 包含了 SpringMVC 的请求逻辑,使用该类拦截 Web 请求并进行相应的逻辑处理
<?xml version="1.0" encoding="UTF-8"?>
<web-app xmlns="http://xmlns.jcp.org/xml/ns/javaee"
         xmlns:xsi="http://www.w3.org/2001/XMLSchema-instance"
         xsi:schemaLocation="http://xmlns.jcp.org/xml/ns/javaee http://xmlns.jcp.org/xml/ns/javaee/web-app_3_1.xsd"
         version="3.1">
    <!-- 使用 ContextLoaderListener时,告诉它 Spring 配置文件地址 -->
    <context-param>
        <param-name>contextConfigLocation</param-name>
        <param-value>/WEB-INF/applicationContext.xml</param-value>
    </context-param>

    <!-- 使用监听器加载 applicationContext 文件 -->
    <listener>
        <listener-class>org.springframework.web.context.ContextLoaderListener</listener-class>
    </listener>

    <!-- 配置 DispatcherServlet -->
    <servlet>
        <servlet-name>dispatcherServlet</servlet-name>
        <servlet-class>org.springframework.web.servlet.DispatcherServlet</servlet-class>
        <init-param>
            <param-name>contextConfigLocation</param-name>
            <param-value>/WEB-INF/spring-mvc.xml</param-value>
        </init-param>
    </servlet>
    <servlet-mapping>
        <servlet-name>dispatcherServlet</servlet-name>
        <url-pattern>/</url-pattern>
    </servlet-mapping>
</web-app>
使用 IDEA 时,尽量选择默认条件和自动扫描加载 Web 配置文件,然后添加 tomcat 进行启动,具体配置请查阅 idea 创建java web项目ssm-gradle
(2) 配置 applicationContext.xml
<?xml version="1.0" encoding="UTF-8"?>
<beans xmlns="http://www.springframework.org/schema/beans"
       xmlns:xsi="http://www.w3.org/2001/XMLSchema-instance"
       xmlns:context="http://www.springframework.org/schema/context"
       xsi:schemaLocation="http://www.springframework.org/schema/beans
       http://www.springframework.org/schema/beans/spring-beans.xsd
       http://www.springframework.org/schema/context
       http://www.springframework.org/schema/context/spring-context.xsd">

	<!--这里比较简单,只是通知 Spring 扫描对应包下的 bean -->
    <context:component-scan base-package="web.controller"/>

</beans>
可以在这里自定义想要加载的 bean ,或者设置数据库数据源、事务管理器等等 Spring 应用配置。
(3) 配置 spring-mvc.xml
<?xml version="1.0" encoding="UTF-8"?>
<beans xmlns="http://www.springframework.org/schema/beans"
       xmlns:xsi="http://www.w3.org/2001/XMLSchema-instance" xmlns:mvc="http://www.springframework.org/schema/mvc"
       xmlns:context="http://www.springframework.org/schema/context"
       xsi:schemaLocation="http://www.springframework.org/schema/beans
       http://www.springframework.org/schema/beans/spring-beans.xsd http://www.springframework.org/schema/mvc
       http://www.springframework.org/schema/mvc/spring-mvc.xsd http://www.springframework.org/schema/context
       http://www.springframework.org/schema/context/spring-context.xsd">

    <!--扫描包,自动注入bean-->
    <context:component-scan base-package="web.controller"/>
    <!--使用注解开发spring mvc-->
    <mvc:annotation-driven/>

    <!--视图解析器-->
    <bean class="org.springframework.web.servlet.view.InternalResourceViewResolver">
        <property name="prefix" value="/WEB-INF/views/"/>
        <property name="suffix" value=".jsp"/>
    </bean>

</beans>
使用了 InternalResourceViewResolver ,它是一个辅助 Bean ,这样配置的意图是: 在 ModelAndView 返回的视图名前加上 prefix 指定的前缀和 suffix 的后缀(我理解为用来解析和返回视图,以及将视图层进行统一管理,放到指定路径中)
(4) 创建 BookController
@Controller
public class BookController {

	@RequestMapping(value = "/", method = RequestMethod.GET)
	public String welcome() {
		return "index";
	}

	@RequestMapping(value = "bookView", method = RequestMethod.GET)
	public String helloView(Model model) {
		ComplexBook book1 = new ComplexBook("Spring 源码深度分析", "技术类");
		ComplexBook book2 = new ComplexBook("雪国", "文学类");
		List<ComplexBook> list = new ArrayList<>(2);
		list.add(book1);
		list.add(book2);
		model.addAttribute("bookList", list);
		return "bookView";
	}

	@RequestMapping(value = "plain")
	@ResponseBody
	public String plain(@PathVariable String name) {
		return name;
	}
}
可以看出,与书中示例并不一样,使用的是更贴合我们实际开发中用到的 @RequestMapping 等注解作为例子。根据请求的 URL 路径,匹配到对应的方法进行处理。
(5) 创建 jsp 文件
index.jsp
<html>
<head>
    <title>Hello World!</title>
</head>
<body>
<h1>Hello JingQ!</h1>
</body>
</html>

---
bookView.jsp
<%@ taglib prefix="c" uri="http://java.sun.com/jsp/jstl/core" %>
<%@ page contentType="text/html;charset=UTF-8" language="java" %>
<html>
<head>
    <title>Book Shop</title>
</head>
<body>
<c:forEach items="${bookList}" var="book">
    <c:out value="${book.name}"/>
    <c:out value="${book.tag}"/>
</c:forEach>
</body>
</html>
按照现在前后端分离的大趋势,我其实并不想用 jsp 视图技术作为例子,但考虑到之前入门时也接触过,也为了跟我一样不会写前端的同学更好理解,所以还是记录一下如何使用 jsp 。
(6) 添加依赖 build.gradle
// 引入 spring-web 和 spring-webmvc,如果不是跟我一样使用源码进行编译,请到 mvn 仓库中寻找对应依赖
optional(project(":spring-web"))
optional(project(":spring-webmvc"))

// 引入这个依赖,使用 jsp 语法 https://mvnrepository.com/artifact/javax.servlet/jstl
compile group: 'javax.servlet', name: 'jstl', version: '1.2'
(7) 启动 Tomcat 如何配置和启动,网上也有很多例子,参考资料 3 是个不错的例子,下面是请求处理结果:
http://localhost:8080/bookView (使用了 JSP 视图进行渲染)
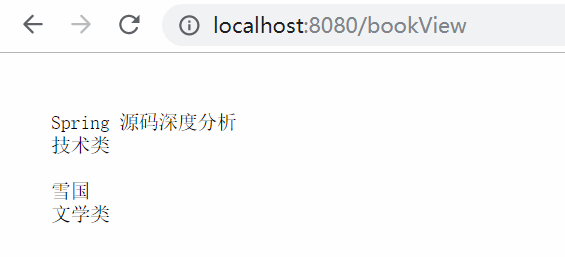
http://localhost:8080/plain/value (前后端分离的话,常用的是这种,最后可以返回简单字符或者 json 格式的对象等)

在刚才的 web.xml 中有两个关键配置,所以现在学习下这两个配置具体是干啥的。
ContextLoaderContext
作用:在启动 web 容器时,自动装载 ApplicationContext 的配置信息。
下面是它的继承体系图:
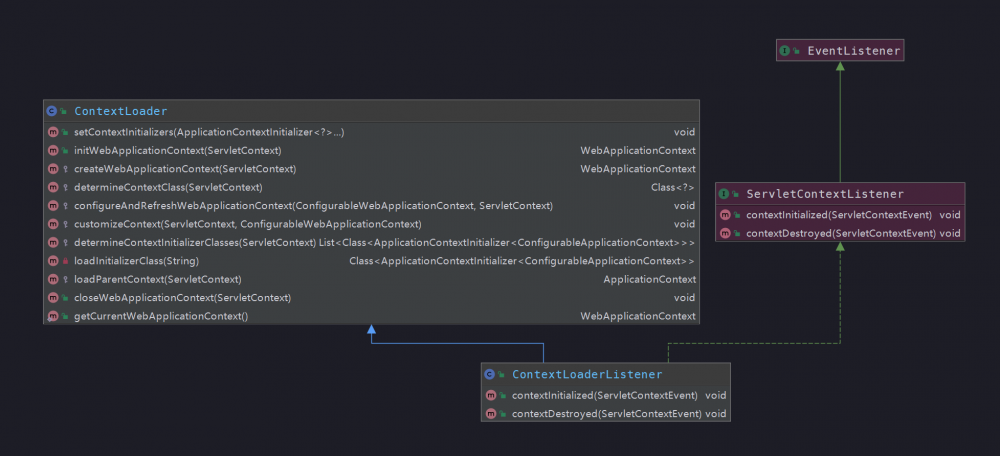
这是一个辅助工具类,可以用来传递配置信息参数,在 web.xml 中,将路径以 context-param 的方式注册并使用 ContextLoaderListener 进行监听读取。
从图中能看出,它实现了 ServletContextListener 这个接口,只要在 web.xml 配置了这个监听器,容器在启动时,就会执行 contextInitialized(ServletContextEvent) 这个方法,进行应用上下文初始化。
public void contextInitialized(ServletContextEvent event) {
	initWebApplicationContext(event.getServletContext());
}
每个 Web 应用都会有一个 ServletContext 贯穿生命周期( 在应用启动时创建,关闭时销毁 ),跟 Spring 中 ApplicationContext 类似,在全局范围内有效。
实际上初始化的工作,是由父类 ContextLoader 完成的:(简略版)
public WebApplicationContext initWebApplicationContext(ServletContext servletContext) {
    // demo 中用到的根容器是 Spring 容器 WebApplicationContext.class.getName() + ".ROOT"
	if (servletContext.getAttribute(WebApplicationContext.ROOT_WEB_APPLICATION_CONTEXT_ATTRIBUTE) != null) {
		// web.xml 中存在多次 ContextLoader 定义
		throw new IllegalStateException();
	}
	long startTime = System.currentTimeMillis();
    // 将上下文存储在本地实例变量中,以保证在 ServletContext 关闭时可用。
    if (this.context == null) {
    	// 初始化 context
    	this.context = createWebApplicationContext(servletContext);
    }
    if (this.context instanceof ConfigurableWebApplicationContext) {
    	ConfigurableWebApplicationContext cwac = (ConfigurableWebApplicationContext) this.context;
    	if (!cwac.isActive()) {
    		if (cwac.getParent() == null) {
    			ApplicationContext parent = loadParentContext(servletContext);
    			cwac.setParent(parent);
    		}
    		configureAndRefreshWebApplicationContext(cwac, servletContext);
    	}
    }
    // 记录在 ServletContext 中
    servletContext.setAttribute(WebApplicationContext.ROOT_WEB_APPLICATION_CONTEXT_ATTRIBUTE, this.context);
    ClassLoader ccl = Thread.currentThread().getContextClassLoader();
    if (ccl == ContextLoader.class.getClassLoader()) {
    	currentContext = this.context;
    }
    else if (ccl != null) {
    	currentContextPerThread.put(ccl, this.context);
    }
    if (logger.isInfoEnabled()) {
    	// 计数器,计算初始化耗时时间
    	long elapsedTime = System.currentTimeMillis() - startTime;
    	logger.info("Root WebApplicationContext initialized in " + elapsedTime + " ms");
    }
    return this.context;
}
该函数主要是体现了创建 WebApplicationContext 实例的一个功能架构,实现的大致步骤如下:
1. WebApplicationContext 存在性的验证: 只能初始化一次,如果有多个声明,将会扰乱 Spring 的执行逻辑,所以有多个声明将会报错。 2. 创建 WebApplicationContext 实例: createWebApplicationContext(servletContext);
protected Class<?> determineContextClass(ServletContext servletContext) {
    // defaultStrategies 是个静态变量,在静态代码块中初始化
    contextClassName = defaultStrategies.getProperty(WebApplicationContext.class.getName());
	return ClassUtils.forName(contextClassName, ContextLoader.class.getClassLoader());
}

/**
 * 默认策略
 */
private static final Properties defaultStrategies;
static {
	try {
		// 从 ContextLoader.properties 文件中加载默认策略
		// 在这个目录下:org/springframework/web/context/ContextLoader.properties
		ClassPathResource resource = new ClassPathResource(DEFAULT_STRATEGIES_PATH, ContextLoader.class);
		defaultStrategies = PropertiesLoaderUtils.loadProperties(resource);
	}
	catch (IOException ex) {
		throw new IllegalStateException("Could not load 'ContextLoader.properties': " + ex.getMessage());
	}
}


org.springframework.web.context.WebApplicationContext=org.springframework.web.context.support.XmlWebApplicationContext
如果按照默认策略,它将会从配置文件 ContextLoader.properties 中读取需要创建的实现类: XmlWebApplicationContext
3. 将实例记录在 servletContext 中 4. 映射当前的类加载器与创建的实例到全局变量 currentContextPerThread 中
通过以上步骤,完成了创建 WebApplicationContext 实例,它继承自 ApplicaitonContext ,在父类的基础上,追加了一些特定于 web 的操作和属性,可以把它当成我们之前初始化 Spring 容器时所用到的 ClassPathApplicaitonContext 那样使用。
DispatcherServlet 初始化
该类是 spring-mvc 的核心,该类进行真正逻辑实现, DisptacherServlet 实现了 Servlet 接口。
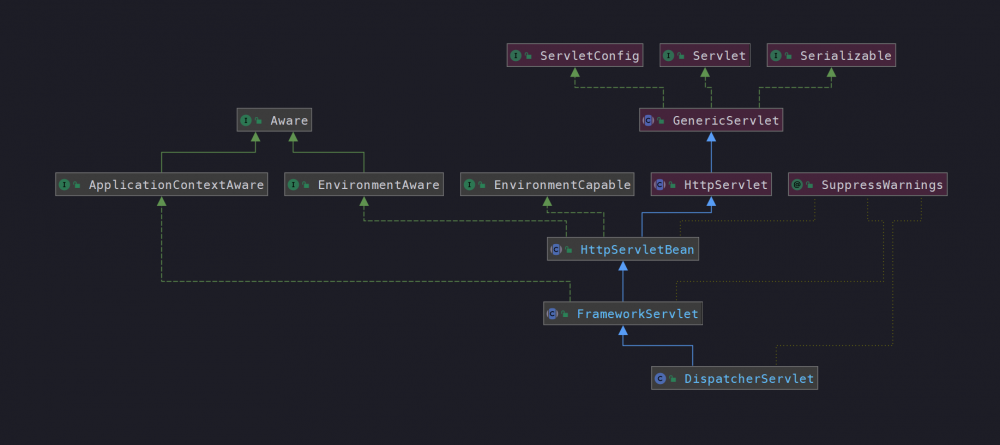
介绍:
servlet 是一个 Java 编写的程序,基于 Http 协议,例如我们常用的 Tomcat ,也是按照 servlet 规范编写的一个 Java 类
servlet 的生命周期是由 servlet 的容器来控制, 分为三个阶段:初始化、运行和销毁。
在 servlet 初始化阶段会调用其 init 方法:
HttpServletBean#init
public final void init() throws ServletException {
	// 解析 init-param 并封装到 pvs 变量中
	PropertyValues pvs = new ServletConfigPropertyValues(getServletConfig(), this.requiredProperties);
	// 将当前的这个 Servlet 类转换为一个 BeanWrapper,从而能够以 Spring 的方式对 init—param 的值注入
	BeanWrapper bw = PropertyAccessorFactory.forBeanPropertyAccess(this);
	ResourceLoader resourceLoader = new ServletContextResourceLoader(getServletContext());
	// 注册自定义属性编辑器,一旦遇到 Resource 类型的属性将会使用 ResourceEditor 进行解析
	bw.registerCustomEditor(Resource.class, new ResourceEditor(resourceLoader, getEnvironment()));
	// 空实现,留给子类覆盖
	initBeanWrapper(bw);
	bw.setPropertyValues(pvs, true);
	// 初始化 servletBean (让子类实现,这里它的实现子类是 FrameworkServlet)
	initServletBean();
}
在这里初始化 DispatcherServlet ,主要是通过将当前的 servlet 类型实例转换为 BeanWrapper 类型实例,以便使用 Spring 中提供的注入功能进行相应属性的注入。
从上面注释,可以看出初始化函数的逻辑比较清晰, 封装参数、转换成 BeanWrapper 实例、注册自定义属性编辑器、属性注入,以及关键的初始化 servletBean 。
容器初始化
下面看下初始化关键逻辑:
FrameworkServlet#initServletBean
剥离了日志打印后,剩下的两行关键代码
protected final void initServletBean() throws ServletException {
	// 仅剩的两行关键代码
	this.webApplicationContext = initWebApplicationContext();
	// 留给子类进行覆盖实现,但我们例子中用的 DispatcherServlet 并没有覆盖,所以先不用管它
	initFrameworkServlet();
}
WebApplicationContext 的初始化
FrameworkServlet#initWebApplicationContext
该函数的主要工作就是创建或刷新 WebApplicationContext 实例并对 servlet 功能所使用的变量进行初始化。
protected WebApplicationContext initWebApplicationContext() {
	// 从根容器开始查找
	WebApplicationContext rootContext =
			WebApplicationContextUtils.getWebApplicationContext(getServletContext());
	WebApplicationContext wac = null;
	if (this.webApplicationContext != null) {
		// 有可能在 Spring 加载 bean 时,DispatcherServlet 作为 bean 加载进来了
		// 直接使用在构造函数被注入的 context 实例
		wac = this.webApplicationContext;
		if (wac instanceof ConfigurableWebApplicationContext) {
			ConfigurableWebApplicationContext cwac = (ConfigurableWebApplicationContext) wac;
			if (!cwac.isActive()) {
				if (cwac.getParent() == null) {
					cwac.setParent(rootContext);
				}
				// 刷新上下文环境
				configureAndRefreshWebApplicationContext(cwac);
			}
		}
	}
	if (wac == null) {
		// 根据 contextAttribute 属性加载 WebApplicationContext
		wac = findWebApplicationContext();
	}
	if (wac == null) {
		// 经过上面步骤都没找到,那就来创建一个
		wac = createWebApplicationContext(rootContext);
	}
	if (!this.refreshEventReceived) {
		synchronized (this.onRefreshMonitor) {
			// 刷新,初始化很多策略方法
			onRefresh(wac);
		}
	}
	if (this.publishContext) {
		// Publish the context as a servlet context attribute.
		String attrName = getServletContextAttributeName();
		getServletContext().setAttribute(attrName, wac);
	}
	return wac;
}
根容器查找
我们最常用到的 spring-mvc ,是 spring 容器和 web 容器共存,这时 rootContext 父容器就是 spring 容器。
在前面的 web.xml 配置的监听器 ContextLaoderListener ,已经将 Spring 父容器进行了加载
WebApplicationContextUtils#getWebApplicationContext(ServletContext)
public static WebApplicationContext getWebApplicationContext(ServletContext sc) {
	// key 值 :WebApplicationContext.class.getName() + ".ROOT"
	// (ServletContext) sc.getAttribute(attrName) ,
	return getWebApplicationContext(sc, WebApplicationContext.ROOT_WEB_APPLICATION_CONTEXT_ATTRIBUTE);
}
同时,根据上面代码,了解到 Spring 父容器,是以 key 值为 : WebApplicationContext.class.getName() + ".ROOT" 保存到 ServletContext 上下文中。
根据 contextAttribute 寻找
虽然有默认 key ,但用户可以重写初始化逻辑(在 web.xml 文件中设定 servlet 参数 contextAttribute ),使用自己创建的 WebApplicaitonContext ,并在 servlet 的配置中通过初始化参数 contextAttribute 指定 key 。
protected WebApplicationContext findWebApplicationContext() {
	String attrName = getContextAttribute();
	if (attrName == null) {
		return null;
	}
	// attrName 就是用户在`web.xml` 文件中设定的 `servlet` 参数 `contextAttribute`
	WebApplicationContext wac =
			WebApplicationContextUtils.getWebApplicationContext(getServletContext(), attrName);
	if (wac == null) {
		throw new IllegalStateException("No WebApplicationContext found: initializer not registered?");
	}
	return wac;
}
重新创建实例
通过前面的方法都没找到,那就来重新创建一个新的实例:
FrameworkServlet#createWebApplicationContext(WebApplicationContext)
protected WebApplicationContext createWebApplicationContext(@Nullable WebApplicationContext parent) {
	return createWebApplicationContext((ApplicationContext) parent);
}

protected WebApplicationContext createWebApplicationContext(@Nullable ApplicationContext parent) {
	// 允许我们自定义容器的类型,通过 contextClass 属性进行配置
	// 但是类型必须要继承 ConfigurableWebApplicationContext,不然将会报错
	Class<?> contextClass = getContextClass();
	if (!ConfigurableWebApplicationContext.class.isAssignableFrom(contextClass)) {
		throw new ApplicationContextException();
	}
	// 通过反射来创建 contextClass
	ConfigurableWebApplicationContext wac =
			(ConfigurableWebApplicationContext) BeanUtils.instantiateClass(contextClass);
	wac.setEnvironment(getEnvironment());
	wac.setParent(parent);
	// 获取 contextConfigLocation 属性,配置在 servlet 初始化函数中
	String configLocation = getContextConfigLocation();
    wac.setConfigLocation(configLocation);
	// 初始化 Spring 环境包括加载配置环境
	configureAndRefreshWebApplicationContext(wac);
	return wac;
}
获取上下文类 contextClass
默认使用的是 XmlWebApplicationContext ,但如果需要配置自定义上下文,可以在 web.xml 中的 <init-param> 标签中修改 contextClass 属性对应的 value ,但需要注意图中提示:
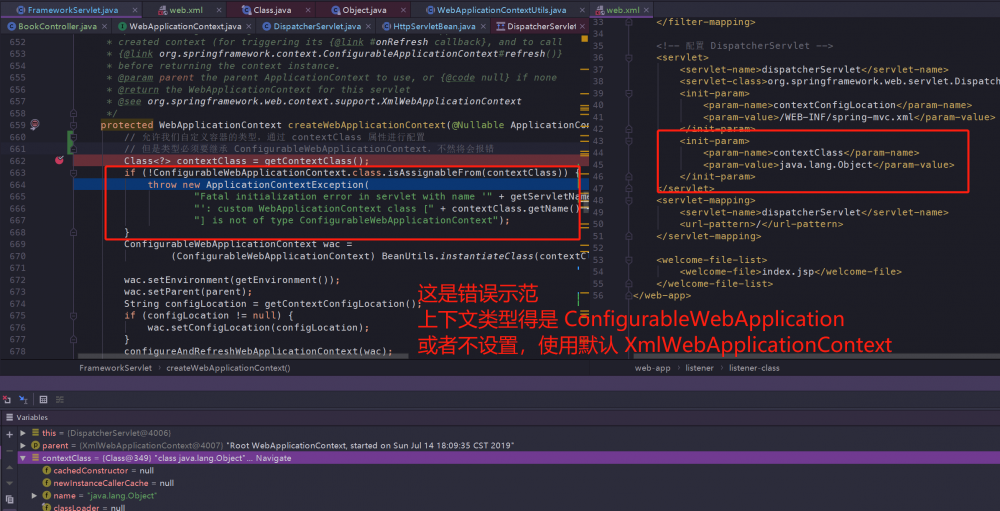
configureAndRefreshWebApplicationContext
使用该方法,用来对已经创建的 WebApplicaitonContext 进行配置以及刷新
protected void configureAndRefreshWebApplicationContext(ConfigurableWebApplicationContext wac) {
    // 遍历 ApplicationContextInitializer,执行 initialize 方法
	applyInitializers(wac);
	// 关键的刷新,加载配置文件及整合 parent 到 wac
	wac.refresh();
}
ApplicationContextInitializer
该类可以通过 <init-param> 的 contextInitializerClasses 进行自定义配置:
<init-param>
    <param-name>contextInitializerClasses</param-name>
    <param-value>自定义类,需继承于 `ApplicationContextInitializer`</param-value>
</init-param>
正如代码中的顺序一样,是在 mvc 容器创建前,执行它的 void initialize(C applicationContext) 方法:
protected void applyInitializers(ConfigurableApplicationContext wac) {
    AnnotationAwareOrderComparator.sort(this.contextInitializers);
	for (ApplicationContextInitializer<ConfigurableApplicationContext> initializer : this.contextInitializers) {
		initializer.initialize(wac);
	}
}
所有如果没有配置的话,默认情况下 contextInitializers 列表为空,表示没有 ApplicationContextInitializer 需要执行。
加载 Spring 配置
wac.refresh() ,实际调用的是我们之前就很熟悉的刷新方法:
org.springframework.context.support.AbstractApplicationContext#refresh
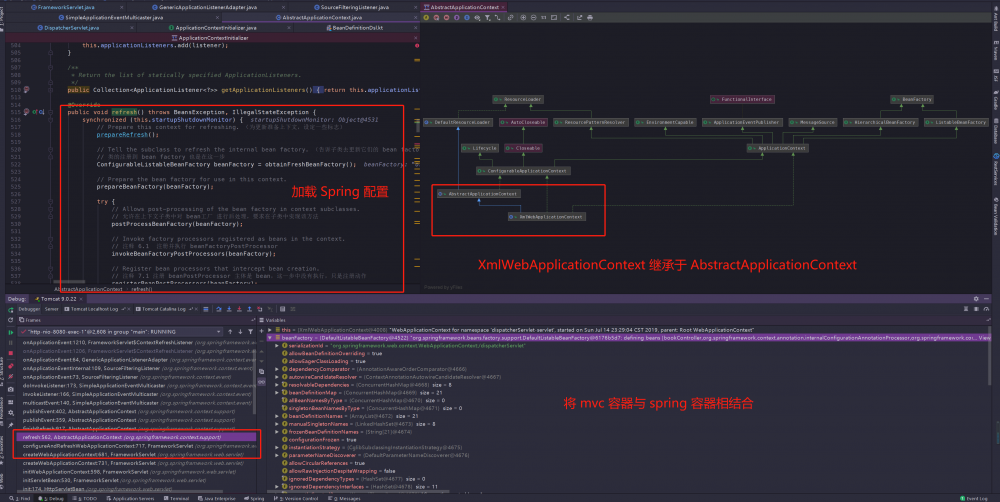
从图中能够看出,刷新方法的代码逻辑与之前一样,通过父类 AbstractApplicationContext 的 refresh 方法,进行了配置文件的加载。
在例子中的 web.xml 配置中,指定了加载 spring-mvc.xml 配置文件
<!-- 配置 DispatcherServlet -->
<servlet>
	<servlet-name>dispatcherServlet</servlet-name>
	<servlet-class>org.springframework.web.servlet.DispatcherServlet</servlet-class>
	<init-param>
		<param-name>contextConfigLocation</param-name>
		<param-value>/WEB-INF/spring-mvc.xml</param-value>
	</init-param>
</servlet>
注册 mvc 解析器
由于我们配置了 contextConfigLocation ,指定了加载资源的路径,所以在 XmlWebApplicationContext 初始化的时候,加载的 Spring 配置文件路径是我们指定 spring-mvc.xml :
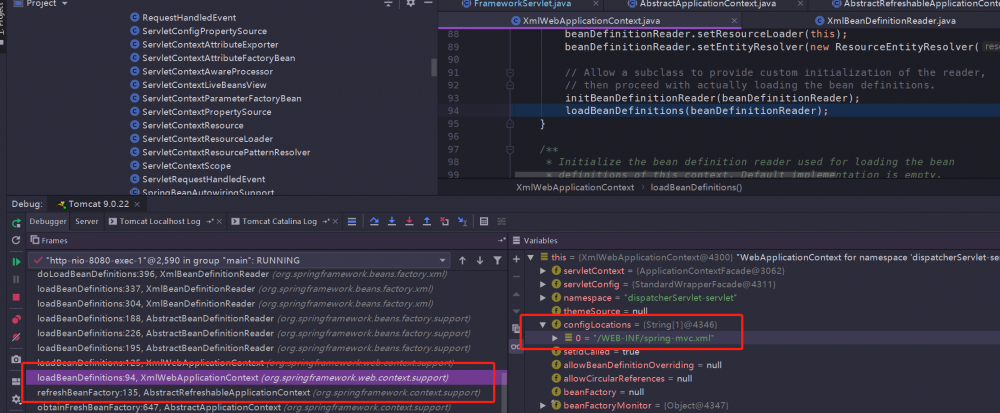
在 spring-mvc.xml 配置中,主要配置了三项
<!--扫描包,自动注入bean-->
<context:component-scan base-package="web.controller"/>
<!--使用注解开发spring mvc-->
<mvc:annotation-driven/>

<!--视图解析器-->
<bean class="org.springframework.web.servlet.view.InternalResourceViewResolver">
    <property name="prefix" value="/WEB-INF/views/"/>
    <property name="suffix" value=".jsp"/>
</bean>
同样老套路,使用了 <mvc:annotation> 自定义注解的话,要注册相应的解析器后, Spring 容器才能解析元素:
org.springframework.web.servlet.config.MvcNamespaceHandler
public void init() {
	// MVC 标签解析需要注册的解析器
	registerBeanDefinitionParser("annotation-driven", new AnnotationDrivenBeanDefinitionParser());
	registerBeanDefinitionParser("default-servlet-handler", new DefaultServletHandlerBeanDefinitionParser());
	registerBeanDefinitionParser("interceptors", new InterceptorsBeanDefinitionParser());
	registerBeanDefinitionParser("resources", new ResourcesBeanDefinitionParser());
	registerBeanDefinitionParser("view-controller", new ViewControllerBeanDefinitionParser());
	registerBeanDefinitionParser("redirect-view-controller", new ViewControllerBeanDefinitionParser());
	registerBeanDefinitionParser("status-controller", new ViewControllerBeanDefinitionParser());
	registerBeanDefinitionParser("view-resolvers", new ViewResolversBeanDefinitionParser());
	registerBeanDefinitionParser("tiles-configurer", new TilesConfigurerBeanDefinitionParser());
	registerBeanDefinitionParser("freemarker-configurer", new FreeMarkerConfigurerBeanDefinitionParser());
	registerBeanDefinitionParser("groovy-configurer", new GroovyMarkupConfigurerBeanDefinitionParser());
	registerBeanDefinitionParser("script-template-configurer", new ScriptTemplateConfigurerBeanDefinitionParser());
	registerBeanDefinitionParser("cors", new CorsBeanDefinitionParser());
}
可以看到, mvc 提供了很多便利的注解,有拦截器、资源、视图等解析器,但我们常用的到的是 anntation-driven 注解驱动,这个注解通过 AnnotationDrivenBeanDefinitionParser 类进行解析,其中会注册两个重要的 bean :
class AnnotationDrivenBeanDefinitionParser implements BeanDefinitionParser {

	public static final String HANDLER_MAPPING_BEAN_NAME = RequestMappingHandlerMapping.class.getName();

	public static final String HANDLER_ADAPTER_BEAN_NAME = RequestMappingHandlerAdapter.class.getName();
	...
}
跳过其他熟悉的 Spring 初始化配置,通过上面的步骤,完成了 Spring 配置文件的解析,将扫描到的 bean 加载到了 Spring 容器中。
那么下面就正式进入 mvc 的初始化。
mvc 初始化
onRefresh 方法是 FrameworkServlet 类中提供的模板方法,在子类 DispatcherServlet 进行了重写,主要用来刷新 Spring 在 Web 功能实现中所必须用到的全局变量:
protected void onRefresh(ApplicationContext context) {
	initStrategies(context);
}

protected void initStrategies(ApplicationContext context) {
	// 初始化 multipartResolver 文件上传相关
	initMultipartResolver(context);
	// 初始化 LocalResolver 与国际化相关
	initLocaleResolver(context);
	// 初始化 ThemeResolver 与主题更换相关
	initThemeResolver(context);
	// 初始化 HandlerMapping 与匹配处理器相关
	initHandlerMappings(context);
	// 初始化 HandlerAdapter 处理当前 Http 请求的处理器适配器实现,根据处理器映射返回相应的处理器类型
	initHandlerAdapters(context);
	// 初始化 HandlerExceptionResolvers,处理器异常解决器
	initHandlerExceptionResolvers(context);
	// 初始化 RequestToViewNameTranslator,处理逻辑视图名称
	initRequestToViewNameTranslator(context);
	// 初始化 ViewResolver 选择合适的视图进行渲染
	initViewResolvers(context);
	// 初始化 FlashMapManager 使用 flash attributes 提供了一个请求存储属性,可供其他请求使用(重定向时常用)
	initFlashMapManager(context);
}
该函数是实现 mvc 的关键所在,先来大致介绍一下初始化的套路:
- 寻找用户自定义配置
- 没有找到,使用默认配置
显然, Spring 给我们提供了高度的自定义,可以手动设置想要的解析器,以便于扩展功能。
如果没有找到用户配置的 bean ,那么它将会使用默认的初始化策略: getDefaultStrategies 方法
默认策略
DispatcherServlet#getDefaultStrategies(缩减版)
protected <T> List<T> getDefaultStrategies(ApplicationContext context, Class<T> strategyInterface) {
	// 策略接口名称
	String key = strategyInterface.getName();
	// 默认策略列表
	String value = defaultStrategies.getProperty(key);
	String[] classNames = StringUtils.commaDelimitedListToStringArray(value);
	List<T> strategies = new ArrayList<>(classNames.length);
	for (String className : classNames) {
		// 实例化
		Class<?> clazz = ClassUtils.forName(className, DispatcherServlet.class.getClassLoader());
		Object strategy = createDefaultStrategy(context, clazz);
		strategies.add((T) strategy);
	}
	return strategies;
}

// 默认策略列表
private static final Properties defaultStrategies;

static {
	// 路径名称是:DispatcherServlet.properties
	try {
		ClassPathResource resource = new ClassPathResource(DEFAULT_STRATEGIES_PATH, DispatcherServlet.class);
		defaultStrategies = PropertiesLoaderUtils.loadProperties(resource);
	}
}
从静态默认策略属性 defaultStrategies 的加载过程中,读取的是 DispatcherServlet.properties 文件内容,看完下面列出来的信息,相信你跟我一样恍然大悟,了解 Spring 配置了哪些默认策略:
org.springframework.web.servlet.LocaleResolver=org.springframework.web.servlet.i18n.AcceptHeaderLocaleResolver

org.springframework.web.servlet.ThemeResolver=org.springframework.web.servlet.theme.FixedThemeResolver

org.springframework.web.servlet.HandlerMapping=org.springframework.web.servlet.handler.BeanNameUrlHandlerMapping,/
	org.springframework.web.servlet.mvc.method.annotation.RequestMappingHandlerMapping,/
	org.springframework.web.servlet.function.support.RouterFunctionMapping

org.springframework.web.servlet.HandlerAdapter=org.springframework.web.servlet.mvc.HttpRequestHandlerAdapter,/
	org.springframework.web.servlet.mvc.SimpleControllerHandlerAdapter,/
	org.springframework.web.servlet.mvc.method.annotation.RequestMappingHandlerAdapter,/
	org.springframework.web.servlet.function.support.HandlerFunctionAdapter


org.springframework.web.servlet.HandlerExceptionResolver=org.springframework.web.servlet.mvc.method.annotation.ExceptionHandlerExceptionResolver,/
	org.springframework.web.servlet.mvc.annotation.ResponseStatusExceptionResolver,/
	org.springframework.web.servlet.mvc.support.DefaultHandlerExceptionResolver

org.springframework.web.servlet.RequestToViewNameTranslator=org.springframework.web.servlet.view.DefaultRequestToViewNameTranslator

org.springframework.web.servlet.ViewResolver=org.springframework.web.servlet.view.InternalResourceViewResolver

org.springframework.web.servlet.FlashMapManager=org.springframework.web.servlet.support.SessionFlashMapManager
接下来看看它们各自的初始化过程以及使用场景:
multipartResolver 文件上传相关
private void initMultipartResolver(ApplicationContext context) {
    try {
		this.multipartResolver = context.getBean(MULTIPART_RESOLVER_BEAN_NAME, MultipartResolver.class);
	catch (NoSuchBeanDefinitionException ex) {
		// Default is no multipart resolver.
		this.multipartResolver = null;
    }
}
默认情况下, Spring 是没有 mulitpart 处理,需要自己设定
<!--上传下载-->
<bean id="multipartResolver" class="org.springframework.web.multipart.commons.CommonsMultipartResolver"/>
注册的 id 为 multipartResolver
LocalResolver 与国际化相关
LocalResolver 接口定义了如何获取客户端的地区
private void initLocaleResolver(ApplicationContext context) {
	try {
	    this.localeResolver = context.getBean(LOCALE_RESOLVER_BEAN_NAME, LocaleResolver.class);
	}
	catch (NoSuchBeanDefinitionException ex) {
    	// We need to use the default.
    	this.localeResolver = getDefaultStrategy(context, LocaleResolver.class);
    }
}
通过寻找 id 为 localeResolver 的 bean ,如果没有的话,将会使用默认的策略进行加载 AcceptHeaderLocaleResolver ,它是基于 URL 参数来控制国际化,例如使用 <a href="?locale=zh_CN"> 来设定简体中文,默认参数名为 locale 。
当然还有其他两种,基于 session 和基于 cookie 的配置,想要深入了解的可以去细看~
ThemeResolver 主题更换相关
主题是一组静态资源(例如样式表 css 和图片 image),也可以理解为应用皮肤,使用 Theme 更改主题风格,改善用户体验。
默认注册的 id 是 themeResolver ,类型是 FixedThemeResolver ,表示使用的是一个固定的主题,以下是它的继承体系图:
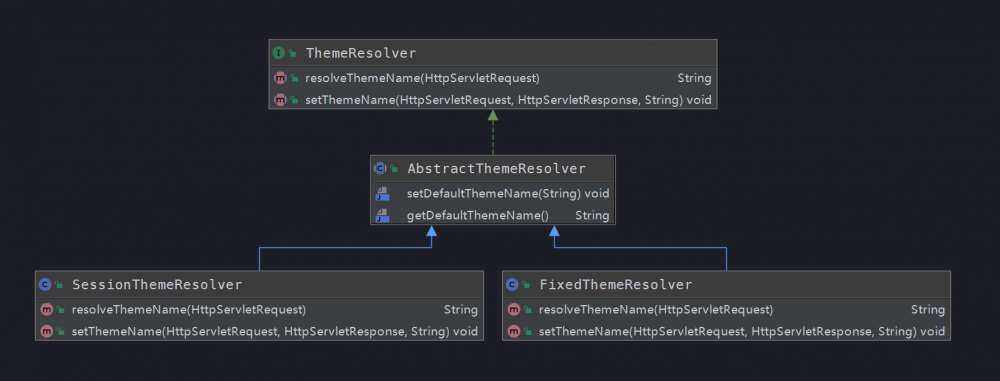
工作原理是通过拦截器拦截,配置对应的主题解析器,然后返回主题名称,还是使用上面的解析器作为例子:
FixedThemeResolver#resolveThemeName
public String resolveThemeName(HttpServletRequest request) {
	return getDefaultThemeName();
}

public String getDefaultThemeName() {
	return this.defaultThemeName;
}
HandlerMapping 与匹配处理器相关
首先判断 detectAllHandlerMappings 变量是否为 true ,表示是否需要加载容器中所有的 HandlerMapping , false 将会加载用户配置的。
如注释所说,至少得保证有一个 HandlerMapping ,如果前面两个分支都没寻找到,那么就进行默认策略加载。
private void initHandlerMappings(ApplicationContext context) {
	this.handlerMappings = null;
	if (this.detectAllHandlerMappings) {
		// 默认情况下,寻找应用中所有的 HandlerMapping ,包括祖先容器(其实就是 Spring 容器啦)
		Map<String, HandlerMapping> matchingBeans =
				BeanFactoryUtils.beansOfTypeIncludingAncestors(context, HandlerMapping.class, true, false);
		if (!matchingBeans.isEmpty()) {
			this.handlerMappings = new ArrayList<>(matchingBeans.values());
			// handlerMapping 有优先级,需要排序
			AnnotationAwareOrderComparator.sort(this.handlerMappings);
		}
	}
	else {
		// 从上下文中,获取名称为 handlerMapping 的 bean
		HandlerMapping hm = context.getBean(HANDLER_MAPPING_BEAN_NAME, HandlerMapping.class);
		this.handlerMappings = Collections.singletonList(hm);

	}
	// 需要保证,至少有一个 HandlerMapping
	// 如果前面两步都没找到 mapping,将会由这里加载默认策略
	if (this.handlerMappings == null) {
		this.handlerMappings = getDefaultStrategies(context, HandlerMapping.class);
	}
}
通过 Debug 得知,之前在加载 Spring 配置时,就已经注入了 RequestMappingHandlerMapping 和 BeanNameUrlHandlerMapping

HandlerAdapter 适配器
套路与前面的一样,使用的默认策略是: HttpRequestHandlerAdapter 、 SimpleControllerHandlerAdapter 、 RequestMappingHandlerAdapter 和 HandlerFunctionAdapter 。
说到适配器,可以将它理解为,将一个类的接口适配成用户所期待的,将两个接口不兼容的工作类,通过适配器连接起来。
HandlerExceptionResolver 处理器异常解决器
套路也与前面一样,使用的默认策略是: ExceptionHandlerExceptionResolver 、 ResponseStatusExceptionResolver 和 DefaultHandlerExceptionResolver 。
实现了 HandlerExceptionResolver 接口的 resolveException 方法,在方法内部对异常进行判断,然后尝试生成 ModelAndView 返回。
public ModelAndView resolveException(
		HttpServletRequest request, HttpServletResponse response, @Nullable Object handler, Exception ex) {
	if (shouldApplyTo(request, handler)) {
		prepareResponse(ex, response);
		ModelAndView result = doResolveException(request, response, handler, ex);
		return result;
	}
	else {
		return null;
	}
}
RequestToViewNameTranslator 处理逻辑视图名称
初始化代码逻辑与前面一样,使用的默认策略是: DefaultRequestToViewNameTranslator
使用场景:当 Controller 处理器方法没有返回逻辑视图名称时, Spring 通过该类的约定,提供一个逻辑视图名称。
由于本地测试不出来,所以引用参考资料 7 的例子:
DefaultRequestToViewNameTranslator的转换例子:
http://localhost:8080/gamecast/display.html -> display(视图)
ViewResolver 视图渲染
套路还是跟前面一样,默认策略使用的是: InternalResourceViewResolver
同时,这也是 demo 中,我们手动配置的视图解析器
FlashMapManager 存储属性
默认使用的是: SessionFlashMapManager ,通过与 FlashMap 配合使用, 用于在重定向时保存/传递参数 。
例如 Post/Redirect/Get 模式, Flash attribute 在重定向之前暂存(根据类名,可以知道范围是 session 级别有效),以便重定向之后还能使用。
RequestMappingHandler
该类作用:配合 @Controller 和 @RequestMapping 注解使用,通过 URL 来找到对应的处理器。
前面在 spring-mvc.xml 文件加载时,初始化了两个重要配置,其中一个就是下面要说的 RequestMappingHandler ,先来看它的继承体系图:
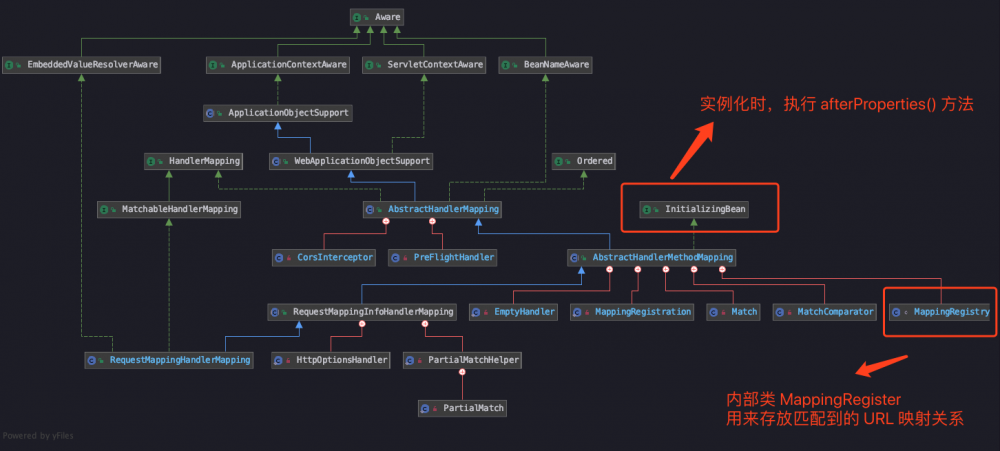
从继承图中看到,它实现了 InitializingBean 接口,所以在初始化时,将会执行 afterPropertiesSet 方法(图片中注释写错方法,请以下面为准),核心调用的初始化方法是父类 AbstractHandlerMethodMapping#initHandlerMethods 方法
AbstractHandlerMethodMapping#initHandlerMethods
protected void initHandlerMethods() {
	// 获取容器中所有 bean 名字
	for (String beanName : this.detectHandlerMethodsInAncestorContexts ?
				BeanFactoryUtils.beanNamesForTypeIncludingAncestors(obtainApplicationContext(), Object.class) :
				obtainApplicationContext().getBeanNamesForType(Object.class)) {
		if (!beanName.startsWith(SCOPED_TARGET_NAME_PREFIX)) {
		    // 如果前缀不是 scopedTarget.
	        // 执行 detectHandlerMethods() 方法
			Class<?> beanType = obtainApplicationContext().getType(beanName);
			if (beanType != null && isHandler(beanType)) {
			    detectHandlerMethods(beanName);
		    }
		}
	}
	// 打印数量,可以当成空实现
	handlerMethodsInitialized(getHandlerMethods());
}

protected void detectHandlerMethods(Object handler) {
	Class<?> handlerType = (handler instanceof String ?
			obtainApplicationContext().getType((String) handler) : handler.getClass());
	if (handlerType != null) {
		Class<?> userType = ClassUtils.getUserClass(handlerType);
		// 通过反射,获取类中所有方法
		// 筛选出 public 类型,并且带有 @RequestMapping 注解的方法
		Map<Method, T> methods = MethodIntrospector.selectMethods(userType,
				(MethodIntrospector.MetadataLookup<T>) method -> {
					// 通过 RequestMappingHandlerMapping.getMappingForMethod 方法组装成 RequestMappingInfo(映射关系)
					return getMappingForMethod(method, userType);

			});
		methods.forEach((method, mapping) -> {
			Method invocableMethod = AopUtils.selectInvocableMethod(method, userType);
			// 通过 mappingRegistry 进行注册上面获取到的映射关系
			registerHandlerMethod(handler, invocableMethod, mapping);
		});
	}
}
梳理一下代码逻辑, initHandlerMethods 方法将会扫描注册 bean 下所有公共 public 方法,如果带有 @RequestMapping 注解的,将会组装成 RequestMappingInfo 映射关系,然后将它注册到 mappingRegistry 变量中。之后可以通过映射关系,输入 URL 就能够找到对应的处理器 Controller 。
MappingRegistry
该类是 AbstractHandlerMethodMapping 的内部类,是个工具类,用来保存所有 Mapping 和 handler method ,通过暴露加锁的公共方法,避免了多线程对该类的内部变量的覆盖修改。
下面是注册的逻辑:
public void register(T mapping, Object handler, Method method) {
	this.readWriteLock.writeLock().lock();
	try {
		// 包装 bean 和方法
		HandlerMethod handlerMethod = createHandlerMethod(handler, method);
		// 校验
		validateMethodMapping(handlerMethod, mapping);
		this.mappingLookup.put(mapping, handlerMethod);
		List<String> directUrls = getDirectUrls(mapping);
		for (String url : directUrls) {
			this.urlLookup.add(url, mapping);
		}
		String name = null;
		if (getNamingStrategy() != null) {
			name = getNamingStrategy().getName(handlerMethod, mapping);
			addMappingName(name, handlerMethod);
		}
		// 跨域参数
		CorsConfiguration corsConfig = initCorsConfiguration(handler, method, mapping);
		if (corsConfig != null) {
			this.corsLookup.put(handlerMethod, corsConfig);
		}
		// 将映射关系放入  Map<T, MappingRegistration<T>> registry
		this.registry.put(mapping, new MappingRegistration<>(mapping, handlerMethod, directUrls, name));
	}
	finally {
		this.readWriteLock.writeLock().unlock();
	}
}
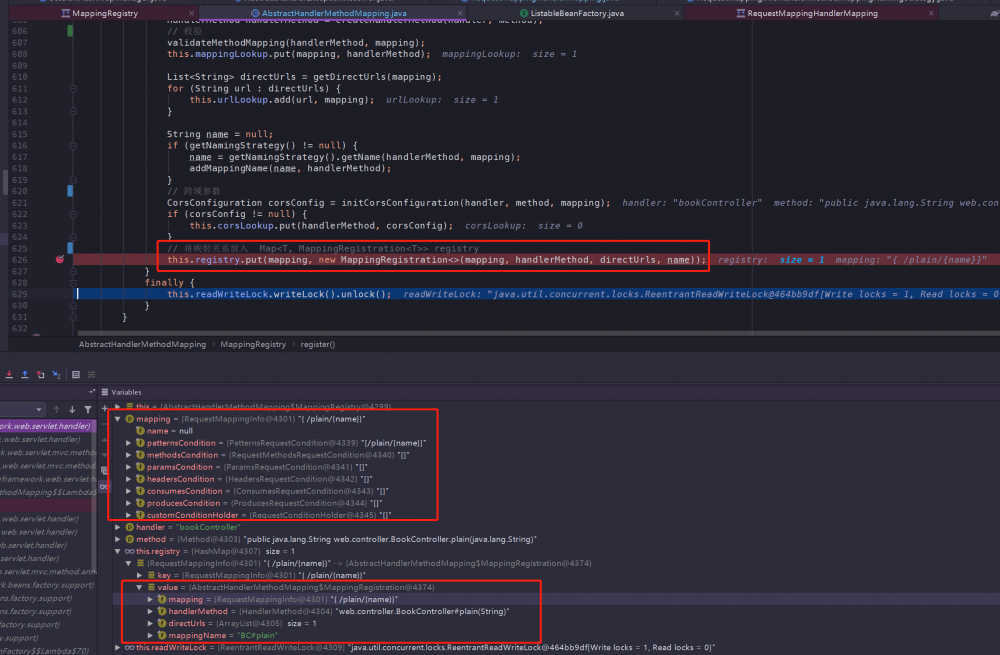
通过前面的包装和校验方法,最后映射关系将会放入这里 Map<T, MappingRegistration<T>> registry 。它是一个泛型的 Map , key 类型是 RequestMappingInfo ,保存了 @RequestMapping 各种属性的集合, value 类型是 AbstractHandlerMethodMapping ,保存的是我们的映射关系。
从图中可以看出,如果输入的 URL 是 /plain/{name} ,将会找到对应的处理方法 web.controller.BookController#plain{String} 。
RequestMappingHandlerAdapter
而另一个重要的配置就是处理器适配器 RequestMappingHandlerAdapter ,由于它的继承体系与 RequestMappingHandler 类似,所以我们直接来看它在加载时执行的方法
RequestMappingHandlerAdapter#afterPropertiesSet
public void afterPropertiesSet() {
	// 首先执行这个方法,可以添加 responseBody 切面 bean
	initControllerAdviceCache();
	// 参数处理器
	if (this.argumentResolvers == null) {
		List<HandlerMethodArgumentResolver> resolvers = getDefaultArgumentResolvers();
		this.argumentResolvers = new HandlerMethodArgumentResolverComposite().addResolvers(resolvers);
	}
	// 处理 initBinder 注解
	if (this.initBinderArgumentResolvers == null) {
		List<HandlerMethodArgumentResolver> resolvers = getDefaultInitBinderArgumentResolvers();
		this.initBinderArgumentResolvers = new HandlerMethodArgumentResolverComposite().addResolvers(resolvers);
	}
	// 初始化结果处理器
	if (this.returnValueHandlers == null) {
		List<HandlerMethodReturnValueHandler> handlers = getDefaultReturnValueHandlers();
		this.returnValueHandlers = new HandlerMethodReturnValueHandlerComposite().addHandlers(handlers);
	}
}
所以看到这个适配器中,初始化了很多工具变量,用来处理 @ControllerAdvice 、 InitBinder 等注解和参数。不过核心还是待会要讲到的 handleInternal() 方法,它将适配处理器调用,然后返回 ModelView 视图。
DispatcherServlet 的逻辑处理
请求处理的入口定义在 HttpServlet ,主要有以下几个方法:
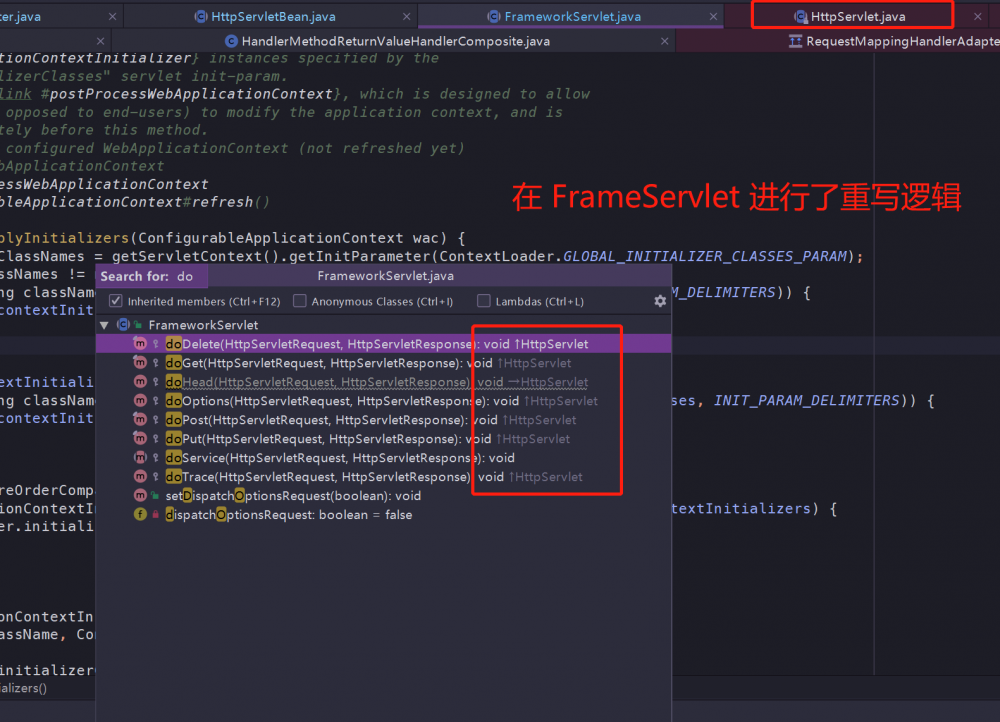
当然,父类 HttpServlet 只是给出了定义,直接调用父类这些方法将会报错,所以 FrameworkServlet 将它们覆盖重写了处理逻辑:
protected final void doGet(HttpServletRequest request, HttpServletResponse response) {
	// 注解 10. 具体调用的是 processRequest 方法
	processRequest(request, response);
}

protected final void doPost(HttpServletRequest request, HttpServletResponse response) {
	processRequest(request, response);
}
可以看到 doGet 、 doPost 这些方法,底层调用的都是 processRequest 方法进行处理,关键方法是委托给子类 DispatcherServlet 的 doServie() 方法
DispatcherServlet#doService
protected void doService(HttpServletRequest request, HttpServletResponse response) throws Exception {
	logRequest(request);
	// 暂存请求参数
	Map<String, Object> attributesSnapshot = null;
	...
	// 经过前面的准备(属性、辅助变量),进入请求处理过程
	doDispatch(request, response);
}
请求分发和处理逻辑的核心是在 doDispatch(request, response) 方法中,在进入这个方法前,还有些准备工作需要执行。
请求上下文
在 processRequest 的 doServie() 方法执行前,主要做了这以下准备工作:
(1) 为了保证当前线程的 LocaleContext 以及 RequestAttributes 可以在当前请求后还能恢复,提取当前线程的两个属性。 (2) 根据当前 request 创建对应的 LocaleContext 以及 RequestAttributes ,绑定到当前线程 (3) 往 request 对象中设置之前加载过的 localeResolver 、 flashMapManager 等辅助工具变量
请求分发 doDispatch
经过前面的配置设置, doDispatch 函数展示了请求的完成处理过程:
DispatcherServlet#doDispatch
protected void doDispatch(HttpServletRequest request, HttpServletResponse response) {
	HttpServletRequest processedRequest = request;
	HandlerExecutionChain mappedHandler = null;
	// 注释 10. 检查是否 MultipartContent 类型
	processedRequest = checkMultipart(request);
	// 根据 request 信息寻找对应的 Handler
	mappedHandler = getHandler(processedRequest);
	if (mappedHandler == null) {
		// 没有找到 handler,通过 response 向用户返回错误信息
		noHandlerFound(processedRequest, response);
		return;
	}
	// 根据当前的 handler 找到对应的 HandlerAdapter 适配器
	HandlerAdapter ha = getHandlerAdapter(mappedHandler.getHandler());
	// 如果当前 handler 支持 last-modified 头处理
	String method = request.getMethod();
	boolean isGet = "GET".equals(method);
	if (isGet || "HEAD".equals(method)) {
		long lastModified = ha.getLastModified(request, mappedHandler.getHandler());
		if (new ServletWebRequest(request, response).checkNotModified(lastModified) && isGet) {
			return;
		}
	}
	// 拦截器的 preHandler 方法的调用
	if (!mappedHandler.applyPreHandle(processedRequest, response)) {
		return;
	}
	// 真正激活 handler 进行处理,并返回视图
	mv = ha.handle(processedRequest, response, mappedHandler.getHandler());
	if (asyncManager.isConcurrentHandlingStarted()) {
		return;
	}
	// 视图名称转换(有可能需要加上前后缀)
	applyDefaultViewName(processedRequest, mv);
	// 应用所有拦截器的 postHandle 方法
	mappedHandler.applyPostHandle(processedRequest, response, mv);
	// 处理分发的结果(如果有 mv,进行视图渲染和跳转)
	processDispatchResult(processedRequest, response, mappedHandler, mv, dispatchException);
}
上面贴出来的代码略有缩减,不过从上面示例中能看出,整体的逻辑都挺清晰的,主要步骤如下:
1. 寻找处理器 mappedandler 2. 根据处理器,寻找对应的适配器 HandlerAdapter 3. 激活 handler ,调用处理方法 4. 返回结果(如果有 mv,进行视图渲染和跳转)
寻找处理器 mappedHandler
以 demo 说明,寻找处理器,就是根据 URL 找到对应的 Controller 方法
DispatcherServlet#getHandler
protected HandlerExecutionChain getHandler(HttpServletRequest request) throws Exception {
	if (this.handlerMappings != null) {
		// 遍历注册的全部 handlerMapping
		for (HandlerMapping mapping : this.handlerMappings) {
			HandlerExecutionChain handler = mapping.getHandler(request);
			if (handler != null) {
				return handler;
			}
		}
	}
	return null;
}
实际上,在这一步遍历了所有注册的 HandlerMapping ,然后委派它们去寻找处理器,如果找到了合适的,就不再往下寻找,直接返回。
同时, HandlerMapping 之间有优先级的概念,根据 mvc 包下 AnnotationDrivenBeanDefinitionParser 的注释:
This class registers the following {@link HandlerMapping HandlerMappings} @link RequestMappingHandlerMapping ordered at 0 for mapping requests to annotated controller methods.
说明了 RequestMappingHandlerMapping 的优先级是最高的,优先使用它来寻找适配器。
具体寻找调用的方法:
AbstractHandlerMapping#getHandler
public final HandlerExecutionChain getHandler(HttpServletRequest request) throws Exception {
	// 根据 Request 获取对应的 handler
	Object handler = getHandlerInternal(request);
	// 将配置中的对应拦截器加入到执行链中,以保证这些拦截器可以有效地作用于目标对象
	HandlerExecutionChain executionChain = getHandlerExecutionChain(handler, request);
	if (hasCorsConfigurationSource(handler)) {
		CorsConfiguration config = (this.corsConfigurationSource != null ? this.corsConfigurationSource.getCorsConfiguration(request) : null);
		CorsConfiguration handlerConfig = getCorsConfiguration(handler, request);
		config = (config != null ? config.combine(handlerConfig) : handlerConfig);
		executionChain = getCorsHandlerExecutionChain(request, executionChain, config);
	}
	return executionChain;
}
(1) getHandlerInternal(request) 函数作用:
根据 request 信息获取对应的 Handler ,也就是我们例子中的,通过 URL 找到匹配的 Controller 并返回。
(2) getHandlerExcetionChain 函数作用:
将适应该 URL 对应拦截器 MappedInterceptor 加入 addInterceptor() 到执行链 HandlerExecutionChain 中。
(3) CorsConfiguration
这个参数涉及到跨域设置,具体看下这篇文章: SpringBoot下如何配置实现跨域请求?
寻找适配器 HandlerAdapter
前面已经找到了对应的处理器了,下一步就得找到它对应的适配器
DispatcherServlet#getHandlerAdapter
protected  getHandlerAdapter(Object handler) throws ServletException {
	if (this.handlerAdapters != null) {
		for (HandlerAdapter adapter : this.handlerAdapters) {
			if (adapter.supports(handler)) {
				return adapter;
			}
		}
	}
}
同样, HandlerAdapter 之间也有优先级概念,由于第 0 位是 RequestMappingHandlerAdapter ,而它的 supports 方法总是返回 true ,所以毫无疑问返回了它
请求处理
通过适配器包装了一层,处理请求的入口如下:
RequestMappingHandlerAdapter#handleInternal
protected ModelAndView handleInternal(HttpServletRequest request,
		HttpServletResponse response, HandlerMethod handlerMethod) throws Exception {
	ModelAndView mav;
	checkRequest(request);
	// Execute invokeHandlerMethod in synchronized block if required.
	if (this.synchronizeOnSession) {
		HttpSession session = request.getSession(false);
		if (session != null) {
			Object mutex = WebUtils.getSessionMutex(session);
			synchronized (mutex) {
				mav = invokeHandlerMethod(request, response, handlerMethod);
			}
		}
		else {
			// No HttpSession available -> no mutex necessary
			mav = invokeHandlerMethod(request, response, handlerMethod);
		}
	}
	else {
		// No synchronization on session demanded at all...
		// 执行适配中真正的方法
		mav = invokeHandlerMethod(request, response, handlerMethod);
	}
	if (!response.containsHeader(HEADER_CACHE_CONTROL)) {
		if (getSessionAttributesHandler(handlerMethod).hasSessionAttributes()) {
			applyCacheSeconds(response, this.cacheSecondsForSessionAttributeHandlers);
		}
		else {
			prepareResponse(response);
		}
	}
	return mav;
}
通过 invokeHandlerMethod 方法,调用对应的 Controller 方法逻辑,包装成 ModelAndView 。
Session 代码块
判断 synchronizeOnSession 是否开启,开启的话,同一个 session 的请求将会串行执行(Object mutex = WebUtils.getSessionMutex(session))
自定义参数解析
解析逻辑由 RequestParamMethodArgumentResolver 完成,具体请查看 spring-mvc
逻辑处理
InvocableHandlerMethod#invokeForRequest
public Object invokeForRequest(NativeWebRequest request, @Nullable ModelAndViewContainer mavContainer,
		Object... providedArgs) throws Exception {
	Object[] args = getMethodArgumentValues(request, mavContainer, providedArgs);
	return doInvoke(args);
}
通过给定的参数, doInvoke 使用了反射操作,执行了 Controller 方法的逻辑。
返回值解析
拿 http://localhost:8080/bookView 作为例子,经过前面的逻辑处理后,返回的只是试图名称 bookView ,在这时,使用到了 ViewNameMethodReturnValueHandler
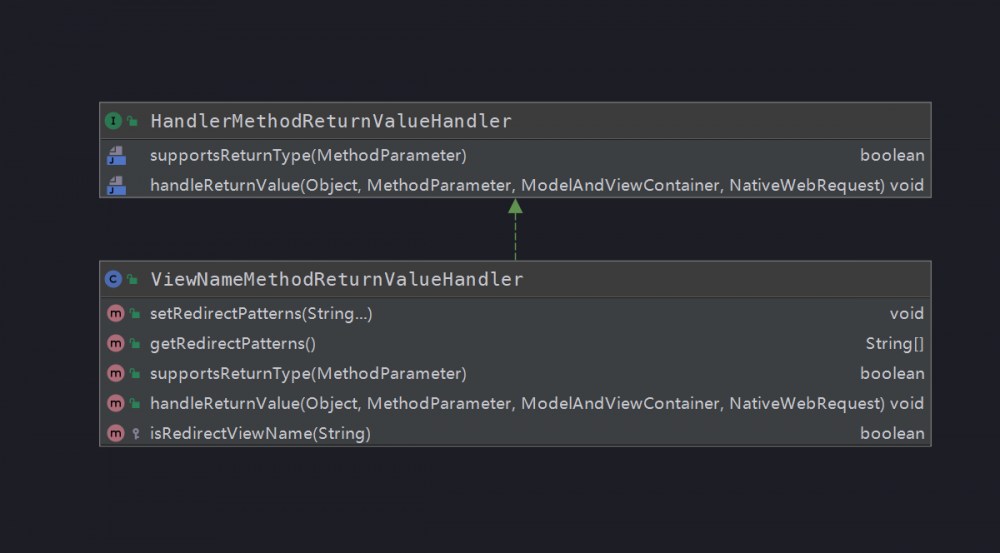
可以看到它实现了 HandlerMethodReturnValueHandler 接口的两个方法
ViewNameMethodReturnValueHandler#supportsReturnType; 表示支持处理的返回类型
public boolean supportsReturnType(MethodParameter returnType) {
	Class<?> paramType = returnType.getParameterType();
	return (void.class == paramType || CharSequence.class.isAssignableFrom(paramType));
}
ViewNameMethodReturnValueHandler#handleReturnValue; 返回处理值,给 mavContainer 设置视图名称 viewName
public void handleReturnValue(@Nullable Object returnValue, MethodParameter returnType,
		ModelAndViewContainer mavContainer, NativeWebRequest webRequest) throws Exception {
	if (returnValue instanceof CharSequence) {
		String viewName = returnValue.toString();
		mavContainer.setViewName(viewName);
		if (isRedirectViewName(viewName)) {
			mavContainer.setRedirectModelScenario(true);
		}
	}
}
最后在适配器中包装成了 ModelAndView 对象
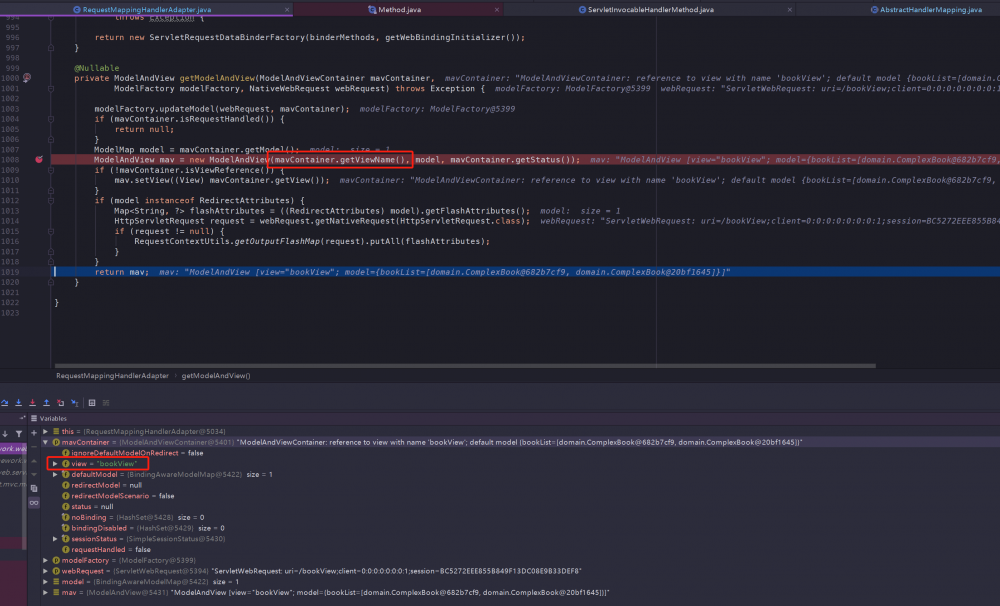
视图渲染
根据处理器执行完成后,适配器包装成了 ModelAndView 返回给 DispatcherServlet 继续进行处理,来到了视图渲染的步骤:
DispatcherServlet#processDispatchResult
private void processDispatchResult(HttpServletRequest request, HttpServletResponse response,
		@Nullable HandlerExecutionChain mappedHandler, @Nullable ModelAndView mv,
		@Nullable Exception exception) throws Exception {
	boolean errorView = false;
	// 跳过了异常判断 =-=
	// Did the handler return a view to render?
	if (mv != null && !mv.wasCleared()) {
		// 如果视图不为空并且 clear 属性为 false, 进行视图渲染
		render(mv, request, response);
		if (errorView) {
			WebUtils.clearErrorRequestAttributes(request);
		}
	}
	if (WebAsyncUtils.getAsyncManager(request).isConcurrentHandlingStarted()) {
		// Concurrent handling started during a forward
		return;
	}
	if (mappedHandler != null) {
		mappedHandler.triggerAfterCompletion(request, response, null);
	}
}
render
还记得我们使用的是 jsp 视图进行渲染么,引用的依赖是 jstl ,所以视图渲染的是 JstlView 类提供的方法,以下是它的继承体系:
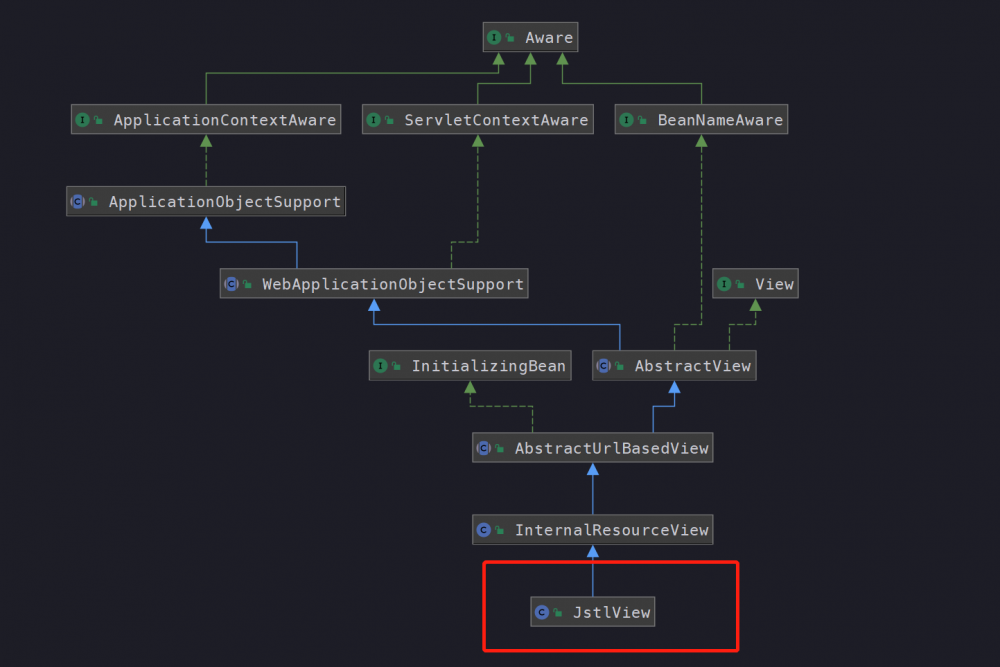
渲染调用的是其父类的方法:
InternalResourceView#renderMergedOutputModel
在给定指定模型的情况下呈现内部资源。这包括将模型设置为请求属性
protected void renderMergedOutputModel(Map<String, Object> model, HttpServletRequest request, HttpServletResponse response) throws Exception {
	// Expose the model object as request attributes.
	exposeModelAsRequestAttributes(model, request);
	// Expose helpers as request attributes, if any.
	exposeHelpers(request);
	// Determine the path for the request dispatcher.
	String dispatcherPath = prepareForRendering(request, response);
	// Obtain a RequestDispatcher for the target resource (typically a JSP).
	RequestDispatcher rd = getRequestDispatcher(request, dispatcherPath);
	if (rd == null) {
		throw new ServletException("");
	}
	// If already included or response already committed, perform include, else forward.
	if (useInclude(request, response)) {
		response.setContentType(getContentType());
		rd.include(request, response);
	}
	else {
		// Note: The forwarded resource is supposed to determine the content type itself.
		rd.forward(request, response);
	}
}
最后发现渲染调用的是第三方依赖 org.apache.catalina.core.ApplicationDispatcher 进行视图绘制,所以不再跟踪下去。
所以整个视图渲染过程,就是在前面将 Model 视图对象中的属性设置到请求 request 中,最后通过原生(tomcat)的 ApplicationDispatcher 进行转发,渲染成视图。
总结
本篇比较完整的描述了 spring-mvc 的框架体系,结合 demo 和代码,将调用链路梳理了一遍,了解了每个环节注册的工具类或解析器,了解了 Spring 容器和 Web 容器是如何合并使用,也了解到 mvc 初始化时加载的默认策略和请求完整的处理逻辑。
总结起来,就是我们在开头写下的内容:
(1) 介绍如何使用
(2) 辅助工具类 ContextLoaderContext
(3) DispatcherServlet 初始化
(4) DispatcherServlet 处理请求
题外话
本篇笔记写得比之前的都要吃力, mvc 模块基本使用了之前总结过的知识点,一边学一边复习之前的知识,而且由于个人在开发环境遇到了阻塞, 秉着 [自己都不能成功运行的代码,是不能提交的] 原则 ,处理了挺长时间。
在跟踪每个知识点时,越深入发现坑越多,想要将它描述完整,在学习理解和总结中不断循环,所以本篇花了很多时间,同时也有很多知识点没有去深入学习,例如 demo 中出现的 @RequestBody 、 @PathVarible 等注解是如何解析和返回结果处理,留个坑。
同时这篇笔记也是目前 Spring 源码学习的最后一篇技术总结,期望能得到朋友们的支持,如果写的不对的地方或者建议,请与我联系,我将完善和补充~
由于个人技术有限,如果有理解不到位或者错误的地方,请留下评论,我会根据朋友们的建议进行修正
Gitee 地址 https://gitee.com/vip-augus/spring-analysis-note.git
Github 地址 https://github.com/Vip-Augus/spring-analysis-note
传送门:
- 本文标签: 适配器 时间 http root DOM 处理器 图片 数据库 list session NSA schema rmi App 文章 协议 Action git json AOP 配置 参数 类加载器 代码 core web tab parse message cache find value bug CSS 总结 目录 CTO 朋友们 编译 Property ip 实例 工作原理 map 文件上传 synchronized GitHub src apache 遍历 监听器 源码 ORM tar key 模型 IDE final 2019 CEO ACE ldap tomcat URLs BeanDefinition Collection cat SpringMVC equals 多线程 lib java 解析 trigger classpath bean js XML springboot 数据 锁 tag 注释 生命 ssl servlet Select Freemarker IO 线程 BeanUtils ArrayList 管理 build spring HTML 下载 测试 Service https Collections id UI 开发
- 版权声明: 本文为互联网转载文章,出处已在文章中说明(部分除外)。如果侵权,请联系本站长删除,谢谢。
- 本文海报: 生成海报一 生成海报二


![[HBLOG]公众号](https://www.liuhaihua.cn/img/qrcode_gzh.jpg)

