一文掌握 Spring Boot Profiles
Spring Boot Profiles 简介
Profile 的概念其实很早在 Spring Framework 就有了,在 Spring Framework 3.1 版本引入了注解 @Profile 和 Environment 环境配置的抽象,只是在 Spring Boot 框架里再进一步将 Profiles 功能进行扩展,使它也成为了 Spring Boot 特性之一,为此单独在 官方文档 25. Profiles 一节里介绍,文档里把 Spring Boot Profiles 也叫做 Spring Profiles。
那么什么又是 Spring Profiles,为什么需要它呢?我们先来看一个熟悉的场景:我们平常项目开发,经常需要根据不同的环境进行配置的修改,比如在本地开发会加载本机的配置和开发环境数据库,在测试服务器上部署时就需要加载测试环境配置和数据库,同样地,当项目发布生产环境时就需要设置为生产环境配置和数据库。这样一来,不同的环境部署都需要额外的处理来调整环境的配置,维护起来十分繁琐,还容易出错。
为了解决不同环境需要的配置切换问题,Spring Profiles 提供了一种方式允许我们指定在特定环境下只加载对应的程序配置,每一种环境配置对应一个 Profile,只有当前 Profile 处于激活状态时,才会将该 Profile 所对应的配置和 Bean 加载到 Spring 程序中。
Spring Profiles 就是针对应用程序,不同环境需要不同配置加载的一种解决方案。
当然 Spring 允许多个 Profile 处于激活状态,比如将应用配置进行细分成数据库配置,消息中间件配置,缓存配置等,都为各自在不同环境定义不同的 Profile 名称,在需要激活环境对应配置时,指定多个 Profile。
Spring Profiles 实战
在 Spring 程序中有两种方式使用 Profiles:XML 配置和注解 @Profile 。
XML 配置定义 Profile
虽然现在 XML 配置方式使用越来越少,还是简单介绍下,通常我们在 XML 文件定义的 Bean 时都有根元素 <beans> ,在 beans 元素上多了一个属性 profile 可以指定环境,比如说把开发环境的 profile 定义为 dev,生产环境的 profile 为:prod。
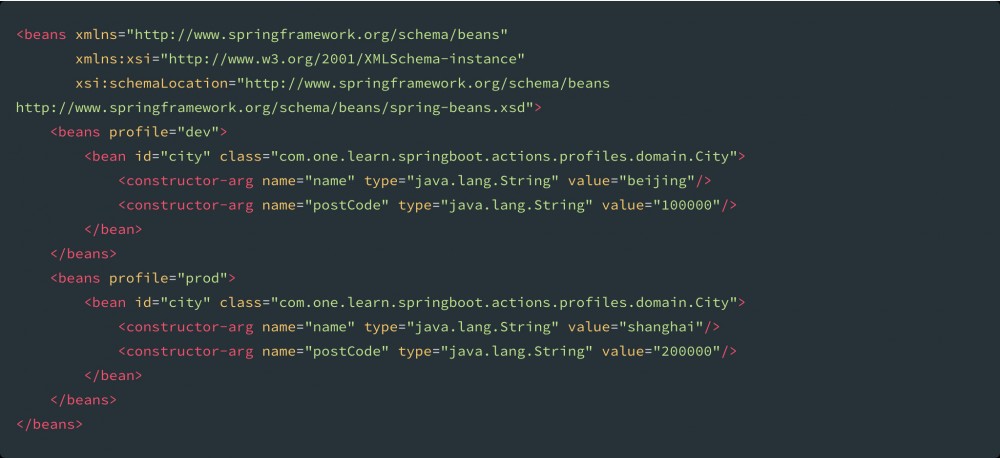
需要注意的是:必须要使用 Spring XML Beans Schema 版本为 4.0 以上才支持 profile 属性。在 XML 文件定义之后我们只需要激活指定的 Profile 名称就可以加载对应的 Bean 对象了,在 Spring 程序中激活的方式主要两种:
- Java API 方式,获取当前 Spring 容器的环境 Bean,设置
activeProfiles属性,然后启动容器
- 采用启动参数方式指定,固定格式:
-Dspring.profiles.active=dev
注解 @Profiles 定义Profile
使用注解定义 Profile 也比较简单,引入一个新的注解 @Profiles ,通常 @Profiles 配合 @Component 或者 @Configuration 使用,如下示例:
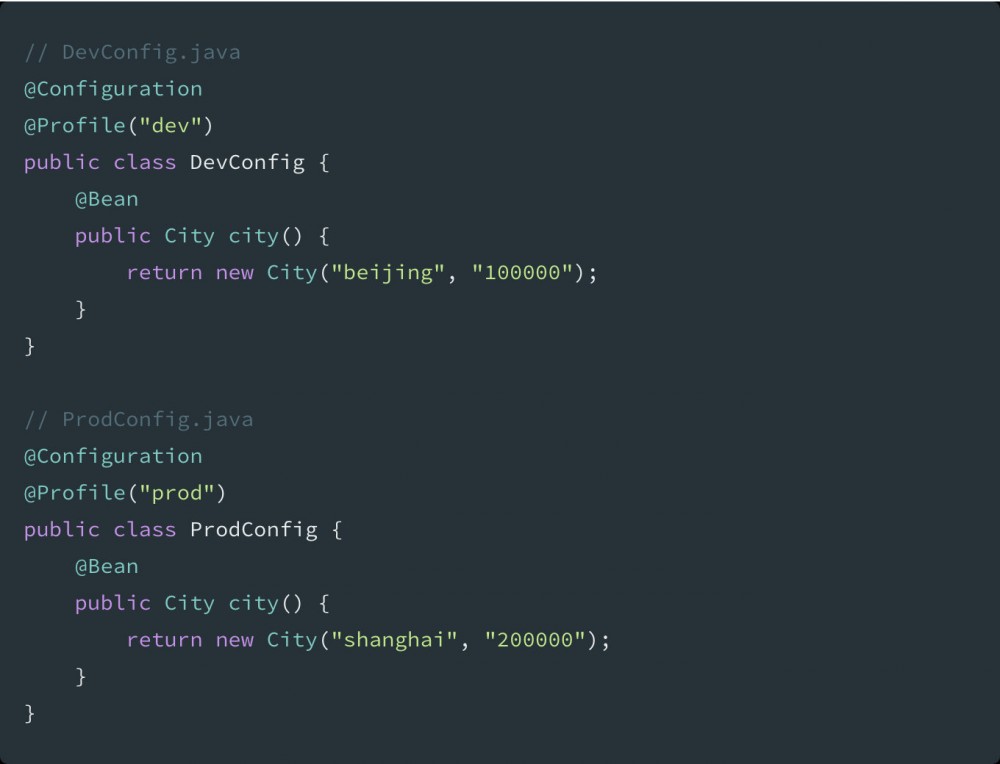
激活 Profile 的方式都是一样的,只要指定 Profile 被激活,其对应的 Bean 才会加载。在 Spring 程序中 Profile 默认为 default,当前我们可以通过 spring.profiles.default 配置方式或者 org.springframework.core.env.AbstractEnvironment#setDefaultProfiles API 方式修改。
Spring Boot Profile 实战
好了,现在我们再来看下在 Spring Boot 程序中如何使用 Profile。通常一个 Spring Boot 程序的配置文件为 yml 或者 properties 格式,由于 yml 格式文件的结构简洁已读,备受官方推崇,我们可以看下如何在 application.yml 定义 Profile 和对应的配置。
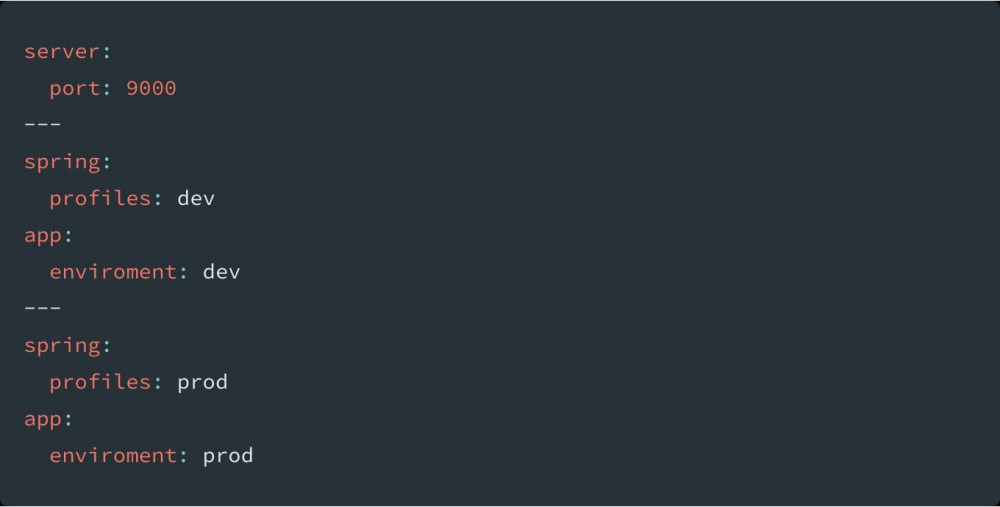
与yml格式文件不同,正对不同的 Profile,无法在一个 properties 文件设置,官方采用命名形式为 applications-${profile}.properties 格式来达成一样的效果。为了看到指定 Profile 激活后的效果,我们可以通过下方的一个例子实践下,通过激活不同 Profile 启动程序,来请求 /enviroment 接口来获取当前的环境配置变量。
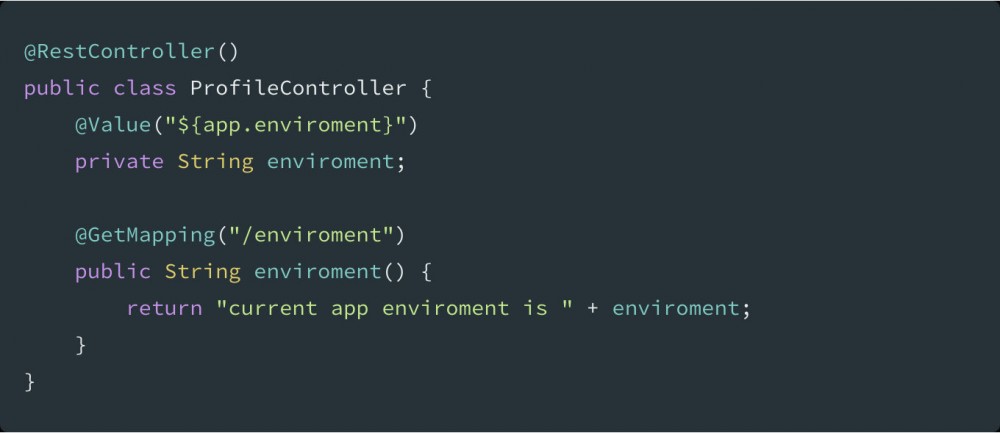
这里我们介绍如何在配置文件中激活 Profile 的方式:在 application.yml 顶部添加如下配置,表明当前所激活的 Profile 为 prod,当然也可以前文介绍的启动参数方式激活:

然后启动程序,curl 方式访问 http://localhost:9000/enviroment 可以得到如下输出结果:

同样如果上述的 active 属性值指定为 dev ,将输出内容: current app enviroment is prod 。
Spring Boot API 方式激活 Profile
在 Spring Boot 程序除了上述的方法来激活 Profile 外,还可以使用 Spring Boot API 方式激活:
-
SpringApplication.setAdditionalProfiles(…)
-
SpringApplicationBuilder.profiles(...)
但需要注意的是使用 Spring Boot API 的话需要在程序启动前设置,也就是 SpringApplication.run(...) 方法执行前,否则没有效果。 采用 Spring Boot API 方式添加的Profile 是属于额外激活的 Profile,也就是说覆盖掉外部传入的 spring.profiles.activie 指定的 Profile。
总结
在Spring Boot 程序中,我们通常定义不同 Profiles 的配置文件,如 application-{profile}.properties ,在默认配置文件 application.properties 中设置 spring.profiles.active=dev ,用于平常开发使用,当需要打包上传服务器时,通过启动参数方式 jar -Dspring.profiles.active=prod xxx.jar 指定对应环境的 Profile 启动程序来加载对应环境的配置,到这里我们学习如何通过 Spring Boot Profiles 特性来应对程序中不同环境配置的切换,希望对工作中的小伙伴有所帮助,也欢迎小伙伴留言分享应对项目环境配置区分加载的实践心得。若有错误或者不当之处,还请大家批评指正,一起学习交流。
下篇文章将通过解读源码的方式具体讲解 Spring Boot Profiles 实现原理,敬请关注期待。

示例代码
本文示例代码可以通过下面仓库地址获取:
- springboot-actions-profiles: https://github.com/wrcj12138a...
环境支持:
- JDK 8
- SpringBoot 2.1.6
- Maven 3.6.0
参考资料
- How to use profiles in Spring Boot Application: http://1t.click/yUj
- Spring Boot Doc: http://1t.click/yUh
- Spring Doc: http://1t.click/yUg
- 全面解读 Spring Profile 的用法: https://mp.weixin.qq.com/s/0i...


![[HBLOG]公众号](https://www.liuhaihua.cn/img/qrcode_gzh.jpg)

