SpringBoot启动源码分析及相关技巧学习
话不多说,我们首先去[start.spring.io]网站上下载一个demo,springboot版本我们选择 2.1.4 ,然后我们一起打断点一步步了解下springboot的启动原理。
我们的工程目录如下:
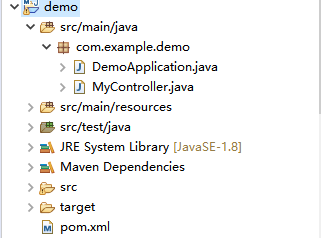
一切的一切,将从我们的 DemoApplication.java 文件开始。代码如下:
@SpringBootApplication
public class DemoApplication {
	public static void main(String[] args) {
		SpringApplication.run(DemoApplication.class, args);
	}
}
复制代码
【技巧一】
我经常看到有朋友在 DemoApplication 类中实现 ApplicationContextAware 接口,然后获取 ApplicationContext 对象,就比如下面的代码:
@SpringBootApplication
public class DemoApplication implements ApplicationContextAware {
    private static ApplicationContext applicationContext = null;
    public static void main(String[] args) {
    	SpringApplication.run(DemoApplication.class, args);
    	// 获取某个bean
    	System.out.println(applicationContext.getBean("xxxx"));
    }
    @Override
    public void setApplicationContext(ApplicationContext applicationContext) throws BeansException {
    	DemoApplication.applicationContext = applicationContext;
    }
}
复制代码
当然这种方法可行,但是其实 SpringApplication.run 方法已经把Spring上下文返回了,我们直接用就行了~~~代码如下:
@SpringBootApplication
public class DemoApplication {
    public static void main(String[] args) {
    	ConfigurableApplicationContext applicationContext = SpringApplication.run(DemoApplication.class, args);
    	// 获取某个bean
    	System.out.println(applicationContext.getBean("xxxx"));
    }
}
复制代码
代码跳至 SpringApplication 类第 263 行
@SuppressWarnings({ "unchecked", "rawtypes" })
    public SpringApplication(ResourceLoader resourceLoader, Class<?>... primarySources) {
        // 1、初始化一个类加载器
    	this.resourceLoader = resourceLoader;
    	Assert.notNull(primarySources, "PrimarySources must not be null");
    	// 2、启动类集合
    	this.primarySources = new LinkedHashSet<>(Arrays.asList(primarySources));
    	// 3、当前应用类型,有三种:NONE、SERVLET、REACTIVE
    	this.webApplicationType = WebApplicationType.deduceFromClasspath();
    	// 4、初始化Initializer
    	setInitializers((Collection) getSpringFactoriesInstances(
    			ApplicationContextInitializer.class));
    	// 5、初始化Listeners
    	setListeners((Collection) getSpringFactoriesInstances(ApplicationListener.class));
    	// 6、初始化入口类
    	this.mainApplicationClass = deduceMainApplicationClass();
    }
复制代码
步骤1-3没什么好讲的,就是初始化一些标识和列表啥的,重点看下第4和第5点,第4、5点帮我们加载了所有依赖的 ApplicationListener 和 ApplicationContextInitializer 配置项,代码移步至 SpringFactoriesLoader 第 132 行,我们可以看到springboot会去加载每个jar里边这个文件 META-INF/spring.factories 的内容,同时还以类加载器 ClassLoader 为键值,对所有的配置做了一个Map缓存。
private static Map<String, List<String>> loadSpringFactories(@Nullable ClassLoader classLoader) {
    // cache做了缓存,我们可以指定classloader,默认为Thread.currentThread().getContextClassLoader();
    // (可在ClassUtils类中getDefaultClassLoader找到答案)
    MultiValueMap<String, String> result = cache.get(classLoader);
    if (result != null) {
    	return result;
    }

    try {
    	Enumeration<URL> urls = (classLoader != null ?
    	        // FACTORIES_RESOURCE_LOCATION的值就是META-INF/spring.factories
    			classLoader.getResources(FACTORIES_RESOURCE_LOCATION) :
    			ClassLoader.getSystemResources(FACTORIES_RESOURCE_LOCATION));
    	result = new LinkedMultiValueMap<>();
    	while (urls.hasMoreElements()) {
    		URL url = urls.nextElement();
    		UrlResource resource = new UrlResource(url);
    		Properties properties = PropertiesLoaderUtils.loadProperties(resource);
    		for (Map.Entry<?, ?> entry : properties.entrySet()) {
    			String factoryClassName = ((String) entry.getKey()).trim();
    			for (String factoryName : StringUtils.commaDelimitedListToStringArray((String) entry.getValue())) {
    				result.add(factoryClassName, factoryName.trim());
    			}
    		}
    	}
    	cache.put(classLoader, result);
    	return result;
    }
    catch (IOException ex) {
    	throw new IllegalArgumentException("Unable to load factories from location [" +
    			FACTORIES_RESOURCE_LOCATION + "]", ex);
    }
}
复制代码
我们简单看下 spring-boot-autoconfigure-2.1.4.RELEASE.jar 下的 spring.factories 看下内容:
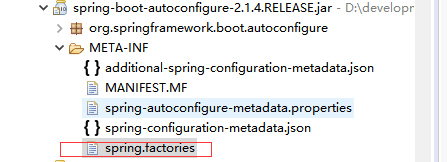
# Initializers初始化器
org.springframework.context.ApplicationContextInitializer=/
org.springframework.boot.autoconfigure.SharedMetadataReaderFactoryContextInitializer,/
org.springframework.boot.autoconfigure.logging.ConditionEvaluationReportLoggingListener

# Application Listeners监听器
org.springframework.context.ApplicationListener=/
org.springframework.boot.autoconfigure.BackgroundPreinitializer

# Auto Configure自动配置(下文将会有讲原理)
org.springframework.boot.autoconfigure.EnableAutoConfiguration=/
org.springframework.boot.autoconfigure.admin.SpringApplicationAdminJmxAutoConfiguration
......
复制代码
【技巧二】
接下来我们看下步骤6,这里可以学习一个小技巧,我们如何获得当前方法调用链中某一个中间方法所在的类信息呢?我们看源码:
private Class<?> deduceMainApplicationClass() {
    try {
    	StackTraceElement[] stackTrace = new RuntimeException().getStackTrace();
    	// 获取运行时方法栈
    	for (StackTraceElement stackTraceElement : stackTrace) {
    	    // 根据名称找到类名
    		if ("main".equals(stackTraceElement.getMethodName())) {
    			return Class.forName(stackTraceElement.getClassName());
    		}
    	}
    }
    catch (ClassNotFoundException ex) {
    	// Swallow and continue
    }
    return null;
}
复制代码
到目前为止,我们只完成了 SpringApplication 这个类的初始化工作,我们拥有了 META-INF/spring.factories 目录下配置的包括监听器、初始化器在内的所有类名,并且实例化了这些类,最后存储于 SpringApplication 这个类中。
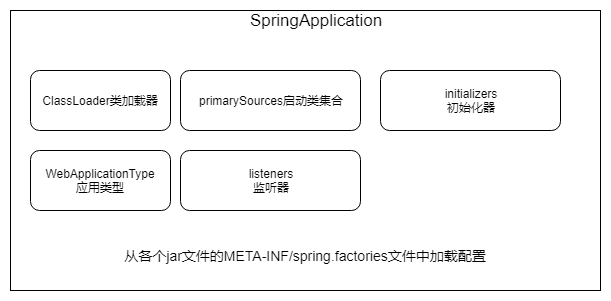
代码移步至 SpringApplication.java 第 295 行,代码如下
public ConfigurableApplicationContext run(String... args) {
    // 1、计时器,spring内部封装的计时器,用于计算容器启动的时间
    StopWatch stopWatch = new StopWatch();
    stopWatch.start();
    // 2、创建一个初始化上下文变量
    ConfigurableApplicationContext context = null;
    // 3、这是spring报告之类的,没深入了解
    Collection<SpringBootExceptionReporter> exceptionReporters = new ArrayList<>();
    configureHeadlessProperty();
    // 4、获取配置的SpringApplicationRunListener类型的监听器,并且启动它
    SpringApplicationRunListeners listeners = getRunListeners(args);
    listeners.starting();
    try {
    	ApplicationArguments applicationArguments = new DefaultApplicationArguments(
    			args);
    	// 5、准备spring上下文环境
    	ConfigurableEnvironment environment = prepareEnvironment(listeners,
    			applicationArguments);
    	configureIgnoreBeanInfo(environment);
    	// 6、打印banner
    	Banner printedBanner = printBanner(environment);
    	// 7、为context赋值
    	context = createApplicationContext();
    	exceptionReporters = getSpringFactoriesInstances(
    			SpringBootExceptionReporter.class,
    			new Class[] { ConfigurableApplicationContext.class }, context);
    	// 8、准备好context上下文各种组件,environment,listeners
    	prepareContext(context, environment, listeners, applicationArguments,
    			printedBanner);
    	// 9、刷新上下文
    	refreshContext(context);
    	afterRefresh(context, applicationArguments);
    	// 10、计时器关闭
    	stopWatch.stop();
    	if (this.logStartupInfo) {
    		new StartupInfoLogger(this.mainApplicationClass)
    				.logStarted(getApplicationLog(), stopWatch);
    	}
    	listeners.started(context);
    	// 11、调用runners,后面会讲到
    	callRunners(context, applicationArguments);
    }
    catch (Throwable ex) {
    	handleRunFailure(context, ex, exceptionReporters, listeners);
    	throw new IllegalStateException(ex);
    }

    try {
    	listeners.running(context);
    }
    catch (Throwable ex) {
    	handleRunFailure(context, ex, exceptionReporters, null);
    	throw new IllegalStateException(ex);
    }
    return context;
}
复制代码
【技巧三】
步骤1中使用到了计时器 StopWatch 这个工具,这个工具我们也可以直接拿来使用的,通常我们统计一段代码、一个方法执行的时间,我们会使用 System.currentTimeMillis 来实现,我们也可以使用 StopWatch 来代替, StopWatch 的强大之处在于它可以统计各个时间段的耗时占比,使用大致如下:
@SpringBootApplication
public class DemoApplication {
    public static void main(String[] args) {
    	StopWatch stopWatch = new StopWatch();
    	stopWatch.start("startContext");
    	ConfigurableApplicationContext applicationContext = SpringApplication.run(DemoApplication.class, args);
    	stopWatch.stop();
    	stopWatch.start("printBean");
    	// 获取某个bean
    	System.out.println(applicationContext.getBean(DemoApplication.class));
    	stopWatch.stop();
    	System.err.println(stopWatch.prettyPrint());
    }
}
复制代码

步骤4代码移步至 SpringApplication 第 413 行,代码如下:
private SpringApplicationRunListeners getRunListeners(String[] args) {
    Class<?>[] types = new Class<?>[] { SpringApplication.class, String[].class };
    return new SpringApplicationRunListeners(logger, getSpringFactoriesInstances(
		SpringApplicationRunListener.class, types, this, args));
}
复制代码
可以看出,springboot依旧是去 META-INF/spring.factories 找 SpringApplicationRunListener 配置的类,并且启动。
步骤5默认创建Spring Environment模块中的 StandardServletEnvironment 标准环境。
步骤7默认创建的上下文类型是 AnnotationConfigServletWebServerApplicationContext ,可以看出这个是Spring上下文中基于注解的Servlet上下文,因此,我们最开始的 DemoApplication.java 类中声明的注解 @SpringBootApplication 将会被扫描并解析。
步骤9刷新上下文是最核心的,看过spring源码都知道,这个 refresh() 方法很经典,具体可以参考小编另一篇文章 Spring容器IOC初始化过程
步骤11中会执行整个上下文中,所有实现了 ApplicationRunner 和 CommandLineRunner 的bean, SpringApplication 第 787 代码如下:
private void callRunners(ApplicationContext context, ApplicationArguments args) {
    List<Object> runners = new ArrayList<>();
    runners.addAll(context.getBeansOfType(ApplicationRunner.class).values());
    runners.addAll(context.getBeansOfType(CommandLineRunner.class).values());
    // 对所有runners进行排序并执行
    AnnotationAwareOrderComparator.sort(runners);
    for (Object runner : new LinkedHashSet<>(runners)) {
    	if (runner instanceof ApplicationRunner) {
    		callRunner((ApplicationRunner) runner, args);
    	}
    	if (runner instanceof CommandLineRunner) {
    		callRunner((CommandLineRunner) runner, args);
    	}
    }
}
复制代码
【 技巧四 】 平时开发中,我们可能会想在Spring容器启动完成之后执行一些操作,举个例子,就假如我们某个定时任务需要再应用启动完成时执行一次,看了上面步骤11的源码,我们大概对下面的代码会恍然大悟,哦,原来这代码就是在 SpringApplication 这个类中调用的。
@Component
public class MyRunner implements ApplicationRunner {

	@Override
	public void run(ApplicationArguments args) throws Exception {
		System.err.println("执行了ApplicationRunner~");
	}

}
复制代码
@Component
public class MyCommandRunner implements CommandLineRunner {

	@Override
	public void run(String... args) throws Exception {
		System.out.println("执行了commandrunner");
	}

}
复制代码
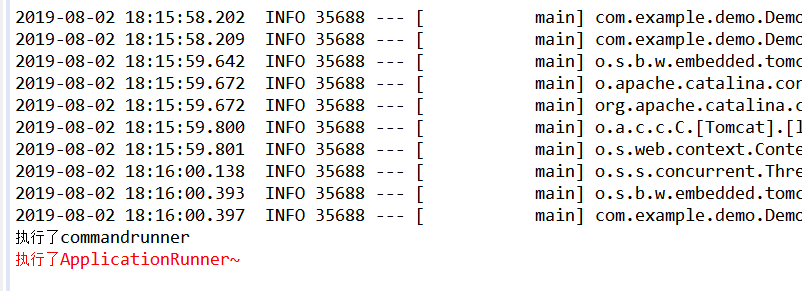
注意点:
- 1、CommandLineRunner和ApplicationRunner执行时期是在spring容器启动完成之后执行的
- 2、整个容器生命周期只执行一次
二、注解@EnableAutoConfiguration的作用是什么?
一般情况下,java引入的jar文件中声明的bean是不会被spring扫描到的,那么我们的各种starter是如何初始化自身的bean呢?答案是在 META-INF/spring.factories 中声明 org.springframework.boot.autoconfigure.EnableAutoConfiguration=xxx ,就比如 spring-cloud-netflix-zuul 这个starter中申明的内容如下:
org.springframework.boot.autoconfigure.EnableAutoConfiguration=/
org.springframework.cloud.netflix.zuul.ZuulServerAutoConfiguration,/
org.springframework.cloud.netflix.zuul.ZuulProxyAutoConfiguration
复制代码
这样声明是什么意思呢?就是说springboot启动的过程中,会将 org.springframework.boot.autoconfigure.EnableAutoConfiguration=xxx 声明的类实例成为bean,并且注册到容器当中,下面是测试用例:
我们在 mydemo 中声明一个bean,代码如下:
@Service
public class MyUser {

}
复制代码
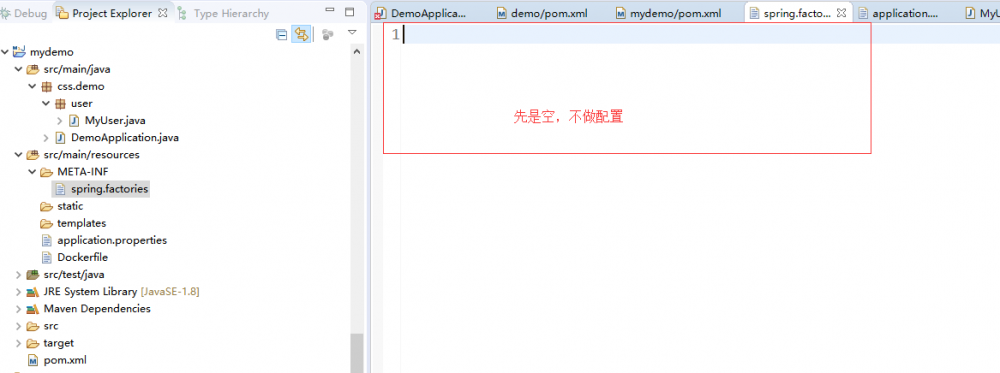
在 demo 中,打印MyUser这个bean,打印如下:
Exception in thread "main" org.springframework.beans.factory.NoSuchBeanDefinitionException: No qualifying bean of type 'css.demo.user.MyUser' available
	at org.springframework.beans.factory.support.DefaultListableBeanFactory.getBean(DefaultListableBeanFactory.java:343)
	at org.springframework.beans.factory.support.DefaultListableBeanFactory.getBean(DefaultListableBeanFactory.java:335)
	at org.springframework.context.support.AbstractApplicationContext.getBean(AbstractApplicationContext.java:1123)
	at com.example.demo.DemoApplication.main(DemoApplication.java:15)
复制代码
我们 mydemo 工程中加上该配置:

demo 工程打印如下:
2019-08-02 19:31:34.814  INFO 21984 --- [           main] o.s.b.w.embedded.tomcat.TomcatWebServer  : Tomcat started on port(s): 8080 (http) with context path ''
2019-08-02 19:31:34.818  INFO 21984 --- [           main] com.example.demo.DemoApplication         : Started DemoApplication in 2.734 seconds (JVM running for 3.254)
执行了ApplicationRunner~
执行了commandrunner
css.demo.user.MyUser@589b028e
复制代码
为什么配置上去就可以了呢?其实在springboot启动过程中,在 AutoConfigurationImportSelector#getAutoConfigurationEntry 中会去调用 getCandidateConfigurations 方法,该方法源码如下:
protected List<String> getCandidateConfigurations(AnnotationMetadata metadata,
			AnnotationAttributes attributes) {
    List<String> configurations = SpringFactoriesLoader.loadFactoryNames(
            // 此处会去调用EnableAutoConfiguration注解
    		getSpringFactoriesLoaderFactoryClass(), getBeanClassLoader());
    Assert.notEmpty(configurations,
    		"No auto configuration classes found in META-INF/spring.factories. If you "
    				+ "are using a custom packaging, make sure that file is correct.");
    return configurations;
}
复制代码
getSpringFactoriesLoaderFactoryClass 方法源码如下:
protected Class<?> getSpringFactoriesLoaderFactoryClass() {
	return EnableAutoConfiguration.class;
}
复制代码
本质上还是利用了 META-INF/spring.factories 文件中的配置,结合springboot factories机制完成的。
三、总结
本文从大致方向解析了springboot的大致启动过程,有些地方点到为止,并未做深入研究,但我们学习源码一为了吸收其编码精华,写出更好的代码,二为了解相关原理,方便更加快速定位解决问题,如有写的不对的地方,请指正,欢迎评论区留言交流,谢谢大家!
- 本文标签: Service map App Lua 总结 缓存 ssl Listeners tomcat CSS IO 实例 ArrayList http 源码 Property 网站 CTO 本质 开发 Proxy web 下载 servlet IDE cache URLs EnableAutoConfiguration 统计 2019 classpath BeanDefinition cat CEO springboot list 类加载器 java 文章 ioc UI Select zuul src tk 启动过程 监听器 tar 时间 id value JVM spring ACE db bean 配置 解析 Netflix example HashSet 测试 Logging https 代码 Collection key equals 目录 生命 tab
- 版权声明: 本文为互联网转载文章,出处已在文章中说明(部分除外)。如果侵权,请联系本站长删除,谢谢。
- 本文海报: 生成海报一 生成海报二


![[HBLOG]公众号](https://www.liuhaihua.cn/img/qrcode_gzh.jpg)

