SpringBoot开发案例之打造十万博文Web篇
点击▲关注 “ 爪哇笔记 ” 给公众号标星置顶
更多精彩 第一时间直达
 前言
前言
通过 Python 爬取十万博文之后,最重要的是要让互联网用户访问到,那么如何做呢?
选型
从后台框架、前端模板、数据库连接池、缓存、代理服务、限流等组件多个维度选型。
-
后台框架 SpringBoot2+、JPA
-
前端框架 Vue
-
模块框架 Thymeleaf
-
数据库连接池 HikariCP
-
缓存 Redis
-
限流 Guava
-
代理服务 Nginx
-
文章编辑 Markdown
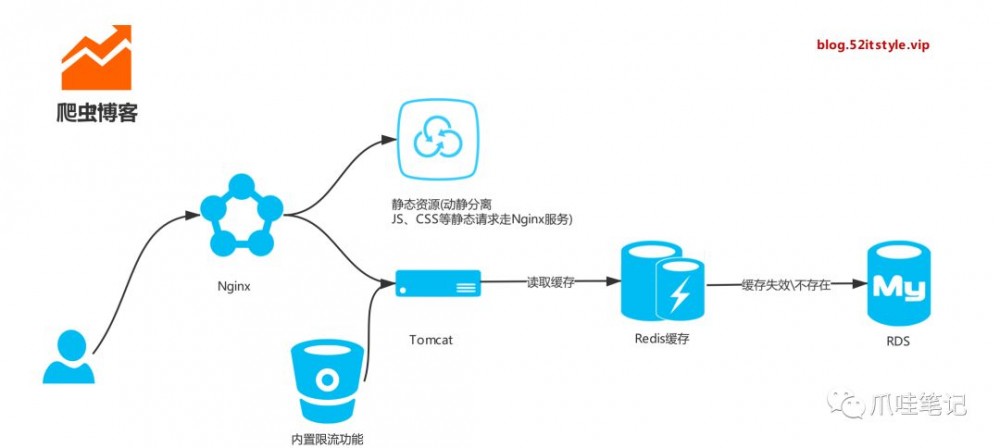
架构

博文
我们可以通过以下方式访问:
https://blog.52itstyle.top/49.html
亦或是:
https://blog.52itstyle.top/49.shtml
当然,如果你愿意你也可以显示为:
https://blog.52itstyle.top/49.php
https://blog.52itstyle.top/49.asp
https://blog.52itstyle.top/49.jsp
只需要在后台配置对应的映射关系即可:
/**
* 博文
*/
@RequestMapping("{id}.html")
public String blog(@PathVariable("id") Long id, ModelMap model) {
Blog blog = blogService.getById(id);
model.addAttribute("blog",blog);
return  "article";
}
由于数据库存储的是 markedown 格式的数据,前台我们通过 editormd 转为 html 代码显示,这里只展示部分代码:
<script type='text/javascript' src='js/jquery.min.js'></script>
<!--省略部分代码-->
<script type='text/javascript' src="editor/editormd.min.js"></script>
<!--省略部分代码-->
<div id="article">
<textarea  th:text="${blog.content}"  style="display:none;" placeholder="markdown语言">
</textarea>
</div>
<!--省略部分代码-->
<script>
editormd.markdownToHTML("article", {
htmlDecode      : "style,script,iframe",
emoji           : true,
taskList        : true,
tex             : true,  // 默认不解析
flowChart       : true,  // 默认不解析
sequenceDiagram : true  // 默认不解析
});
</script>
缓存
爬取的博文一般、基本、大概不会修改,所以我们完全可以缓存起来,避免跟数据库直接交互,顺便提升一下访问速速。正好手头有个 256MB 的阿里云 Redis 服务,拿来就用了。
首相引入以下组件:
<dependency>
<groupId>org.springframework.boot</groupId>
<artifactId>spring-boot-starter-cache</artifactId>
</dependency>
<dependency>
<groupId>org.springframework.boot</groupId>
<artifactId>spring-boot-starter-data-redis</artifactId>
</dependency>
配置 redis:
spring.redis.database=1
spring.redis.host=r-m5e4873fd882de14.redis.rds.aliyuncs.com
spring.redis.port=6379
spring.redis.password=6347888
spring.redis.pool.max-active=8
spring.redis.pool.max-wait=-1
spring.redis.pool.max-idle=8
spring.redis.pool.min-idle=0
spring.redis.timeout=3000ms
spring.cache.type = redis
接口实现,引入 Cacheable 注解:
@Override
@Cacheable(cacheNames ="blog")
public Blog getById(Long id) {
String nativeSql = "SELECT * FROM blog WHERE id=?";
return dynamicQuery.nativeQuerySingleResult(Blog.class,nativeSql,new Object[]{id});
}
配置完成之后,我们打开数据库配置,多次访问博文地址,如果只是初次打印 SQL 说明配置成功:
spring.jpa.show-sql = true
限流
万一哪天流量暴涨亦或是有人恶意攻击,尔等小服务器根本扛不住,所以有时候我们需要一定的手段进行限流,比如限制IP访问的频率次数。
这里我们使用开源的第三方组件库,引入以下组件:
<dependency>
<groupId>com.google.guava</groupId>
<artifactId>guava</artifactId>
<version>25.1-jre</version>
</dependency>
自定义注解:
/**
* 自定义注解  限流
*/
@Target({ElementType.PARAMETER, ElementType.METHOD})
@Retention(RetentionPolicy.RUNTIME)
@Documented
public  @interface ServiceLimit {
/**
* 描述
*/
String description()  default "";

/**
* key
*/
String key() default "";

/**
* 类型
*/
LimitType limitType() default LimitType.CUSTOMER;

enum LimitType {
/**
* 自定义key
*/
CUSTOMER,
/**
* 根据请求者IP
*/
IP
}
}
限流逻辑:
/**
* 限流 AOP
*/
@Aspect
@Configuration
public class LimitAspect {

//根据IP分不同的令牌桶, 每天自动清理缓存
private static LoadingCache<String, RateLimiter> caches = CacheBuilder.newBuilder()
.maximumSize(1000)
.expireAfterWrite(1, TimeUnit.DAYS)
.build(new CacheLoader<String, RateLimiter>() {
@Override
public RateLimiter load(String key){
// 新的IP初始化 每秒只发出5个令牌
return RateLimiter.create(5);
}
});

//Service层切点  限流
@Pointcut("@annotation(com.itstyle.blog.common.limit.ServiceLimit)")
public void ServiceAspect() {

}

@Around("ServiceAspect()")
public  Object around(ProceedingJoinPoint joinPoint) {
MethodSignature signature = (MethodSignature) joinPoint.getSignature();
Method method = signature.getMethod();
ServiceLimit limitAnnotation = method.getAnnotation(ServiceLimit.class);
ServiceLimit.LimitType limitType = limitAnnotation.limitType();
String key = limitAnnotation.key();
Object obj;
try {
if(limitType.equals(ServiceLimit.LimitType.IP)){
key = IPUtils.getIpAddr();
}
RateLimiter rateLimiter = caches.get(key);
Boolean flag = rateLimiter.tryAcquire();
if(flag){
obj = joinPoint.proceed();
}else{
throw new RrException("小同志,你访问的太频繁了");
}
} catch (Throwable e) {
throw new RrException("小同志,你访问的太频繁了");
}
return obj;
}
}
收录
完事具备,就差被搜索引擎收录了,我们可以通过手动生成网站地图,提交给百度。
/**
* 生成地图
* 参见:https://blog.52itstyle.top/sitemap.xml
*/
@Component
public class SitemapTask {

@Autowired
private DynamicQuery dynamicQuery;

protected Logger logger = LoggerFactory.getLogger(getClass());

@Value("${blog.url}")
private  String blogUrl;

//每天23点执行一次
@Scheduled(cron = "0 0 23 * * ?")
public void createSitemap() {
logger.info("定时提交百度收录开始");
StringBuffer xml = new  StringBuffer();
xml.append("<?xml version='1.0' encoding='utf-8'?>/n");
xml.append("<urlset>/n");
String nativeSql = "SELECT id,create_time FROM blog";
List<Object[]> list = dynamicQuery.query(nativeSql,new Object[]{});
list.forEach(blog -> {
String url = blogUrl+blog[0]+".html";
xml.append("   <url>/n");
xml.append("       <loc>"+url+"</loc>/n");
xml.append("       <lastmod>"+blog[1]+"</lastmod>/n");
xml.append("   </url>/n");
});
xml.append("</urlset>/n");
saveAsFileWriter(xml.toString());
logger.info("定时提交百度收录结束");
}

private static void saveAsFileWriter(String content) {
String path = ClassUtils.getDefaultClassLoader().getResource("").getPath();
String filePath = path + "static"+ SystemConstant.SF_FILE_SEPARATOR+"sitemap.xml";
FileWriter fwriter = null;
try {
fwriter = new FileWriter(filePath, false);
fwriter.write(content);
} catch (IOException ex) {
ex.printStackTrace();
} finally {
try {
fwriter.flush();
fwriter.close();
} catch (IOException ex) {
ex.printStackTrace();
}
}
}
}
打包
尽量不要以Jar包形式部署,为了以后方便部署,最好放置到 外置Tomcat 下。
pom.xml 中移除内置 Tomcat:
<dependency>
<groupId>org.springframework.boot</groupId>
<artifactId>spring-boot-starter-tomcat</artifactId>
<scope>provided</scope>
</dependency>
修改启动类:
/**
* 启动类
* 创建者 科帮网
* 创建时间    2019年7月21日
*/
@SpringBootApplication
@EnableCaching
@EnableScheduling
public class Application extends SpringBootServletInitializer {
private static final Logger logger = LoggerFactory.getLogger(Application.class);

public static void main(String[] args) {
SpringApplication.run(Application.class, args);
logger.info("项目启动");
}

@Override
protected SpringApplicationBuilder configure(SpringApplicationBuilder application) {
return application.sources(Application.class);
}
}
代理
项目部署后,最好加一层代理服务,这里我们使用Nginx:
server {
listen 80;
server_name blog.52itstyle.top;
return 301 https://$server_name$request_uri;
}
server{
listen 443 ssl;
server_name blog.52itstyle.top;
#证书路径
ssl_certificate    /usr/local/openresty/nginx/cert/2543486_blog.52itstyle.top.pem;
#私钥路径
ssl_certificate_key   /usr/local/openresty/nginx/cert/2543486_blog.52itstyle.top.key;
#缓存有效期
ssl_session_timeout 5m;
#可选的加密算法,顺序很重要,越靠前的优先级越高.
ssl_ciphers ECDHE-RSA-AES128-GCM-SHA256:ECDHE:ECDH:AES:HIGH:!NULL:!aNULL:!MD5:!ADH:!RC4;
#安全链接可选的加密协议
ssl_protocols TLSv1 TLSv1.1 TLSv1.2;
ssl_prefer_server_ciphers on;
location = /500.html {
root   /usr/local/openresty/nginx/html;
}
error_page 500 502 503 504 = /503/503.html;
location / {
proxy_pass  http://127.0.0.1:8080;
}
location ~ //.ht {
deny  all;
}
}
动静分离,将静态文件交由Nginx处理,加速博客访问:
#静态文件交给nginx处理
location ~ .*/.(js|css|gif|jpg|jpeg|png|bmp)?$
{
root /home/tomcat8/webapps/ROOT/WEB-INF/classes/static;
expires 2h;
}
源码:https://gitee.com/52itstyle/Python
演示:https://blog.52itstyle.top
列表:https://blog.52itstyle.top/index
详情:https://blog.52itstyle.top/49.shtml
小结
撸完整个项目,基本能接触的都用上了,前后端框架、连接池、限流、缓存、动静分离,HTTPS安全认证、百度收录等等,特别适合有一定开发基础的小伙伴!
最后,花了半天时间,上架了一款博客小程序
欢迎访问

点 在看 再走呗!
- 本文标签: App cache 源码 list Proxy https build 安全 CSS JPA root Select springboot final 加密 数据库 博客 云 jquery CTO ORM 协议 value 连接池 git OpenResty 搜索引擎 IDE 文章 PHP Document id pom 开发 Markdown description http 配置 时间 constant ssl key equals ip Webapps 网站 python web redis 解析 AOP tab 阿里云 限流 tar ask map 代码 Service 服务器 XML 索引 tomcat 开源 2019 cat ACE java 数据 HTML IO 认证 REST 缓存 js src sql Google JavaScript Nginx URLs session servlet 百度 部署 互联网 Word spring UI
- 版权声明: 本文为互联网转载文章,出处已在文章中说明(部分除外)。如果侵权,请联系本站长删除,谢谢。
- 本文海报: 生成海报一 生成海报二


![[HBLOG]公众号](https://www.liuhaihua.cn/img/qrcode_gzh.jpg)

