springboot源码分析系列(四)--web错误处理机制
在我们开发的过程中经常会看到下图这个界面,这是SpringBoot默认出现异常之后给用户抛出的异常处理界面。

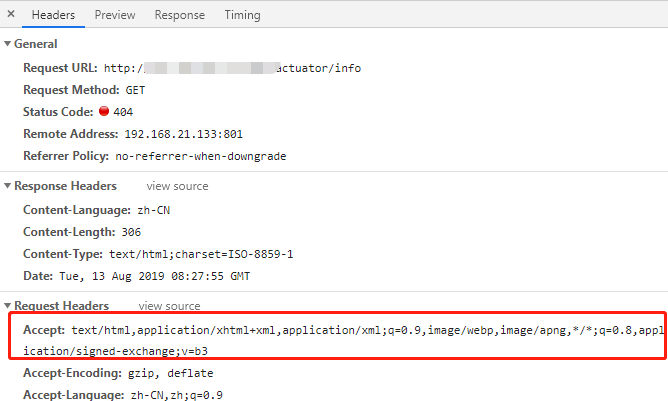
对应的请求信息如下:

如果是其他客户端请求,如postman测试,会默认返回json数据
{
        "timestamp":"2019-08-06 22:26:16",
        "status":404,
        "error":"Not Found",
        "message":"No message available",
        "path":"/asdad"
}
在之前的文章中介绍过了SpringBoot的自动配置机制,默认错误处理机制也是自动配置其中的一部分。在spring-boot-autoconfiguration-XXX.jar这个包中加载了所有的自动配置类,其中ErrorMvcAutoConfiguration就是SpringBoot处理异常的机制。
下面简单的分析一下它的机制
SpringBoot错误处理机制
首先看一下ErrorMvcAutoConfiguration这个类里面主要起作用的几个方法
/**
 * 绑定一些错误信息
 */
@Bean
@ConditionalOnMissingBean(value = ErrorAttributes.class, search = SearchStrategy.CURRENT)
public DefaultErrorAttributes errorAttributes() {
    return new DefaultErrorAttributes(this.serverProperties.getError().isIncludeException());
}
/**
 * 默认错误处理
 */
@Bean
@ConditionalOnMissingBean(value = ErrorController.class, search = SearchStrategy.CURRENT)
public BasicErrorController basicErrorController(ErrorAttributes errorAttributes) {
    return new BasicErrorController(errorAttributes, this.serverProperties.getError(), this.errorViewResolvers);
}
/**
 * 错误处理页面
 */
@Bean
public ErrorPageCustomizer errorPageCustomizer() {
    return new ErrorPageCustomizer(this.serverProperties, this.dispatcherServletPath);
}

@Configuration
static class DefaultErrorViewResolverConfiguration {

    private final ApplicationContext applicationContext;

    private final ResourceProperties resourceProperties;

    DefaultErrorViewResolverConfiguration(ApplicationContext applicationContext,
            ResourceProperties resourceProperties) {
        this.applicationContext = applicationContext;
        this.resourceProperties = resourceProperties;
    }
    /**
     * 决定去哪个错误页面
     */
    @Bean
    @ConditionalOnBean(DispatcherServlet.class)
    @ConditionalOnMissingBean
    public DefaultErrorViewResolver conventionErrorViewResolver() {
        return new DefaultErrorViewResolver(this.applicationContext, this.resourceProperties);
    }

}
errorAttributes
主要起作用的是下面这个类
org.springframework.boot.web.servlet.error.DefaultErrorAttributes
这个类会共享很多错误信息,如:
errorAttributes.put("timestamp", new Date());
errorAttributes.put("status", status);
errorAttributes.put("error", HttpStatus.valueOf(status).getReasonPhrase());
errorAttributes.put("errors", result.getAllErrors());
errorAttributes.put("exception", error.getClass().getName());
errorAttributes.put("message", error.getMessage());
errorAttributes.put("trace", stackTrace.toString());
errorAttributes.put("path", path);
这些信息作为共享信息返回,所以当我们使用模板引擎时,也可以像取出其他参数一样取出。
basicErrorController
//org.springframework.boot.autoconfigure.web.servlet.error.BasicErrorController

@Controller
//定义请求路径,如果没有error.path路径,则路径为/error
@RequestMapping("${server.error.path:${error.path:/error}}")
public class BasicErrorController extends AbstractErrorController {

    //如果支持的格式 text/html
    @RequestMapping(produces = MediaType.TEXT_HTML_VALUE)
    public ModelAndView errorHtml(HttpServletRequest request, HttpServletResponse response) {
        HttpStatus status = getStatus(request);
        //获取要返回的值
        Map<String, Object> model = Collections
                .unmodifiableMap(getErrorAttributes(request, isIncludeStackTrace(request, MediaType.TEXT_HTML)));
        response.setStatus(status.value());
        //解析错误视图信息,也就是下面1.4中的逻辑
        ModelAndView modelAndView = resolveErrorView(request, response, status, model);
        //返回视图,如果没有存在的页面模板,则使用默认错误视图模板
        return (modelAndView != null) ? modelAndView : new ModelAndView("error", model);
    }

    @RequestMapping
    public ResponseEntity<Map<String, Object>> error(HttpServletRequest request) {
        //如果是接收所有格式的HTTP请求
        Map<String, Object> body = getErrorAttributes(request, isIncludeStackTrace(request, MediaType.ALL));
        HttpStatus status = getStatus(request);
        //响应httpEntity
        return new ResponseEntity<>(body, status);
    }
}
由上面的源码可知,basicErrorControll主要用于创建请求返回的controller类,并根据http请求可接受的格式不同返回对应的信息。也就是我们在文章的一开始看到的情况,页面请求和接口测试工具请求得到的结果略有差异。
errorPageCustomizer
errorPageCustomizer这个方法调了同类里面的ErrorPageCustomizer 这个内部类。当遇到错误时,如果没有自定义error.path属性,请求会转发至/error
/**
 * {@link WebServerFactoryCustomizer} that configures the server's error pages.
 */
private static class ErrorPageCustomizer implements ErrorPageRegistrar, Ordered {

    private final ServerProperties properties;

    private final DispatcherServletPath dispatcherServletPath;

    protected ErrorPageCustomizer(ServerProperties properties, DispatcherServletPath dispatcherServletPath) {
        this.properties = properties;
        this.dispatcherServletPath = dispatcherServletPath;
    }

    @Override
    public void registerErrorPages(ErrorPageRegistry errorPageRegistry) {
        //getPath()得到如下地址,如果没有自定义error.path属性,则去/error位置
        //@Value("${error.path:/error}")
        //private String path = "/error";
        ErrorPage errorPage = new ErrorPage(
                this.dispatcherServletPath.getRelativePath(this.properties.getError().getPath()));
        errorPageRegistry.addErrorPages(errorPage);
    }

    @Override
    public int getOrder() {
        return 0;
    }

}
conventionErrorViewResolver
下面的代码只展示部分核心方法
// org.springframework.boot.autoconfigure.web.servlet.error.DefaultErrorViewResolver

public class DefaultErrorViewResolver implements ErrorViewResolver, Ordered {

    static {
        Map<Series, String> views = new EnumMap<>(Series.class);
        views.put(Series.CLIENT_ERROR, "4xx");
        views.put(Series.SERVER_ERROR, "5xx");
        SERIES_VIEWS = Collections.unmodifiableMap(views);
    }

    @Override
    public ModelAndView resolveErrorView(HttpServletRequest request, HttpStatus status, Map<String, Object> model) {
        //使用HTTP完整状态码检查是否有页面可以匹配
        ModelAndView modelAndView = resolve(String.valueOf(status.value()), model);
        if (modelAndView == null && SERIES_VIEWS.containsKey(status.series())) {
            //使用HTTP状态码第一位匹配初始化中的参数创建视图对象
            modelAndView = resolve(SERIES_VIEWS.get(status.series()), model);
        }
        return modelAndView;
    }

    private ModelAndView resolve(String viewName, Map<String, Object> model) {
        // 拼接错误视图路径 /error/{viewName}
        String errorViewName = "error/" + viewName;
        // 使用模板引擎尝试创建视图对象
        TemplateAvailabilityProvider provider = this.templateAvailabilityProviders.getProvider(errorViewName,
                this.applicationContext);
        if (provider != null) {
            return new ModelAndView(errorViewName, model);
        }
        //没有模板引擎,使用静态资源文件夹解析视图
        return resolveResource(errorViewName, model);
    }

    private ModelAndView resolveResource(String viewName, Map<String, Object> model) {
        // 遍历静态资源文件夹,检查是否有存在视图
        for (String location : this.resourceProperties.getStaticLocations()) {
            try {
                Resource resource = this.applicationContext.getResource(location);
                resource = resource.createRelative(viewName + ".html");
                if (resource.exists()) {
                    return new ModelAndView(new HtmlResourceView(resource), model);
                }
            }
            catch (Exception ex) {
            }
        }
        return null;
    }
}
Thymeleaf对于错误页面的解析如下:
public class ThymeleafTemplateAvailabilityProvider implements TemplateAvailabilityProvider {

    @Override
    public boolean isTemplateAvailable(String view, Environment environment, ClassLoader classLoader,
            ResourceLoader resourceLoader) {
        if (ClassUtils.isPresent("org.thymeleaf.spring5.SpringTemplateEngine", classLoader)) {
            String prefix = environment.getProperty("spring.thymeleaf.prefix", ThymeleafProperties.DEFAULT_PREFIX);
            String suffix = environment.getProperty("spring.thymeleaf.suffix", ThymeleafProperties.DEFAULT_SUFFIX);
            return resourceLoader.getResource(prefix + view + suffix).exists();
        }
        return false;
    }

}
错误页面首先会检查模板引擎文件夹下的/error/HTTP状态码文件,如果不存在,则去检查模板引擎下的/error/4xx或者/error/5xx文件,如果还不存在,则检查静态资源文件夹下对应的上述文件
自定义异常页面
刚才分析了异常处理机制是如何工作的,下面我们来自己定义一个异常页面。根据源码分析可以看到,自定义错误页面只需要在模板文件夹下的error文件夹下放置4xx或者5xx文件即可。
<!doctype html>
<html lang="en" xmlns:th="http://www.thymeleaf.org">
<head>
    <meta charset="UTF-8">
    <meta name="viewport" content="width=device-width, initial-scale=1.0">
    <title>[[${status}]]</title>
    <!-- Bootstrap core CSS -->
    <link href="/webjars/bootstrap/4.1.3/css/bootstrap.min.css" rel="stylesheet">
</head>
<body >
<div class="m-5" >
    <p>错误码:[[${status}]]</p>
    <p >信息:[[${message}]]</p>
    <p >时间:[[${#dates.format(timestamp,'yyyy-MM-dd hh:mm:ss ')}]]</p>
    <p >请求路径:[[${path}]]</p>
</div>

</body>
</html>
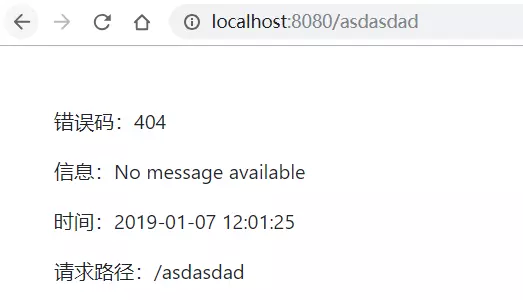
随意访问不存在路径得到下图

自定义错误JSON
根据上面的错误处理机制可以得知,最终返回的JSON信息是从一个map对象转换出来的,只需要自定义map中的值,就可以自定义错误信息的json了。直接重写DefaultErrorAttributes类的 getErrorAttributes 方法即可。
/**
 * 自定义错误信息JSON值
 */
@Component
public class ErrorAttributesCustom extends DefaultErrorAttributes {
    //重写getErrorAttributes方法
    @Override
    public Map<String, Object> getErrorAttributes(WebRequest webRequest, boolean includeStackTrace) {
        //获取原来的响应数据
        Map<String, Object> map = super.getErrorAttributes(webRequest, includeStackTrace);
        String code = map.get("status").toString();
        String message = map.get("error").toString();
        HashMap<String, Object> hashMap = new HashMap<>();
        //添加我们定制的响应数据
        hashMap.put("code", code);
        hashMap.put("message", message);
        return hashMap;
    }
}
使用postman测试结果如下:

- 本文标签: 源码 core 数据 Collection 解析 final spring message 代码 HashMap XML entity 测试 UI IO HTML 开发 js 文章 CSS springboot Collections src 定制 配置 ORM App 参数 https ACE Bootstrap id json client ssl map bean CTO value servlet http IDE mmap 遍历 provider web cat Property 时间 2019 key
- 版权声明: 本文为互联网转载文章,出处已在文章中说明(部分除外)。如果侵权,请联系本站长删除,谢谢。
- 本文海报: 生成海报一 生成海报二


![[HBLOG]公众号](https://www.liuhaihua.cn/img/qrcode_gzh.jpg)

