SpringBoot(2)—启动原理之run方法的运行
SpringBoot版本为:2.1.1.RELEASE
在上一篇文章中,我们讲到了SpringApplication对象的创建,接下来将会分析SpringApplication创建之后run()方法的执行。
通过debug的方式,我们可以进入run方法,源代码如下:
~~~java/**
- Run the Spring application, creating and refreshing a new
- {@link ApplicationContext}.
- @param args the application arguments (usually passed from a Java main method)
- @return a running {@link ApplicationContext}
*/
public ConfigurableApplicationContext run(String... args) {
<1>:
StopWatch stopWatch = new StopWatch();
stopWatch.start();
ConfigurableApplicationContext context = null;
        Collection<SpringBootExceptionReporter> exceptionReporters = new ArrayList<>();
        configureHeadlessProperty();复制代码
<2>:
        SpringApplicationRunListeners listeners = getRunListeners(args);
        listeners.starting();
        try {复制代码
<3>:
            ApplicationArguments applicationArguments = new DefaultApplicationArguments(
                    args);复制代码
<4>:
            ConfigurableEnvironment environment = prepareEnvironment(listeners,
                    applicationArguments);复制代码
configureIgnoreBeanInfo(environment);复制代码
<5>:
            Banner printedBanner = printBanner(environment);复制代码
<6>:
            context = createApplicationContext();
            exceptionReporters = getSpringFactoriesInstances(
                    SpringBootExceptionReporter.class,
                    new Class[] { ConfigurableApplicationContext.class }, context);复制代码
<7>:
            prepareContext(context, environment, listeners, applicationArguments,
                    printedBanner);复制代码
<8>:
            refreshContext(context);复制代码
<9>:
            afterRefresh(context, applicationArguments);
            stopWatch.stop();
            if (this.logStartupInfo) {
                new StartupInfoLogger(this.mainApplicationClass)
                        .logStarted(getApplicationLog(), stopWatch);
            }复制代码
<10>:
            listeners.started(context);复制代码
<11>:
            callRunners(context, applicationArguments);
        }
        catch (Throwable ex) {
            handleRunFailure(context, ex, exceptionReporters, listeners);
            throw new IllegalStateException(ex);
        }复制代码
try {复制代码
<12>:
            listeners.running(context);
        }
        catch (Throwable ex) {
            handleRunFailure(context, ex, exceptionReporters, null);
            throw new IllegalStateException(ex);
        }
    <13>:
        return context;
    }
~~~复制代码
下面我们逐一分析:<1> : StopWatch stopWatch = new StopWatch();stopWatch.start();
这段代码功能很简单,创建一个StopWatch对象,开始记录run()启动过程时长;
<2>: 先来看这个方法:SpringApplicationRunListeners listeners = getRunListeners(args);
~~~javaprivate SpringApplicationRunListeners getRunListeners(String[] args) {Class[] types = new Class[] { SpringApplication.class, String[].class };return new SpringApplicationRunListeners(logger, getSpringFactoriesInstances(SpringApplicationRunListener.class, types, this, args));}~~~
在这段代码里,我们又看见了熟悉的 getSpringFactoriesInstances(),原理还是一样,就是 getSpringFactoriesInstances()方法会从类路径下的 META-INF/spring.factories文件中找 对应SpringApplicationRunListener的全路径数组,并通过createSpringFactoriesInstances()方法实例化成对象返回;再看 listeners.starting() 方法:
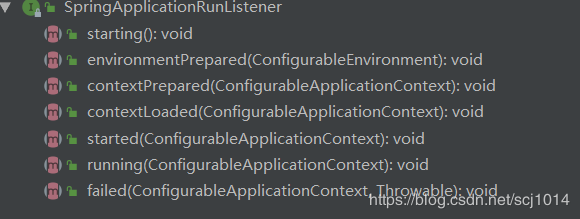
~~~javapublic void starting() {for (SpringApplicationRunListener listener : this.listeners) {listener.starting();}}~~~所以这个方法就是回调之前获得的所有SpringApplicationRunListener对象的starting()方法,启动监听。我们可以继续再深入看一下这个监听对象的其他方法:
 SpringApplicationRunListener 接口中共有上面几个方法,这几个方法将会贯穿run()方法的运行。
<3>:这个方法的作用也很简单,即使封装命令行参数。
<4>: ConfigurableEnvironment environment = prepareEnvironment(listeners,applicationArguments)
其实这是环境准备阶段,我们可以看一下它的实现过程:
~~~javaprivate ConfigurableEnvironment prepareEnvironment(SpringApplicationRunListeners listeners,ApplicationArguments applicationArguments) {// Create and configure the environmentConfigurableEnvironment environment = getOrCreateEnvironment();configureEnvironment(environment, applicationArguments.getSourceArgs());listeners.environmentPrepared(environment);bindToSpringApplication(environment);if (!this.isCustomEnvironment) {environment = new EnvironmentConverter(getClassLoader()).convertEnvironmentIfNecessary(environment, deduceEnvironmentClass());}ConfigurationPropertySources.attach(environment);return environment;}~~~这个方法表示创建环境,并且environment 的属性都会加载进来,包括 application.properties 和外部的属性配置,具体实现有兴趣的同学可以研究一下。其中listeners.environmentPrepared(environment)方法表示环境准备完成
<5>:功能为打印Banner,也可以自定义启动logo,比如在resources路径下创建一个banner.txt文件,将你想打印的图标放入其中
<6>:创建ApplicationContext容器,根据类型决定是创建普通WEB容器还是REACTIVE容器还是普通Annotation的ioc 容器
<7>:prepareContext(context, environment, listeners, applicationArguments,printedBanner);这个方法的具体实现:
~~~javaprivate void prepareContext(ConfigurableApplicationContext context,ConfigurableEnvironment environment, SpringApplicationRunListeners listeners,ApplicationArguments applicationArguments, Banner printedBanner) {context.setEnvironment(environment);postProcessApplicationContext(context);7.1:applyInitializers(context);7.2:listeners.contextPrepared(context);if (this.logStartupInfo) {logStartupInfo(context.getParent() == null);logStartupProfileInfo(context);}// Add boot specific singleton beansConfigurableListableBeanFactory beanFactory = context.getBeanFactory();beanFactory.registerSingleton("springApplicationArguments", applicationArguments);if (printedBanner != null) {beanFactory.registerSingleton("springBootBanner", printedBanner);}if (beanFactory instanceof DefaultListableBeanFactory) {((DefaultListableBeanFactory) beanFactory).setAllowBeanDefinitionOverriding(this.allowBeanDefinitionOverriding);}// Load the sourcesSet
7.1: 从initializers集合中遍历所有的ApplicationContextInitializer,并通过initializer.initialize( )方法初始化
7,2:回调SpringApplicationRunListener对象的contextPrepared()方法,表示容器已准备
<8>:refreshContext(context)刷新容器,初始化ioc容器,向容器中加入配置类、组件,并且可以出发自动配置功能,具体原理可以参考SpringBoot的自动配置原理和Spring注解版容器的加载
<9>: afterRefresh(context, applicationArguments);执行Spring容器初始化的后置处理,默认为空~~~javaprotected void afterRefresh(ConfigurableApplicationContext context,ApplicationArguments args) {}~~~
<10>: listeners.started(context);回调所有的SpringApplicationRunListener对象的started()方法
<11>: callRunners(context, applicationArguments)
~~~javaprivate void callRunners(ApplicationContext context, ApplicationArguments args) {List
<12>:listeners.running(context);回调所有SpringApplicationRunListener对象的running()方法
<13>:return context返回容器
至此,SpringBoot的启动过程已全部完毕,下一篇文章将会讲解SpringBoot的事件监听机制!
`


![[HBLOG]公众号](https://www.liuhaihua.cn/img/qrcode_gzh.jpg)

