SpringCloud (GreenwichR2) 第二章 Feign 集成 附源码
官方文档
cloud.spring.io/spring-clou…
简介
Feign是一个声明性web服务客户端。它使编写web服务客户端变得更容易。使用feign创建一个接口并对其进行注释。它有可插入的注释支持,包括外部注释和jax-rs注释。feign还支持可插入的编码器和解码器。spring cloud增加了对spring mvc注释的支持,以及对使用spring web中默认使用的httpMessageConverter的支持。spring cloud集成了ribbon和eureka,在使用feign时提供了一个负载平衡的http客户端-----来自官方翻译。
其实Feign框架就是, 上一章第五节服务消费者 使用的一个工具,主要做的事情就是帮助服务消费者查找和调用服务。
下面我分三步走
- 创建一个服务消费者,增加OpenFeign框架,调用服务服务提供者的服务。
- 构建两个相同的服务提供者,在一个服务消费者使用OpenFeign框架,返回接口查看效果。
- OpenFeign的相关配置案例实现
一.集成OpenFeign框架,走通http请求
我们在上一章基础上创建一个服务消费者,步骤和上一章第五节类似,就是多了OpenFeign框架依赖。
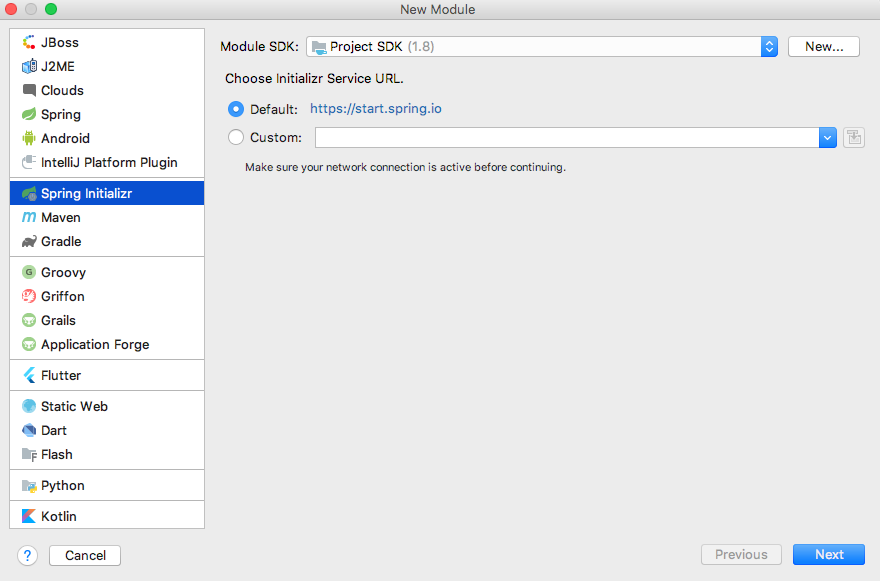
选中scloud项目,右击 New - Module - Spring Initializr

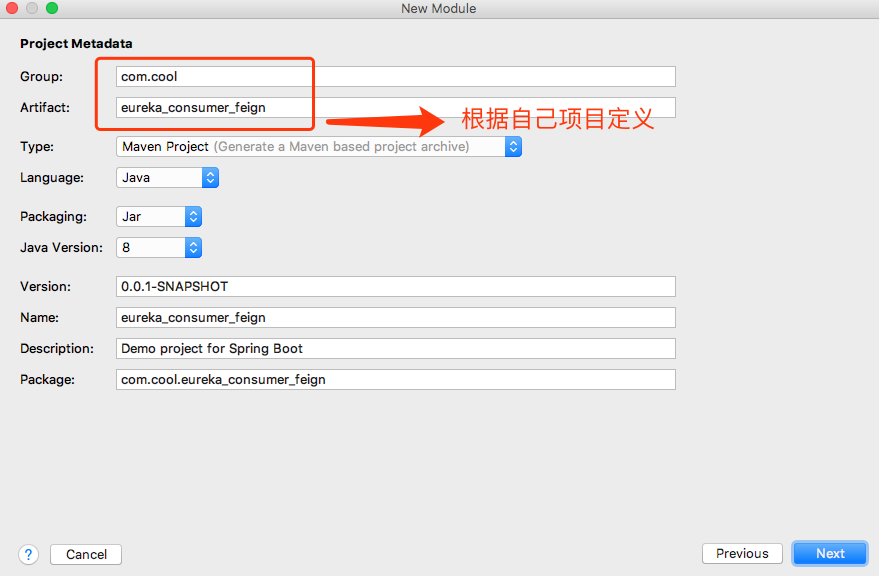
next

next

修改模块的pom文件
<?xml version="1.0" encoding="UTF-8"?>
<project xmlns="http://maven.apache.org/POM/4.0.0" xmlns:xsi="http://www.w3.org/2001/XMLSchema-instance"
         xsi:schemaLocation="http://maven.apache.org/POM/4.0.0 https://maven.apache.org/xsd/maven-4.0.0.xsd">
    <modelVersion>4.0.0</modelVersion>
    <!--继承自主工程-->
    <parent>
        <artifactId>scloud</artifactId>
        <groupId>com.cool</groupId>
        <version>1.0-SNAPSHOT</version>
    </parent>
    <groupId>com.cool</groupId>
    <artifactId>eureka_consumer_openfeign</artifactId>
    <version>0.0.1-SNAPSHOT</version>
    <name>eureka_consumer_openfeign</name>
    <description>Demo project for Spring Boot</description>

    <dependencies>
        <dependency>
            <groupId>org.springframework.cloud</groupId>
            <artifactId>spring-cloud-starter-netflix-eureka-client</artifactId>
        </dependency>
        <dependency>
            <groupId>org.springframework.cloud</groupId>
            <artifactId>spring-cloud-starter-openfeign</artifactId>
        </dependency>
        <dependency>
            <groupId>org.springframework.boot</groupId>
            <artifactId>spring-boot-starter-test</artifactId>
            <scope>test</scope>
        </dependency>
    </dependencies>
    <dependencyManagement>
        <dependencies>
            <dependency>
                <groupId>org.springframework.cloud</groupId>
                <artifactId>spring-cloud-dependencies</artifactId>
                <version>${spring-cloud.version}</version>
                <type>pom</type>
                <scope>import</scope>
            </dependency>
        </dependencies>
    </dependencyManagement>
    <build>
        <plugins>
            <plugin>
                <groupId>org.springframework.boot</groupId>
                <artifactId>spring-boot-maven-plugin</artifactId>
            </plugin>
        </plugins>
    </build>
</project>复制代码
在启动文件中增加 @EnableFeignClients 和 @EnableEurekaClient 注解
@SpringBootApplication
@EnableFeignClients
@EnableEurekaClient
public class EurekaConsumerOpenfeignApplication {

    public static void main(String[] args) {
        SpringApplication.run(EurekaConsumerOpenfeignApplication.class, args);
    }
}复制代码
修改 application.properties 文件
#端口号
server.port=8669
# 需要指明spring.application.name 这个很重要
# 这在以后的服务与服务之间相互调用一般都是根据这个
spring.application.name=eureka-openfeign
#服务注册中心实例的主机名
eureka.instance.hostname=localhost
#服务注册中心端口号
eureka.port=8666
#在此指定服务注册中心地址
eureka.client.service-url.defaultZone=http://${eureka.instance.hostname}:${eureka.port}/eureka/复制代码
至此配置已经完成,下面我们根据上面介绍,创建一个接口和一个Restful api进行测试下吧。
创建一个接口
@Component
@FeignClient(value = "eureka-client") // 这里eureka-client 即是服务提供者spring.application.name
public interface TestServer {
    @GetMapping(value = "/hello")
    public String sayHello(@RequestParam(value = "name", defaultValue = "gdl") String name);
}
复制代码
创建一个Restful Api
@RestController
@RequestMapping("/test")
public class TestController {
    @Autowired
    TestServer testServer;

    @GetMapping("/sayHello/{name}")
    public String sayHello(@PathVariable("name") String name){
        return testServer.sayHello(name);
    }
}
复制代码
现在可以和第一章一样,先启动 eureka_server 模块服务,在启动eureka_client 模块提供服务,最后启动我们现在配置的服务 访问 http://localhost:8666 查看下服务提供者

访问下 本模块配置Restful 接口 http://localhost:8669/test/sayHello/world 哇!通了~

由此看出Feign扮演的角色,就是查找和调用服务提供者服务。
二.构建两个相同的服务提供者
那我就仿照第一章第四节的内容,在创建一个服务提供者就命名eureka_client1吧,下面会给出源码,eureka_client1和eureka_client的代码没什么区别,这里我就不贴了。
不一样的是 eureka_client1 的 application.properties 文件修改 server.port =8670
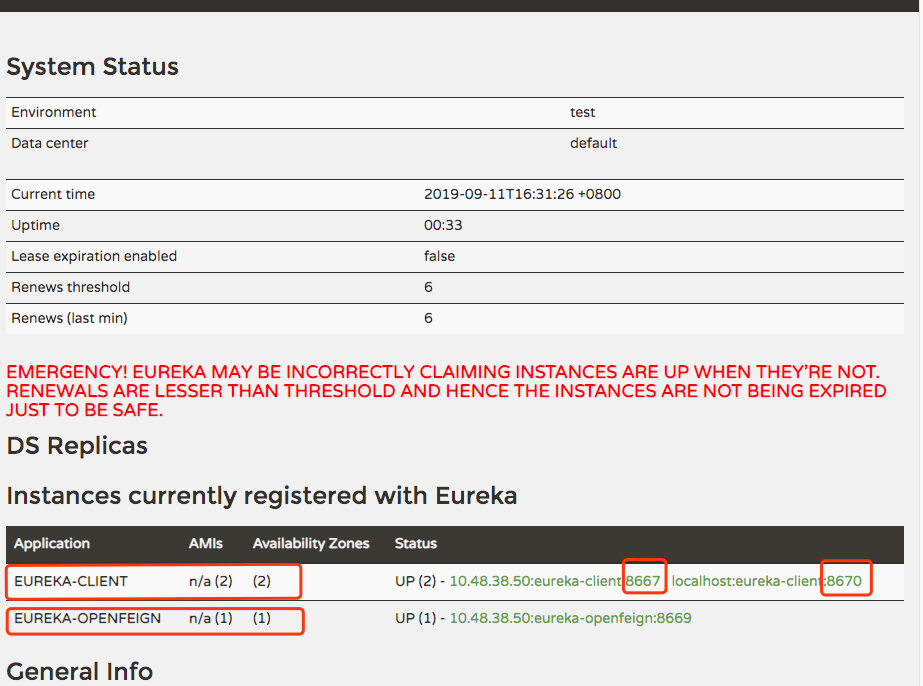
然后我们启动 eureka_server 模块服务,在启动eureka_client1 和 eureka_client 两个服务 提供模块, 最后启动我们现在配置的服务, 访问下 http://localhost:8666 查看下已注册的服务

最后启动 本模块配置的Restful 接口 http://localhost:8669/test/sayHello/world 多刷几下,是不是出现了下面结果。


是不是so easy !
三.声明性web服务客户端有哪些配置
配置这边暂时留白了,集成项目的时候一个个列出常用的配置,时间宝贵,赶紧研究下一个技术之Gateway。
切换到 f_openfeign 分支!!!
- 本文标签: ribbon map 实例 client 翻译 id https API 服务注册 REST ACE db Spring cloud cat App build web IO git RESTful 注册中心 Eureka http 端口 springcloud description 注释 schema apache plugin ip Netflix UI value 主机 源码 springboot tar 时间 consumer spring Service pom Feign 配置 XML src 测试 Spring Boot 代码 dependencies message maven
- 版权声明: 本文为互联网转载文章,出处已在文章中说明(部分除外)。如果侵权,请联系本站长删除,谢谢。
- 本文海报: 生成海报一 生成海报二


![[HBLOG]公众号](https://www.liuhaihua.cn/img/qrcode_gzh.jpg)

