Spring Security 解析(六) —— 基于JWT的单点登陆(SSO)开发及原理解析
Spring Security 解析(六) —— 基于JWT的单点登陆(SSO)开发及原理解析
在学习Spring Cloud 时,遇到了授权服务oauth 相关内容时,总是一知半解,因此决定先把Spring Security 、Spring Security Oauth2 等权限、认证相关的内容、原理及设计学习并整理一遍。本系列文章就是在学习的过程中加强印象和理解所撰写的,如有侵权请告知。
项目环境:
- JDK1.8
- Spring boot 2.x
- Spring Security 5.x
单点登录(Single Sign On),简称为SSO,是目前比较流行的企业业务整合的解决方案之一。 SSO的定义是在多个应用系统中,用户只需要登录一次就可以访问所有相互信任的应用系统。单点登陆本质上也是OAuth2的使用,所以其开发依赖于授权认证服务,如果不清楚的可以看我的上一篇文章。
一、 单点登陆 Demo开发
从单点登陆的定义上来看就知道我们需要新建个应用程序,我把它命名为 security-sso-client。接下的开发就在这个应用程序上了。
一、Maven 依赖
主要依赖 spring-boot-starter-security、spring-security-oauth2-autoconfigure、spring-security-oauth2 这3个。其中 spring-security-oauth2-autoconfigure 是Spring Boot 2.X 才有的。
<dependency>
            <groupId>org.springframework.boot</groupId>
            <artifactId>spring-boot-starter-security</artifactId>
        </dependency>
        <dependency>
            <groupId>org.springframework.boot</groupId>
            <artifactId>spring-boot-starter-data-redis</artifactId>
        </dependency>
        <!--@EnableOAuth2Sso 引入,Spring Boot 2.x 将这个注解移到该依赖包-->
        <dependency>
            <groupId>org.springframework.security.oauth.boot</groupId>
            <artifactId>spring-security-oauth2-autoconfigure</artifactId>
            <exclusions>
                <exclusion>
                    <groupId>org.springframework.security.oauth</groupId>
                    <artifactId>spring-security-oauth2</artifactId>
                </exclusion>
            </exclusions>
            <version>2.1.7.RELEASE</version>
        </dependency>
        <!-- 不是starter,手动配置 -->
        <dependency>
            <groupId>org.springframework.security.oauth</groupId>
            <artifactId>spring-security-oauth2</artifactId>
            <!--请注意下 spring-authorization-oauth2 的版本 务必高于 2.3.2.RELEASE,这是官方的一个bug:
            java.lang.NoSuchMethodError: org.springframework.data.redis.connection.RedisConnection.set([B[B)V
            要求必须大于2.3.5 版本,官方解释:https://github.com/BUG9/spring-security/network/alert/pom.xml/org.springframework.security.oauth:spring-security-oauth2/open
            -->
            <version>2.3.5.RELEASE</version>
        </dependency>复制代码
二、单点配置 @EnableOAuth2Sso
单点的基础配置引入是依赖 @EnableOAuth2Sso 实现的,在Spring Boot 2.x 及以上版本 的 @EnableOAuth2Sso 是在 spring-security-oauth2-autoconfigure 依赖里的。我这里简单配置了一下:
@Configuration
@EnableOAuth2Sso
public class ClientSecurityConfig extends WebSecurityConfigurerAdapter {

    @Override
    public void configure(HttpSecurity http) throws Exception {
        http.authorizeRequests()
                .antMatchers("/","/error","/login").permitAll()
                .anyRequest().authenticated()
                .and()
                .csrf().disable();
    }
}复制代码
因为单点期间可能存在某些问题,会重定向到 /error ,所以我们把 /error 设置成无权限访问。
三、测试接口及页面
测试接口
@RestController
  @Slf4j
  public class TestController {

      @GetMapping("/client/{clientId}")
      public String getClient(@PathVariable String clientId) {
          return clientId;
      }

  }复制代码
测试页面
<!DOCTYPE html>
    <html lang="en">
    <head>
        <meta charset="UTF-8">
        <title>OSS-client</title>
    </head>
    <body>
    <h1>OSS-client</h1>
    <a href="http://localhost:8091/client/1">跳转到OSS-client-1</a>
    <a href="http://localhost:8092/client/2">跳转到OSS-client-2</a>
    </body>
    </html>复制代码
四、单点配置文件配置授权信息
由于我们要测试多应用间的单点,所以我们至少需要2个单点客户端,我这边通过Spring Boot 的多环境配置实现。
application.yml 配置
我们都知道单点实现本质就是Oauth2的授权码模式,所以我们需要配置访问授权服务器的地址信息,包括 :
- security.oauth2.client.user-authorization-uri = /oauth/authorize 请求认证的地址,即获取code 码
- security.oauth2.client.access-token-uri = /oauth/token 请求令牌的地址
- security.oauth2.resource.jwt.key-uri = /oauth/token_key 解析jwt令牌所需要密钥的地址,服务启动时会调用 授权服务该接口获取jwt key,所以务必保证授权服务正常
- security.oauth2.client.client-id = client1 clientId 信息
- security.oauth2.client.client-secret = 123456 clientSecret 信息
其中有几个配置需要简单解释下:
- security.oauth2.sso.login-path=/login OAuth2授权服务器触发重定向到客户端的路径 ,默认为 /login,这个路径要与授权服务器的回调地址(域名)后的路径一致
- server.servlet.session.cookie.name = OAUTH2CLIENTSESSION 解决单机开发存在的问题,如果是非单机开发可忽略其配置
auth-server: http://localhost:9090 # authorization服务地址


security:
  oauth2:
    client:
      user-authorization-uri: ${auth-server}/oauth/authorize #请求认证的地址
      access-token-uri: ${auth-server}/oauth/token #请求令牌的地址
    resource:
      jwt:
        key-uri: ${auth-server}/oauth/token_key #解析jwt令牌所需要密钥的地址,服务启动时会调用 授权服务该接口获取jwt key,所以务必保证授权服务正常
    sso:
      login-path: /login #指向登录页面的路径,即OAuth2授权服务器触发重定向到客户端的路径 ,默认为 /login

server:
  servlet:
    session:
      cookie:
        name: OAUTH2CLIENTSESSION  # 解决  Possible CSRF detected - state parameter was required but no state could be found  问题
spring:
  profiles:
    active: client1
    复制代码
application-client1.yml 配置
application-client2 和 application-client1是一样的,只是端口号和client信息不一样而已,这里就不再重复贴出了。
server:
  port: 8091

security:
  oauth2:
    client:
      client-id: client1
      client-secret: 123456
    复制代码
五、单点测试
效果如下:

从效果图中我们可以发现,当我们第一次访问client2 的接口时,跳转到了授权服务的登陆界面,完成登陆后成功跳转回到了client2 的测试接口,并且展示了接口返回值。此时我们访问client1 的 测试接口时直接返回(表面现象)了接口返回值。这就是单点登陆的效果,好奇心强的同学一定会在心里问道:它是如何实现的? 那么接下来我们就来揭开其面纱。
二、 单点登陆原理解析
一、@EnableOAuth2Sso
我们都知道 @EnableOAuth2Sso 是实现单点登陆的最核心配置注解,那么我们来看下 @EnableOAuth2Sso 的源码:
@Target(ElementType.TYPE)
@Retention(RetentionPolicy.RUNTIME)
@Documented
@EnableOAuth2Client
@EnableConfigurationProperties(OAuth2SsoProperties.class)
@Import({ OAuth2SsoDefaultConfiguration.class, OAuth2SsoCustomConfiguration.class,
        ResourceServerTokenServicesConfiguration.class })
public @interface EnableOAuth2Sso {

}复制代码
其中我们关注4个配置文件的引用: ResourceServerTokenServicesConfiguration 、OAuth2SsoDefaultConfiguration 、 OAuth2SsoProperties 和 @EnableOAuth2Client:
- OAuth2SsoDefaultConfiguration 单点登陆的核心配置,内部创建了 SsoSecurityConfigurer 对象, SsoSecurityConfigurer 内部 主要是配置 OAuth2ClientAuthenticationProcessingFilter 这个单点登陆核心过滤器之一。
- ResourceServerTokenServicesConfiguration 内部读取了我们在 yml 中配置的信息
- OAuth2SsoProperties 配置了回调地址url ,这个就是 security.oauth2.sso.login-path=/login 匹配的
- @EnableOAuth2Client 标明单点客户端,其内部 主要 配置了 OAuth2ClientContextFilter 这个单点登陆核心过滤器之一
二、 OAuth2ClientContextFilter
OAuth2ClientContextFilter 过滤器类似于 ExceptionTranslationFilter , 它本身没有做任何过滤处理,只要当 chain.doFilter() 出现异常后 做出一个重定向处理。 但别小看这个重定向处理,它可是实现单点登陆的第一步,还记得第一次单点时会跳转到授权服务器的登陆页面么?而这个功能就是 OAuth2ClientContextFilter 实现的。我们来看下其源码:
public void doFilter(ServletRequest servletRequest,
              ServletResponse servletResponse, FilterChain chain)
              throws IOException, ServletException {
          HttpServletRequest request = (HttpServletRequest) servletRequest;
          HttpServletResponse response = (HttpServletResponse) servletResponse;
          request.setAttribute(CURRENT_URI, calculateCurrentUri(request)); // 1、记录当前地址(currentUri)到HttpServletRequest

          try {
              chain.doFilter(servletRequest, servletResponse);
          } catch (IOException ex) {
              throw ex;
          } catch (Exception ex) {
              // Try to extract a SpringSecurityException from the stacktrace
              Throwable[] causeChain = throwableAnalyzer.determineCauseChain(ex);
              UserRedirectRequiredException redirect = (UserRedirectRequiredException) throwableAnalyzer
                      .getFirstThrowableOfType(
                              UserRedirectRequiredException.class, causeChain);
              if (redirect != null) {  // 2、判断当前异常 UserRedirectRequiredException 对象 是否为空
                  redirectUser(redirect, request, response); // 3、重定向访问 授权服务 /oauth/authorize
              } else {
                  if (ex instanceof ServletException) {
                      throw (ServletException) ex;
                  }
                  if (ex instanceof RuntimeException) {
                      throw (RuntimeException) ex;
                  }
                  throw new NestedServletException("Unhandled exception", ex);
              }
          }
      }复制代码
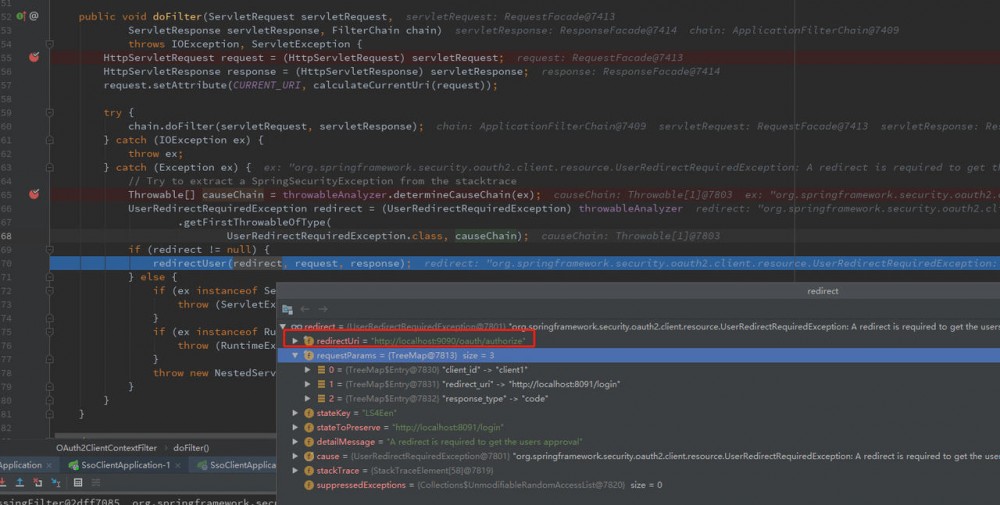
Debug看下: 
整个 filter 分三步:
- 1、记录当前地址(currentUri)到HttpServletRequest
- 2、判断当前异常 UserRedirectRequiredException 对象 是否为空
- 3、重定向访问 授权服务 /oauth/authorize
三、 OAuth2ClientAuthenticationProcessingFilter
OAuth2ClientContextFilter 过滤器 其要完成的工作就是 通过获取到的code码调用 授权服务 /oauth/token 接口获取 token 信息,并将获取到的token 信息解析成 OAuth2Authentication 认证对象。起源如下:
@Override
      public Authentication attemptAuthentication(HttpServletRequest request, HttpServletResponse response)
              throws AuthenticationException, IOException, ServletException {

          OAuth2AccessToken accessToken;
          try {
              accessToken = restTemplate.getAccessToken(); //1、  调用授权服务获取token
          } catch (OAuth2Exception e) {
              BadCredentialsException bad = new BadCredentialsException("Could not obtain access token", e);
              publish(new OAuth2AuthenticationFailureEvent(bad));
              throw bad;
          }
          try {
              OAuth2Authentication result = tokenServices.loadAuthentication(accessToken.getValue()); // 2、  解析token信息为 OAuth2Authentication 认证对象并返回
              if (authenticationDetailsSource!=null) {
                  request.setAttribute(OAuth2AuthenticationDetails.ACCESS_TOKEN_VALUE, accessToken.getValue());
                  request.setAttribute(OAuth2AuthenticationDetails.ACCESS_TOKEN_TYPE, accessToken.getTokenType());
                  result.setDetails(authenticationDetailsSource.buildDetails(request));
              }
              publish(new AuthenticationSuccessEvent(result));
              return result;
          }
          catch (InvalidTokenException e) {
              BadCredentialsException bad = new BadCredentialsException("Could not obtain user details from token", e);
              publish(new OAuth2AuthenticationFailureEvent(bad));
              throw bad;
          }

      }复制代码
整个 filter 2点功能:
- restTemplate.getAccessToken(); //1、 调用授权服务获取token
- tokenServices.loadAuthentication(accessToken.getValue()); // 2、 解析token信息为 OAuth2Authentication 认证对象并返回
完成上面步骤后就是一个正常的security授权认证过程,这里就不再讲述,有不清楚的同学可以看下我写的相关文章。
四、 AuthorizationCodeAccessTokenProvider
在讲述 OAuth2ClientContextFilter 时有一点没讲,那就是 UserRedirectRequiredException 是 谁抛出来的。 在讲述 OAuth2ClientAuthenticationProcessingFilter 也有一点没讲到,那就是它是如何判断出 当前 /login 是属于 需要获取code码的步骤还是去获取 token 的步骤( 当然是判断/login 是否带有code 参数,这里主要讲明是谁来判断的)。 这2个点都设计到了 AuthorizationCodeAccessTokenProvider 这个类。这个类是何时被调用的?其实 OAuth2ClientAuthenticationProcessingFilter 隐藏在 restTemplate.getAccessToken(); 这个方法内部 调用的 accessTokenProvider.obtainAccessToken() 这里。 我们来看下OAuth2ClientAuthenticationProcessingFilter 的 obtainAccessToken() 方法内部源码:
public OAuth2AccessToken obtainAccessToken(OAuth2ProtectedResourceDetails details, AccessTokenRequest request)
              throws UserRedirectRequiredException, UserApprovalRequiredException, AccessDeniedException,
              OAuth2AccessDeniedException {

          AuthorizationCodeResourceDetails resource = (AuthorizationCodeResourceDetails) details;

          if (request.getAuthorizationCode() == null) {  //1、 判断当前参数是否包含code码
              if (request.getStateKey() == null) {
                  throw getRedirectForAuthorization(resource, request); //2、 不包含则抛出 UserRedirectRequiredException 异常
              }
              obtainAuthorizationCode(resource, request);
          }
          return retrieveToken(request, resource, getParametersForTokenRequest(resource, request),
                  getHeadersForTokenRequest(request)); // 3 、 包含则调用获取token

      }复制代码
整个方法内部分3步:
- 1、 判断当前参数是否包含code码
- 2、 不包含则抛出 UserRedirectRequiredException 异常
- 3、 包含继续获取token
最后可能有同学会问,为什么第一个客户端单点要跳转到授权服务登陆页面去登陆, 而当问第二个客户端却没有,其实 2次 客户端单点的流程都是一样的,都是授权码模式,但为什么客户端2 却不需要登陆呢? 其实是因为Cookies/Session的原因,因为我们访问同2个客户端基本上都是在同一个浏览器中进行的。 不信的同学可以试试2个浏览器分别访问2个单点客户端。
三、 个人总结
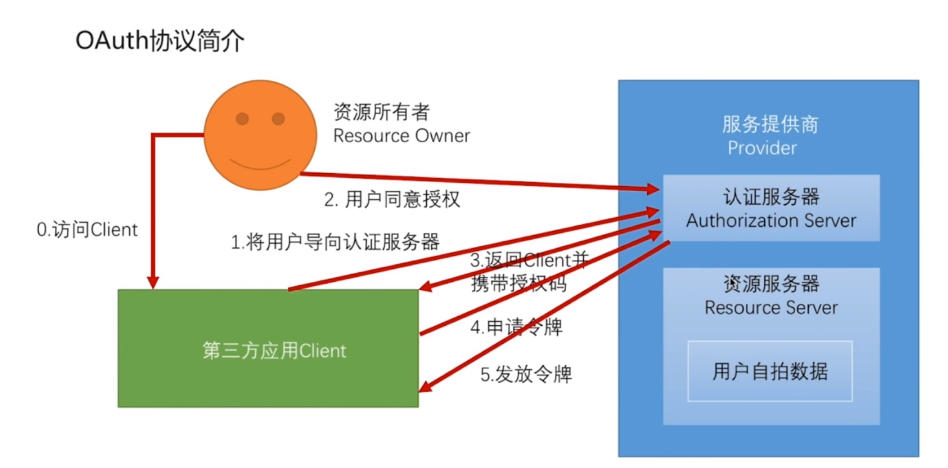
单点登陆本质上就是授权码模式,所以理解起来还是很容易的,如果非要给个流程图,还是那张授权码流程图:

本文介绍 基于JWT的单点登陆(SSO)开发及原理解析 开发的代码可以访问代码仓库 ,项目的github 地址 : https://github.com/BUG9/spring-security
如果您对这些感兴趣,欢迎star、follow、收藏、转发给予支持!
- 本文标签: java key build pom IO map session App 开发 源码 ACE https bug IDE spring XML Connection maven Service 密钥 cookies CEO 参数 测试 http git Spring Security redis rmi Document 企业 端口 Security cat Spring cloud 域名 REST 服务器 src servlet Spring Boot UI 解析 provider authenticate Authorization tar token 代码 web value client id 配置 2019 HTML 总结 认证 文章 CDN 本质 GitHub
- 版权声明: 本文为互联网转载文章,出处已在文章中说明(部分除外)。如果侵权,请联系本站长删除,谢谢。
- 本文海报: 生成海报一 生成海报二


![[HBLOG]公众号](https://www.liuhaihua.cn/img/qrcode_gzh.jpg)

