SpringBoot集成Druid连接池
关于数据库连接池
-
早期数据库访问(也没多少人上网)
①装载数据库驱动程序;
②通过jdbc建立数据库连接;
③访问数据库,执行sql语句;
④断开数据库连接。
对于并发量大的网站,会导致以下问题:
-
每一次web请求都要建立一次数据库连接,在同样的步骤下重复占用系统资源
-
不能控制被创建的连接对象数,系统资源会被毫无顾及的分配出去
如连接过多,也可能导致内存泄漏,服务器崩溃。
-
-
数据库连接池
连接池的作用是为了提高性能,将已经创建好的连接保存在池中,当有请求来时,直接使用已经创建好的连接对Server端进行访问。
这样省略(复用)了创建连接和销毁连接的过程(TCP连接建立时的三次握手和销毁时的四次握手),从而在性能上得到了提高。
-
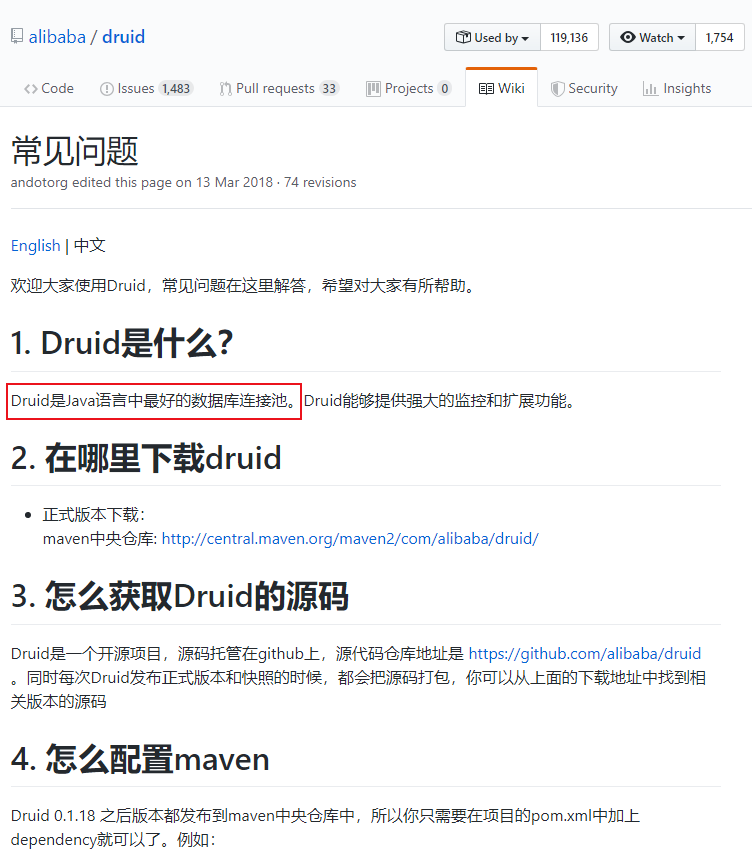
嚣张的Druid(GitHub的Wiki上自称是Java语言最好的数据库连接池)

集成Druid
在上次Thymeleaf基础上进行集成
https://www.cnblogs.com/noneplus/p/11528129.html
- 引入pom
<!-- https://mvnrepository.com/artifact/com.alibaba/druid -->
<dependency>
    <groupId>com.alibaba</groupId>
    <artifactId>druid</artifactId>
    <version>1.1.20</version>
</dependency>
-
yaml
spring: datasource: # 数据源基本配置 username: noneplus password: Noneplus564925080! driver-class-name: com.mysql.cj.jdbc.Driver url: jdbc:mysql://47.103.6.247:3306/user?serverTimezone=UTC type: com.alibaba.druid.pool.DruidDataSource # Druid数据源配置 initialSize: 5 minIdle: 5 maxActive: 20 maxWait: 60000 timeBetweenEvictionRunsMillis: 60000 minEvictableIdleTimeMillis: 300000 validationQuery: SELECT 1 FROM DUAL testWhileIdle: true testOnBorrow: false testOnReturn: false poolPreparedStatements: true # 配置监控统计拦截的filters,去掉后监控界面sql无法统计,'wall'用于防火墙 filters: stat,wall,log4j maxPoolPreparedStatementPerConnectionSize: 20 useGlobalDataSourceStat: true connectionProperties: druid.stat.mergeSql=true;druid.stat.slowSqlMillis=500 thymeleaf: cache: false pagehelper: helperDialect: mysql reasonable: true supportMethodsArguments: true pageSizeZero: false #pageSize=0 -
DruidConfig
package zkrun.top.web.config; import com.alibaba.druid.pool.DruidDataSource; import com.alibaba.druid.support.http.StatViewServlet; import com.alibaba.druid.support.http.WebStatFilter; import org.springframework.boot.context.properties.ConfigurationProperties; import org.springframework.boot.web.servlet.FilterRegistrationBean; import org.springframework.boot.web.servlet.ServletRegistrationBean; import org.springframework.context.annotation.Bean; import org.springframework.context.annotation.Configuration; import javax.sql.DataSource; import java.util.Arrays; import java.util.HashMap; import java.util.Map; @Configuration public class DruidConfig { //加载application.yaml中的Druid配置 @ConfigurationProperties(prefix = "spring.datasource") @Bean public DataSource druid(){ return new DruidDataSource(); } //配置Druid的监控 //1、配置一个管理后台的Servlet @Bean public ServletRegistrationBean statViewServlet(){ ServletRegistrationBean bean = new ServletRegistrationBean(new StatViewServlet(), "/druid/*"); Map<String,String> initParams = new HashMap<>(); initParams.put("loginUsername","hq"); initParams.put("loginPassword","564925080"); initParams.put("allow","");//默认就是允许所有访问 initParams.put("deny","192.168.15.21"); bean.setInitParameters(initParams); return bean; } //2、配置一个web监控的filter @Bean public FilterRegistrationBean webStatFilter(){ FilterRegistrationBean bean = new FilterRegistrationBean(); bean.setFilter(new WebStatFilter()); Map<String,String> initParams = new HashMap<>(); initParams.put("exclusions","*.js,*.css,/druid/*"); bean.setInitParameters(initParams); bean.setUrlPatterns(Arrays.asList("/*")); return bean; } } -
log4j
<dependency>
            <groupId>log4j</groupId>
            <artifactId>log4j</artifactId>
            <version>1.2.17</version>
        </dependency>
测试
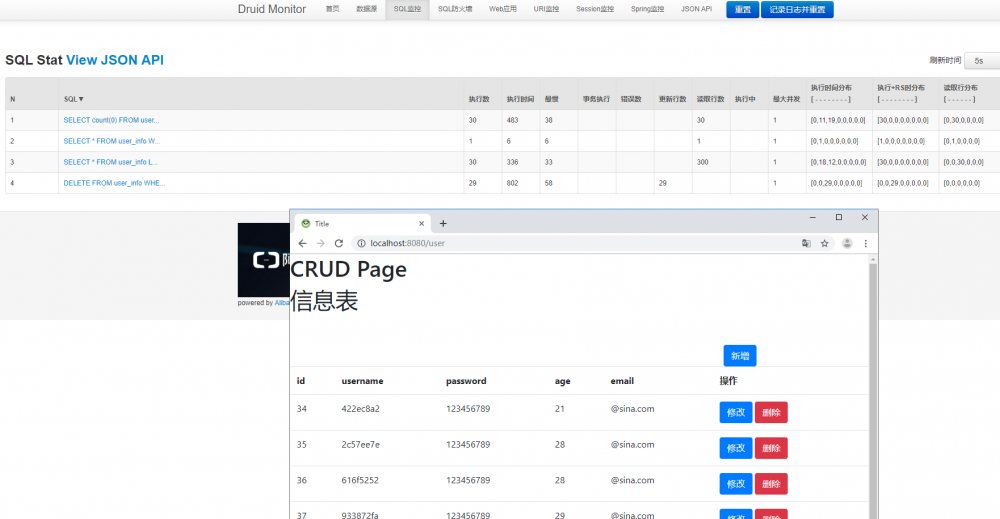
访问:
http://localhost:8080/druid/

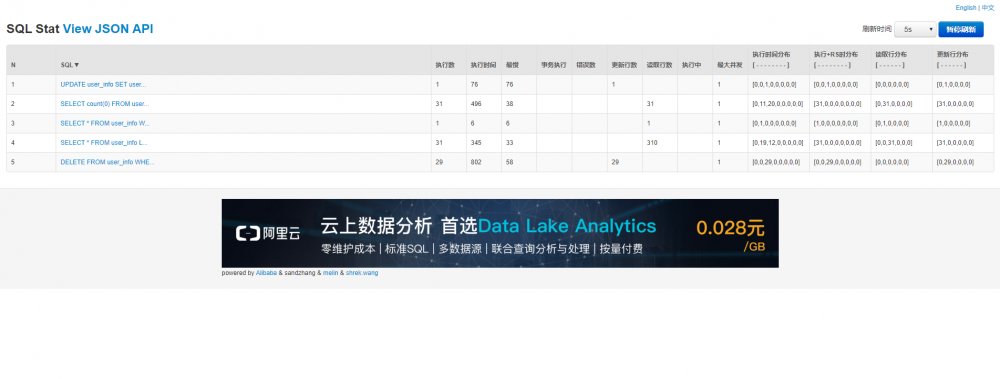
实时监控:


数据源配置文件密码加密显示
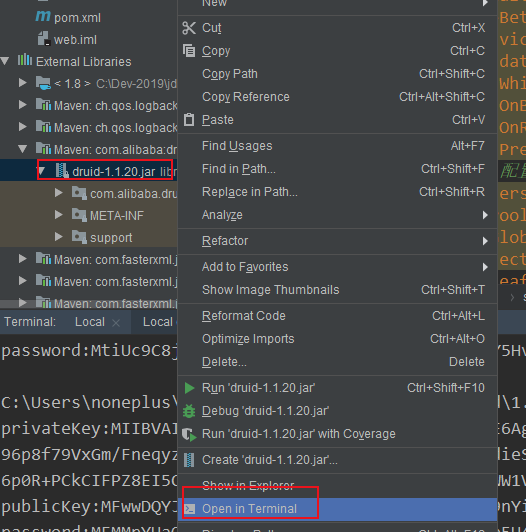
- 找到jar包,在终端打开:

- 生成密码
java -cp druid-1.0.16.jar com.alibaba.druid.filter.config.ConfigTools yourPassword
其中druid-1.0.16.jar换成正在使用对应的版本,yourPassword改成数据库连接的密码。
生成privateKey和publicKey以及password
privateKey:MIIBVAIBADANBgkqhkiG9w0BAQEFAASCAT4wggE6AgEAAkEAgiX0+n2diIixWASA642qrI8hTo2xg1LItfeDFwGEg9G1wvlarF69gq+wDBpPhY63DDbry8d3I/vNZMaG0bGxwwIDAQABAkAQfiDiUWLSN4hJwCBaOVSkk2rEGp6hJq
96p8f79VxGm/FneqyzLgiIQvvIutsOWSSQses+C/cDoXYEgfddieSpAiEAuq1lcFuBPh7MWZwlbIi0GM4+/1tNQed+W9Lm3qGJYk0CIQCyepaXbrY8Vk8pUZMOKr74kFFBfG5WqbAJuNYym1PMTwIgZttPfx8METxLADzm6exQvzI0x+J4qQ1yNAn
6p0R+PCkCIFPZ8EI5C3kRe6OH5bT0NECHXQWNNjGVC1Wl90xTWW1VAiEAnKdXLI45e1e8jgpCQ4TG90PmDlKlrcxUnBiHUrOhyew=
publicKey:MFwwDQYJKoZIhvcNAQEBBQADSwAwSAJBAIIl9Pp9nYiIsVgEgOuNqqyPIU6NsYNSyLX3gxcBhIPRtcL5WqxevYKvsAwaT4WOtww268vHdyP7zWTGhtGxscMCAwEAAQ==
password:MEMMpYHaOUFVuaR37bMbUmGW76WVSLAD7pnFLrbup5H4Q6sZvWMDsYAcnZvAL2hY2Man1rc6SCJMYwrse1xPKw==
- yaml配置
修改password,添加公钥。
spring:
  datasource:
    #   数据源基本配置
    username: noneplus
    password: MEMMpYHaOUFVuaR37bMbUmGW76WVSLAD7pnFLrbup5H4Q6sZvWMDsYAcnZvAL2hY2Man1rc6SCJMYwrse1xPKw==   # 1.配置生成的password
    driver-class-name: com.mysql.cj.jdbc.Driver
    url: jdbc:mysql://47.103.6.247:3306/user?serverTimezone=UTC
    type: com.alibaba.druid.pool.DruidDataSource
    #   Druid数据源配置
    initialSize: 5
    minIdle: 5
    maxActive: 20
    maxWait: 60000
    timeBetweenEvictionRunsMillis: 60000
    minEvictableIdleTimeMillis: 300000
    validationQuery: SELECT 1 FROM DUAL
    testWhileIdle: true
    testOnBorrow: false
    testOnReturn: false
    poolPreparedStatements: true
    #   配置监控统计拦截的filters,去掉后监控界面sql无法统计,'wall'用于防火墙
    filters: stat,wall,log4j,config  # 3.添加config
    maxPoolPreparedStatementPerConnectionSize: 20
    useGlobalDataSourceStat: true
    # 2.开启加密,配置公钥
    connectionProperties: druid.stat.mergeSql=true;druid.stat.slowSqlMillis=500;config.decrypt=true;config.decrypt.key=MFwwDQYJKoZIhvcNAQEBBQADSwAwSAJBAIIl9Pp9nYiIsVgEgOuNqqyPIU6NsYNSyLX3gxcBhIPRtcL5WqxevYKvsAwaT4WOtww268vHdyP7zWTGhtGxscMCAwEAAQ==
  thymeleaf:
    cache: false
pagehelper:
  helperDialect: mysql
  reasonable: true
  supportMethodsArguments: true
  pageSizeZero: false #pageSize=0
代码参考
https://github.com/HCJ-shadow/SpringBootPlus
正文到此结束
- 本文标签: cat 连接池 GitHub java Connection ip IO 配置 并发 HTML tab http 数据库 HashMap 管理 spring dataSource servlet cache map druid App 测试 统计 js 数据库访问 CSS pagehelper mysql list bean sql Statement TCP 服务器 src https springboot 数据 UTC key pom kk 网站 JDBC 代码 web lib git id UI 加密 Select db Word
- 版权声明: 本文为互联网转载文章,出处已在文章中说明(部分除外)。如果侵权,请联系本站长删除,谢谢。
- 本文海报: 生成海报一 生成海报二
热门推荐
相关文章
Loading...


![[HBLOG]公众号](https://www.liuhaihua.cn/img/qrcode_gzh.jpg)

