SSM+maven实现答题管理系统(一)
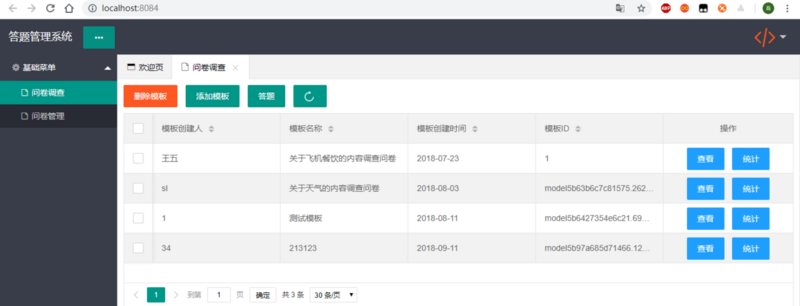
最近项目比较忙,然后又生病了,都没时间写博客了QAQ。这次我带来了SSM框架搭建的一个答题管理系统,之前我用的tp框架构建的 答题管理系统 ,这次我用SSM框架重构了一下
1.前期准备
SSM架构的相关知识(Spring+Springmvc+mybatis)
IDEA/eclipse/myeclipse编译器
layui文档的bang助: layui开发使用文档
默认的maven配置
Navicat/mysql workbench等数据库可视化管理工具
使用IDEA创建maven项目
2.架构设计(mvc)
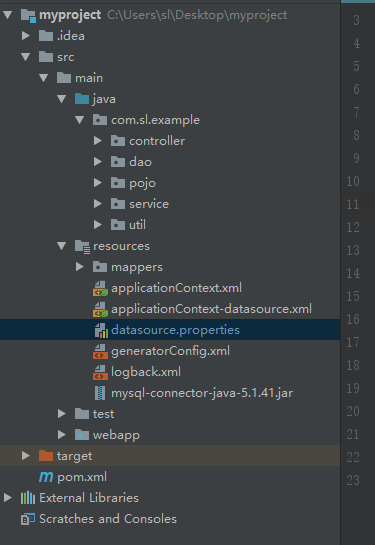
首先将resources包设置为Resource Root
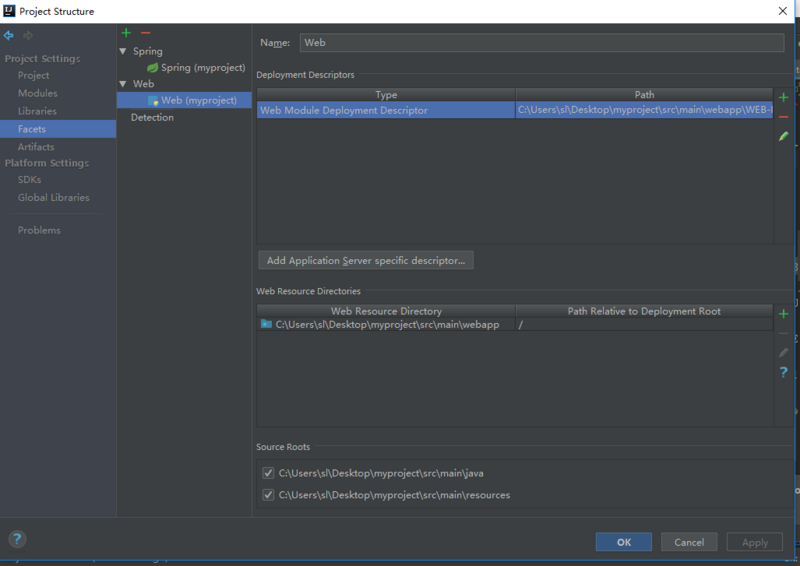
将webapp包设置为Web项目目录
指定Web目录:
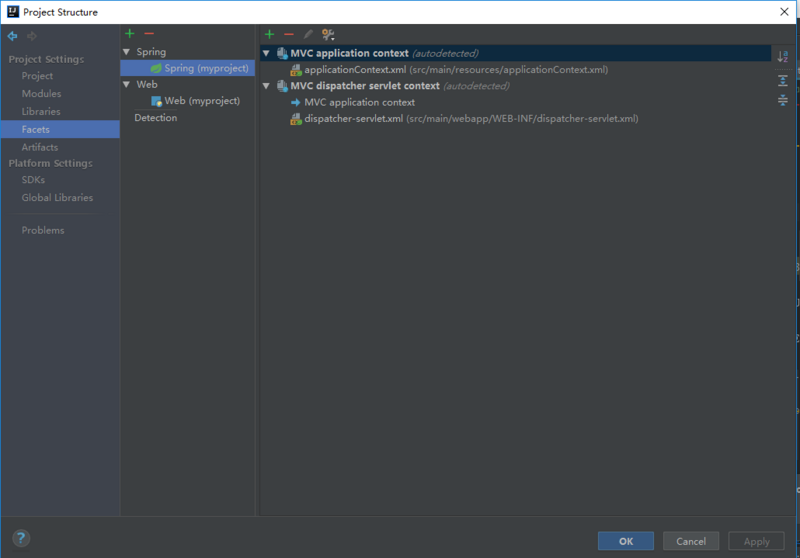
指定Spring配置文件目录:
model层采用mybatis进行持久化处理
mybatis generator插件进行逆向工程,
以下说明几个配置文件:
applicationContext:Springmvc配置文件
<?xml version="1.0" encoding="UTF-8"?>
<beans xmlns="http://www.springframework.org/schema/beans"
       xmlns:xsi="http://www.w3.org/2001/XMLSchema-instance" xmlns:aop="http://www.springframework.org/schema/aop"
       xmlns:tx="http://www.springframework.org/schema/tx" xmlns:jdbc="http://www.springframework.org/schema/jdbc"
       xmlns:context="http://www.springframework.org/schema/context"
       xsi:schemaLocation="
     http://www.springframework.org/schema/context http://www.springframework.org/schema/context/spring-context.xsd
     http://www.springframework.org/schema/beans http://www.springframework.org/schema/beans/spring-beans.xsd
     http://www.springframework.org/schema/tx http://www.springframework.org/schema/tx/spring-tx.xsd
     http://www.springframework.org/schema/aop http://www.springframework.org/schema/aop/spring-aop.xsd">

    <!--扫描包下的注解-->
    <context:component-scan base-package="com.sl.example" annotation-config="true"/>

    <!--<context:annotation-config/>-->
    <aop:aspectj-autoproxy/>


    <import resource="applicationContext-datasource.xml"/>


</beans>
applicationContext-datasource.xml:数据库连接池配置文件
<?xml version="1.0" encoding="UTF-8"?>
<beans xmlns="http://www.springframework.org/schema/beans"
       xmlns:xsi="http://www.w3.org/2001/XMLSchema-instance" xmlns:aop="http://www.springframework.org/schema/aop"
       xmlns:tx="http://www.springframework.org/schema/tx" xmlns:jdbc="http://www.springframework.org/schema/jdbc"
       xmlns:context="http://www.springframework.org/schema/context"
       xsi:schemaLocation="
     http://www.springframework.org/schema/context http://www.springframework.org/schema/context/spring-context.xsd
     http://www.springframework.org/schema/beans http://www.springframework.org/schema/beans/spring-beans.xsd
     http://www.springframework.org/schema/tx http://www.springframework.org/schema/tx/spring-tx.xsd
     http://www.springframework.org/schema/aop http://www.springframework.org/schema/aop/spring-aop.xsd">

    <context:component-scan base-package="com.sl.example" annotation-config="true"/>

    <bean id="propertyConfigurer"
          class="org.springframework.beans.factory.config.PropertyPlaceholderConfigurer">
        <property name="order" value="2"/>
        <property name="ignoreUnresolvablePlaceholders" value="true"/>
        <property name="locations">
            <list>
                <value>classpath:datasource.properties</value>
            </list>
        </property>
        <property name="fileEncoding" value="utf-8"/>
    </bean>


    <bean id="dataSource" class="org.apache.commons.dbcp.BasicDataSource" destroy-method="close">
        <property name="driverClassName" value="${db.driverClassName}"/>
        <property name="url" value="${db.url}"/>
        <property name="username" value="${db.username}"/>
        <property name="password" value="${db.password}"/>
        <!-- 连接池启动时的初始值 -->
        <property name="initialSize" value="${db.initialSize}"/>
        <!-- 连接池的最大值 -->
        <property name="maxActive" value="${db.maxActive}"/>
        <!-- 最大空闲值.当经过一个高峰时间后,连接池可以慢慢将已经用不到的连接慢慢释放一部分,一直减少到maxIdle为止 -->
        <property name="maxIdle" value="${db.maxIdle}"/>
        <!-- 最小空闲值.当空闲的连接数少于阀值时,连接池就会预申请去一些连接,以免洪峰来时来不及申请 -->
        <property name="minIdle" value="${db.minIdle}"/>
        <!-- 最大建立连接等待时间。如果超过此时间将接到异常。设为-1表示无限制 -->
        <property name="maxWait" value="${db.maxWait}"/>
        <!--#给出一条简单的sql语句进行验证 -->
        <!--<property name="validationQuery" value="select getdate()" />-->
        <property name="defaultAutoCommit" value="${db.defaultAutoCommit}"/>
        <!-- 回收被遗弃的(一般是忘了释放的)数据库连接到连接池中 -->
        <!--<property name="removeAbandoned" value="true" />-->
        <!-- 数据库连接过多长时间不用将被视为被遗弃而收回连接池中 -->
        <!--<property name="removeAbandonedTimeout" value="120" />-->
        <!-- #连接的超时时间,默认为半小时。 -->
        <property name="minEvictableIdleTimeMillis" value="${db.minEvictableIdleTimeMillis}"/>

        <!--# 失效检查线程运行时间间隔,要小于MySQL默认-->
        <property name="timeBetweenEvictionRunsMillis" value="40000"/>
        <!--# 检查连接是否有效-->
        <property name="testWhileIdle" value="true"/>
        <!--# 检查连接有效性的SQL语句-->
        <property name="validationQuery" value="SELECT 1 FROM dual"/>
    </bean>

    <bean id="sqlSessionFactory" class="org.mybatis.spring.SqlSessionFactoryBean">
        <property name="dataSource" ref="dataSource"/>
        <property name="mapperLocations" value="classpath*:mappers/*Mapper.xml"></property>

        <!-- 分页插件 -->
        <property name="plugins">
            <array>
                <bean class="com.github.pagehelper.PageHelper">
                    <property name="properties">
                        <value>
                            dialect=mysql
                        </value>
                    </property>
                </bean>
            </array>
        </property>

    </bean>

    <bean name="mapperScannerConfigurer" class="org.mybatis.spring.mapper.MapperScannerConfigurer">
        <property name="basePackage" value="com.sl.example.dao"/>
    </bean>

    <!-- 使用@Transactional进行声明式事务管理需要声明下面这行 -->
    <tx:annotation-driven transaction-manager="transactionManager" proxy-target-class="true" />
    <!-- 事务管理 -->
    <bean id="transactionManager" class="org.springframework.jdbc.datasource.DataSourceTransactionManager">
        <property name="dataSource" ref="dataSource"/>
        <!--提交失败是否回滚-->
        <property name="rollbackOnCommitFailure" value="true"/>
    </bean>


</beans>
datasource.properties:数据库配置文件
# 配置下载的驱动包的位置
db.driverLocation = C:/java/mysql-connector-java-5.1.41.jar

# db.driverClassName = oracle.jdbc.driver.OracleDriver

db.driverClassName = com.mysql.jdbc.Driver

# db.url=jdbc:mysql://数据库IP:数据库 Port/database?characterEncoding=utf-8
db.url = jdbc:mysql://xxxx:3306/tp5?characterEncoding=utf-8
db.username =XXX
db.password =XXXXX

db.initialSize = 20
db.maxActive = 50
db.maxIdle = 20
db.minIdle = 10
db.maxWait = 10
db.defaultAutoCommit = true
db.minEvictableIdleTimeMillis = 3600000
generatorConfig.xml:mybatis generator逆向工程时的配置文件
<?xml version="1.0" encoding="UTF-8"?>
<!DOCTYPE generatorConfiguration
        PUBLIC "-//mybatis.org//DTD MyBatis Generator Configuration 1.0//EN"
        "http://mybatis.org/dtd/mybatis-generator-config_1_0.dtd">

<generatorConfiguration>
    <!--1.jdbcConnection设置数据库连接-->
    <!--2.javaModelGenerator设置类的生成位置-->
    <!--3.sqlMapGenerator设置生成xml的位置-->
    <!--4.javaClientGenerator设置生成dao层接口的位置-->
    <!--5.table设置要进行逆向工程的表名以及要生成的实体类的名称-->


    <properties resource="datasource.properties"></properties>

    <!--指定特定数据库的jdbc驱动jar包的位置-->
    <classPathEntry location="${db.driverLocation}"/>

    <context id="default" targetRuntime="MyBatis3">

        <!-- optional,旨在创建class时,对注释进行控制 -->
        <commentGenerator>
            <property name="suppressDate" value="true"/>
            <property name="suppressAllComments" value="true"/>
        </commentGenerator>

        <!--jdbc的数据库连接 -->
        <jdbcConnection
                driverClass="${db.driverClassName}"
                connectionURL="${db.url}"
                userId="${db.username}"
                password="${db.password}">
        </jdbcConnection>


        <!-- 非必需,类型处理器,在数据库类型和java类型之间的转换控制-->
        <javaTypeResolver>
            <property name="forceBigDecimals" value="false"/>
        </javaTypeResolver>


        <!-- Model模型生成器,用来生成含有主键key的类,记录类 以及查询Example类
            targetPackage     指定生成的model生成所在的包名
            targetProject     指定在该项目下所在的路径
        -->
        <javaModelGenerator targetPackage="com.sl.example.pojo" targetProject="./src/main/java">
            <!-- 是否允许子包,即targetPackage.schemaName.tableName -->
            <property name="enableSubPackages" value="false"/>
            <!-- 是否对model添加 构造函数 -->
            <property name="constructorBased" value="true"/>
            <!-- 是否对类CHAR类型的列的数据进行trim操作 -->
            <property name="trimStrings" value="true"/>
            <!-- 建立的Model对象是否不可改变  即生成的Model对象不会有 setter方法,只有构造方法 -->
            <property name="immutable" value="false"/>
        </javaModelGenerator>

        <!--mapper映射文件生成所在的目录 为每一个数据库的表生成对应的SqlMap文件 -->
        <sqlMapGenerator targetPackage="mappers" targetProject="./src/main/resources">
            <property name="enableSubPackages" value="false"/>
        </sqlMapGenerator>

        <!-- 客户端代码,生成易于使用的针对Model对象和XML配置文件 的代码
                type="ANNOTATEDMAPPER",生成Java Model 和基于注解的Mapper对象
                type="MIXEDMAPPER",生成基于注解的Java Model 和相应的Mapper对象
                type="XMLMAPPER",生成SQLMap XML文件和独立的Mapper接口
        -->

        <!-- targetPackage:mapper接口dao生成的位置 -->
        <javaClientGenerator type="XMLMAPPER" targetPackage="com.sl.example.dao" targetProject="./src/main/java">
            <!-- enableSubPackages:是否让schema作为包的后缀 -->
            <property name="enableSubPackages" value="false" />
        </javaClientGenerator>

        <!-- tablenName: 数据库表名
                domainObjectName: 生成的类名
                enableCountByExample: 是否可以通过对象查数量
                enableUpdateByExample: 是否可以通过对象进行更新
        -->
        <table tableName="t_gr_user" domainObjectName="User" enableCountByExample="false" enableUpdateByExample="false" enableDeleteByExample="false" enableSelectByExample="false" selectByExampleQueryId="false"></table>

        <table tableName="t_gr_qsn_model" domainObjectName="Model" enableCountByExample="false" enableUpdateByExample="false" enableDeleteByExample="false" enableSelectByExample="false" selectByExampleQueryId="false">
        </table>
        <table tableName="t_gr_qsn" domainObjectName="Qsn" enableCountByExample="false" enableUpdateByExample="false" enableDeleteByExample="false" enableSelectByExample="false" selectByExampleQueryId="false">
        </table>
        <table tableName="t_gr_qsn_detail" domainObjectName="Detail" enableCountByExample="false" enableUpdateByExample="false" enableDeleteByExample="false" enableSelectByExample="false" selectByExampleQueryId="false">
        </table>
        <table tableName="t_gr_psg_qsn_r" domainObjectName="Choose" enableCountByExample="false" enableUpdateByExample="false" enableDeleteByExample="false" enableSelectByExample="false" selectByExampleQueryId="false">
        </table>
    </context>
</generatorConfiguration>
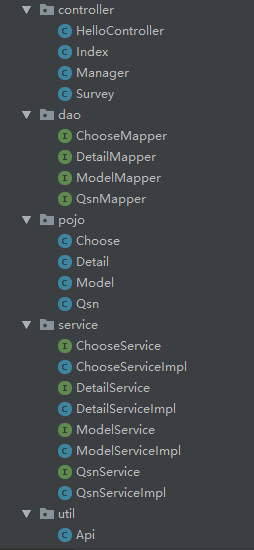
然后controller包下对应控制器
dao包下是逆向生成的DAO数据层
pojo包下是逆向生成的实体类
service是我们写的业务层
util是我们的工具类
最后的最后,我们数据库设计:
既然是答题管理系统。
一套题(即一个模板)(model表)对应多个题目(qsn表)
一个题目(qsn表)对应多个答案(detail表)
然后Navicat表设计如下:
model表:(t_gr_是前缀 rmkX是备用字段都不用管)

qsn表:(这里我没有设置外键 实际上qsn表的model_id应该设置外键)

detail表:(同上)

好了 说了那么多 终于做好所有的准备了,可以正式进入我们的开发了。
3.本章目标
与thinkphp实现答题管理系统对应,我们依旧先实现model表(答题模板的增加功能模块的实现)
4.View层实现(Jquery+layui)
首先是添加模板的View层实现。

引用了layui的按钮组样式 id为btn-add的按钮 即为添加模板按钮

点击添加模板 我们用Jquery设置其弹出了一个layui的弹出层 id为set-add-put
//弹出添加窗口
            $('#btn-add').click(function() {
                layer.open({
                    type: 1,
                    skin: 'layui-layer-rim', //加上边框
                    area: ['660px', '350px'], //宽高
                    content: $('#set-add-put'),
                    title: "添加模板"
                });
            });
如下
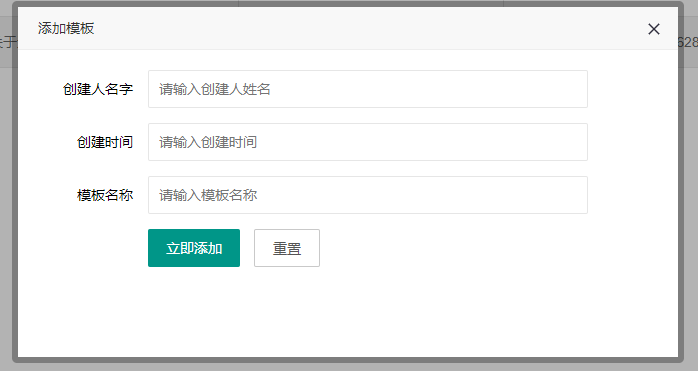
input框有三个,分别对应数据库的create_name,time,name。
<!--添加弹出层-->
    <div id="set-add-put" style="display:none; width:550px; padding:20px;">
        <form class="layui-form">
            <div class="layui-form-item">
                <label class="layui-form-label">创建人名字</label>
                <div class="layui-input-block">
                    <input type="text" name="create_name" required lay-verify="required" placeholder="请输入创建人姓名" autocomplete="off" class="layui-input">
                </div>
            </div>
            <div class="layui-form-item">
                <label class="layui-form-label">创建时间</label>
                <div class="layui-input-block">
                    <input type="text" name="time" required lay-verify="required" placeholder="请输入创建时间" autocomplete="off" class="layui-input" id="time">
                </div>
            </div>
            <div class="layui-form-item">
                <label class="layui-form-label">模板名称</label>
                <div class="layui-input-block">
                    <input type="text" name="name" required lay-verify="required" placeholder="请输入模板名称" autocomplete="off" class="layui-input">
                </div>
            </div>
            <div class="layui-form-item">
                <div class="layui-input-block">
                    <button type="button" class="layui-btn" lay-submit lay-filter="formDemo" id="add">立即添加</button>
                    <button type="reset" class="layui-btn layui-btn-primary">重置</button>
                </div>
            </div>
        </form>
    </div>
然后,我们数据点击立即添加按钮,id为add。我们对其用Jquery进行ajax请求。
//添加数据
            $('#add').click(function() {
                var create_name = $('input[name="create_name"]').val(); //获取值
                var name = $('input[name="name"]').val();
                var time = $('input[name="time"]').val();
                if (create_name !== '') {
                    //打开正在加载中弹出层
                    layer.msg('加载中', {
                        icon: 16,
                        shade: 0.01,
                        time: '9999999'
                    });
                    var url = "survey/add_model";//这里的url是相较与tp5的路由不同的地方
                    var data = {
                        create_name: create_name,
                        name: name,
                        time: time
                    }
                    $.post(url, data, function(data) { //使用ajax提交
                        layer.closeAll();
                        if (data.code == 1) { //这里的code对应返回的状态码
                            layer.msg(data.msg, {
                                icon: 6
                            });
                            location.reload();
                        } else {
                            layer.msg(data.msg, {
                                icon: 5
                            });
                        }
                    }, "json");
                }
            });
提交的data,就是我们输入框获取的三个值,create_name,name,time。
提交到Controller层,如果返回的数据状态码为代表成功的1,则刷新整个页面,否则,提示错误。
然后我们看看Controller层的代码。
5.Controller层实现
首先我在util包下定义了一个Api类用来存放我们的工具类,主要用于返回给前端json数据
package com.sl.example.util;

import java.util.HashMap;
import java.util.List;
import java.util.Map;

//code=1 success 2 fail 3 warning
public class Api {
    public Map<String,Object> returnJson(int code,String msg){
        Map map=new HashMap();
        map.put("code",code);
        map.put("msg",msg);
        return map;
    }

    public Map<String,Object> returnJson(int code, String msg, List<Map> data){
        Map map=new HashMap();
        map.put("code",code);
        map.put("msg",msg);
        map.put("data",data);
        return map;
    }

    public Map<String,Object> returnJson(int code, String msg, Map data){
        Map map=new HashMap();
        map.put("code",code);
        map.put("msg",msg);
        map.put("data",data);
        return map;
    }
}
返回的数据重载可选,三个为,code状态码,msg信息,data返回的数据。
两个为,code状态码,msg信息。
然后对应的controller层代码
//增加model
    @RequestMapping(value="Index/survey/add_model")
    @ResponseBody
    public Map<String,Object> addModel(HttpServletRequest req) throws IOException{
        String name = req.getParameter("name");
        String createName=req.getParameter("createName");
        String strtime=req.getParameter("time");//有注解,默认转换
        if (createName==null){
            return api.returnJson(3,"warning");
        }
        UUID uuid=UUID.randomUUID();
        String modelId=uuid.toString();
        Model model=new Model();
        Date time=string2Date.DateChange(strtime);
        model.setCreateName(createName);
        model.setName(name);
        model.setTime(time);
        model.setModelId(modelId);
        int is_add=modelService.InsertModel(model);
        if (is_add!=0){
            return api.returnJson(1,"添加成功");
        }else{
            return api.returnJson(2,"添加失败");
        }
    }
这里使用了UUID来创建一个相对唯一的模板ID,调用modelService层的InsertModel方法 传入model对象,来添加模板
6.Service层实现:
ModelService.java
package com.sl.example.service;


import com.sl.example.pojo.Model;

import java.util.List;

public interface ModelService {
    public List<Model> findAllModel();

    public int deleteModelById(String modelId);

    public int deleteModelByIds(String[] arr);

    public int InsertModel(Model model);

    public Model selectModelById(String modelId);
}
ModelService.Impl:
package com.sl.example.service;


import com.sl.example.pojo.Model;

import java.util.List;

public interface ModelService {
    public List<Model> findAllModel();

    public int deleteModelById(String modelId);

    public int deleteModelByIds(String[] arr);

    public int InsertModel(Model model);

    public Model selectModelById(String modelId);
}
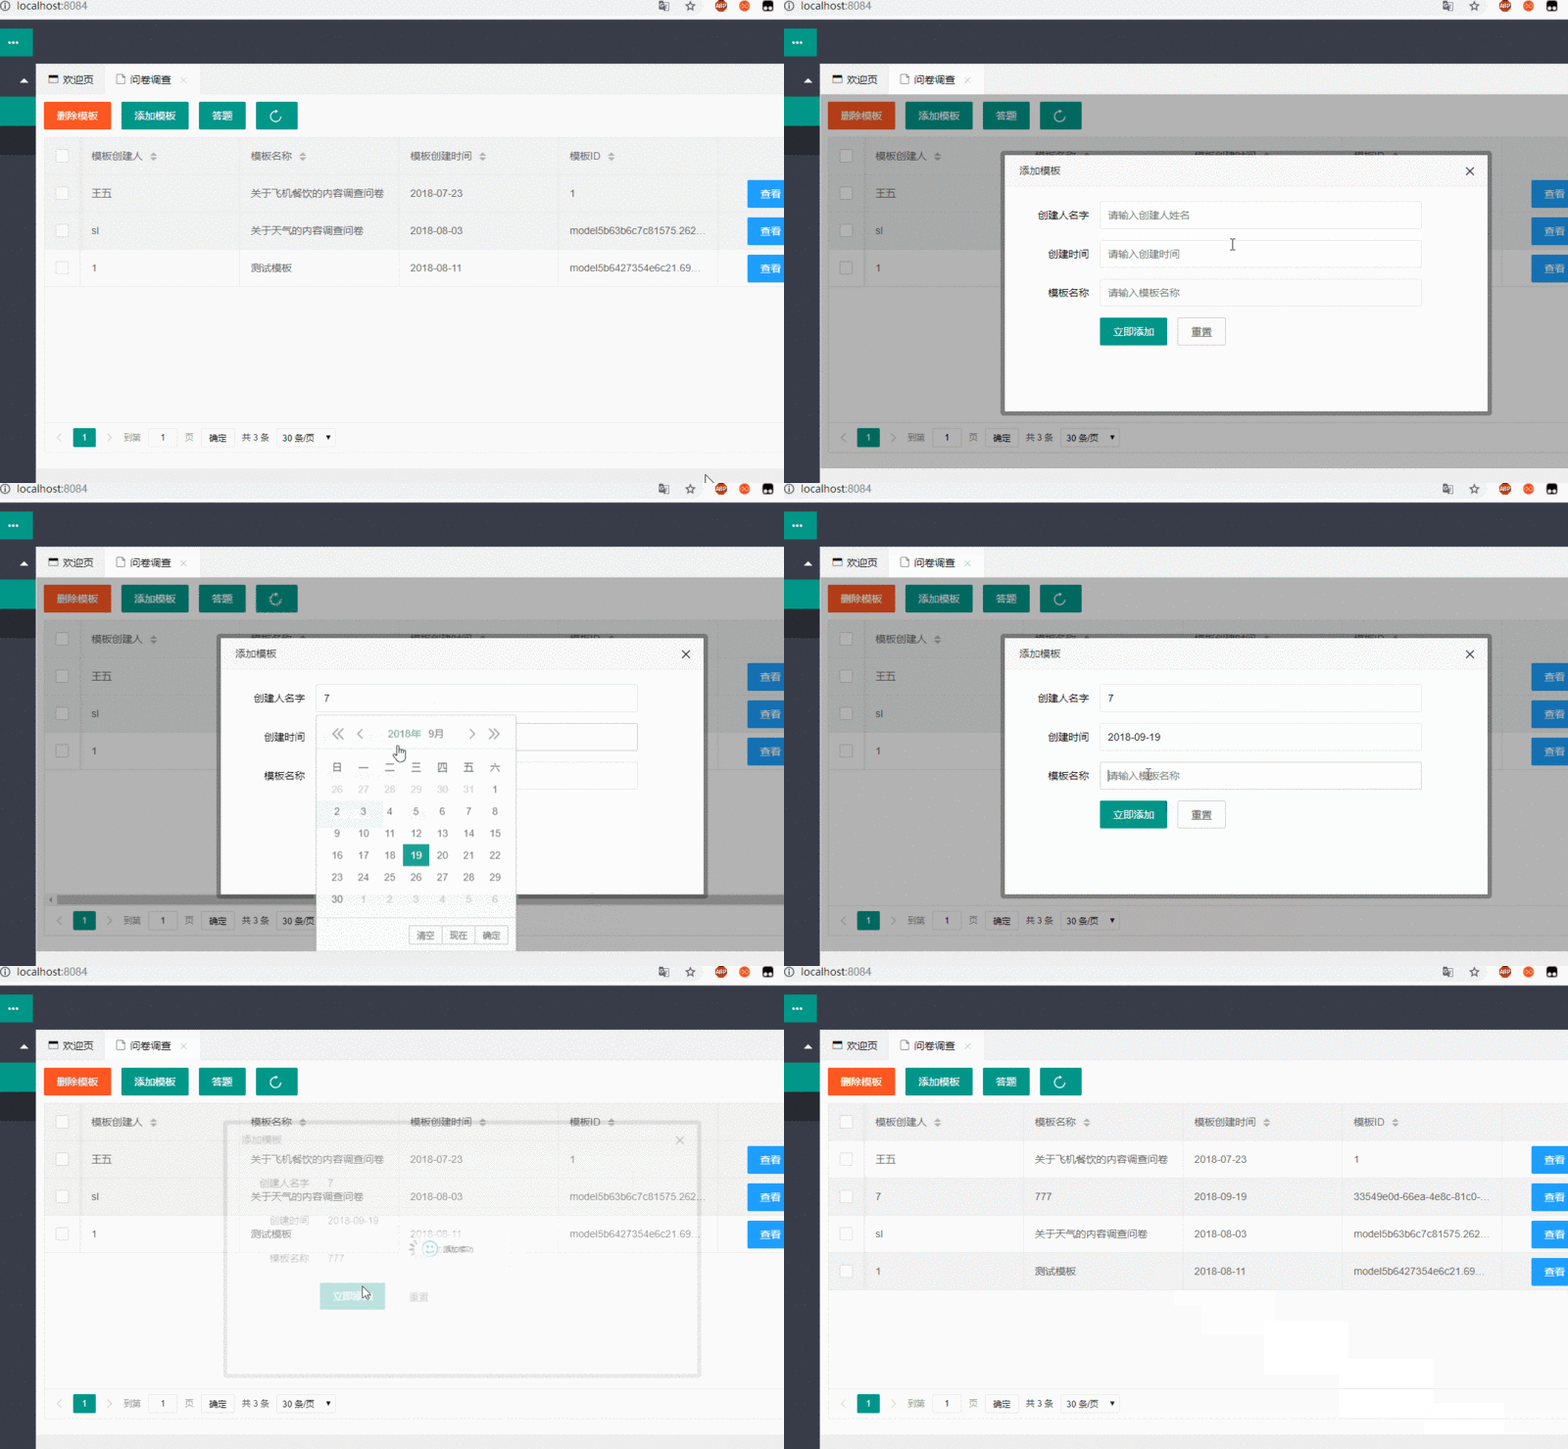
7.功能一览
然后我们查看下我们的功能实现了没
此外还有对应的
SSM+maven实现答题管理系统二:模板删除功能SSM+maven实现答题管理系统三:题目及选项增删功能
SSM+maven实现答题管理系统四:答题功能
SSM+maven实现答题管理系统五:统计功能
项目已经部署上线: 点我 (访客用户名zhangsan 密码123456)
好啦 还有两小时就下班啦,我要去休息啦,喜欢就给颗小:heartpulse::heartpulse:还有star吧~
项目仅供测试学习使用,拒绝任何形式的商业用途,转侵删。
项目源码关注公众号Code In Java,回复"答题管理系统"即可获取。除此之外,还有Java学习图谱,数据结构与算法资料等各种资料都可以在后台获取。
关注公众号:Code In Java
资源,项目,面试题一网打尽
希望与你成为Java技术的同路人
- 本文标签: 代码 XML 开发 client 下载 ORM 希望 spring JDBC 测试 servlet find jquery GitHub json 分页 example ACE 业务层 MQ 目录 连接池 编译 eclipse tar 配置 API Select mybatis schema Word bean AOP mysql 构造方法 root myeclipse map 管理 DOM 插件 Connection 博客 Service IO session PHP maven js sql NSA App SpringMVC dataSource 删除 Action plugin HashMap web 部署 db https cat IDE CTO list DBCP http Property sqlsession 架构设计 apache rand tab git 线程 数据 注释 value Ajax 统计 处理器 mapper 模型 update pagehelper 源码 struct 数据库 时间 key Java类 src autocommit SqlSessionFactory id java Proxy classpath ip Oracle UI
- 版权声明: 本文为互联网转载文章,出处已在文章中说明(部分除外)。如果侵权,请联系本站长删除,谢谢。
- 本文海报: 生成海报一 生成海报二


![[HBLOG]公众号](https://www.liuhaihua.cn/img/qrcode_gzh.jpg)

